
Categorie popolari
State cercando un filato?


Commenti / Domande (101)
Renée ha scritto:
Please confirm this is correct for insert needle in st below section: On 9th (19th) row before working st on LH needle, insert RH needle from RS into st 3/6 rows down & pull through a loop of working yarn to required length from WS to RS. This loop will lie on RS stretching up to RH needle. K1. Then stick RH needle from RS through same stitch as you stuck it through previously & pull through another loop of yarn from WS to RS to required length. Is this what you mean?
29.11.2014 - 15:06Renée ha scritto:
The instructions for insert needle down in st 6/3 rows below. It states; yarn should be pulled from WS to a length of 2/1.5cms. However, it was explained lwr down in this chain: you get the yarn from the WS and pull the stitch from the RS (see post from 08.10.2014 kl. 17:06). But the pattern doesn't state that you pull from the RS. Also the pictures supplied look like the whole process is done from RS. I'm confused by the instructions provided. Please clarify in detail what is required here.
29.11.2014 - 11:41RHS ha scritto:
You missed the first part of my question in my previous post, here it is again below: I start the decreases when the entire piece measures 10cms: i.e. 10cms including the P2/K2 ribbing?
28.11.2014 - 11:59DROPS Design ha risposto:
Dear Mrs RHS and sorry for having missed this part of your question, you are correct, decreases start when piece measures 10 cm from the beg, ie including P2/K2 ribbing. Happy knitting!
28.11.2014 - 13:41RHS ha scritto:
About the YOs in A1. It's not stated in the pattern, but I assume from looking at the finished garment that the YOs are used to create holes in the work and are not used as increases. Therefore, when I come to work the YOs on the following round, I just need to knit or purl them (depending on what the pattern states) as if they were normal stitches And NOT knit or purl into the back of the loop? Is this correct?
23.11.2014 - 13:43DROPS Design ha risposto:
Dear Mrs RHS, you are correct, the yos made in pattern are creating holes, just work them regular P or K as in pattern but not into back of the loop. Happy knitting!
24.11.2014 - 11:16RHS ha scritto:
Re: previous query regarding the decrease of 3 sts in A1. Just to be clear, I mean perform 3 separate instances of knit 2 tog or purl 2 together. And not knit or purl 3 stitches together.
12.11.2014 - 12:24DROPS Design ha risposto:
Yes that's correct, it may look better to rather K/P 2 tog than 3 tog. Happy knitting!
12.11.2014 - 14:31RHS ha scritto:
Pattern states: A1 over first 82 sts, at same time dec 3 sts =79sts. Just to clarify, over the course of diagram A1, I have to knit or purl 3 sts together?
12.11.2014 - 12:20DROPS Design ha risposto:
Dear Mrs RHS, you work the next 82 sts following A.1 and at the same time K/P 2 sts tog evenly a total of 3 times to match the 79 sts in diagram. Happy knitting!
12.11.2014 - 14:12RHS ha scritto:
The symbols for:slip 1 st on cable needle behind & in front of piece are a bit confusing as the arrows point in the wrong direction to behind & in front. I knitted the Drops cabled wrist warmers and in that pattern the symbols (arrows) for cable behind and cable front pointed in the opposite direction to the symbols in this pattern. Are the symbols incorrect?
11.11.2014 - 15:20DROPS Design ha risposto:
Dear Mrs RHS, symbols are correct: for 4th symbol (= / over 2 squares), slip 1 st behind piece and for 5th symbol (= \ over 2 squares), slip 1 st in front of piece. There may be some changes from a pattern to another, make sure you are working as stated under diagram text. Happy knitting!
11.11.2014 - 17:45
![]() Maria Stella Magrì ha scritto:
Maria Stella Magrì ha scritto:
Per questo modello, come scegliere la taglia, ho visto che per altri modelli già la M corrisponde ad una 48 italiana
10.11.2014 - 14:33DROPS Design ha risposto:
Buongiorno Maria Stella. La taglia 48 dovrebbe corrispondere ad una XL. Se ha già un capo analogo di cui è soddisfatta delle misure, confronti le misure del suo capo con quelle riportate nel grafico alla fine del modello, per scegliere la taglia corretta. Buon lavoro!
10.11.2014 - 16:28
![]() Fanny ha scritto:
Fanny ha scritto:
Det minskas inte i diagrammet: se den lilla ringen som kompenserar.
01.10.2014 - 08:51
![]() Ulrica Törning ha scritto:
Ulrica Törning ha scritto:
På första mönstervarvet står det att det ska minskas 3 maskor jämt fördelat. Från 82 till 79 maskor. Samtidigt är det inritat två minskningar i diagrammet. Då blr det ju 77 maskor??? Eller är de två inräknade i de tre ni nämner först?
01.10.2014 - 07:48
|
||||||||||||||||||||||||||||||||||||||||||||||||||||
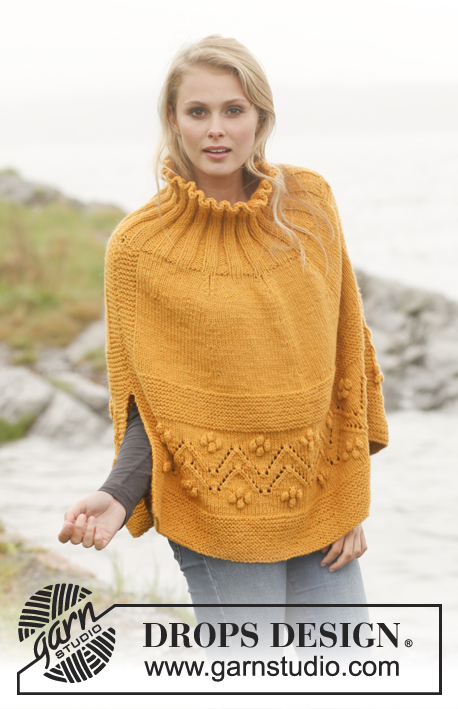
Frozen Ivy#frozenivyponcho |
||||||||||||||||||||||||||||||||||||||||||||||||||||
|
|
||||||||||||||||||||||||||||||||||||||||||||||||||||
Poncho DROPS con trecce e motivo a foglie in "Karisma" Taglie: dalla S alla XXXL.
DROPS 151-2 |
||||||||||||||||||||||||||||||||||||||||||||||||||||
|
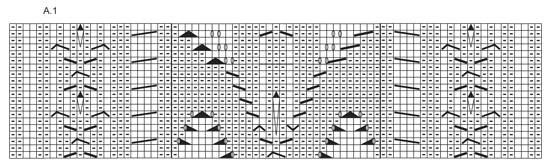
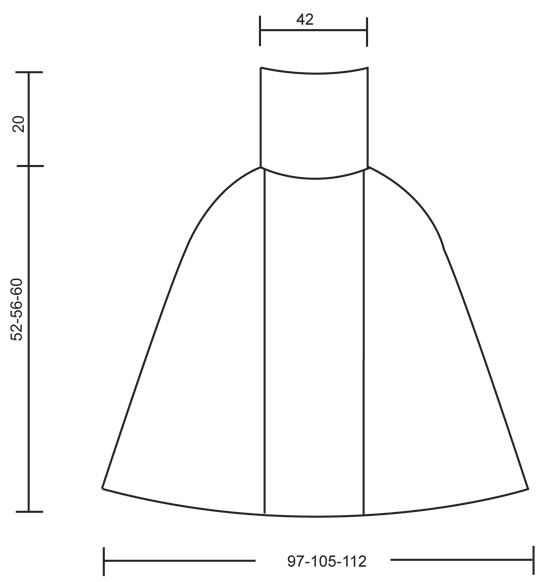
MOTIVO: Vedere diag A.1. DIMINUZIONI: Cominciare 6 m prima del segnapunto e lavorare così: 2 m insieme a dir, 1 m dir, 2 m rov, 2 m dir (il segnapunto si trova in mezzo a queste 2 m), 2 m rov, 1 m dir, passare 1 m a dir senza lavorarla, 1 m dir, accavallare la m passata sopra quella lavorata ---------------------------------------------------------- PONCHO: Avviare 408-440-472 m con i ferri circolari 3,5 e Karisma. Lavorare le coste 2 m rov / 2 m dir per 8 cm. Continuare con i ferri circolari 4. Lavorare poi così: A.1 sulle prime 82 m, ALLO STESSO TEMPO, distribuire 3 diminuzioni in modo uniforme sopra queste m (= 79 m), * maglia rasata sopra le 26-30-34 m seguenti, continuare con 2 m rov, 2 m dir, 2 m rov sopra le 6 m seguenti (queste m sono direttamente sopra le 2 m rov, 2 m dir, 2 m rov delle coste) *, ripetere da *-* altre 2 volte, maglia rasata sopra le 26-30-34 m seguenti, A.1 sopra le 82 m seguenti, ALLO STESSO TEMPO, distribuire 3 diminuzioni uniformemente sopra queste m (= 79 m), * maglia rasata sopra le 26-30-34 m seguenti, continuare con 2 m rov, 2m dir, 2 m rov sopra le 6 m seguenti (queste m sono direttamente sopra le 2 m rov, 2 m dir, 2 m rov delle coste)*, ripetere da *-* altre 2 volte, maglia rasata sopra le 26-30-34 m seguenti = 402-434-466 m. Inserire 4 segnapunti nel lavoro così: inserire il 1° segno dopo 108-112-116 m (tra 2 m dir delle 1° coste), il 2° segno dopo 172-184-196 m (tra 2 m dir delle 3° coste), il 3° segno dopo 309-329-349 m (tra 2 m dir delle 4° coste), e il 4° segno dopo 373-401-429 m (tra 2 m dir delle 6° coste). Continuare così, ALLO STESSO TEMPO, quando il lavoro misura 10 cm, diminuire 1 m ad ogni lato dei segnapunti – VEDERE DIMINUZIONI! Ripetere queste diminuzioni ogni 2 cm 19-19-19 volte, poi ogni cm, 5-9-13 volte (in totale 24-28-32 diminuzioni) = rimangono 210 m sul ferro per tutte le misure. Il lavoro misura ca 52-56-60 cm. Continuare con i ferri circolari 3,5. Lavorare 1 giro dir, ALLO STESSO TEMPO, distribuire 42 diminuzioni uniformemente = 168 m. Lavorare 1 giro rov. Lavorare le coste 2 m dir / 2 m rov per 20 cm. Intrecciare con il dir sopra il dir e il rov sopra il rov. |
||||||||||||||||||||||||||||||||||||||||||||||||||||
Spiegazioni del diagramma |
||||||||||||||||||||||||||||||||||||||||||||||||||||
|
||||||||||||||||||||||||||||||||||||||||||||||||||||
 |
||||||||||||||||||||||||||||||||||||||||||||||||||||
 |
||||||||||||||||||||||||||||||||||||||||||||||||||||
Avete terminato questo modello?Allora taggate le vostre foto con #dropspattern #frozenivyponcho o inviatele alla #dropsfan gallery. Avete bisogno di aiuto con questo modello?Troverete 15 video tutorial, una sezione per i commenti/domande e molto altro guardando il modello su www.garnstudio.com © 1982-2026 DROPS Design A/S. Ci riserviamo tutti i diritti. Questo documento, compreso tutte le sue sotto-sezioni, è protetto dalle leggi sul copyright. Potete leggere quello che potete fare con i nostri modelli alla fine di ogni modello sul nostro sito. |
||||||||||||||||||||||||||||||||||||||||||||||||||||


Con oltre 40 anni di esperienza nel design di modelli di maglia e uncinetto, DROPS Design offre la più estesa collezione di modelli gratuiti su internet - tradotti in 17 lingue. Ad oggi vi possiamo fornire 324 cataloghi e 12290 modelli - 9561 dei quali sono tradotti in Italiano.
Ci stiamo impegnando molto per darvi il meglio che vi possiamo offrire in termini di maglia e uncinetto, ispirazioni e consigli così come filati di grande qualità ad un prezzo incredibile! Volete utilizzare i nostri modelli per qualcosa d'altro oltre al vostro uso personale? Potete leggere tutto ciò che è consentito nel testo sul Copyright in basso su tutte le pagine dei nostri modelli. Buon lavoro!
Lasciare un commento sul modello DROPS 151-2
Noi saremmo felici di ricevere i tuoi commenti e opinioni su questo modello!
Se vuoi fare una domanda, fai per favore attenzione a selezionare la categoria corretta nella casella qui sotto per velocizzare il processo di risposta. I campi richiesti sono indicati da *.