
Categorie popolari
State cercando un filato?


Commenti / Domande (101)
![]() Lisbet Holze Jespersen ha scritto:
Lisbet Holze Jespersen ha scritto:
Hej igen. Den 11.1.2016 havde jeg nogle spørgsmål til opskrift 151-02. Da jeg p.t. sidder og strikker denne poncho må I gerne svare hurtigste muligt.
16.01.2016 - 23:58
![]() Lisbet Holze Jespersen ha scritto:
Lisbet Holze Jespersen ha scritto:
Sign.forklaring: 2 skrå op 1 skrå ned. Sæt 2 m på hj.pind bag arb. 1 ret og 1 vr. + 1 ret fra hj.p.. selvom der er sat 2 m på hj.pind. Der må være noget galt??? Sign.forklaring med at hente masker op bagfra. 3 m ialt. På næste pind strikkes således:1 løs af 2 r sammen. Løs m over 2 r sammen. Iflg. sign. skal der strikkes 1 vr ???
11.01.2016 - 15:01DROPS Design ha risposto:
= sæt 2 m på h.j.p bag arb, 1 ret, 1 vr + 1 ret fra hj.p. Det er de 2 sidste masker du strikker fra hjælpepinden. God fornøjelse!
26.01.2016 - 15:04
![]() M.boer ha scritto:
M.boer ha scritto:
In het patroon van deze poncho moet je in een naald 2 steken samenbreien/ of een overhaling. In de volgende naald kom je dus steken tekort , je kan dan niet 1 recht 1 averecht breien boven de b.v samengebreide steken want die heb je nergens toegevoegd. Graag uitleg / reactie. B.v.d. Vr.groet, Marja Boer.
05.05.2015 - 21:32DROPS Design ha risposto:
Hoi Marja. Je maakt ook 1 omslag bij elke 2 samenbreien/overhaling. Zoals ik het lees kom je dan uit met een gelijk aantal steken.
06.05.2015 - 17:38
![]() Sue ha scritto:
Sue ha scritto:
Have you produced a video tutorial for the3/6 stitch because I have no idea where or how to even start with that? Thank you.
27.01.2015 - 22:37DROPS Design ha risposto:
Dear Sue, there is no video available yet, but to work this st, *insert your needle 3/6 rows below, get yarn from WS and go back through that st with the yarn from RS (you have 1 more st on the right needle)*, then work next st and repeat from *-* once again in the same st below, you have now 3 sts on the right needle, on next round, work these 3 sts: Slip 1 as if to K, K2 tog, psso (1 st remains). Happy knitting!
28.01.2015 - 10:57
![]() Françoise Bastin ha scritto:
Françoise Bastin ha scritto:
Bonjour, J'ai réalisé ce poncho en rouge, il est magnifique. J'ai repris la base mais changé les deux panneaux de dessin. En fait j'ai repris presque l'entièreté d'un diagramme d'un pull pour homme (n°135-3). Je le trouve aussi magnifique. Je vais procéder de la même manière pour une autre personne et cela donnera 3 ponchos différents. Françoise.
21.01.2015 - 10:32RHS ha scritto:
Hi Is the circumference of the neck 42cm or 84cm?
08.01.2015 - 12:25DROPS Design ha risposto:
Dear RHS, measurements in chart are taken flat, from side to side, circumference of the neck will be then approx. 84 cm (neck will be 42 cm from side to side when lying flat). Happy knitting!
08.01.2015 - 13:40
![]() Sandra ha scritto:
Sandra ha scritto:
Hallo an Alle, weiß denn jemand wieviel Wolle für Größe S/M benötigt wird :-) ? Dankeschön
25.12.2014 - 18:56DROPS Design ha risposto:
Den Garnverbrauch finden Sie neben dem Foto unter der gestrichelten Linie, dort ist das Material samt Verbrauch angegeben.
29.12.2014 - 10:11Renée ha scritto:
Thank you for your help!
04.12.2014 - 15:26Renée ha scritto:
Thanks for confirming. Just one final aspect I am a little unsure of regarding the insert needle 3/6 rows down, when you create the 2nd loop (the 3rd of the 3 sts), you stick the needle through the same stitch as you stuck it through to create the first loop. Is that correct? i.e. both loops/strands of yarn are pulled through the same stitch.
04.12.2014 - 13:37DROPS Design ha risposto:
Dear Renée, that's correct, you will then have 3 sts instead of 1 on this place (1st st picked below + K1 + 2nd st picked below) that you will dec to 1 st on next round. Happy knitting!
04.12.2014 - 15:05Renée ha scritto:
I already looked at the images you are directing me to and I did not find them particularly helpful. Can you please check my post from 29/11/14 at 15:06 where I have described what I think is required for the stitch 3/6 rows down and then confirm that this is correct or not. The description provided in the pattern is too vague and should be rewritten as it is quite misleading.
03.12.2014 - 17:02DROPS Design ha risposto:
Dear Renée, you are correct, *you insert needle some rows below, get the yarn from WS and pull it through the st (= towards RS) = you will have an extra st "loop" on right needle* - work 1 st and repeat again from *-* = 3 st on right needle - on next round, work these 3 sts: Slip 1 as if to K, K2 tog, psso. Happy knitting!
03.12.2014 - 17:34
|
||||||||||||||||||||||||||||||||||||||||||||||||||||
Frozen Ivy#frozenivyponcho |
||||||||||||||||||||||||||||||||||||||||||||||||||||
|
|
||||||||||||||||||||||||||||||||||||||||||||||||||||
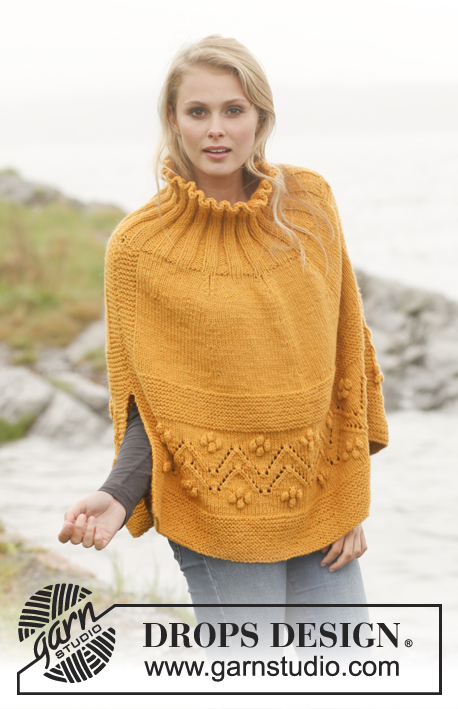
Poncho DROPS con trecce e motivo a foglie in "Karisma" Taglie: dalla S alla XXXL.
DROPS 151-2 |
||||||||||||||||||||||||||||||||||||||||||||||||||||
|
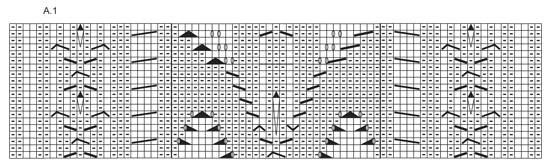
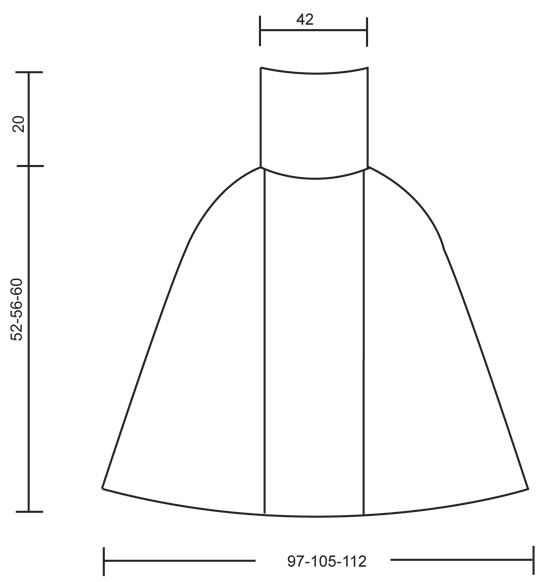
MOTIVO: Vedere diag A.1. DIMINUZIONI: Cominciare 6 m prima del segnapunto e lavorare così: 2 m insieme a dir, 1 m dir, 2 m rov, 2 m dir (il segnapunto si trova in mezzo a queste 2 m), 2 m rov, 1 m dir, passare 1 m a dir senza lavorarla, 1 m dir, accavallare la m passata sopra quella lavorata ---------------------------------------------------------- PONCHO: Avviare 408-440-472 m con i ferri circolari 3,5 e Karisma. Lavorare le coste 2 m rov / 2 m dir per 8 cm. Continuare con i ferri circolari 4. Lavorare poi così: A.1 sulle prime 82 m, ALLO STESSO TEMPO, distribuire 3 diminuzioni in modo uniforme sopra queste m (= 79 m), * maglia rasata sopra le 26-30-34 m seguenti, continuare con 2 m rov, 2 m dir, 2 m rov sopra le 6 m seguenti (queste m sono direttamente sopra le 2 m rov, 2 m dir, 2 m rov delle coste) *, ripetere da *-* altre 2 volte, maglia rasata sopra le 26-30-34 m seguenti, A.1 sopra le 82 m seguenti, ALLO STESSO TEMPO, distribuire 3 diminuzioni uniformemente sopra queste m (= 79 m), * maglia rasata sopra le 26-30-34 m seguenti, continuare con 2 m rov, 2m dir, 2 m rov sopra le 6 m seguenti (queste m sono direttamente sopra le 2 m rov, 2 m dir, 2 m rov delle coste)*, ripetere da *-* altre 2 volte, maglia rasata sopra le 26-30-34 m seguenti = 402-434-466 m. Inserire 4 segnapunti nel lavoro così: inserire il 1° segno dopo 108-112-116 m (tra 2 m dir delle 1° coste), il 2° segno dopo 172-184-196 m (tra 2 m dir delle 3° coste), il 3° segno dopo 309-329-349 m (tra 2 m dir delle 4° coste), e il 4° segno dopo 373-401-429 m (tra 2 m dir delle 6° coste). Continuare così, ALLO STESSO TEMPO, quando il lavoro misura 10 cm, diminuire 1 m ad ogni lato dei segnapunti – VEDERE DIMINUZIONI! Ripetere queste diminuzioni ogni 2 cm 19-19-19 volte, poi ogni cm, 5-9-13 volte (in totale 24-28-32 diminuzioni) = rimangono 210 m sul ferro per tutte le misure. Il lavoro misura ca 52-56-60 cm. Continuare con i ferri circolari 3,5. Lavorare 1 giro dir, ALLO STESSO TEMPO, distribuire 42 diminuzioni uniformemente = 168 m. Lavorare 1 giro rov. Lavorare le coste 2 m dir / 2 m rov per 20 cm. Intrecciare con il dir sopra il dir e il rov sopra il rov. |
||||||||||||||||||||||||||||||||||||||||||||||||||||
Spiegazioni del diagramma |
||||||||||||||||||||||||||||||||||||||||||||||||||||
|
||||||||||||||||||||||||||||||||||||||||||||||||||||
 |
||||||||||||||||||||||||||||||||||||||||||||||||||||
 |
||||||||||||||||||||||||||||||||||||||||||||||||||||
Avete terminato questo modello?Allora taggate le vostre foto con #dropspattern #frozenivyponcho o inviatele alla #dropsfan gallery. Avete bisogno di aiuto con questo modello?Troverete 15 video tutorial, una sezione per i commenti/domande e molto altro guardando il modello su www.garnstudio.com © 1982-2026 DROPS Design A/S. Ci riserviamo tutti i diritti. Questo documento, compreso tutte le sue sotto-sezioni, è protetto dalle leggi sul copyright. Potete leggere quello che potete fare con i nostri modelli alla fine di ogni modello sul nostro sito. |
||||||||||||||||||||||||||||||||||||||||||||||||||||


Con oltre 40 anni di esperienza nel design di modelli di maglia e uncinetto, DROPS Design offre la più estesa collezione di modelli gratuiti su internet - tradotti in 17 lingue. Ad oggi vi possiamo fornire 324 cataloghi e 12290 modelli - 9561 dei quali sono tradotti in Italiano.
Ci stiamo impegnando molto per darvi il meglio che vi possiamo offrire in termini di maglia e uncinetto, ispirazioni e consigli così come filati di grande qualità ad un prezzo incredibile! Volete utilizzare i nostri modelli per qualcosa d'altro oltre al vostro uso personale? Potete leggere tutto ciò che è consentito nel testo sul Copyright in basso su tutte le pagine dei nostri modelli. Buon lavoro!
Lasciare un commento sul modello DROPS 151-2
Noi saremmo felici di ricevere i tuoi commenti e opinioni su questo modello!
Se vuoi fare una domanda, fai per favore attenzione a selezionare la categoria corretta nella casella qui sotto per velocizzare il processo di risposta. I campi richiesti sono indicati da *.