
Categorie popolari
State cercando un filato?


Commenti / Domande (61)
![]() Lili ha scritto:
Lili ha scritto:
Hej Jeg forstår ikke helt antallet af masker. Derfor 2 spørgsmål vedr halsedissen: Hvorfor skal der være 2 ret-m i slutningen af pinden, så der bliver for mange masker i mønsteret, når det er syet sammen yderst i kant-m? (Jeg forstår heller ikke at der er 2 kant-m i den ene ende og ikke 1 i hver ende). Hvorfor skal det ikke strikkes rundt på rundpind i stedet for frem og tilbage? Så ville man undgå en masse vrang-m og montering
24.10.2022 - 21:18DROPS Design ha risposto:
Hej Lili, Det kan være fordi du får lidt bedre hold i siden når du strikker hulmønster, men du gør naturligvis hvad der passer dig bedst. Se videoen vi har lavet til denne opskrift, du finder en nederst i opskriften :)
26.10.2022 - 09:42
![]() Marie-france ha scritto:
Marie-france ha scritto:
Comment adapté ce modele en circulaire, merci
04.08.2022 - 12:11
![]() Olimpia Stella ha scritto:
Olimpia Stella ha scritto:
Si Graziepuò eseguire il modello senza usare i ferri circolari; ed eventualmente come?
18.06.2020 - 15:00
![]() Olimpia Stella ha scritto:
Olimpia Stella ha scritto:
Si Graziepuò eseguire il modello senza usare i ferri circolari; ed eventualmente come?
18.06.2020 - 14:59DROPS Design ha risposto:
Buongiorno Olimpia. Sia il cappello che lo scaldacollo sono lavorati in ferri di andata e ritorno. Può quindi usare i ferri dritti al posto dei circolari e seguire le spiegazioni riportate senza dover fare modiche. Buon lavoro!
18.06.2020 - 15:15
![]() Charlotte Jensen ha scritto:
Charlotte Jensen ha scritto:
Hejsa Jeg sidder og strikker denne hue: Drops 150-42. Har nu gentaget mønstret 4 gange. :-) Skal jeg tage ind inden sidste retpind, inden jeg afslutter mønsterraporten 4. gang eller?? Charlotte
22.01.2020 - 20:14DROPS Design ha risposto:
Hej Charlotte, nej du sætter kun mærkerne på næstsidste pind, fortsætter med mønsteret og begynder at tage ind når arbejdet måler 19cm, da strikker du glatstrik. God fornøjelse!
30.01.2020 - 08:55
![]() M.f. Van Winden ha scritto:
M.f. Van Winden ha scritto:
Goedendag, ik wil de muts en sjaal breien, maar ik mis in het telpatroon de aanwijzing voor de beide streepjes, de vakjes staan in wit getekend. Met daarachter of 1 steek afhalen, volgende recht breien, afgehaakde steek overhalen. En ander wit vakje 2 recht samen breien.
05.01.2017 - 20:31Milica ha scritto:
Dear all, I do not fully understand the correction on hat. What is the full text between **? I also do not understand the decrease after 16th marker. If I put the marker in A3 I have only 2 stitches after that marker. Then I can not do the decrease 16 stitches 5 times to get 15 stitches at the end (95st-16st*5=15st remains), I am losing the marker after first decrease row. I appreciate any help. Thank you in advance
27.11.2016 - 15:31DROPS Design ha risposto:
Dear Milica, the correction is included in the online pattern. When piece measures 19-20 cm, work as follows: *2 rows in stocking st. Then dec by K 2 tog after every marker = 16-17 sts dec. Work 3 rows in stocking st. Then dec by K 2 tog after every marker = 16-17 sts dec, K 1 row *, repeat from *-* (= 8 rows) 1 more time (= 2 times in total = 16 rows in total). Happy knitting!
28.11.2016 - 09:30Sueli ha scritto:
Boa tarde. Sou do Brasil Eu ainda não consegui entender onde como e onde diminuir. agradeço muito sua atenção
05.07.2016 - 16:20Jessica ha scritto:
My last question was related to neck scarf.
19.05.2016 - 22:46DROPS Design ha risposto:
Dear Jessica, the previous answer applies to the hat - for the neck scarf, you repeat A.2 a total of 20 times in width, ie row starts with 1 edge st, then work A.1 (worked 1 time in width), then repeat A.2 a total of 20 times in width, and finish with A.3 (worked 1 time in width) and 1 edge st. Happy knitting!
20.05.2016 - 10:30Jessica ha scritto:
Hi, I have a question. I've made a pattern of eight lines. The guide has been written to be knit A.2 twenty repeats. Does this mean that the A.1 slipped? A.2 muzzle until there is seven of the loop and then A.3. ?
19.05.2016 - 21:41DROPS Design ha risposto:
Dear Jessica, when working A.1, A.2 and A.3 you follow the diagrams at the same time, ie after you have worked 1 time all diagrams in height, start from row 1 again in all diagrams. But when you reach finished measurement in height, make sure the last row is either the last row (row 8) in all diagrams or row 4 in all diagrams (half a repeat in height in A.2). Happy knitting!
20.05.2016 - 10:24
|
||||||||||||||||
Autumn Mist#autumnmistset |
||||||||||||||||
|
|
||||||||||||||||
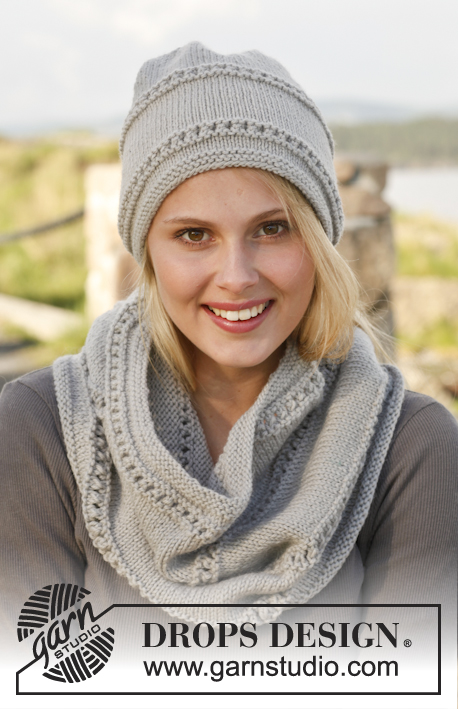
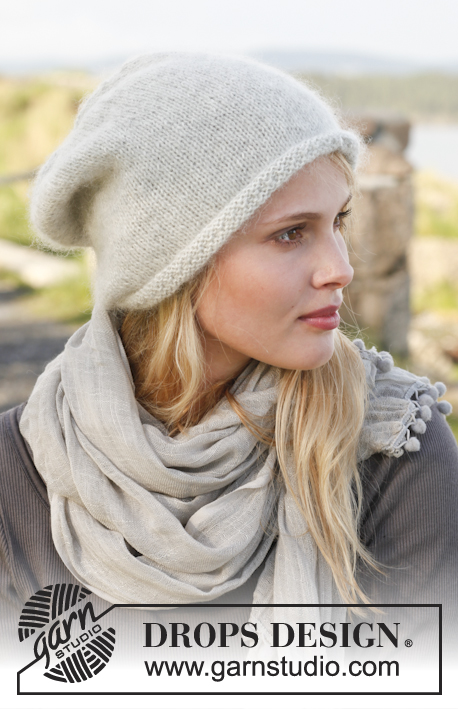
Scaldacollo e cappello DROPS lavorati ai ferri con motivo traforato in "Lima".
DROPS 150-42 |
||||||||||||||||
|
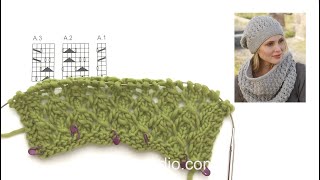
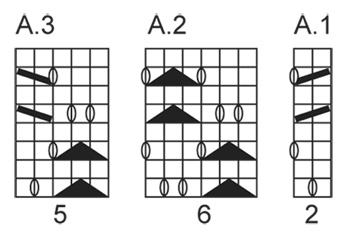
M. LEGACCIO (avanti e indietro sui f.): Lavorare tutti i f. a dir. 1 “costa” a m. legaccio = 2 f. dir. MOTIVO: Vedere i diagrammi A.1, A.2 e A.3, i diagrammi mostrano tutti i f. del motivo visti dal diritto del lavoro. ---------------------------------------------------------- CAPPELLO: Lavorato avanti e indietro sui f. Avviare 95-101 m. con i f. n° 4 mm con Lima. Lavorare a COSTE a m. legaccio – leggere la spiegazione sopra – fino a quando il lavoro misura 5-6 cm. Sul f. successivo dal diritto del lavoro passare ai f. n° 5 mm e lavorare come segue: 2 m. di vivagno a m. legaccio (lavorate a m. legaccio fino alla fine del lavoro), MOTIVO A.1 (= 2 m.) – leggere la spiegazione sopra – A.2 (= 6 m.) fino a quando rimangono 7 m. (= 14-15 ripetizioni in larghezza), A.3 (= 5 m.), finire con 2 m. di vivagno a m. legaccio (lavorate a m. legaccio fino alla fine del lavoro). Lavorare 4 ripetizioni con il motivo in verticale e ALLO STESSO TEMPO inserire un segnapunti nella m. che rimane dopo tutte le diminuzioni sul penultimo f. nel motivo = 16-17 segnapunti. Continuare il motivo fino a quando il lavoro misura 19-20 cm. Aggiustare per finire dopo un’intera o metà ripetizione di A.2. Ora continuare il lavoro a m. rasata come segue: * lavorare 2 f. a m. rasata. Poi diminuire lavorando 2 m. insieme a dir. dopo ogni segnapunti = 16-17 diminuzioni. Lavorare 3 f. a m. rasata. Poi diminuire lavorando 2 m. insieme a dir. dopo ogni segnapunti = 16-17 diminuzioni, lavorare 1 f a dir *, ripetere *-* un’altra volta (= 2 volte in totale). Poi lavorare 2 f. a m. rasata, sul f. successivo diminuire dopo ogni segnapunti lavorando 2 m. insieme a dir. = 16-17 diminuzioni = 15-16 m. rimaste sul f. Tagliare il filo e farlo passare attraverso le m. rimaste. Tirare forte e affrancare. CONFEZIONE: Cucire il lato nel filo davanti delle m. più esterne. SCALDACOLLO: Lavorato avanti e indietro sui f. circolari. Avviare 131 m. con i f. circolari n° 5 mm con Lima. Lavorare 2 COSTE a m. legaccio – leggere la spiegazione sopra. Sul f. successivo dal diritto del lavoro lavorare 2 m. di vivagno a m. legaccio, MOTIVO A.1 (= 2 m.) – leggere la spiegazione sopra – diagramma A.2 (= 6 m.) fino a quando rimangono 7 m. (= A.2 è stato lavorato 20 volte in totale), diagramma A.3 (= 5 m.), 2 m. si vivagno a m. legaccio. Quando il lavoro misura circa 40 cm (e sono state lavorate 12 ripetizioni in verticale), lavorare 2 “coste” a m. legaccio. Il lavoro misura circa 42 cm. Intrecciare senza stringere. Tagliare e affrancare il filo. CONFEZIONE: Cucire lo scaldacollo nel filo davanti della m. di vivagno. |
||||||||||||||||
Spiegazioni del diagramma |
||||||||||||||||
|
||||||||||||||||
 |
||||||||||||||||
Avete terminato questo modello?Allora taggate le vostre foto con #dropspattern #autumnmistset o inviatele alla #dropsfan gallery. Avete bisogno di aiuto con questo modello?Troverete 16 video tutorial, una sezione per i commenti/domande e molto altro guardando il modello su www.garnstudio.com © 1982-2026 DROPS Design A/S. Ci riserviamo tutti i diritti. Questo documento, compreso tutte le sue sotto-sezioni, è protetto dalle leggi sul copyright. Potete leggere quello che potete fare con i nostri modelli alla fine di ogni modello sul nostro sito. |
||||||||||||||||


Con oltre 40 anni di esperienza nel design di modelli di maglia e uncinetto, DROPS Design offre la più estesa collezione di modelli gratuiti su internet - tradotti in 17 lingue. Ad oggi vi possiamo fornire 324 cataloghi e 12290 modelli - 9561 dei quali sono tradotti in Italiano.
Ci stiamo impegnando molto per darvi il meglio che vi possiamo offrire in termini di maglia e uncinetto, ispirazioni e consigli così come filati di grande qualità ad un prezzo incredibile! Volete utilizzare i nostri modelli per qualcosa d'altro oltre al vostro uso personale? Potete leggere tutto ciò che è consentito nel testo sul Copyright in basso su tutte le pagine dei nostri modelli. Buon lavoro!
Lasciare un commento sul modello DROPS 150-42
Noi saremmo felici di ricevere i tuoi commenti e opinioni su questo modello!
Se vuoi fare una domanda, fai per favore attenzione a selezionare la categoria corretta nella casella qui sotto per velocizzare il processo di risposta. I campi richiesti sono indicati da *.