
Categorie popolari
State cercando un filato?


Commenti / Domande (7)
![]() Marlies Thomalla ha scritto:
Marlies Thomalla ha scritto:
Sehr schönes Modell
12.01.2025 - 12:13
![]() Birgit ha scritto:
Birgit ha scritto:
Wenn ich die reihen immer wende, entsteht doch rechts und links ein Schlitz, oder nicht? Grüße Birgit
15.10.2024 - 15:19DROPS Design ha risposto:
Liebe Birgit, beim Kragen wird man verkürzten Reihen stricken, so wird die vordere Seite der Arbeit länger, aber dann wenn alle die verkürzten Reihen fertig sind wird man Bündchen in Runde wieder stricken, so gibt es keinen Schiltz, nur die Vorderseite länger als die Rückseite. Viel Spaß beim Stricken!
15.10.2024 - 17:00
![]() Kristin ha scritto:
Kristin ha scritto:
Herregud, jeg skjønte det nå :p
17.12.2016 - 14:16DROPS Design ha risposto:
Hej Kristin. Det var godt at höre. God fornöjelse vider.
19.12.2016 - 14:45
![]() Kristin Killi ha scritto:
Kristin Killi ha scritto:
Hei! Jeg har kommet til det punktet hvor jeg skal felle av tommelkilen. Etterpå står det at jeg skal lage 2 nye masker bak tommelkilen og fortsette rundt med glattstrikk. Skal jeg øke med 2 masker på slutten før jeg tar opp maskene fra tommelkilen og strikker glatt i 2 cm?
17.12.2016 - 14:03AnneUK ha scritto:
Thanks for your replies and reference to videos. I have now completed the neck warmer but still do not fully understand how the pattern relates to the photograph. The pattern refers to short rows for a tip at the front, worked in rib, whilst the photo shows the ribbed section at the back. Can you explain, please.
10.03.2016 - 13:07DROPS Design ha risposto:
Dear Anne, the neckwarmer is worked with rib on the back and stocking st (with rib at the top and the bottom) on the remaining sts. Short rows are worked on mid front to make this part higher than back part. Then work rib over all sts for bottom edge. Happy knitting!
10.03.2016 - 14:48
![]() Mirta ha scritto:
Mirta ha scritto:
Hallo, wie hoch ist bitte der hintere Teil vom Kragen? Vielen Dank!
14.03.2014 - 10:35DROPS Design ha risposto:
Liebe Mirta, wie haben leider keine genaue Schnittübersicht, da dieser Kragen keine genau Passform verlangt - aber Sie können sich an dem Foto orientieren.
17.03.2014 - 12:24
![]() Sarah Biebas ha scritto:
Sarah Biebas ha scritto:
Hallo, ich verstehe die Passage beim Daumenkeil nicht so ganz, wie das nach der 5. R mit der Aufnahme gedacht ist. Wie viel Runden stricke ich für 12 Aufnahmen?
06.11.2013 - 17:10DROPS Design ha risposto:
Liebe Sarah, Sie nehmen in jeder ungerade Runde 2 M auf, also haben Sie in der 5. Rd 6 M aufgenommen, Sie müssen also noch 3 weitere Aufnahme-Rd stricken (Rd 7, 9 und 11) bis Sie 12 M aufgenommen haben.
07.11.2013 - 11:12
|
|
DROPS Extra 0-903 |
|
 |
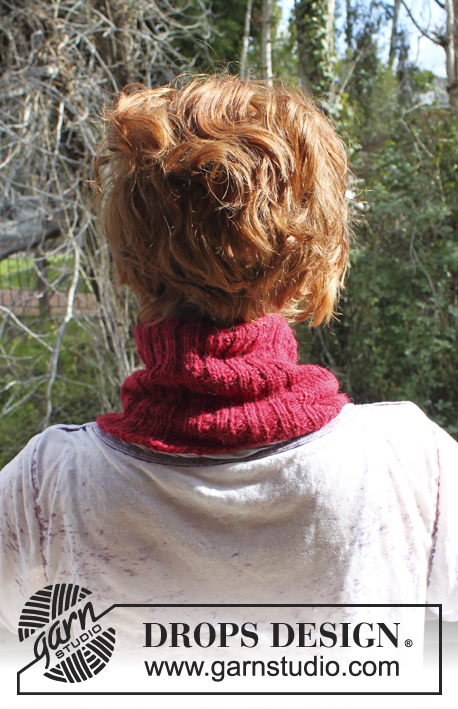 |
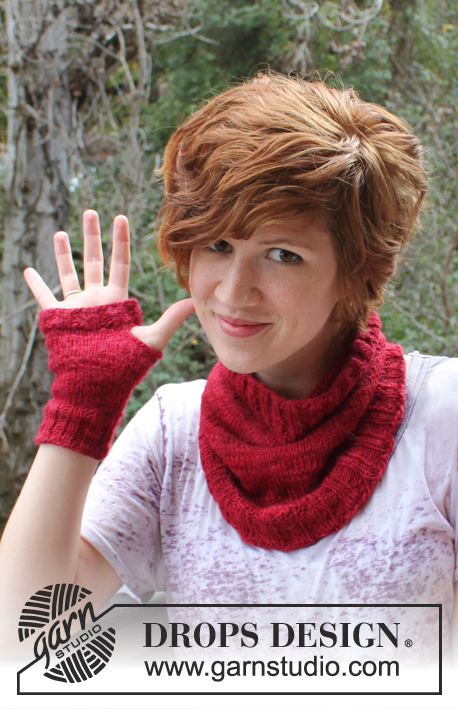
Scaldapolsi e scaldacollo DROPS in "DROPS ♥ You #3" oppure "Karisma".
DROPS Extra 0-903 |
|
|
SCALDAPOLSI:
Si lavora in tondo sui ferri a doppia punta. Avviare 36 m con 2 fili. Tagliare uno dei 2 fili e continuare con 1 solo filo. Lavorare le coste = 2 m dir / 2 m rov finché il lavoro non misuri ca 4 cm. Continuare poi a maglia rasata per 3,5 cm - RICORDARSI DELLA TENSIONE DELLA MAGLIA! Cominciare a aumentare per il pollice al giro seguente: 1° GIRO: Fare 1 gettato, 2 m dir, 1 gettato e lavorare le m rimanenti a dir. 2° GIRO e tutti i giri pari durante gli aumenti del pollice: Lavorare tutti i gettati a dir ritorto, lavorare le altre m a dir. 3° GIRO: Fare 1 gettato, 4 m dir, 1 gettato e lavorare le m rimanenti a dir. 5° GIRO: Fare 1 gettato, 6 m dir, 1 gettato e lavorare le m rimanenti a dir. Continuare così con 1 gettato ad ogni lato delle m aumentate finché non siano aumentate 12 m in totale e che siano 14 m per il pollice. Al giro seguente, intrecciare le 14 m del pollice e continuare in tondo a dir. Avviare 2 nuove maglie dietro le maglie per il pollice e continuare con 2 cm maglia rasata. Continuare poi con le coste 2 m dir / 2 m rov per 2 cm. Intrecciare senza stringere con il dir sopra il dir e il rov sopra il rov con 2 fili insieme. Lavorare un altro scaldapolso identico. SCALDACOLLO: Si lavora in tondo sui ferri circolari. Avviare 96 m con 2 fili. Tagliare uno dei 2 fili e continuare con 1 solo filo. Lavorare le coste = 2 m dir / 2 m rov finché il lavoro non misuri ca 4 cm. Al ferro seguente lavorare così: Inserire un segnapunti, lavorare le prime 12 m a coste come prima, lavorare 70 m a dir, lavorare le ultime 14 m a coste come prima. Continuare con le coste sopra 26 m e maglia rasata sopra le 70 m rimanenti finché il lavoro non misuri ca 12 cm. Lavorare poi a ferri accorciati per creare una punta davanti: Lavorare le prime 12 m a coste come prima, poi 70 m a maglia rasata, girare il lavoro e lavorare a rov le m seguenti finché non rimangano 12 m di coste, girare. Lavorare come prima, ma, girare quando rimangano 2 m maglia rasata prima delle coste, girare. Lavorare il ferro seguente a rov finché non rimangano 2 m rov prima delle coste dall’altra parte, girare. Continuare a lavorare e girare 2 m prima rispetto alla volta precedente finché non rimangano solo 6 m in mezzo davanti. Lavorare 1 giro sopra tutte le maglie fino alle coste. Continuare a coste in tondo per ca 4 cm. Intrecciare senza stringere con 2 fili, dir sopra dir e rov sopra rov (fare eventualmente 1 gettato dopo ogni 2 m e intrecciare il gettato come una maglia) con 2 fili. |
|
Avete terminato questo modello?Allora taggate le vostre foto con #dropspattern o inviatele alla #dropsfan gallery. Avete bisogno di aiuto con questo modello?Troverete 14 video tutorial, una sezione per i commenti/domande e molto altro guardando il modello su www.garnstudio.com © 1982-2026 DROPS Design A/S. Ci riserviamo tutti i diritti. Questo documento, compreso tutte le sue sotto-sezioni, è protetto dalle leggi sul copyright. Potete leggere quello che potete fare con i nostri modelli alla fine di ogni modello sul nostro sito. |
|


Con oltre 40 anni di esperienza nel design di modelli di maglia e uncinetto, DROPS Design offre la più estesa collezione di modelli gratuiti su internet - tradotti in 17 lingue. Ad oggi vi possiamo fornire 324 cataloghi e 12290 modelli - 9561 dei quali sono tradotti in Italiano.
Ci stiamo impegnando molto per darvi il meglio che vi possiamo offrire in termini di maglia e uncinetto, ispirazioni e consigli così come filati di grande qualità ad un prezzo incredibile! Volete utilizzare i nostri modelli per qualcosa d'altro oltre al vostro uso personale? Potete leggere tutto ciò che è consentito nel testo sul Copyright in basso su tutte le pagine dei nostri modelli. Buon lavoro!
Lasciare un commento sul modello DROPS Extra 0-903
Noi saremmo felici di ricevere i tuoi commenti e opinioni su questo modello!
Se vuoi fare una domanda, fai per favore attenzione a selezionare la categoria corretta nella casella qui sotto per velocizzare il processo di risposta. I campi richiesti sono indicati da *.