
Categorie popolari
State cercando un filato?


Commenti / Domande (90)
Diane Court ha scritto:
Dear garnstudio I live in Australia and made this hat in a recycled cotton .I love it, tho hat is heavy. I want to make it again and to buy your recommended yarn from you. I checked tension & made it single strand using 4 mm). Your website info on Paris says use a 5mm hook on one strand. The pattern says use 2 strands on a size 3mm. I see you have one question in English on this subject, but doesn't two strands of Paris make up very thick and bulky? Thank you for your time.
08.12.2013 - 05:55DROPS Design ha risposto:
Dear Mrs Court, you work here with a tight gauge to get the hat as it should be, that's the reason why your swatch should be 16 dc in width and 17 rows in height with a crochet hook size 3 mm or size required to get the correct measurements = 10 x 10 cm to match final result. Happy crocheting!
08.12.2013 - 20:58
![]() Batoul Fawaz ha scritto:
Batoul Fawaz ha scritto:
Hello!! are you sure this hat is made with a crochet 3mm size??
25.11.2013 - 21:24DROPS Design ha risposto:
Dear Mrs Batoul Fawaz, pattern is correct, you need a crochet hook size 3 mm or size needed to get the correct tension of 16 sc x 17 rows with 2 strands Bomull-Lin or Paris = 10 x 10 cm. Try with a larger/smaller hook if necessary. Happy crocheting!
26.11.2013 - 09:09Roxana ha scritto:
Only with a hook of 5mm you can make a string of 16 mesure 10 cm. In the picture you can see holes in the hat so it is a biger hook than 3. The yarn is for 5 and is in 2 so I think it would be hard enought to stay that firm. It is a very beautifull pattern.
24.08.2013 - 22:12
![]() EVI ha scritto:
EVI ha scritto:
Ihan oikeastiko 2-kertainen lanka ja numeron 3 virkkuukoukku?
31.07.2013 - 12:52DROPS Design ha risposto:
Työstä tulee hyvin tukeva, joten se virkataan ohuella koukulla ja paksulla langalla.
01.08.2013 - 12:21
![]() Zanne ha scritto:
Zanne ha scritto:
Jeg har lige hæklet denne vidunderlige, og meget klædelige hat - men da jeg har det meget med varme, blev den alt for tyk og tung til mig med dobbelt garn. Justerede derfor lidt i maskeantallet og har hæklet den i een tråd muskat på nål 3 og den har stadig den faste struktur og sidder perfekt. Elsker den.
29.07.2013 - 17:06
![]() Kat ha scritto:
Kat ha scritto:
I just finished making this hat for a friend and it turned out beautiful. I made it in a shade of pale yellow so it has the look of a straw hat - I am so pleased it is so lovely !
29.06.2013 - 04:35
![]() Maria Gabriela De Castro Fontes ha scritto:
Maria Gabriela De Castro Fontes ha scritto:
Não é possível fazer a amostra de 16 pb de largura x 17 carreiras de altura com 2 fios Bomull-Lin ou Paris = 10 x 10 cm. Eu fiz com agulha 3,1/2 e com 1 fio o que deu certo.
09.05.2013 - 23:41
![]() Lotta ha scritto:
Lotta ha scritto:
Skall de verkligen vara nr 3 o dubb garn av Paris??
23.04.2013 - 13:17
![]() Flory ha scritto:
Flory ha scritto:
Ook ik heb moeite met haken met 2 draden Paris op naald 3. Ik kan de beide draden haast niet pakken. Wat gebeurt er als ik met naald 4 haak? Gaat dat dan ten koste van de stevigheid?
19.04.2013 - 13:07DROPS Design ha risposto:
Je moet de stekenverhouding voor het patroon aanhouden (16 v breed x 17 tr hoog). Haak je met nld 4 en klopt de stekenverhouding niet, dan wordt de hoed te groot en slap. Dus haak een proeflapje en zie welke nld je nodig hebt voor de juiste verhouding.
21.04.2013 - 20:01
![]() Petra ha scritto:
Petra ha scritto:
2 Fäden Paris und eine Häkelnadel Nr. 3 stimmt wirklich? Paris hätte dann eine Lauflänge von 38m/50g... Bei einfädig wäre 3 ok, aber bei 2fädig?
10.04.2013 - 20:51DROPS Design ha risposto:
Liebe Petra, wir haben in der Designabteilung nachgefragt, es ist wirklich Nadelstärke 3, ansonsten würde der Hut nicht die nötige Standfestigkeit bekommen (besonders für die Krempe).
14.04.2013 - 08:28
|
|
Marlene#marlenehat |
|
 |
 |
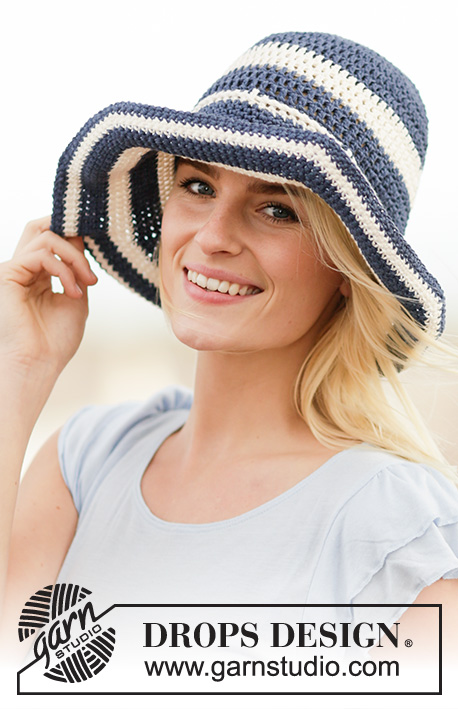
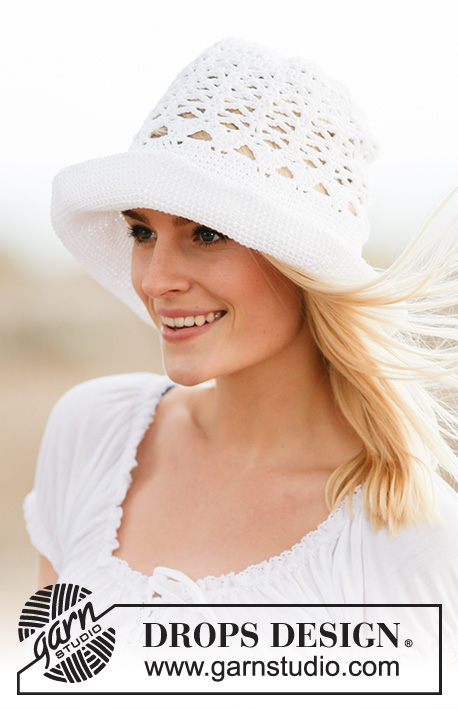
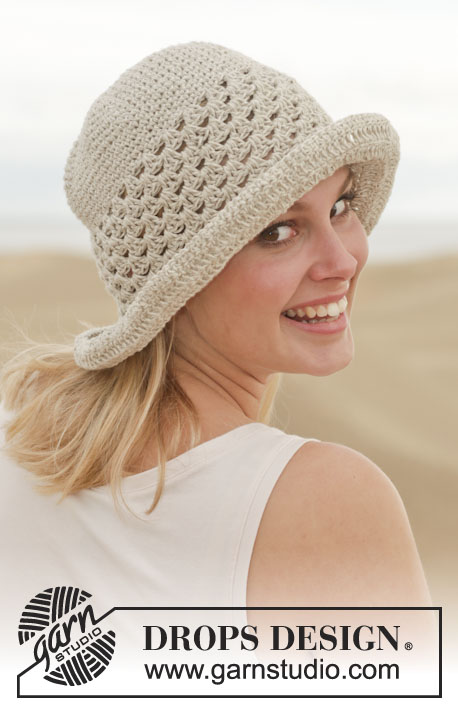
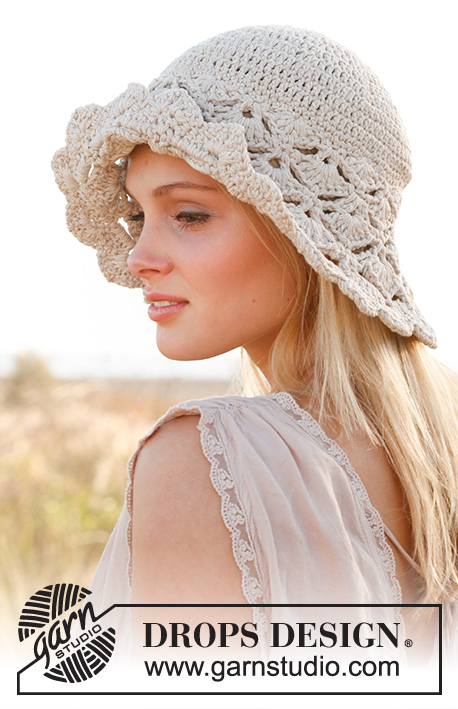
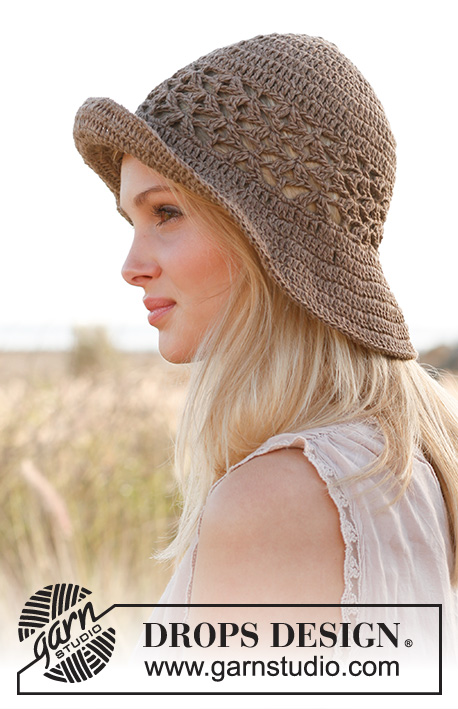
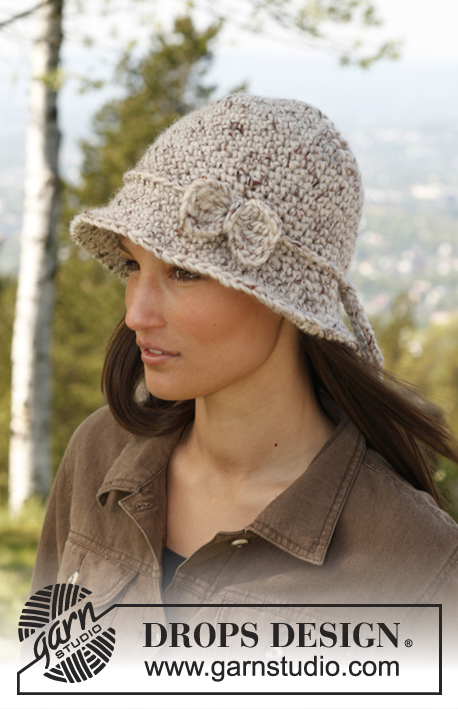
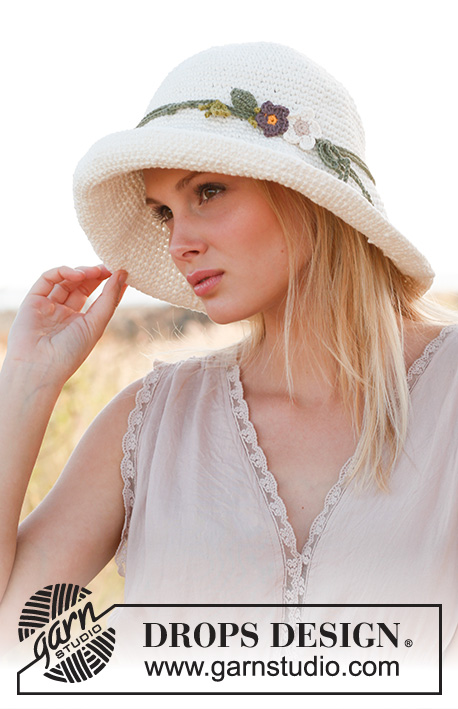
Cappello DROPS all’uncinetto con 2 capi di "Bomull Lin" o 2 capi di "Paris".
DROPS 146-32 |
|
|
INFORMAZIONI PER IL LAVORO: Dopo l’ultima m.b. sul giro, continuare fino al giro successivo con 1 m.b. nella m.b. successiva (= 1° m.b. dal giro precedente). NOTA: Inserire un segnapunti all’inizio del giro tra l’ultima m.b. e la 1° m.b. sul giro, spostare il segnapunti verso l’alto durante il lavoro. --------------------------------------------------------- CAPPELLO: Il cappello è lavorato dall’alto in basso. Lavorare 4 cat. con l’uncinetto n° 3 mm con 2 capi di Bomull-Lin o 2 capi di Paris e formare un anello con 1 m.bss. nella 1° cat. FARE ATTENZIONE ALLA TENSIONE DEL LAVORO! GIRO 1: Lavorare 1 cat., 5 m.b. nell’anello di cat. – LEGGERE LE INFORMAZIONI PER IL LAVORO! GIRO 2: lavorare 2 m.b. in ogni m.b. = 10 m.b. GIRO 3: * 2 m.b. nella 1° m.b., 1 m.b. nella m.b. successiva *, ripetere *-* = 15 m.b. GIRO 4: * 2 m.b. nella 1° m.b., 1 m.b. nella m.b. successiva, 1 m.b. nella m. successiva *, ripetere *-* = 20 m.b. Inserire 1 segnapunti all’inizio del giro. Poi aumentare 5 m.b. su ogni giro, aumentare nello stesso punto del giro precedente, cioè 1 m.b. in più tra ogni aumento a ogni giro. Il cerchio diventerà un pentagono. Continuare in questo modo fino a quando sono stati lavorati 16-17 giri in totale = 80-85 m.b. sul giro. Poi lavorare in tondo con 1 m.b. in ogni m.b. fino a quando il lavoro misura 15-16 cm dal centro. Continuare a lavorare la tesa come segue: GIRO 1: lavorare 1 m.b. in ogni m.b. e allo stesso tempo aumentare 8 m.b. in modo uniforme = 88-93 m. GIRO 2: lavorare 1 m.b. in ogni m.b. GIRI 3- 19: Continuare come il primo e secondo giro aumentando 8 m.b. sui giri dispari e lavorando a m.b. in ogni m.b. sui giri pari. GIRO 20: Lavorare 1 m.b. in ogni m.b., finire con 1 m.bss. nella 1° m.b. = 160-165 m.b. Tagliare e affrancare il filo. CORDINO: Lavorare a cat. con il Safran colore n° 26 con l’uncinetto n° 3 mm fino a quando il cordino misura circa 180 cm, tagliare e affrancare il filo. FIORE PICCOLO: Lavorare come segue: 4 cat. con il Safran colore n° 11 con l’uncinetto n° 3 mm e formare un anello con 1 m.bss. nella 1° cat. GIRO 1: lavorare 1 cat., 5 m.b. nell’anello di cat., 1 m.bss. nella 1° cat. dall’inizio del giro. GIRO 2 (passare al colore n° 23): in ogni m.b. lavorare: * 3 cat., 2 m.a., 1 cat., 1 m.b. *, ripetere *-* per tutto il giro e finire l’ultima volta con 1 m.bss. nella 1° cat. dall’inizio del giro (= 5 foglie). Tagliare e affrancare il filo. FIORE GRANDE: Lavorare come segue: 4 cat. con il Safran colore n° 21 con l’uncinetto n° 3 mm e formare 1 anello con 1 m.bss. nella 1° cat. GIRO 1: lavorare 1 cat., 5 m.b. nell’anello di cat., 1 m.bss. nella 1° cat. dall’inizio del giro. GIRO 2 (passare al colore n° 18): in ogni m.b. lavorare: * 4 cat., 3 m.a.d., 1 cat., 1 m.b. *, ripetere *-* per tutto il giro e finire l’ultima volta con 1 m.bss. nella 1° cat. dall’inizio del giro invece di 1 m.b. nella m. successiva (= 5 foglie). Tagliare e affrancare il filo FOGLIA: Lavorare la foglia con delle m. su entrambi i lati di una riga di cat. Lavorare 2 foglie con il colore n° 26 e lavorare 1 foglia con il colore n° 14. Lavorare come segue: 8 cat., girare e saltare la 1° cat., continuare con 2 m.b., 3 m.a., 2 m.b. Lavorare 1 cat. alla fine della riga, continuare sull’altro lato della riga con 2 m.b., 3 m.a., 2 m.b., finire con 1 m.bss. nella 1° m.b. Tagliare e affrancare il filo. RAMI: Lavorare 1 ramo con il colore n° 26 e lavorare 2 rami con il colore n° 14. Lavorare come segue: 8 cat., 1 m.b. nel cordino dove volete mettere il ramo, 8 cat., tagliare i fili e fare 1 nodo in basso all’inizio e alla fine della riga. Lavorare altri 2 rami. CONFEZIONE: Affrancare i fiori e le foglie sul cordino. Far passare il cordino 2 volte attorno al cappello prima di fare un fiocco. |
|
Avete terminato questo modello?Allora taggate le vostre foto con #dropspattern #marlenehat o inviatele alla #dropsfan gallery. Avete bisogno di aiuto con questo modello?Troverete 6 video tutorial, una sezione per i commenti/domande e molto altro guardando il modello su www.garnstudio.com © 1982-2026 DROPS Design A/S. Ci riserviamo tutti i diritti. Questo documento, compreso tutte le sue sotto-sezioni, è protetto dalle leggi sul copyright. Potete leggere quello che potete fare con i nostri modelli alla fine di ogni modello sul nostro sito. |
|


Con oltre 40 anni di esperienza nel design di modelli di maglia e uncinetto, DROPS Design offre la più estesa collezione di modelli gratuiti su internet - tradotti in 17 lingue. Ad oggi vi possiamo fornire 324 cataloghi e 12290 modelli - 9561 dei quali sono tradotti in Italiano.
Ci stiamo impegnando molto per darvi il meglio che vi possiamo offrire in termini di maglia e uncinetto, ispirazioni e consigli così come filati di grande qualità ad un prezzo incredibile! Volete utilizzare i nostri modelli per qualcosa d'altro oltre al vostro uso personale? Potete leggere tutto ciò che è consentito nel testo sul Copyright in basso su tutte le pagine dei nostri modelli. Buon lavoro!
Lasciare un commento sul modello DROPS 146-32
Noi saremmo felici di ricevere i tuoi commenti e opinioni su questo modello!
Se vuoi fare una domanda, fai per favore attenzione a selezionare la categoria corretta nella casella qui sotto per velocizzare il processo di risposta. I campi richiesti sono indicati da *.