
Categorie popolari
State cercando un filato?


Commenti / Domande (62)
![]() Diane ha scritto:
Diane ha scritto:
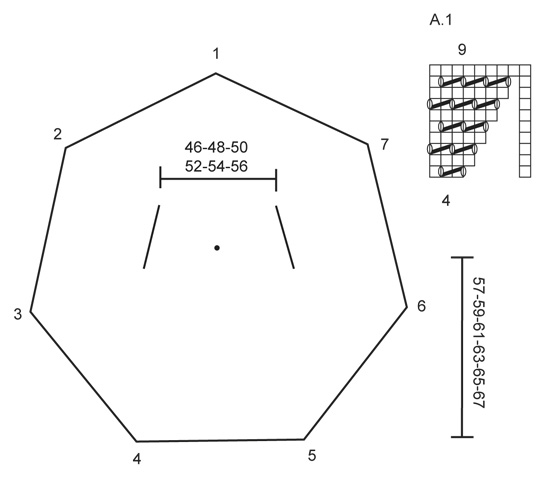
I am starting the A1 chart. I understand the first row of the chart where you increase. I also understand the 2nd row of the chart of just knitting. My problem is the 3rd row of A1. I now have 35 stitches on my needle divided into 7 parts of 5 stitches each. Can you please tell me exactly how I do the first 5 stitches where the increase is?
31.08.2024 - 22:07DROPS Design ha risposto:
Dear Diane, in the 3rd round: *knit 1, yarn over, knit 2 together, yarn over, knit 2 together, yarn over* between each set of markers. So you increase 1 stitch in each section, to 42. Happy knitting!
31.08.2024 - 23:38
![]() Isabelle ha scritto:
Isabelle ha scritto:
Bonjour Je viens de terminer pour la deuxième fois la partie veste de ce tricot et je remarque que j'ai à nouveau une pointe qui se forme dans le dos. J'ai utilisé une mini aiguille circulaire dès le 4ème rang à la place des aiguilles doubles pointes. Honnêtement je n'ai pas envie de recommencer une troisième fois. N'y aurait-il pas une erreur dans les explications? Merci
27.03.2024 - 18:36DROPS Design ha risposto:
Bonjour Isabelle, il ne doit pas y avoir de pointe, pensez à bien vérifier votre tension pour qu'elle soit la même tout du long et éviter ainsi d'éventuelles déformations, resserrez les 7 mailles du montage pour voir si vous arrivez à supprimer cette pointe, ou bien tentez un blocage, ça pourra aider aussi. Bon tricot!
02.04.2024 - 12:45
![]() Fiona Caldwell ha scritto:
Fiona Caldwell ha scritto:
What do the blank spaces mean in A1 diagram. Thank you
07.11.2022 - 19:15DROPS Design ha risposto:
Dear Mrs Caldwell, the first row in A.1 is worked over 4 sts but the last row over 9 sts, since you will increase sts on every other round, we need to have space after the first stitch until all increases are done, ie work 1st row as follows: *K1, YO, K2 tog, YO, K1* and repeat from *-*. Happy knitting!
08.11.2022 - 08:59
![]() Alice ha scritto:
Alice ha scritto:
I am confused about the double pointed needle size. At the top of the page where it indicates what size to use for the project, it says, "DROPS DOUBLE POINTED NEEDLES AND CIRCULAR NEEDLE (40 and 80 cm / 16'' and 32'') SIZE 7 mm/US 10.75 " But in the instructions it says, "Cast on 7 sts with Alaska and distribute them on 4 double pointed needles size 6 mm / US 10." Thank you.
06.08.2022 - 06:03DROPS Design ha risposto:
Dear Alice, yes, there seems to be a mistake in the pattern. You use double pointed 6mm needles for the initial lace pattern, so they should be included in the upper part of the pattern. We will correct the header as soon as possible. Thank you.
07.08.2022 - 23:05
![]() Jelena ha scritto:
Jelena ha scritto:
I was adding those 7 stitches as the instruction says, but the diagram itself is adding stitches as we go (if I read it correctly, if not, maybe there is my mistake).
08.03.2022 - 22:30DROPS Design ha risposto:
Dear Jelena, you are working A.1 a total of 7 times in the round, and working as shown in diagram you will automatically increase 1 stitch in each A.1 = 7 sts in total on every other round.After A.1 is done in height, repeat diagram in height until there are 31-33-35-37-39-41 sts between each marker. Hope it will help, happy knitting!
09.03.2022 - 17:49
![]() Jelena ha scritto:
Jelena ha scritto:
While working on diagram parts, I ended up with more than 100 stitches between markers, which is 2-3 times more than it's mentioned in instructions. Where did I go wrong?
08.03.2022 - 21:28DROPS Design ha risposto:
Dear Jelena, you should work diagram A.1 increasing 7 sts on every other round until there are 31-33-35-37-39-41 sts between each marker ( 27-28-29-30-31-32 cm from center of circle, if your tension is right). Can this help?
08.03.2022 - 22:21
![]() Corinna ha scritto:
Corinna ha scritto:
Hallo, verstehe diesen Teil nicht, können sie mir das bitte genauer erklären?Nach Diagramm A.1 das Muster mit 7 Zunahmen in jeder 2. Rd fortsetzen, die zugenommenen M fortlaufend in das Muster einarbeiten. Vielen Dank
05.03.2021 - 10:10DROPS Design ha risposto:
Liebe Corinna, stricken Sie wie zuvor mit *1 M re, 1 Umschlag, Lochmuster wie zuvor in A.1* und von *bis* immer so wiederholen, dh nach jeder rechte Masche am Anfang von A.1 mit 1 Umschlag zunehmen und das Lochmuster wie zuvor weiterstricken = Es wurde 7 Mal A.1 in der Runde wiederholt und jeweils 7 Masche zugenommen, wenn Sie so weiterstricken, werden Sie jeweils 7 Masche in jede 2. Runde wie zuvor zunehmen. Viel Spaß beim stricken!
05.03.2021 - 13:07
![]() Mary-Anne ha scritto:
Mary-Anne ha scritto:
I think there is a mistake where you bind off for the second sleeve. According to the diagram it should be between the 6th and 7th marker, but the pattern says to knit to 7th marker and then bind off.
01.05.2020 - 17:38DROPS Design ha risposto:
Dear Mary-Anne, which language are you following? The UK and US-English say both to work to 6th marker and to bind off until 7th marker (= sts between 6th and 7th will be bound off). Thank you! Happy knitting!
04.05.2020 - 10:54
![]() Cecilia ha scritto:
Cecilia ha scritto:
Buonasera vorrei tanto realizzare questo capo ma sono una principiante,sinceramente sto imparando grazie a voi.ma a volte non riesco a capire,il di dietro lo vedo anche complicato.i ferri a doppia punta mai usati,potrei farlo tutto a maglia rasata?grazie sempre gentili.
16.09.2017 - 16:24DROPS Design ha risposto:
Buonasera Cecilia. Spesso la lavorazione sembra più difficile di quanto non lo sia realmente. Nel caso di questa giacca, lavorarla a maglia rasata vorrebbe dire cambiare le caratteristiche della giacca stessa e ci risulterebbe difficile aiutarla. Per imparare può consultare la sezione dei video o rivolgersi al suo rivenditore Drops di fiducia. Buon lavoro!
16.09.2017 - 19:49
![]() Sylvia ha scritto:
Sylvia ha scritto:
Liebes drops Team, bitte beschreiben sie mir nochmal, Diagramm A1. Wie viele Reihen hat ein Mustersatz und ab wann nehme ich die 7 Maschen zu? Vielen Dank
22.05.2015 - 22:11DROPS Design ha risposto:
Sie beginnen mit A.1, wenn Sie 28 M in der Rd haben. Die Lücken im Diagramm ignorieren Sie einfach. In der 1. Rd hat A.1 4 M, Sie stricken A.1 also 7x in der Rd (zwischen 2 Markierern ist 1 Rapport A.1). In der 1. Rd machen Sie 1 Umschlag mehr, als Sie zus.str (1x zus.str, 2 Umschläge in der 1. Rd), also haben Sie nach der 1. Rd pro Rapport 1 M zugenommen, = 5 M pro Rapport, = 35 M in der 2. Rd. In der 3. Rd machen Sie wieder 1 Umschlag mehr, als Sie M zus.str (2x zus.str, 3 Umschl.), haben also in der 4. Rd 6 M pro Rapport, usw. bis A.1 9 M hat. Dann setzen Sie das Muster von A.1 zwischen den Markierern genauso weiter fort, also je 1 Umschlag mehr, das sind die 7 Zun. pro Rd.
23.05.2015 - 09:47
|
|||||||||||||
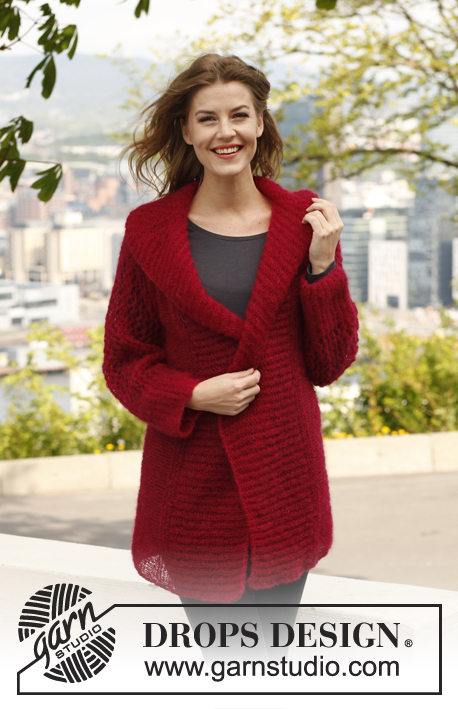
Warm Circle#warmcirclejacket |
|||||||||||||
|
|
|||||||||||||
Giacchino DROPS in cerchio a coste in "Nepal". Taglie: dalla S alla XXXL.
DROPS 140-35 |
|||||||||||||
|
MOTIVO: Vedere il diagramma A.1. M. LEGACCIO (in tondo con i ferri circolari): 1 “costa” = 2 giri * 1 giro a dir. e 1 giro a rov. *, ripetere *-*. --------------------------------------------------------- GIACCHINO: Lavorato in tondo in cerchio dal centro dietro. Avviare 7 m. con il filato Alaska e distribuirli su 4 ferri a doppia punta n° 6 mm. Lavorare 1 giro a dir. e ALLO STESSO TEMPO lavorare 2 m. a dir. in ogni m. = 14 m. Inserire 7 segnapunti nel lavoro, con 2 m. tra ognuno. 1° segnapunti = all’inizio del giro = dietro del collo. Continuare a dir., sul giro successivo lavorare 2 m. in 1 m. ogni 2 maglie = 21 m. Sul giro successivo lavorare 2 m. in ogni 3 maglie. = 28 m. Poi lavorare secondo il motivo A.1, lavorare 1 ripetizione sulle 4 m. tra ogni segnapunti. Alla fine di A.1 continuare il motivo con 7 aumenti ogni 2 ferri, lavorare le m. aumentate secondo il motivo. Passare ai ferri circolari n° 6 mm quando necessario. FARE ATTENZIONE ALLA TENSIONE DEL LAVORO! Quando il lavoro misura 27-28-29-30-31-32 cm dal centro, lavorare 2 “coste” a M. LEGACCIO – leggere la spiegazione sopra – su tutte le m. (ora ci sono circa 31-33-35-37-39-41 m. tra ogni segnapunti = 217-231-245-259-273-287 m. in totale). Lavorare a dir. fino al secondo segnapunti. Intrecciare tutte le m. tra il 2° e il 3° segnapunti (= circa 31-33-35-37-39-41 m.). Lavorare fino al 6° segnapunti. Intrecciare tutte le m. fino al 7° segnapunti (= circa 31-33-35-37-39-41 m.). Lavorare fino al 1° segnapunti. Lavorare 1 giro a rov. e ALLO STESSO TEMPO avviare lo stesso n° di m. che sono state intrecciate sulle m. intrecciate. Lavorare 1 “costa”. Passare ai ferri circolari n° 7 mm. Quindi lavorare a m. rasata su tutte le m., ALLO STESSO TEMPO ogni 2 giri aumentare 1 m. all’altezza di tutti i segnapunti – aumentare in modo alternato sul lato destro e sinistro dei segnapunti (= 7 aumenti ogni 2 giri) – sul giro successivo lavorare a dir. ritorto le m. aumentate per evitare buchi. Continuare a m. rasata e con gli aumenti fino a quando il lavoro misura 20-21-22-23-24-25 cm dallo scalfo (ci dovrebbero essere 49-52-55-58-61-64 m. tra ogni segnapunti e circa 343-364-385-406-427-448 m. in totale). Tornare ai ferri circolari n° 6 mm, lavorare 1 f. a dir. e allo stesso tempo aggiustare il n° di m. in modo che sia divisibile per 6. Quindi lavorare a coste 3 m. dir./3 m. rov. Quando le coste misurano 3 cm, aumentare tutte le sezioni a rov. a 4 m. rov., quando le coste misurano 6 cm, aumentare tutte le sezioni a rov. a 5 m. rov. Continuare a coste 3 m. dir./5 m. rov. fino a quando le coste misurano 10 cm. Intrecciare le m. con dir. su dir. e rov. su rov. Il lavoro misura circa 57-59-61-63-65-67 cm in totale dal centro. MANICA: Riprendere 62-66-70-74-78-82 m. attorno allo scalfo con i ferri circolari n° 7 mm corti e lavorare a m. rasata in tondo fino a quando la manica misura 15 cm. Passare ai ferri circolari corti n° 6 mm, lavorare 1 giro a m. rasata e allo stesso tempo distribuire 16-18-20-22-24-26 aumenti in modo uniforme = 78-84-90-96-102-108 m. Continuare a coste 3 m. dir./3 m. rov. fino a quando la manica misura 30-31-32-33-34-35 cm. Intrecciare le m. con dir. su dir. e rov. su rov. |
|||||||||||||
Spiegazioni del diagramma |
|||||||||||||
|
|||||||||||||
 |
|||||||||||||
Avete terminato questo modello?Allora taggate le vostre foto con #dropspattern #warmcirclejacket o inviatele alla #dropsfan gallery. Avete bisogno di aiuto con questo modello?Troverete 10 video tutorial, una sezione per i commenti/domande e molto altro guardando il modello su www.garnstudio.com © 1982-2026 DROPS Design A/S. Ci riserviamo tutti i diritti. Questo documento, compreso tutte le sue sotto-sezioni, è protetto dalle leggi sul copyright. Potete leggere quello che potete fare con i nostri modelli alla fine di ogni modello sul nostro sito. |
|||||||||||||


Con oltre 40 anni di esperienza nel design di modelli di maglia e uncinetto, DROPS Design offre la più estesa collezione di modelli gratuiti su internet - tradotti in 17 lingue. Ad oggi vi possiamo fornire 324 cataloghi e 12290 modelli - 9561 dei quali sono tradotti in Italiano.
Ci stiamo impegnando molto per darvi il meglio che vi possiamo offrire in termini di maglia e uncinetto, ispirazioni e consigli così come filati di grande qualità ad un prezzo incredibile! Volete utilizzare i nostri modelli per qualcosa d'altro oltre al vostro uso personale? Potete leggere tutto ciò che è consentito nel testo sul Copyright in basso su tutte le pagine dei nostri modelli. Buon lavoro!
Lasciare un commento sul modello DROPS 140-35
Noi saremmo felici di ricevere i tuoi commenti e opinioni su questo modello!
Se vuoi fare una domanda, fai per favore attenzione a selezionare la categoria corretta nella casella qui sotto per velocizzare il processo di risposta. I campi richiesti sono indicati da *.