
Categorie popolari
State cercando un filato?


Commenti / Domande (71)
![]() Ùna ha scritto:
Ùna ha scritto:
My problem with this pattern is where I actually knit the cable panels. The instructions say that the markers are in the middle of each cable. I find this confusing. Could you not tell me how many stitches to knit before I start the cables. I am an experienced knitter but this leaves me confused. Please tell me exactly where the cables should be placed, and where the raglan increases are in relation to the cable panels.
23.10.2020 - 22:32DROPS Design ha risposto:
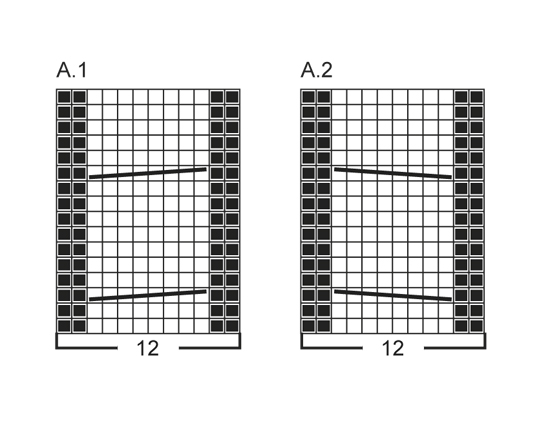
Dear Ùna, work until 6 sts remain before marker and work the diagram over the next 12 stitches (= 6 sts before marker + 6 sts after marker). Repeat on each marker. This means you wil work: first 6 sts A.1/A.2, marker, last 6 sts A.1/A.2. You will then increase before/after the cable panels/the diagram, but the raglan increases are worked on a different rythm on body and sleeves, you will sometimes increase 8 sts (= everywhere) or only 4 sts (only sleeves or only body) - see size. Hope this helps. Happy knititng!
26.10.2020 - 07:37
![]() Irmgard Weberberger ha scritto:
Irmgard Weberberger ha scritto:
Habe die 4Markierungen gesetzt, 1. Nach 16 Maschen,2. nach10 Maschen,3.nach 20Maschen und 4. nach 10 Maschen,bleiben 16 Maschen übrig. Nun beginne ich mit dem Zopfmuster wie beschrieben 6Maschen vor der Markierung .Zopf ist in der Mitte der Markierung,2Umschlage und nun habe ich nur noch 4 Maschen vor der 2.Markierung. Also es geht sich nicht aus,dass der zweite Zopf in der Mitte der Markierung ist. Was mache ich falsch? Bitte um ihre Hilfe
19.09.2020 - 16:45DROPS Design ha risposto:
Liebe Frau Weberberger, nachdem Sie die Markierungen eingesetzt haben, stricken Sie eine Rückreihe mit Zunahmen, dann haben Sie: 18 M bis 1. Mark, 14 M bis 2. Mark, 24 M bis 3. Mark, 14 M bis 4. Mark und 18 M bleiben. Dann stricken Sie (Hinreihe): 6 Blendemaschen, 6 M glatt (Vorderteil) A.1 (= 12 M), 2 M glatt (Ärmel), A.2 (= 12 M), 12 M glatt (Rückenteil), A.1 (12 M), 2 M glatt (Ärmel), A.2 (12 M), 6 M, 6 Bldenmaschen (Vorderteil). Viel Spaß beim stricken!
21.09.2020 - 09:02
![]() Greta ha scritto:
Greta ha scritto:
I have started 'weekend in Paris'. It's the increase 6 stitches before the raglan a 'body' increase? I understand that for 25 rows both raglan and body are increased on r side rows and then the Reagan continues in the same way but the body on 4th row. Are the fronts the body? What about the back?
24.10.2019 - 17:31DROPS Design ha risposto:
Dear Greta, before working the first raglan increase you increase a total of 16 sts = 2 sts on each side of each of the 4 markers (= 4 sts at each marker). Then work with A.1/A.2 (raglan line) and increase for raglan in a differrent rythm on sleeves (2 sts on each sleeve) and on body (= back piece = 2 sts, front piece: 1 st on each front piece) depending on the size, ie you will first increase 8 sts (= sleeves + body) on every 2nd row, then increase 4 sts on every 2nd row (sleeve only) and 8 sts on every 4th row (sleeves + body). Happy knitting!
25.10.2019 - 09:08
![]() Ana María ha scritto:
Ana María ha scritto:
Los comentarios son muy buenos para entender las indicaciones. Así como se puede leer en el idioma materno, por favor, dejen que los comentarios también sean en el mismo. Me encanta esta página.
25.02.2019 - 19:22
![]() Valérie ha scritto:
Valérie ha scritto:
Hallo! Ook ik raak niet wijs uit het patroon. Ik heb de pas gebreid en 16 steken gemeerderd. Maar hoe gaat het verder? Als ik het goed begrijp staat het meerderen op de mouwen en op het lijf (telkens +1 omslag?) volledig apart van het breien van de kabels (raglan, 2 x +2 omslagen)? Maar dus hoe en vooral waar op de rij moet ik meerderen voor de mouwen en voor het lijf? Gaat het telkens maar om 1 omslag per onderdeel (voorbies, kabel, mouw, rug)? Waar dien ik deze omslag telkens te maken?
19.11.2018 - 16:57DROPS Design ha risposto:
Dag Valérie,
Nadat je de 16 meerderingen hebt gedaan, brei je verder en brei je A.1 over markeerdraad 1 en 3, waarbij de markeerdraad in het midden van A.1 zit, dus in het midden van de kabel. Op dezlfde manier brei je A.2 over markeerdraad 2 en 4.
Daarnaast moet ook meerderen voor de raglan. Bij 'RAGLAN' staat hoe je dit doet (begin 6 steken voor de markeerdraad, etc) en in de beschrijving staat hoe vaak je dit doet. Het aantal keren is namelijk verschillend voor het lijf en de mouwen.
13.12.2018 - 09:12
![]() Stefania ha scritto:
Stefania ha scritto:
Ho letto che è possibile lavorare questo modello con i ferri dritti è possibile però avere le spiegazioni? grazie
26.01.2017 - 09:32DROPS Design ha risposto:
Buongiorno Stefania. Il cardigan è lavorato avanti e indietro sui ferri circolari. Se preferisce lavorare con i ferri dritti può seguire le stesse indicazioni riportate nel testo. Sarà un po’ più scomodo per via del numero delle maglie. Per le maniche può lavorarle sui ferri dritti, aggiungendo 1 m di margine che servirà per la cucitura. Buon lavoro!
26.01.2017 - 12:15
![]() Monica Filippa ha scritto:
Monica Filippa ha scritto:
Buongiorno, per realizzare questo modello con filato Drops Alaska, devo sempre considerare, per taglia S, gr 250? Grazie
01.09.2016 - 10:59DROPS Design ha risposto:
Buongiorno Monica. La resa del filato Alaska è diversa da quella di Alpaca Bouclè. Deve calcolare il totale dei metri necessari con Alpaca Bouclè e dividere per i metri in un gomitolo di Alaska. Nel suo caso: 5 gomitoli di Alpaca Bouclè x 140 m (m in un gomitolo) = 700 m / 70 m (m in un gomitolo di Alaska) = 10 gomitoli. Buon lavoro!
01.09.2016 - 11:05Liz ha scritto:
Thank you again for your reply. Very helpful. I'm loving the challenge of this pattern and determined to do it. I'm knitting it in your alpaca in black which makes it a little more challenging to see. Am I understanding correctly that the 2 yo are done on each side front and back and on each side of each sleeve for 22 times, then every 4 th row on the front back while I continue increasing on the sleeves every other row for 34 times.
19.06.2016 - 05:37DROPS Design ha risposto:
Dear Liz, in 3rd size, you will inc for raglan a total of 22 times in back, front pieces and sleeves every other row, then continue inc only on sleeve 12 more times every other row (= a total of 34 times), while you continue inc on body 6 times every 4th row, ie every other row you will inc only on sleeve (4 sts inc), and every 4th row inc for sleeves and body (8 sts inc). Happy knitting!
20.06.2016 - 08:53
![]() Liz ha scritto:
Liz ha scritto:
I simply cannot understand the instructions for this pattern. I have work the neck band and placed the markers. The section following is a complete jumble to me. Has anyone else written out the instructions? If not I am going to have to start over with another pattern.
17.06.2016 - 04:28DROPS Design ha risposto:
Dear Liz, work first 1 row from WS inc 2 sts on each side of 4 markers (kfb 2 sts before + 2 sts after each marker) - continue then in pattern with A.1 and A.2 and inc for raglan on next row from RS - You will inc differently on sleeves and on body, ie on some rows you will inc in each piece (sleeves, back and front pieces, when inc every other row) and in some rows you will only inc in sleeves (every other row in sleeves, but every 4th row in body). Inc in each piece to inc as explained under "RAGLAN". Happy knitting!
17.06.2016 - 08:34Shoshana Lev ha scritto:
Is it possible to get more explanation on the raglan ? please make it in english
20.12.2015 - 12:47DROPS Design ha risposto:
Dear Mrs Lev, inc for raglan are done before/after A.1/A.2 with 2 yos, only 1 of the yo will be then worked on next row. You will inc differently on sleeves (every other row) and on front pieces/back piece (firrst every 2 rows then every 4 rows). Happy knitting!
21.12.2015 - 11:09
|
|||||||||||||
Paris weekend#parisweekendcardigan |
|||||||||||||
 |
 |
||||||||||||
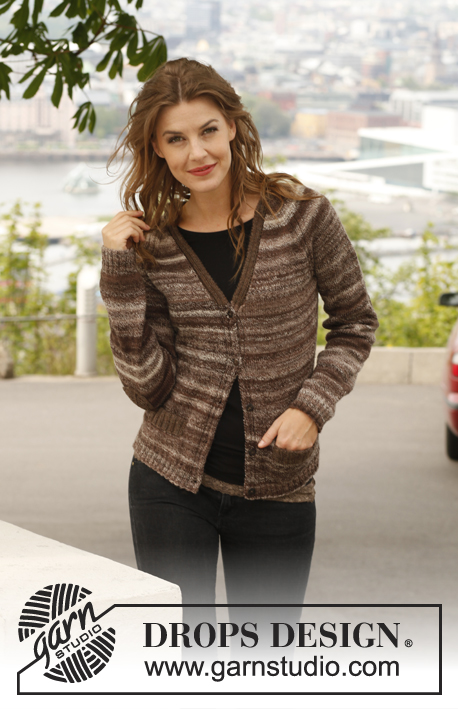
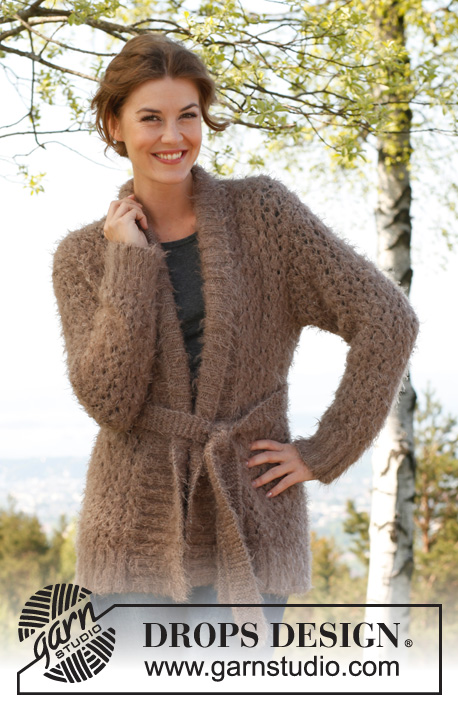
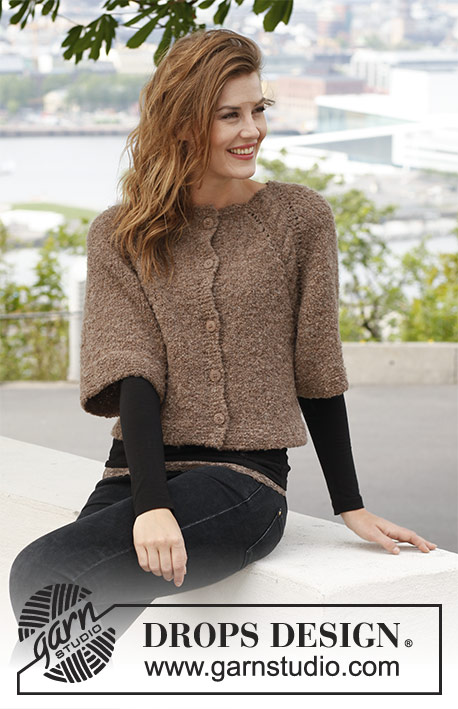
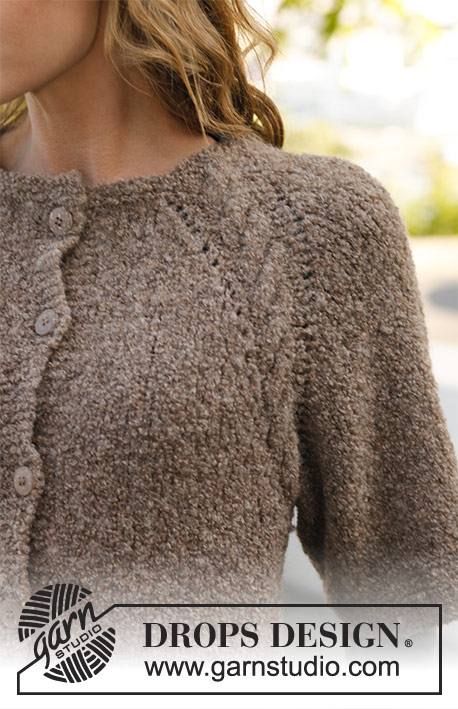
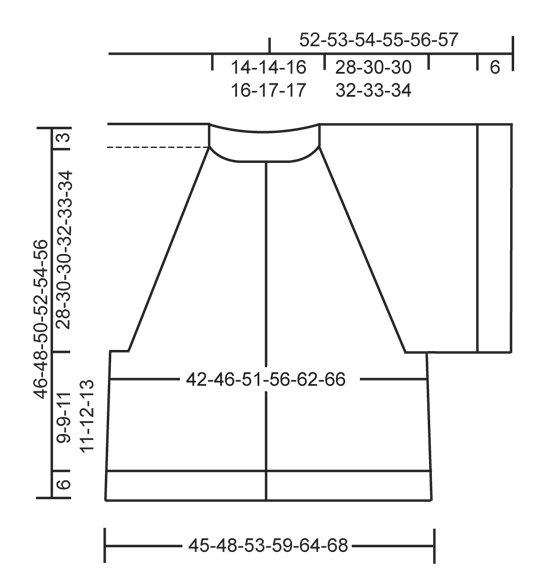
Giacca DROPS ai ferri, con raglan e maniche a ¾ in "Alpaca Bouclé", lavorata dall’alto verso il basso. Taglie: Dalla S alla XXXL.
DROPS 142-26 |
|||||||||||||
|
PUNTO LEGACCIO (avanti e indietro sui ferri): Lavorare tutti i ferri a dir. 1 “costa” a legaccio = 2 ferri a dir. PUNTO LEGACCIO (in tondo, sui ferri circolari): Lavorare * 1 giro a dir e 1 giro a rov *, ripetere da *-*. ASOLE: Intrecciare le m per le asole sul bordo davanti destro. 1 asola = lavorare insieme a dir la 3° e la 4° m dal bordo e fare 1 m gettata. Intrecciare le m per le asole quando il lavoro misura (i cm fanno riferimento all’altezza totale - misurare dal collo verso il basso): TAGLIA S: 2, 11, 21, 30 e 40 cm TAGLIA M: 2, 12, 22, 32 e 42 cm TAGLIA L: 2, 12, 23, 33 e 44 cm TAGLIA XL: 2, 10, 19, 28, 37 e 46 cm. TAGLIA XXL: 2, 12, 21, 30, 39 e 48 cm. TAGLIA XXXL: 2, 12, 21, 31, 40 e 50 cm. MOTIVO: Vedere i diagramma A.1 e A.2. I diagrammi mostrano il motivo sul diritto del lavoro. RAGLAN: Iniziare 6 m prima del segno: fare 2 m gettate sul ferro, lavorare seguendo il diagramma A.1/A.2 (il segno si trova al centro della ripetizione), fare 2 m gettate. Al ferro successivo, far scivolare dal ferro una delle 2 m gettate prima e dopo il diagramma A.1 / A.2 e lavorare l’altra m gettata a maglia rasata (quindi rov sul rovescio del lavoro). SUGGERIMENTO PER GLI AUMENTI (per il davanti & dietro): Aumentare 1 m facendo 1 m gettata; al ferro successivo, lavorare la m gettata ritorta per evitare che si formi un buco. -------------------------------------------------------- GIACCA: Si lavora avanti e indietro sui ferri circolari, dal collo verso il basso. SPRONE: Avviare 72-72-76-76-83-83 m LENTE (comprese 6 m da ciascun lato, per i bordi davanti) sui ferri circolari n° 4,5 con il filato Alpaca Bouclé. Lavorare 6 ferri a PUNTO LEGACCIO - vedere le spiegazioni sopra (1° ferro = diritto del lavoro). Proseguire con i ferri circolari n° 5 e lavorare a maglia rasata; ALLO STESSO TEMPO, lavorare un'alzata sul dietro, per il collo, come segue (1° ferro = diritto del lavoro): lavorare finché non rimangono 16-16-18-18-19-19 m, girare, stringere il filo e lavorare finché non rimangono 16-16-18-18-19-19 m dall'altra parte, girare, stringere il filo e lavorare finché non rimangono 22-22-24-24-26-26 m, girare, stringere il filo e lavorare finché non rimangono 22-22-24-24-26-26 m dall'altra parte, girare, stringere il filo e lavorare finché non rimangono 28-28-30-30-33-33 m, girare, stringere il filo e lavorare finché non rimangono 28-28-30-30-33-33 m dall'altra parte, girare, stringere il filo e lavorare le rimanenti m sul ferro. Inserire ora 4 segni nel lavoro per il raglan, come segue (inserire i segni nel lavoro senza lavorare le m): inserire il primo segno dopo 16-16-17-17-19-19 m (= davanti), inserire il 2à segno dopo 10-10-10-10-10-10 m (= manica), inserire il 3° segno dopo 20-20-22-22-25-25 m (= dietro) e inserire il 4° segno dopo 10-10-10-10-10-10 m (= manica). Dopo l'ultimo segno ci sono 16-16-17-17-19-19 m per il davanti. LEGGERE TUTTE LE INDICAZIONI SUCCESSIVE PRIMA DI PROSEGUIRE: Lavorare 1 ferro a rov sul rovescio del lavoro (lavorare le m dei bordi davanti a punto legaccio). ALLO STESSO TEMPO, aumentare 2 m da ciascun lato dei 4 segni lavorando 2 m in ognuna delle 2 m da ciascun lato dei 4 segni (= vengono aumentate 16 m) = 88-88-92-92-99-99 m. Lavorare a maglia rasata con 6 m da ciascun lato per i bordi davanti a punto legaccio (1° ferro = diritto del lavoro) - ALLO STESSO TEMPO lavorare una treccia seguendo il diagramma A.1 in corrispondenza del primo e del 3° segno e una treccia seguendo il diagramma A.2 in corrispondenza del 2° e del 4° segno (i segni si trovano al centro di ogni treccia) - Ricordarsi le ASOLE sul bordo davanti destro - vedere le spiegazioni sopra. ALLO STESSO TEMPO, durante il primo ferro sul diritto del lavoro, iniziare ad aumentare per il RAGLAN - vedere le spiegazioni sopra. ATTENZIONE: gli aumenti per il davanti / dietro e le maniche sono diversi. RICORDARSI LA TENSIONE DEL LAVORO! AUMENTARE COME SEGUE PER LE MANICHE: Iniziare al 1° ferro sul diritto del lavoro e aumentare ogni 2 ferri (quindi aumentare ad ogni ferro sul diritto del lavoro) per un totale di 31-33-34-36-37-38 volte. AUMENTARE COME SEGUE PER IL DAVANTI / DIETRO: Iniziare al 1° ferro sul diritto del lavoro e aumentare ogni 2 ferri (quindi aumentare ad ogni ferro sul diritto del lavoro) per un totale di 13-17-22-28-33-38 volte e poi ogni 4 ferri (quindi ogni 2 ferri sul diritto del lavoro) per un totale di 9-8-6-4-2-0 volte = 300-320-340-364-387-403 m. Gli aumenti per il raglan sono ora terminati. Lavorare 1 ferro sul rovescio del lavoro come prima. Lavorare ora un ferro sul diritto del lavoro come prima e, ALLO STESSO TEMPO, lavorare le m della treccia del diagramma A.1 insieme a 2 a 2 a dir, e lavorare le m della treccia del diagramma A.2 insieme a 2 a 2 a dir ritorto (vengono diminuite 4 m per ogni treccia) = sul ferro rimangono 284-304-324-348-371-387 m. Lavorare il ferro successivo sul rovescio del lavoro, come segue: lavorare fino al primo segno, mettere in attesa su un ferma maglie le 72-76-78-82-84-86 m tra il 1° e il 2° segno per la manica, avviare 8-8-8-10-10-10 nuove m sopra il ferma maglie, lavorare fino al 3° segno, mettere in attesa su un ferma maglie le 72-76-78-82-84-86 m tra il 3° e il 4° segno per la manica, avviare 8-8-8-10-10-10 nuove m sopra il ferma maglie e lavorare le rimanenti m = sul ferro ci sono 156-168-184-204-223-235 m. DAVANTI & DIETRO: DA ADESSO IN AVANTI MISURARE IL LAVORO DA QUESTO PUNTO! Proseguire avanti e indietro a maglia rasata con 6 m a punto legaccio, da ciascun lato per i bordi davanti. ALLO STESSO TEMPO, inserire 1 segno al centro delle 8-8-8-10-10-10 nuove m da ciascun lato. Quando il lavoro misura 4-4-5-5-5-6 cm, aumentare 1 m da ciascun lato di ognuno dei 2 segni - vedere il SUGGERIMENTO PER GLI AUMENTI (= sono state aumentate 4 m). Ripetere questi aumenti quando il lavoro misura 8-8-10-10-11-12 cm = 164-176-192-212-231-243 m. Proseguire finché il lavoro non misura 9-9-11-11-12-13 cm (il lavoro misura ca. 40-42-44-46-48-50 cm dalla spalla verso il basso). Proseguire con i ferri circolari n° 4,5 e lavorare a punto legaccio, avanti e indietro, per 6 cm; intrecciare poi le m senza STRINGERE TROPPO IL FILO. Il lavoro misura ca. 46-48-50-52-54-56 cm dalla spalla verso il basso. MANICHE: Riprendere, sui ferri circolari corti n° 5, le m messe in attesa su uno dei ferma maglie e avviare altre 8-8-8-10-10-10 nuove m per il sotto della manica = 80-84-86-92-94-96 m. DA ADESSO IN AVANTI MISURARE IL LAVORO DA QUESTO PUNTO! Lavorare a maglia rasata in tondo, finché la manica non misura 9-8-8-7-6-6 cm (misure più corte per le taglie grandi perché le spalle sono più larghe e l'arrotondamento della manica è più lungo). Proseguire con i ferri circolari n° 4,5 e lavorare a punto legaccio in tondo per 6 cm; intrecciare poi le m senza STRINGERE TROPPO IL FILO. Lavorare la seconda manica in modo uguale. CONFEZIONE: Cucire le aperture sotto le maniche. Cucire i bottoni. |
|||||||||||||
Spiegazioni del diagramma |
|||||||||||||
|
|||||||||||||
 |
|||||||||||||
 |
|||||||||||||
Avete terminato questo modello?Allora taggate le vostre foto con #dropspattern #parisweekendcardigan o inviatele alla #dropsfan gallery. Avete bisogno di aiuto con questo modello?Troverete 17 video tutorial, una sezione per i commenti/domande e molto altro guardando il modello su www.garnstudio.com © 1982-2026 DROPS Design A/S. Ci riserviamo tutti i diritti. Questo documento, compreso tutte le sue sotto-sezioni, è protetto dalle leggi sul copyright. Potete leggere quello che potete fare con i nostri modelli alla fine di ogni modello sul nostro sito. |
|||||||||||||


Con oltre 40 anni di esperienza nel design di modelli di maglia e uncinetto, DROPS Design offre la più estesa collezione di modelli gratuiti su internet - tradotti in 17 lingue. Ad oggi vi possiamo fornire 324 cataloghi e 12290 modelli - 9561 dei quali sono tradotti in Italiano.
Ci stiamo impegnando molto per darvi il meglio che vi possiamo offrire in termini di maglia e uncinetto, ispirazioni e consigli così come filati di grande qualità ad un prezzo incredibile! Volete utilizzare i nostri modelli per qualcosa d'altro oltre al vostro uso personale? Potete leggere tutto ciò che è consentito nel testo sul Copyright in basso su tutte le pagine dei nostri modelli. Buon lavoro!
Lasciare un commento sul modello DROPS 142-26
Noi saremmo felici di ricevere i tuoi commenti e opinioni su questo modello!
Se vuoi fare una domanda, fai per favore attenzione a selezionare la categoria corretta nella casella qui sotto per velocizzare il processo di risposta. I campi richiesti sono indicati da *.