
Categorie popolari
State cercando un filato?


Commenti / Domande (53)
![]() Karin ha scritto:
Karin ha scritto:
Kann mir bitte jemand sagen wo das Muster anfängt?
20.07.2024 - 16:03DROPS Design ha risposto:
Liebe Karin, das Muster M1 beginnt an der Passe, d.h., wenn Sie alle Maschen zusammen auf die Rundnadel genommen haben. Beachten Sie, dass Sie das richtige Diagramm M1 für Ihre gewünschte Größe auswählen und mit der richtigen Runde beginnen (Pfeil im Diagramm). Die Runde beginnt an der hinteren Mitte, die Sie sich am besten markieren, dort beginnt dann der erste Mustersatz des Musters. Viel Spaß beim Stricken!
23.07.2024 - 00:06
![]() Eugenia ha scritto:
Eugenia ha scritto:
Buona sera sono principalmente su questo modello non capisco quanto inizia il motivo spero di essermi spiegata buona serata e complimenti
03.07.2024 - 21:58DROPS Design ha risposto:
Buonasera Eugenia, il diagramma inizia sullo sprone. Buon lavoro!
06.07.2024 - 14:55
![]() Hélène ha scritto:
Hélène ha scritto:
Bonjour, au dernier rang A.2 , je dois augmenter des mailles pour la taille 3/4 ans. Est-ce que je tiens compte de ces jetés pour faire le motif ou je les ignore? Je dois faire 3 mailles naturel et une maille rose foncé et ainsi de suite…
20.04.2024 - 20:42DROPS Design ha risposto:
Bonjour Hélène, je présume qu'il y a erreur sur le modèle, car c'est ici un top pour femme avec diminutions dans A.2, et sans jacquard/couleur. Merci de bien vouloir poser votre question en bas du modèle concerné, nous pourrons alors vérifier ensemble pour vous aider. Merci pour votre compréhension.
22.04.2024 - 08:08
![]() Lisa A Flynn ha scritto:
Lisa A Flynn ha scritto:
I am knitting the large size Mirabell. I started the MI chart at the large size. Had 320 stitches on the needles as instructed. Knitted 3 rounds as indicated in the chart. On the first decrease round, where the small and med start, it says to knit 2 tog, knit 16, then knit 2tog. When I am almost done with the round I am left with 12 stitches. Shouldn't it end with 18 stitches so you knit 16 and end the round with a knit 2tog?
04.04.2024 - 03:01DROPS Design ha risposto:
Dear Lisa, the M.1 stitch is a 20 stitch repeat, which should fiit perfectly into the 320 stitches round, with no stitches left over (16 repeat). It might help, if you put a marker at the beginning of the round and then ater every 20th stitches to mark where a repeat begins and ends. Happy Knitting!
04.04.2024 - 04:20
![]() Elyse Coleman ha scritto:
Elyse Coleman ha scritto:
I see no place in this pattern that says to work the yoke pattern. After knitting the four rows of purl and knit the pattern directs the knitter to switch to larger needle size, continue in stockinette and place markers. I expected to start the yolk chart at that point but it does not say to do so and the stitches on the needle are not multiples of the first row of the chart. After that a series of decreases are given so I would assume the chart should be completed. I look forward to your reply
04.08.2022 - 18:36DROPS Design ha risposto:
Hi Elyse, The top is worked bottom up, so you are starting with purl and knit around the bottom edge, you then work as far as the armholes, work the sleeve edges and finally begin on the yoke. Happy knitting!
05.08.2022 - 07:00
![]() Claudia ha scritto:
Claudia ha scritto:
Die Maschenzahl beim Markierungen setzen stimmt nicht.
11.06.2022 - 20:52
![]() Jensen ha scritto:
Jensen ha scritto:
Jeg synes ikke opskriften angiver, hvor mønsteret skal starte?
13.07.2020 - 15:31DROPS Design ha risposto:
Hei Jensen. Når du har strikket toppen og satt ermkantene inn på samme rundpinne, står det i oppskriften: Omg starter fortsat midt bagpå. Nu strikkes der og tages ind efter M.1 over alle m – start ved pilen for din str. God Fornøyelse!
14.07.2020 - 07:11Anna ha scritto:
Hello: I would like to make this top longer (about 60 cm). Do you have any helpful tips/advice as to adjusting the pattern. My original plan is just do 20 cm instead of 7 at the very beginning befor dec. I plan to use 100% linen yarn for M size. Thank you!
30.04.2018 - 04:50DROPS Design ha risposto:
Dear Anna, we are unfortunately not able to adjust every our patterns to every individual request. For any individual assistance you are welcome to contact your DROPS store, even per mail or telephone, or any knitting forum. Happy knitting!
30.04.2018 - 11:06
![]() Hilde A. Simmack ha scritto:
Hilde A. Simmack ha scritto:
Nydelig genser. Strikket den i Belle. Strikker i str. XL og måtte legge til 10 m ekstra på ermkanten for at armene ikke skulle bli for stramme. Feller av 10 i hver ende i steden for 5.
18.01.2017 - 09:13
![]() Justyna ha scritto:
Justyna ha scritto:
Gdzie na stronie mogę znaleźć tabelkę rozmiarów? Bo nie wiem, jaki rozmiar odpowiada jakim wymiarom...
01.06.2016 - 11:47DROPS Design ha risposto:
Proszę spojrzeć na link: https://www.garnstudio.com/lesson.php?id=24&cid=5 Pozdrawiamy!
01.06.2016 - 18:16
|
|||||||||||||
Mirabell#mirabelltop |
|||||||||||||
 |
 |
||||||||||||
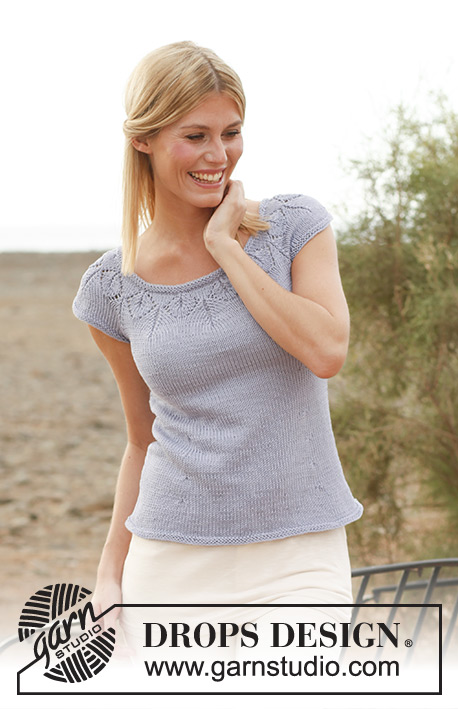
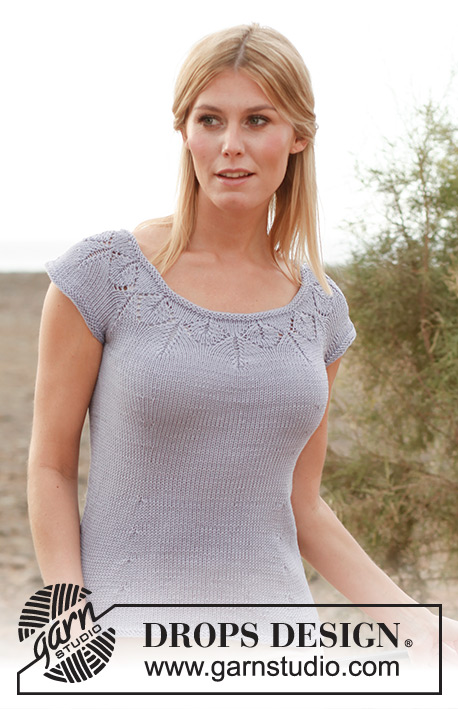
Canotta DROPS con sprone arrotondato e motivo a pizzo in "Muskat". Taglie: dalla S alla XXXL
DROPS 138-3 |
|||||||||||||
|
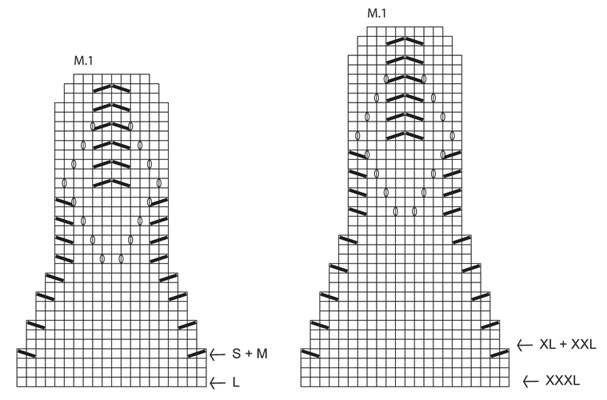
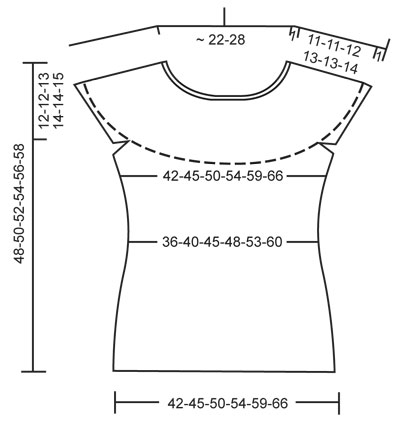
-------------------------------------------------------- MOTIVO: Vedere il diagramma M.1 per la vostra taglia – il diagramma mostra 1 ripetizione del motivo. SUGGERIMENTO PER LE DIMINUZIONI: Diminuire come segue a ogni segnapunti: lavorare fino a quando rimangono 2 m. prima del segnapunti, passare 1 m. a dir., 1 dir., accavallare la m. passata sopra quella appena lavorata, segnapunti, lavorare 2 m. insieme a dir. SUGGERIMENTO PER GLI AUMENTI: Aumentare come segue a ogni segnapunti: lavorare fino a quando rimane 1 m. prima del segnapunti, fare un gettato, lavorare 2 m. e fare 1 altro gettato. Sul giro successivo lavorare il gettato a dir. ritorto per evitare buchi. -------------------------------------------------------- CANOTTA: Lavorata in tondo con i ferri circolari. Il giro inizia al centro dietro. Con i ferri circolari misura 3 mm e il filato Muskat avviare SENZA STRINGERE 176-190-212-226-248-276 m. Lavorare 1 giro a rov., 1 giro a dir., 1 giro a rov. e 1 giro a dir. Passare ai ferri circolari misura 4 mm e continuare a m. rasata – ALLO STESSO TEMPO (sul primo giro) inserire 4 segnapunti nel lavoro come segue: lavorare 22-24-27-29-31-35 m., inserire un segnapunti, lavorare 44-48-52-56-62-68 m., inserire un segnapunti, lavorare 44-47-54-57-62-70 m. (= centro davanti), inserire un segnapunti, lavorare 44-48-52-56-62-68 m., inserire un segnapunti, lavorare il resto del giro (= 22-23-27-28-31-35 m.) FARE ATTENZIONE ALLA TENSIONE DEL LAVORO! Quando il lavoro misura 7 cm, diminuire 1 m. a ogni lato dei 4 segnapunti – LEGGERE IL SUGGERIMENTO PER LE DIMINUZIONI! Ripetere le diminuzioni ogni 10 giri per un totale di 3 volte = 152-166-188-202-224-252 m. sul ferro. Quando il lavoro misura 24 cm, aumentare 1 m. a ogni lato dei 4 segnapunti – LEGGERE IL SUGGERIMENTO PER GLI AUMENTI! Ripetere gli aumenti ogni 10 giri per un totale di 3 volte = 176-190-212-226-248-276 m. Quando il lavoro misura 36-38-39-40-42-43 cm, lavorare il giro successivo come segue: lavorare 40-44-49-52-57-64 m. (= metà del dietro), intrecciare 8-8-8-10-10-10 m. per lo scalfo, lavorare 80-87-98-103-114-128 m. (= davanti), intrecciare 8-8-8-10-10-10 m. per lo scalfo e lavorare 40-43-49-51-57-64 m. (= metà del dietro). Mettere il lavoro da parte e lavorare i bordi delle maniche. BORDI DELLE MANICHE: Lavorati avanti e indietro sui ferri circolari. Con i ferri circolari 3 mm e il filato Muskat avviare 62-65-65-72-72-76 m. Lavorare 3 f. a dir. avanti e indietro (1° f. = rovescio del lavoro). Lavorare il f. successivo come segue: intrecciare le prime 4-4-4-5-5-5 m., lavorare a dir. le 54-57-57-62-62-66 m. successive e ALLO STESSO TEMPO distribuire 6-6-5-5-4-4 aumenti in modo uniforme (aumentare lavorando 2 m. in 1 m.), intrecciare le ultime 4-4-4-5-5-5 m., tagliare il filo = 60-63-62-67-66-70 m. Mettere il lavoro da parte e lavorare l’altro bordo. SPRONE: Trasferire i bordi della manica sullo stesso ferro circolare del corpo dove sono stati intrecciati gli scalfi = 280-300-320-340-360-396 m. Ogni giro inizia ancora al centro dietro. Continuare a lavorare e diminuire secondo il diagramma M.1 su tutte le m. – iniziare a livello della freccia per la vostra taglia. Alla fine del diagramma M.1, ci sono 112-120-128-136-144-144 m. sul ferro. Passare ai ferri circolari misura 3 mm. Lavorare 1 giro a rov., 1 giro a dir. e 1 giro a rov. prima di intrecciare senza stringere a dir. L’intera canotta misura circa 48-50-52-54-56-58 cm. CONFEZIONE: Cucire i margini delle maniche bordo a bordo nel filo davanti della m. più esterna. Cucire le aperture sotto le maniche. |
|||||||||||||
Spiegazioni del diagramma |
|||||||||||||
|
|||||||||||||
 |
|||||||||||||
 |
|||||||||||||
Avete terminato questo modello?Allora taggate le vostre foto con #dropspattern #mirabelltop o inviatele alla #dropsfan gallery. Avete bisogno di aiuto con questo modello?Troverete 12 video tutorial, una sezione per i commenti/domande e molto altro guardando il modello su www.garnstudio.com © 1982-2026 DROPS Design A/S. Ci riserviamo tutti i diritti. Questo documento, compreso tutte le sue sotto-sezioni, è protetto dalle leggi sul copyright. Potete leggere quello che potete fare con i nostri modelli alla fine di ogni modello sul nostro sito. |
|||||||||||||


Con oltre 40 anni di esperienza nel design di modelli di maglia e uncinetto, DROPS Design offre la più estesa collezione di modelli gratuiti su internet - tradotti in 17 lingue. Ad oggi vi possiamo fornire 325 cataloghi e 12298 modelli - 9569 dei quali sono tradotti in Italiano.
Ci stiamo impegnando molto per darvi il meglio che vi possiamo offrire in termini di maglia e uncinetto, ispirazioni e consigli così come filati di grande qualità ad un prezzo incredibile! Volete utilizzare i nostri modelli per qualcosa d'altro oltre al vostro uso personale? Potete leggere tutto ciò che è consentito nel testo sul Copyright in basso su tutte le pagine dei nostri modelli. Buon lavoro!
Lasciare un commento sul modello DROPS 138-3
Noi saremmo felici di ricevere i tuoi commenti e opinioni su questo modello!
Se vuoi fare una domanda, fai per favore attenzione a selezionare la categoria corretta nella casella qui sotto per velocizzare il processo di risposta. I campi richiesti sono indicati da *.