DROPS Muskat
DROPS Muskat
100% Cotton
from 11.00 RON /50g
Get the yarn to make this pattern from 66.00RON.

The yarn cost is calculated from the pattern’s smallest size and the yarn’s cheapest product type. Looking for an even better price? You might find it on the DROPS Deals!

DROPS SS24

Mirabell

Knitted DROPS top with round yoke and lace pattern in ”Muskat”. Size: S - XXXL

DROPS 138-3
DROPS design: Pattern no R-604
Yarn group B
--------------------------------------------------------
Size: S - M - L - XL - XXL - XXXL

Materials: DROPS MUSKAT from Garnstudio
300-350-350-400-450-500 g colour no 01, light blue purple

DROPS CIRCULAR NEEDLE (80 cm) SIZE 4 mm - or size needed to get 21 sts x 28 rows in stocking st = 10 x 10 cm.
DROPS CIRCULAR NEEDLE (40 and 80 cm) SIZE 3 mm - for edges in garter st.

-------------------------------------------------------

Alternative Yarn – See how to change yarns here
Yarn Groups A to F – Use the same pattern and change the yarn here
Yarn usage using an alternative yarn – Use our yarn converter here

-------------------------------------------------------

DROPS Muskat
DROPS Muskat
100% Cotton
from 11.00 RON /50g
Get the yarn to make this pattern from 66.00RON.

The yarn cost is calculated from the pattern’s smallest size and the yarn’s cheapest product type. Looking for an even better price? You might find it on the DROPS Deals!

Pattern instructions

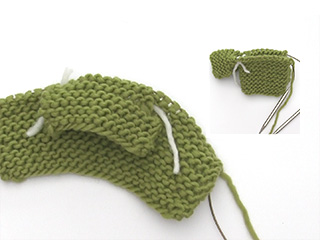
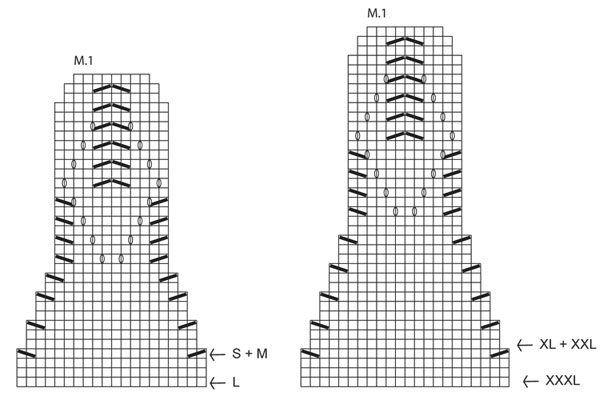
PATTERN:
See diagram M.1 for your size – the diagram shows 1 repetition of the pattern.
DECREASE TIP:
Dec as follows at every marker: Work until 2 sts remain before marker, slip 1 st as if to K, K 1, psso, marker, K 2 tog.
INCREASE TIP:
Inc as follows at every marker: Work until 1 st remains before marker, make 1 YO, work 2 sts and make 1 more YO. On next round K YOs twisted to avoid holes.
--------------------------------------------------------

TOP:
Worked in the round on circular needle. Rounds start mid back.
LOOSELY cast on 176-190-212-226-248-276 sts on circular needle size 3 mm with Muskat. P 1 round, K 1 round, P 1 round and K 1 round. Switch to circular needle size 4 mm and continue in stocking st – AT THE SAME TIME (on 1st round) insert 4 markers in the piece as follows: Work 22-24-27-29-31-35 sts, insert a marker, work 44-48-52-56-62-68 sts, insert a marker, work 44-47-54-57-62-70 sts (= mid front), insert a marker, work 44-48-52-56-62-68 sts, insert a marker, work the rest of round (= 22-23-27-28-31-35 sts) REMEMBER THE KNITTING TENSION!
When piece measures 7 cm, dec 1 st on each side of the 4 markers - READ DECREASE TIP! Repeat dec on every 10th round a total of 3 times = 152-166-188-202-224-252 sts on needle. When piece measures 24 cm, inc 1 st on each side of the 4 markers - READ INCREASE TIP! Repeat inc on every 10th round a total of 3 times = 176-190-212-226-248-276 sts. When piece measures 36-38-39-40-42-43 cm, work next round as follows: Work 40-44-49-52-57-64 sts (= half the back piece), cast off 8-8-8-10-10-10 sts for armhole, work 80-87-98-103-114-128 sts (= front piece), cast off 8-8-8-10-10-10 sts for armhole and work 40-43-49-51-57-64 sts (= half the back piece). Put piece aside and work the sleeve edges.

SLEEVE EDGE:
Worked back and forth on circular needle.
Cast on 62-65-65-72-72-76 sts on circular needle size 3 mm with Muskat. K 3 rows back and forth (1st row = WS). Work next row as follows: Cast off the first 4-4-4-5-5-5 sts, K the next 54-57-57-62-62-66 sts while AT THE SAME TIME inc 6-6-5-5-4-4 sts evenly (inc by working 2 sts in 1 st), cast off the last 4-4-4-5-5-5 sts, cut the thread = 60-63-62-67-66-70 sts. Put piece aside and knit another sleeve edge.

YOKE:
Slip sleeve edges on to same circular needle as body where armholes were cast off = 280-300-320-340-360-396 sts. Every round still starts mid back.
Continue to work and dec according to diagram M.1 over all sts – beg at the arrow for your size. When diagram M.1 has been worked, there are 112-120-128-136-144-144 sts on needle.
Switch to circular needle size 3 mm. P 1 round, K 1 round and P 1 round before loosely casting off with K.
The entire top measures approx. 48-50-52-54-56-58 cm.

ASSEMBLY:
Sew sleeve seams tog edge to edge in front loop of outermost sts. Sew the openings under the sleeves.

Diagram

symbols = K
symbols = 1 YO between 2 sts
symbols = K 2 tog
symbols = slip 1 st as if to K, K 1, psso
diagram
diagram
Do you have a question? See a list of frequently asked questions (FAQ)

Knitting tension is what determines the final measurements of your work, and is usually measured per 10 x 10 cm. It is provided like so: number of stitches in width x number of rows in height - eg: 19 stitches x 26 rows = 10 x 10 cm.

The knitting tension is very individual; some people knit/crochet loosely while others work tightly. You adjust the knitting tension with the needle size, which is why the suggested needle size is only meant as a guide! You need to adjust this (up or down) to ensure that YOUR knitting tension matches the knitting tension provided in the pattern. If you work with a different knitting tension than provided you will have a different yarn consumption, and your work will have different measurements than what the pattern suggests.

The knitting tension also determines which yarns can replace each other. As long as you achieve the same knitting tension you can replace one yarn with another.

See DROPS lesson: How to measure your tension/gauge

See DROPS video: How to make a gauge tension swatch

The required amount of yarn is provided in grams, eg: 450 g. To calculate how many balls you’ll need you first need to know how many grams are in 1 ball (25g, 50g or 100g). This information is available if you click on the individual yarn quality on our pages. Divide the amount required with the amount of each ball. For example, if each ball is 50g (the most common amount), the calculation will be as follows: 450 / 50 = 9 balls.

The important thing when changing from one yarn to another is that the knitting/crochet tension remains the same. This is so that the measurements of the finished piece will be the same as on the sketch provided. It is easier to achieve the same knitting tension using yarns from the same yarn group. It is also possible to work with multiple strands of a thinner yarn to achieve the knitting tension of a thicker one. Please try our yarn converter. We recommend you to always work a test swatch.

Please NOTE: when changing yarn the garment might have a different look and feel to the garment in the photo, due to individual properties and qualities of each yarn.

See DROPS lesson: Can I use a different yarn than the one mentioned in the pattern?

All our yarns are categorised into yarn groups (from A to F) according to thickness and knitting tension – group A contains the thinnest yarns and group F the thickest. This makes it easier for you to find alternative yarns to our patterns, should you wish to switch yarn. All yarns within the same group have a similar knitting tension and can easily replace each other. However, different yarn qualities have different structures and properties which will give the finished work a unique look and feel.

Click here for an overview of the yarns in each yarn group

At the top of all our patterns you’ll find a link to our yarn calculator, which is a helpful tool should you wish to use a different yarn than suggested. By filling in the yarn quality you wish to replace, the amount (in your size) and number of strands, the calculator will present good alternative yarns with the same knitting tension. Additionally it will tell you how much you’ll require in the new qualities and whether you’ll need to work with multiple strands. Most skeins are 50g (some are 25g or 100g).

If the pattern is worked with multiple colours, every colour will have to be calculated separately. Similarly, if the pattern is worked with several strands of different yarns (for example 1 strand Alpaca and 1 strand Kid-Silk) you will have to find alternatives for each, individually.

Click here to see our yarn calculator

Since different yarns have different qualities and textures we have chosen to keep the original yarn in our patterns. However, you can easily find options among our available qualities by using our yarn calculator, or simply pick a yarn from the same yarn group.

It is possible that some retailers still have discontinued yarns in stock, or that someone has a few skeins at home that they would like to find patterns for.

The yarn calculator will provide both alternative yarn as well as required amount in the new quality.

If you think it's hard to decide what size to make, it can be a good idea to measure a garment you own already and like the size of. Then you can pick the size by comparing those measures with the ones available in the pattern's size chart.

You'll find the size chart at the bottom of the pattern.

See DROPS lesson: How to read size chart

The needle size provided in the pattern serves only as a guide, the important thing is to follow the knitting tension. And since knitting tension is very individual, you will have to adjust the needle size to ensure that YOUR tension is the same as in the pattern – maybe you’ll have to adjust 1, or even 2 needle sizes, up or down to achieve the correct tension. For this, we recommend that you work test swatches.

Should you work with a different knitting tension than the one provided, the measurements of the finished garment might deviate from the measurement sketch.

See DROPS lesson: How to measure your tension/gauge

See DROPS video: How to make a tension/gauge swatch

Working a garment top-down provides more flexibility and room for personal adjustment. For example it is easier to try the garment on while working, as well as making adjustments to length of yoke and shoulder caps.

The instructions are carefully explaining every step, in the correct order. Diagrams are adjusted to the knitting direction and are worked as usual.

The diagram depicts all rows/rounds, and every stitch seen from the right side. It is read from bottom to top, from right to left. 1 square = 1 stitch.

When working back and forth, every other row is worked from the right side and every other row is worked from the wrong side. When working from the wrong side, the diagram will have to be worked reversed: from left to right, knit stitches are purled, purl stitches are knit etc.

When working in the round every round is worked from the right side and the diagram are worked from right to left on all rounds.

See DROPS lesson: How to read knitting diagrams

The diagram depicts all rows/rounds, and every stitch seen from the right side. It is worked from bottom to top, from right to left.

When working back and forth every other row is worked from the right side: from right to left and every other row is worked from the wrong side: from left to right.

When working in the round, every row in the diagram are worked from the right side, from right to left.

When working a circular diagram you start in the middle and work your way outwards, counter clockwise, row by row.

The rows usually start with a given number of chain stitches (equivalent to the height of the following stitch), this will either be depicted in the diagram or explained in the pattern.

See DROPS lesson: How to read crochet diagrams

Instructions for working several diagrams after each other on the same row/round, will often be written like so: “work A.1, A.2, A.3 a total of 0-0-2-3-4 times". This means you work A.1 once, then A.2 is worked once, and A.3 is repeated (in width) the number of times provided for your size – in this case like so: S = 0 times, M = 0 times, L=2 times, XL= 3 times and XXL = 4 times.

The diagrams are worked as usual: begin with the first row in A.1, then work the first row in A.2 etc.

See DROPS lesson: How to read knitting diagrams

See DROPS lesson: How to read crochet diagrams

The total width of the garment (from wrist-to-wrist) will be larger in the larger sizes, despite the actual sleeves being shorter. The larger sizes have longer sleeve caps and wider shoulders, so there will be a good fit in all sizes.

The measurement sketch/schematic drawing provides information regarding the full length of the garment. If it’s a jumper or a jacket the length is measured from the highest point on the shoulder closest to the neckline, and straight down to the bottom of the garment. It is NOT measured from the tip of shoulder. Similarly, the length of yoke is measured from the highest point on the shoulder and down to where yoke is split into body and sleeves.

On a jacket measures are never taken along bands, unless specifically stated. Always measure inside band stitches when measuring the length.

See DROPS lesson: How to read a schematic drawing

Diagrams are often repeated on the round or in height. 1 repeat is the diagram the way it appears in the pattern. If it says to work 5 repeats of A.1 in the round, then you work A.1 a total of 5 times after/next to each other in the round. If it says to work 2 repeats of A.1 vertically/in height you work the entire diagram once, then begin again at the start and work the entire diagram one more time.

Chain stitches are slightly narrower than other stitches and to avoid working the cast-on edge too tight, we simply chain more stitches to begin with. The stitch count will be adjusted on the following row to fit the pattern and measurement sketch.

The rib edge is more elastic and will contract slightly compared to, for example, stocking stitch. By increasing before the rib edge, you avoid a visible difference in width between the rib edge and the rest of the body.

It’s very easy to cast off too tightly, and by making yarn overs while casting off (and simultaneously casting these off) you avoid a too tight cast off edge.

See DROPS video: How to bind off with yarn overs (yo)

To achieve an even increase (or decrease) you can increase on, for example: every 3rd and 4th row alternately, like so: work 2 rows and increase on the 3rd row, work 3 rows and increase on the 4th. Repeat this until the increase is complete.

See DROPS lesson: Increase or decrease 1 st on every 3rd and 4th row alternately

Should you prefer to work in the round instead of back and forth, you may of course adjust the pattern. You’ll need to add steeks mid-front (usually 5 stitches), and follow the instructions. When you would normally turn and work from the wrong side, simply work across the steek and continue in the round. At the end you’ll cut the piece open, pick up stitches to work bands, and cover the cut edges.

See DROPS video: How to knit steeks and cut open

Should you prefer to work back and forth instead of in the round, you may of course adjust the pattern so you work the pieces separately and then assemble them at the end. Divide the stitches for the body in 2, add 1 edge stitch in each side (for sewing) and work the front and back pieces separately.

See DROPS lesson: Can I adapt a pattern for circular needles into straight needles?

Pattern repeats can vary slightly in the different sizes, in order to get the correct proportions. If you’re not working the exact same size as the garment in the photo, yours might deviate slightly. This has been carefully developed and adjusted so that the complete impression of the garment is the same in all sizes.

Make sure to follow instructions and diagrams for your size!

If you have found a pattern you like which is available in women’s size it’s not very difficult to convert it to men’s size. The biggest difference will be the length of sleeves and body. Start working on the women size that you think would fit across the chest. The additional length will be worked right before you cast off for the armhole/sleeve cap. If the pattern is worked top-down you can add the length right after the armhole or before the first decrease on sleeve.

Regarding additional yarn amount, this will depend on how much length you add, but it is better with a skein too many than too few.

All yarns will have excess fibres (from production) that might come off as lint or shedding. Brushed yarns (ie hairier yarns) have more of these loose, excess fibres, causing more shedding.

Shedding also depends on what is worn under or over the garment, and whether this pulls at the yarn fibres. It’s therefore not possible to guarantee that there will be no shedding

Below are some tips on how to get the best result when working with hairier yarns:

1. When the garment is finished (before you wash it) shake it vigorously so the looser hairs come off. NOTE: do NOT use a lint roller, brush or any method that pulls at the yarn.

2. Place the garment in a plastic bag and put it in your freezer - the temperature will cause the fibres to become less attached to each other, and excess fibres will come off easier.

3. Leave in the freezer for a few hours before taking it out and shaking it again.

4. Wash the garment according to the instructions on the yarn label.

Pilling is a natural process that happens to even the most exclusive of fibers. It's a natural sign of wear and tear that is hard to avoid, and that is most visible in high friction areas of your garment like a sweater's arms and cuffs.

You can make your garment look as new by removing the pilling, using a fabric comb or a pill/lint remover.

Still can't find the answer you need? Then scroll down and leave your question so one of our experts can try to help you. This will be done normally within 5 to 10 working days.
In the meantime, you can read the questions and answers that others have left to this pattern or join the DROPS Workshop on Facebook to get help from fellow knitters/crocheters!

Mirabell

Camille, France

T-Shirt

Anna, Australia

Post a comment to pattern DROPS 138-3

We would love to hear what you have to say about this pattern!

If you want to leave a question, please make sure you select the correct category in the form below, to speed up the answering process. Required fields are marked *.

Comments / Questions (51)

country flag Lisa A Flynn wrote:

I am knitting the large size Mirabell. I started the MI chart at the large size. Had 320 stitches on the needles as instructed. Knitted 3 rounds as indicated in the chart. On the first decrease round, where the small and med start, it says to knit 2 tog, knit 16, then knit 2tog. When I am almost done with the round I am left with 12 stitches. Shouldn't it end with 18 stitches so you knit 16 and end the round with a knit 2tog?

04.04.2024 - 03:01

DROPS Design answered:

Dear Lisa, the M.1 stitch is a 20 stitch repeat, which should fiit perfectly into the 320 stitches round, with no stitches left over (16 repeat). It might help, if you put a marker at the beginning of the round and then ater every 20th stitches to mark where a repeat begins and ends. Happy Knitting!

04.04.2024 - 04:20

country flag Elyse Coleman wrote:

I see no place in this pattern that says to work the yoke pattern. After knitting the four rows of purl and knit the pattern directs the knitter to switch to larger needle size, continue in stockinette and place markers. I expected to start the yolk chart at that point but it does not say to do so and the stitches on the needle are not multiples of the first row of the chart. After that a series of decreases are given so I would assume the chart should be completed. I look forward to your reply

04.08.2022 - 18:36

DROPS Design answered:

Hi Elyse, The top is worked bottom up, so you are starting with purl and knit around the bottom edge, you then work as far as the armholes, work the sleeve edges and finally begin on the yoke. Happy knitting!

05.08.2022 - 07:00

country flag Claudia wrote:

Die Maschenzahl beim Markierungen setzen stimmt nicht.

11.06.2022 - 20:52

country flag Jensen wrote:

Jeg synes ikke opskriften angiver, hvor mønsteret skal starte?

13.07.2020 - 15:31

DROPS Design answered:

Hei Jensen. Når du har strikket toppen og satt ermkantene inn på samme rundpinne, står det i oppskriften: Omg starter fortsat midt bagpå. Nu strikkes der og tages ind efter M.1 over alle m – start ved pilen for din str. God Fornøyelse!

14.07.2020 - 07:11

Anna wrote:

Hello: I would like to make this top longer (about 60 cm). Do you have any helpful tips/advice as to adjusting the pattern. My original plan is just do 20 cm instead of 7 at the very beginning befor dec. I plan to use 100% linen yarn for M size. Thank you!

30.04.2018 - 04:50

DROPS Design answered:

Dear Anna, we are unfortunately not able to adjust every our patterns to every individual request. For any individual assistance you are welcome to contact your DROPS store, even per mail or telephone, or any knitting forum. Happy knitting!

30.04.2018 - 11:06

country flag Hilde A. Simmack wrote:

Nydelig genser. Strikket den i Belle. Strikker i str. XL og måtte legge til 10 m ekstra på ermkanten for at armene ikke skulle bli for stramme. Feller av 10 i hver ende i steden for 5.

18.01.2017 - 09:13

country flag Justyna wrote:

Gdzie na stronie mogę znaleźć tabelkę rozmiarów? Bo nie wiem, jaki rozmiar odpowiada jakim wymiarom...

01.06.2016 - 11:47

DROPS Design answered:

Proszę spojrzeć na link: https://www.garnstudio.com/lesson.php?id=24&cid=5 Pozdrawiamy!

01.06.2016 - 18:16

country flag Antonella wrote:

E' normale che il lavoro, che ora è alto circa 20 cm, si arrotoli sul fondo?

26.06.2015 - 16:05

DROPS Design answered:

Buongiorno Antonella, il top è lavorato principalmente a maglia rasata ed è normale che tenda ad arrotolarsi sul fondo; il bordino a maglia legaccio dovrebbe aiutare ad evitarlo, in ogni caso dopo il bloccaggio questo problema dovrebbe sparire. Buon lavoro!

26.06.2015 - 18:22

country flag Antonella wrote:

Lavoro a maglia da molti anni ma uso solo i ferri dritti. Vorrei cimentarmi con i ferri circolari. Secondo voi posso iniziare ad usarli provando con questo modello o è troppo difficile? Eventualmente potreste consigliarmi altri modelli estivi più semplici? Grazie

04.06.2015 - 18:32

DROPS Design answered:

Buongiorno Antonella. Il modello da lei scelto non presenta difficoltà particolari per chi non ha mai lavorato in tondo. Sulla striscia grigia, a destra della fotografia, cliccando sulla voce Video, trova i video che possono aiutarla nella realizzazione del modello. Ci può riscrivere dovesse incontrare delle difficoltà. Buon lavoro!

05.06.2015 - 08:54

country flag Milagros wrote:

Buenas tardes, por favor,¿me podrian decir si este modelo se podria hacer con agujas rectas? Si fuese asi,¿como podria incorporarle las mangas al estar por separado delantero y espalda para hacer el canesu? Muchas gracias por su atencion, reciban un cordial saludo.

11.05.2015 - 19:24

DROPS Design answered:

Hola Milagros, este modelo no se puede trabajar con agujas rectas debido al nº de pts y a que se trabaja en redondo. La única opción alternativa es trabajar con 4 agujas de doble punta.

15.05.2015 - 08:50