
Categorie popolari
State cercando un filato?


Commenti / Domande (73)
![]() Cheryl ha scritto:
Cheryl ha scritto:
How can I create a yarn group D with Brushed Alpaca Silk, which is a yarn group C. Will A+ C = D?
07.11.2025 - 20:09DROPS Design ha risposto:
Hi Cheryl, Yes 1 strand of yarn from group C + 1 strand from group A = same thickness as 1 strand of yarn from group D. Regards, Drops Team.
12.11.2025 - 07:06
![]() Anni Nielsen ha scritto:
Anni Nielsen ha scritto:
Hej igen. Når jeg skal strikke kant, er det så rigtig forstået at jeg skal tage ud (ved at lave omslag) til ca dobbelt antal masker, f.eks. 650 masker for den største størrelse hvor jeg inden kanten slutter med 328 masker ?
28.07.2022 - 18:28DROPS Design ha risposto:
Hej Anni, ja det stemmer, dels bliver omkredsen større og dels bruger snoningerne flere masker samtidigt som det bliver som en smuk flæsekant :)
05.08.2022 - 08:17
![]() Anni Nielsen ha scritto:
Anni Nielsen ha scritto:
Hej. Jeg har delt maskerne (4 x 82) og strikker højre forstykke hvor sidste maske skal sættes på tråden til hhv nakke og midt bagpå, men skalsidste maske strikkes eller flyttes inden . Jeg har prøver begge dele men uanset hvad jeg gør, så bliver den sidste maske meget lang. Håber I kan hjælpe 🤞
04.07.2022 - 17:56DROPS Design ha risposto:
Hej Anni, jo du strikker pinden ud, strikker maskerne som skal sættes på tråden og fortsætter pinden ud i den anden side. Ja de vil blive lidt længere, men stram den første maske efter tråden :)
05.07.2022 - 08:43
![]() Phạm Hoang ha scritto:
Phạm Hoang ha scritto:
Hi, I use 2.5mm needles, i have total 328 sts when it come 23cm. How can i divide for armhole? Please help.
06.12.2021 - 05:35DROPS Design ha risposto:
Dear Mrs Hoang, this pattern has been writtten for a tension of 19 sts x 26 rows stocking stitch = 10 x 10 cm and we are unfortunately not able to adjust each of our pattern to every single request - please contact the store where you bought the yarn for any individual assistance. Thanks for your comprehension. Happy knitting!
06.12.2021 - 09:04
![]() Carrole Lebel ha scritto:
Carrole Lebel ha scritto:
Bonjour. J'ai 2 questions. 1) Lorsque je tricote un tour sans augmentation, (tricoter 30-32-34 m, rabattre 36-40-44 m ) continuer ... tricoter les 30-32-34 dernières ... du tour), est-ce que je le fais alternativement jersey envers et jersey endroit comme au début de l'ouvrage ou jersey endroit sur tout le rang ? 2) Les augmentations (jusqu'à ce que l'ouvrage mesure 25-28-31 cm à partir du centre), se font-elles en vis-èa-vis des jetés ? Merci beaucoup
23.05.2019 - 01:48DROPS Design ha risposto:
Bonjour Mme Lebel, tout à fait, quand vous rabattez les mailles des emmanchures, vous tricotez les mailles comme avant (jersey endroit et jersey envers) pour continuer le même motif qu'avant. Ensuite, vous continuez comme avant de nouveau, comme si vous n'aviez pas rabattu les mailles des emmanchures, vous devez avoir 1 m en plus dans chaque "section" et les jetés doivent continuer comme avant. Bon tricot!
23.05.2019 - 09:35
![]() HUOT-MARCHAND ha scritto:
HUOT-MARCHAND ha scritto:
Bonjour, quel fil utiliser à présent pour réaliser ce modèle ? MERCI Bonne journée
20.05.2018 - 09:50DROPS Design ha risposto:
Bonjour Mme Huot-Marchand, vous pouvez utiliser 2 fils DROPS Kid-Silk ou 1 fil Brushed Alpaca Silk - essayez notre convertisseur en indiquant bien le poids de fil indiqué pour la taille puis "trouver des alternatives". Bon tricot!
22.05.2018 - 08:32
![]() Heather ha scritto:
Heather ha scritto:
The instructions for the right front piece are confusing English -please can you help clarify? Do you continue YO increases every other row when knitting back and forth maintaining pattern of loops in middle and one side of right front piece? Or does "now done" mean finished as in no more increases and you'd start with 66 and finish with 18 stitches if doing small/medium size?
21.02.2017 - 00:33DROPS Design ha risposto:
Dear Heather, when you are working back and forth on right front piece, inc are done, ie you don't work any YOs anymore, just work K over K and P over P while slipping at the same time the last 2-2-1 st on every row on a st holder (= on each side) until there are 12-32-26 sts on a st holder in each side). Happy knitting!
21.02.2017 - 09:48
![]() Heather ha scritto:
Heather ha scritto:
Aha now I understand it is meant to be 8 segments radiating out from the middle of the circle alternating stocking and garter each separated buy the pretty YO loops. It's hard to make out on photo and at first I though was all stocking as wool pale and fluffy, beautiful though. (I need to flip the loops/purl into back of loop to get loophole pattern rather than plain increase whereas the knit YOs make the pattern treated normally)
11.02.2017 - 21:41
![]() Heather ha scritto:
Heather ha scritto:
The pattern is written for the round but to get the effect I think is in the photo it's best to ignore the purls and knit all stitches... at least the way I have been taught! The instructions as written produce 4 segments of half socking and half garter stitch radiating out from the middle with 4 YO loop patterns dividing them and the other YOs are knitted as invisible increases. Is this right or should I knit all and make each YO form pattern radiating out from middle?
11.02.2017 - 17:12DROPS Design ha risposto:
Dear Heather, you should have *1 section in stocking st, 1 section in reversed stocking st* around (total of 8 sections with YOs in between), there are no garter st there. Happy knitting!
13.02.2017 - 10:12
![]() Heather ha scritto:
Heather ha scritto:
Currently making practice circles to make sure I understand the pattern. Please can you help? Should it be 4 YO loop details with the segments between half stocking and half garter in appearance or it be stocking stitch all over with all 8 YO loops making lovely pattern radiating out from the middle?
11.02.2017 - 17:02DROPS Design ha risposto:
Dear Heather, you will have a total of 8 sections with 1 YO in between (from round 3), then work every other section in stocking st, and every other remaining section in reversed stocking st. Happy knitting!
13.02.2017 - 10:11
|
||||||||||
Ocean Waves#oceanwavesbolero |
||||||||||
 |
 |
|||||||||
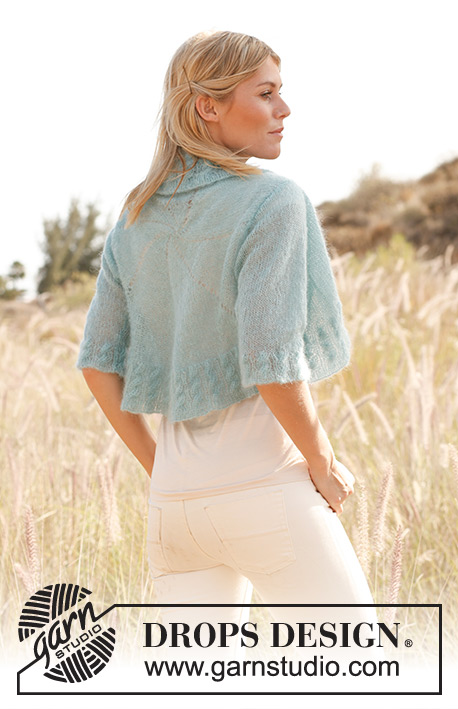
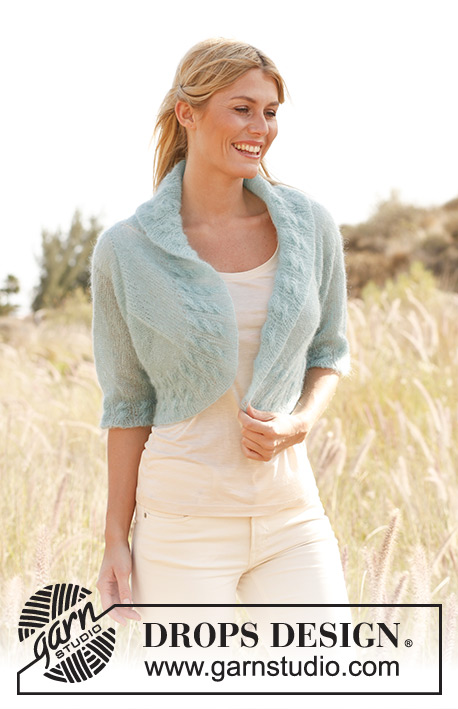
Bolero DROPS, maniche ¾ e bordi a treccia, in "Vivaldi". Dalla S alla XXXL
DROPS 138-24 |
||||||||||
|
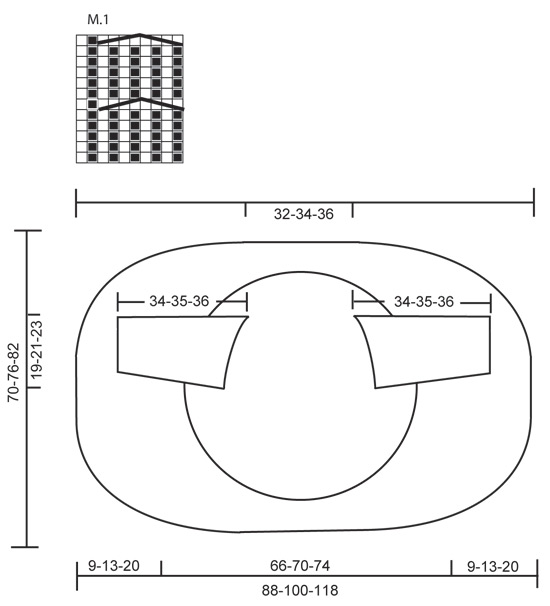
BOLERO: Si lavora in tondo, in forma di cerchio, iniziando in mezzo dietro. Stendere il lavoro su una superficie per fare le misure. Avviare 8 m con il filato Vivaldi e distribuire le m su 4 ferri a doppia punta n° 4 (= 2 m su ogni f). Inserire 1 segnapunti all’inizio del giro = in mezzo dietro lato collo. 1° GIRO: * 1 m dir, 1 gettato, 1 m rov, 1 gettato *, ripetere da *-* 4 volte = 16 m. 2° GIRO: * 2 m dir, 2 m rov *, ripetere da *-* tutto il giro. 3° GIRO: * 2 m dir, 1 gettato, 2 m rov, 1 gettato *, ripetere da *-* tutto il giro = 24 m. 4° GIRO: * 3 m dir, 3 m rov *, ripetere da *-* tutto il giro. 5° GIRO: * 3 m dir, 1 gettato, 3 m rov, 1 gettato *, ripetere da *-* tutto il giro = 32 m. 6° GIRO: * 4 m dir, 4 m rov *, ripetere da *-* tutto il giro. Continuare ad aumentare nello stesso modo ogni 2 giri (= 8 aumenti). Per ogni giro con aumenti, ci sarà 1 m in più tra ogni aumento. Cambiare ferri e continuare con i ferri circolari quando ci sono sufficientemente maglie. RICORDARSI DELLA TENSIONE DELLA MAGLIA! Quando il lavoro misura 19-21-23 cm dal centro (ci sono ora ca 200-224-240 m sul ferro), lavorare il giro seguente così (questo deve essere 1 giro senza aumenti): Lavorare 30-32-34 m, intrecciare 36-40-44 m (= scalfo) lavorare finché non rimangano 66-72-78 m, intrecciare 36-40-44 m (= scalfo), lavorare le ultime 30-32-34 m del giro. Al giro seguente, avviare lo stesso numero di maglie sopra ogni scalfo di quelle che sono state intrecciate + le m da aumentare sopra gli scalfi su questo giro. Continuare a lavorare e ad aumentare come prima finché il lavoro non misuri 25-28-31 cm dal centro (= ca 264-296-328 m sul f). Lavorare il giro seguente così (questo deve essere 1 giro senza aumenti): Passare le ultime 33-37-41 m lavorate in attesa su un fermamaglie/filo, lavorare le prime 33-37-41 m del giro e passare in attesa anche queste m sullo stesso fermamaglie/filo (= lato scollo), lavorare 66-74-82 m e passarle in attesa su un altro fermamaglie/filo (= davanti sinistro), lavorare 66-74-82 m e passarle in attesa su un 3° fermamaglie/filo (= in basso dietro in mezzo), lavorare le ultime 66-74-82 m (= davanti destro). DAVANTI DESTRO: Continuare avanti e indietro sulle 66-74-82 m sul f come prima – NOTA: Gli aumenti sono finiti – ALLO STESSO TEMPO, passare in attesa le ultime 2-2-1 m ad ogni ferro sul fermamaglie/filo del lato scollo e quello del dietro in basso. Fare questo 12-16-26 volte ad ogni lato (= 24-32-26 m ad ogni lato). Alla fine passare le m rimanenti su 1 dei fermamaglie/fili. DAVANTI SINISTRO: Riprendere le 66-74-82 m inattesa dal fermamaglie/filo del lato sinistro sul ferro e lavorare come il lato destro. BORDO: Riprendere tutte le m sui ferri circolari 4. Lavorare 1 giro dir ALLO STESSO TEMPO, fare 1 gettato tra ogni maglia quasi – aggiustare per avere un numero totale di maglie divisibile per 10. Al giro seguente, lavorare a coste 1 m rov / 1 m dir (lavorare i gettati ritorti per evitare buchi nel lavoro, vuol dire puntare il ferro nella maglia posteriore della maglia). Lavorare poi M.1 per 8 cm (fare attenzione che le maglie rov e dir siano allineate con il rov sopra il rov e il dir sopra il dir con le m del 1° giro), continuare con 1 m rov / 1 m dir per 5 giri dopo l’ultima treccia, intrecciare poi con il rov sopra il rov e il dir sopra il dir. MANICHE: Si lavorano in tondo sui ferri a doppia punta (gioco di ferri). Avviare 80-90-100 m con i ferri a doppia punta 4 ed il filato Vivaldi. Inserire 1 segnapunti all’inizio del giro (= in mezzo sotto la manica). Lavorare M.1 1 volta in altezza + i 4 primi giri ancora una volta. Lavorare il giro seguente così: * 1 m dir, 2 m insieme a dir *, ripetere da *-* finché non rimanga(no) 2-0-1 m, lavorare queste m a dir = 54-60-67 m. Continuare a maglia rasata. Quando il lavoro misura 8 cm, aumentare 1 m ad ogni lato del segnapunti sotto la manica. Ripetere questi aumenti ogni 3 cm in totale 6 volte = 66-72-79 m. Quando il lavoro misura 25 cm, intrecciare 6 m in mezzo sotto la manica (= 3 m ad ogni lato del segnapunti) e lavorare avanti e indietro il lavoro fino alla fine. Intrecciare poi all’inizio di ogni ferro ad ogni lato per l’arrotondamento della manica: 2 m 3 volte e 1 m 4-5-6 volte, poi intrecciare 2 m ad ogni lato finché il lavoro non misuri 33-34-35 cm, e intrecciare 3 m 1 volta ad ogni lato. Intrecciare le m rimanenti, il lavoro misura ca 34-35-36 cm. CONFEZIONE: Attaccare le maniche perché il centro dell’arrotondamento della manica sia posizionato dove gli scalfi sono più vicini l‘uno all’altro (vuol dire, dove la 1° m è stata intrecciata per il 1° scalfo e dove l’ultima m è stata intrecciate per ili 2° scalfo). |
||||||||||
Spiegazioni del diagramma |
||||||||||
|
||||||||||
 |
||||||||||
Avete terminato questo modello?Allora taggate le vostre foto con #dropspattern #oceanwavesbolero o inviatele alla #dropsfan gallery. Avete bisogno di aiuto con questo modello?Troverete 15 video tutorial, una sezione per i commenti/domande e molto altro guardando il modello su www.garnstudio.com © 1982-2026 DROPS Design A/S. Ci riserviamo tutti i diritti. Questo documento, compreso tutte le sue sotto-sezioni, è protetto dalle leggi sul copyright. Potete leggere quello che potete fare con i nostri modelli alla fine di ogni modello sul nostro sito. |
||||||||||


Con oltre 40 anni di esperienza nel design di modelli di maglia e uncinetto, DROPS Design offre la più estesa collezione di modelli gratuiti su internet - tradotti in 17 lingue. Ad oggi vi possiamo fornire 324 cataloghi e 12290 modelli - 9561 dei quali sono tradotti in Italiano.
Ci stiamo impegnando molto per darvi il meglio che vi possiamo offrire in termini di maglia e uncinetto, ispirazioni e consigli così come filati di grande qualità ad un prezzo incredibile! Volete utilizzare i nostri modelli per qualcosa d'altro oltre al vostro uso personale? Potete leggere tutto ciò che è consentito nel testo sul Copyright in basso su tutte le pagine dei nostri modelli. Buon lavoro!
Lasciare un commento sul modello DROPS 138-24
Noi saremmo felici di ricevere i tuoi commenti e opinioni su questo modello!
Se vuoi fare una domanda, fai per favore attenzione a selezionare la categoria corretta nella casella qui sotto per velocizzare il processo di risposta. I campi richiesti sono indicati da *.