
Categorie popolari
State cercando un filato?


Commenti / Domande (74)
![]() Nicci ha scritto:
Nicci ha scritto:
Dank voor het antwoord. Wat ik echter bedoel met te veel steken is dat ik op toer 15 omslag - 4 recht gebreit heb (na toer 16 zijn dit dus 5 steken). Hier kan ik dan vervolgens toch geen omslag - 1 recht - omslag - 1 recht (totaal van 2 steken) op kwijt? Dan houd ik steken over wil het patroon niet scheef boven elkaar komen.
28.03.2013 - 14:11DROPS Design ha risposto:
Ga door op deze manier; Er komen dus steeds meer tricotsteken tussen de eerste en de volgende omslag aan beide zijkanten
28.03.2013 - 14:48
![]() Tineke Van Bergen ha scritto:
Tineke Van Bergen ha scritto:
Klaar! Hij is prachtig geworden!
28.03.2013 - 14:02
![]() Nicci ha scritto:
Nicci ha scritto:
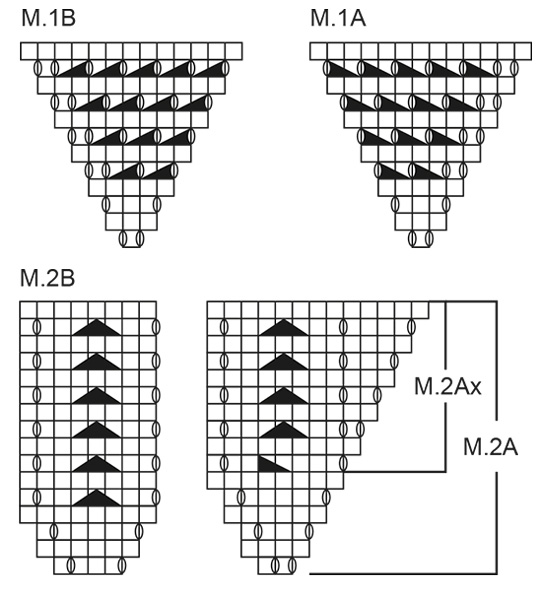
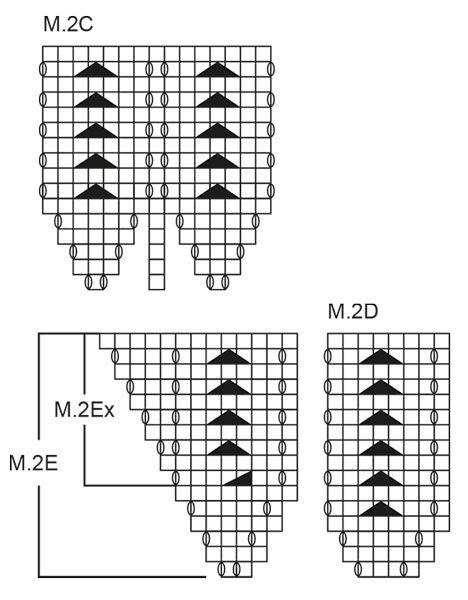
Ik heb eenmaal M2 in de hoogte gebreid. Ik begrijp dat ik de laatste 2 toeren van 2B, 2C en 2D steeds moet gaan herhalen en na de 2 kantsteken moet beginnen met 2A vanaf toer 1 (en vervolgens 2B zoals in de laatste 2 rijen enz). Dan kom ik echter qua stekenaantal en patroon niet meer uit...waar zit 'm de fout?
26.03.2013 - 13:46DROPS Design ha risposto:
Beste Nicci. Als je de laatste 2 toeren moet herhalen van M2B, C en D, dan brei je M.2A en E zoals beschreven, 1e rij M2A: 2 r, begin M2A opnieuw over de volgende 2 st, M2B over de volgende 8 st, 1e rij van van M2E: brei M2D over de eerste 8 st en begin M2E opniew over de volgende 2 st. Waarom je aantal st niet correct is weet ik niet. Veel breiplezier.
28.03.2013 - 13:19
![]() SewSassy1 ha scritto:
SewSassy1 ha scritto:
Hi again. This is where I am, I have worked M.2 once, where the pattern asks to repeat the last 2 rows of M2B, C & D, do I work those without doing A 1st and E last? thank you
13.02.2013 - 19:38DROPS Design ha risposto:
Dear Sewsassy1, when you repeat the last 2 rows in M.2B,C & D, you work M.2A and E as stated, 1st row M.2A : K2, start M.2A from beg again over next 2 sts, M2B over next 8 sts, and 1st row M.2E : work M.2D over first 8 sts then start M.2E from beg again over next 2 sts, K2. Happy knitting !
14.02.2013 - 09:12
![]() SewSassy1 ha scritto:
SewSassy1 ha scritto:
OK, that helps me visualize. Now when it refers to M.2B and the 3 sts in the middle what does this mean? I thought I had 5 sts in the middle from increasing earlier on. What happens to the 5 mid back sts? thanks
30.01.2013 - 13:46DROPS Design ha risposto:
Dear Sewsassy, it means you will work M.2B until the 3 mid sts (mid st + 1 st either side), on these 3 sts you will work M2C (=3 sts on 1st row), then continue with M2D and M2E. on 2nd row of M2, you will have 5 sts on M2C work them as indicated. After you have worked M2 oce in height, repeat the last 2 rows of M2B, C and D until the end and M2A and M2C as stated in pattern. Happy knitting !
30.01.2013 - 14:56
![]() SewSassy1 ha scritto:
SewSassy1 ha scritto:
I would like help with this pattern starting with M.2, I do not understand what is required or where I will be with the work when I finish M.2E
30.01.2013 - 04:54DROPS Design ha risposto:
Dear Sewsassy, after you have worked M.2E 1 time in height, just repeat the diagrams as before, you will have 1 more repeat of M2B and M2D each time. Happy knitting !
30.01.2013 - 09:44
![]() Jessica Andersen ha scritto:
Jessica Andersen ha scritto:
Mönstret på M2 stämmer inte när man ökat mittmaskerna med 5 maskor. Hur gör man? Hittar nämligen inget svar på min fråga under rubriken Rättelser.
28.12.2012 - 10:51
![]() Therese Lepold ha scritto:
Therese Lepold ha scritto:
Kann man das mittlere Muster auch als Quadratisches Tuch stricken? Wenn ja, was muß ich dann evtl. ändern. Oder gibt es ein ähnliches Muster welches man dann nehmen kann?
20.11.2012 - 23:49DROPS Design ha risposto:
Liebe Frau Lepold, das Muster wurde so entworfen, dass es diese Form ergibt. Vielleicht finden Sie ja in unserer Musterdatenbank ein Modell, das Ihren Vorstellungen genauer entspricht.
21.11.2012 - 09:07
![]() DROPS Design NL ha scritto:
DROPS Design NL ha scritto:
We hebben de beschrijving wat aangepast n.a.v. vragen over de werkwijze. Hopelijk wordt het op deze manier duidelijker.
03.10.2012 - 12:37
![]() Cornen ha scritto:
Cornen ha scritto:
Je ne comprends pas trop car moi je me retrouve avec beaucoup de mailles en jersey endroit au début ( après les 2 mailles en mousse et le jeté) et à la fin ( avant le jeté et les 2 mailles en mousses) et ce n'est pas très joli... :-(
17.09.2012 - 11:18DROPS Design ha risposto:
Vous devez continuer en suivant les diagrammes M.2 comme indiqué, (et sans mailles jersey après/avant les 2 m au point mousse). Ainsi, au 1er rang de M2, vous suivez ces indications, les jetés pour augmenter sont compris dans chacun des diagrammes M2A et M2E. Après les 16 rangs des diagrammes, vous reprenez dès le 1er rang. Pour toute aide personnalisée, je vous demande de bien vouloir contacter votre magasin DROPS. Il pourra vous expliquer plus facilement. Bon tricot !
17.09.2012 - 13:38
|
||||||||||||||||
Rosita#rositashawl |
||||||||||||||||
 |
 |
|||||||||||||||
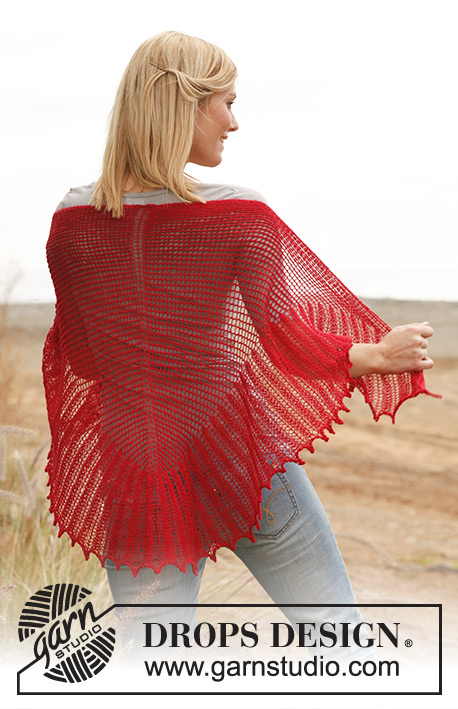
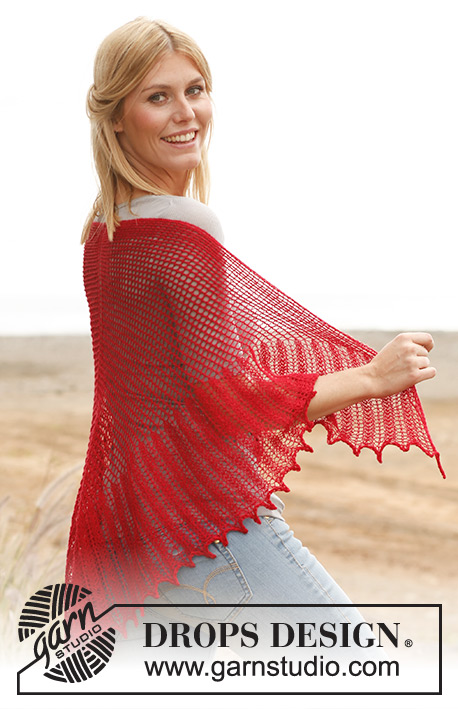
Scialle DROPS lavorato ai ferri con motivo a pizzo in "Lace".
DROPS 139-2 |
||||||||||||||||
|
TENSIONE DEL LAVORO: Questo indumento deve essere bagnato e tirato alla misura definitiva alla fine. La tensione del lavoro quindi non è importante ma per avere un’idea del fatto che stiate lavorando in modo lasso/stretto, lavorate un campione di 23 m. x 30 f. a m. rasata con i ferri misura 3,5 mm = circa 10 x 10 cm. M. A LEGACCIO (avanti e indietro sui ferri): lavorare tutti i f. a dir. MOTIVO: Vedere i diagrammi M.1 e M.2. I diagrammi mostrano il motivo dal diritto del lavoro. Il motivo nel diagramma M.1A è al contrario rispetto al motivo nel diagramma M.1B. SUGGERIMENTO PER GLI AUMENTI: Lavorare 5 m. in 1 m. come segue: 1 dir., 1 gettato, 1 dir., 1 gettato, 1 dir. NOTA: Per evitare una m. centrale fragile quando si aumenta 5 m. in questa m., riprendere le m. sia della m. centrale sul f. sia della m. della riga precedente contemporaneamente. --------------------------------------------------------- SCIALLE: Lavorato avanti e indietro con i ferri circolari, lavorare dal centro dietro del collo verso il basso. Con i ferri circolari misura 3,5 mm e il filato Lace avviare 3 m. Lavorare come segue: Ferro 1: lavorare 2 m. a dir. nella prima e nella seconda m., e 1 m. a dir. nella terza m. = 5 m. Ferro 2: lavorare tutte le m. a dir. Ferro 3: 1 m. a dir., lavorare 2 dir. nella m. successiva, inserire un segnapunti nella m. successiva (m. centrale), lavorare 2 m. a dir. nella m. successiva, 1 m. a dir. = 7 m. Ferro 4: lavorare tutte le m. a dir. Ferro 5 (rovescio del lavoro): lavorare 2 m. a dir. (= m. di vivagno), 3 m. a rov. e 2 m. a dir. (= m. di vivagno). Continuare come segue: 2 m. di vivagno a M. LEGACCIO – leggere la spiegazione sopra, diagramma M.1A, 1 m. centrale a m. rasata, diagramma M.1B e 2 m. di vivagno a m. legaccio. Alla fine del diagramma M.1, continuare con gli aumenti e il motivo nello stesso modo, cioè aumentare 4 m. a ogni f. sul dir. del lavoro. Lavorare fino a quando lo scialle misura circa 42 cm – misurare al centro dietro e tirare leggermente quando si misura (finire dopo 1 f. dal rovescio del lavoro). Sul f. successivo (= dal diritto del lavoro) aumentare la m. centrale a 5 m. – LEGGERE IL SUGGERIMENTO PER GLI AUMENTI. Continuare con il diagramma M.2 come segue: 2 m. a m. legaccio, diagramma M.2A sulle prime 2 m., inserire un segnapunti, quindi diagramma M.2B fino alle 3 m. al centro, inserire un segnapunti, lavorare le 3 m. centrali secondo il diagramma M.2C, inserire un segnapunti, continuare con il diagramma M.2D fino a quando rimangono 4 m., inserire un segnapunti, lavorare il diagramma M.2E su 2 m. e le ultime 2 m. a m. legaccio. Proseguire in questo modo finché non sono state lavorate in tutto 20 righe del diagramma M.2. Proseguire come segue: 2 m a punto legaccio, diagramma M.2Ax sulle 8 m successive, lavorare come prima finché non rimangono 10 maglie, lavorare il diagramma M.2Ex sulle 8 m successive, 2 m a punto legaccio. Continuare il motivo in questo modo fino a quando il lavoro misura circa 60 cm al centro dietro (con un leggero stiramento). Intrecciare con 2 capi come segue: 2 m. a dir., passarle indietro sul f. sinistro e lavorarle insieme a dir. ritorto (cioè lavorarle nel filo dietro della m. anziché in quello davanti). * lavorare un’altra m. (= 2 m. sul f. destro), passarle indietro sul f. sinistro e lavorarle insieme a dir. ritorto *, ripetere da *-* fino a quando sono state intrecciate tutte le m. Ciò viene fatto per rendere elastico il bordo per il bloccaggio. BLOCCAGGIO: Mettere lo scialle in acqua tiepida fino a quando è bagnato fradicio. Strizzare l’acqua dallo scialle con attenzione – non torcere lo scialle – quindi arrotolarlo in un asciugamano e strizzare per rimuovere l’acqua – lo scialle sarà solo umido ora. Mettere lo scialle su un tappeto o un materasso – tirarlo alla grandezza desiderata delicatamente e affrancarlo con degli spilli. Lasciare asciugare. Ripetere il processo quando l’indumento è stato lavato. |
||||||||||||||||
Spiegazioni del diagramma |
||||||||||||||||
|
||||||||||||||||
 |
||||||||||||||||
 |
||||||||||||||||
Avete terminato questo modello?Allora taggate le vostre foto con #dropspattern #rositashawl o inviatele alla #dropsfan gallery. Avete bisogno di aiuto con questo modello?Troverete 8 video tutorial, una sezione per i commenti/domande e molto altro guardando il modello su www.garnstudio.com © 1982-2026 DROPS Design A/S. Ci riserviamo tutti i diritti. Questo documento, compreso tutte le sue sotto-sezioni, è protetto dalle leggi sul copyright. Potete leggere quello che potete fare con i nostri modelli alla fine di ogni modello sul nostro sito. |
||||||||||||||||


Con oltre 40 anni di esperienza nel design di modelli di maglia e uncinetto, DROPS Design offre la più estesa collezione di modelli gratuiti su internet - tradotti in 17 lingue. Ad oggi vi possiamo fornire 324 cataloghi e 12290 modelli - 9561 dei quali sono tradotti in Italiano.
Ci stiamo impegnando molto per darvi il meglio che vi possiamo offrire in termini di maglia e uncinetto, ispirazioni e consigli così come filati di grande qualità ad un prezzo incredibile! Volete utilizzare i nostri modelli per qualcosa d'altro oltre al vostro uso personale? Potete leggere tutto ciò che è consentito nel testo sul Copyright in basso su tutte le pagine dei nostri modelli. Buon lavoro!
Lasciare un commento sul modello DROPS 139-2
Noi saremmo felici di ricevere i tuoi commenti e opinioni su questo modello!
Se vuoi fare una domanda, fai per favore attenzione a selezionare la categoria corretta nella casella qui sotto per velocizzare il processo di risposta. I campi richiesti sono indicati da *.