
Categorie popolari
State cercando un filato?


Commenti / Domande (77)
![]() Ingrid ha scritto:
Ingrid ha scritto:
Beste,ben het patroon 77-19 aan het maken,zit aan de 12 cm boord ,moet nu meerderen 4 ker 1 steek,dat komt toch niet uit met het patroon,weet eigenlijk hoe ik verder moet,gr
25.04.2026 - 11:21DROPS Design ha risposto:
Dag Ingrid,
Je breit de gemeerderde steken gaandeweg mee in het patroon. Na de eerste keer meerderen lukt dat nog niet, dus dan brei je de gemeerderde steken in tricotsteek. Zodra je in patroon kunt breien, brei je deze steken in patroon.
25.04.2026 - 19:25
![]() Ingrid ha scritto:
Ingrid ha scritto:
Vraagje,wordt dit patroon van onder naar boven gebreid,ben nog een beginneling,moet veel vragen en veel uittrekken,maar we komen er wel
07.04.2026 - 19:59DROPS Design ha risposto:
Dag Ingrid,
Dit patroon wordt van onder naar boven gebreid. Je kunt ook de veel gestelde vragen lezen en de video's bekijken voor tips en hulp.
08.04.2026 - 21:22
![]() Julianna ha scritto:
Julianna ha scritto:
L es mérethez 224 szemmel kezdtem. A magyar leírás alapján, 12 cm után 1 szemet kell szaporítani 5 cm ként 4 alkalommal. Ha mind két oldalon szaporítok 1 szemet 4 alkalommal az 2*4= 8 szem, vagyis 232 szem lesz szaporítás után. Ezt az értéket nem látom. A magyar fordításban lehet, hogy hiba van. El tudnák küldeni az eredetit?
02.03.2026 - 09:18
![]() Anita ha scritto:
Anita ha scritto:
Heb een beetje moeite met het telpatroon te begrijpen waar de steken worden samen gebreid zonder ze af te halen 3 rechts samen en dann de volgende averechts samen dan zitten de steken toch over elkaar heen? Bedankt voor antwoord
24.08.2025 - 05:45DROPS Design ha risposto:
Dag Anita,
Je breit 3 steken averecht samen, maar je laat de 3 steken niet van de linker naald af glijden. Dan brei je dezelfde 3 steken recht samen en tot slot nog een keer averecht samen. Daarna laat je de steken pas van de naald af glijden. In de eerste video die bij het patroon staat wordt dit ook getoond.
27.08.2025 - 21:07
![]() Irena ha scritto:
Irena ha scritto:
Dzień dobry. Utknęłam . Jestem w momencie TYŁ&PRZÓD: "Na wys. 12 cm od dołu robótki dodać 1 m z każdej strony oczek z markerami 4 razy co 5 cm - przer. dodawane o. ściegiem fantazyjnym w miarę postępu robótki = 192-208-224-240-272 o.". Co to 1m? Jezeli to oczko, to jeslidodam 4x4oczka to ze 111 nie bedzie 240. (rozmiar xl). Nie wiem co w tym miejscu mam zrobic. Proszę o pomoc.
21.07.2025 - 09:32DROPS Design ha risposto:
Witaj Ireno, masz na początku 224 oczka. Wkładasz markery w oczka na bokach, tzn, masz 111 oczek na przód, 1 oczko z markerem, 111 oczek na tył i 1 oczko z markerem, razem 224 oczka. Dodajesz 4 x 4 oczka w okrążeniu > 224+16=240 oczek. Pozdrawiamy!
21.07.2025 - 10:22
![]() Stefania Hagen ha scritto:
Stefania Hagen ha scritto:
Buongiorno, desideravo comunicare la mia osservazione sulla spiegazione dei primi due punti del DIAGRAMMA. E' sicuro che non c''è qualche errore?: --------------- Diagramma - 1 m dir. sul rovescio (???) del lavoro, rov sul diritto (???) del lavoro - 1 m rov sul diritto del lavoro, dir sul rovescio del lavoro --------------- Se fosse come descritto, sul diritto del lavoro ci sarebbero SOLO punti rovescio... Grazie
15.07.2025 - 09:42DROPS Design ha risposto:
Buonasera Stefania, grazie per la segnalazione, abbiamo corretto la legenda. Buon lavoro!
15.07.2025 - 22:47
![]() Kirsten Sørensen ha scritto:
Kirsten Sørensen ha scritto:
Skal der ikke strikkes en halskant?
09.07.2025 - 22:57DROPS Design ha risposto:
Hej Kirsten. Du stickar 5 p rib på forstk og rygstk. Mvh DROPS Design
10.07.2025 - 10:07
![]() Patricia ha scritto:
Patricia ha scritto:
Bonjour Je tricote le modèle en S. Pour le dos, vous écrivez de tricoter 5 rangs de côtes au milieu à partir de 49 cm. Nous arrivons alors à 52 cm. Il n’est donc pas possible de tricoter les épaules comme le devant sans dépasser ces 52 cm, alors que sur votre schéma, nous voyons que le décolleté semble pareil que le devant. Est-ce que le début des côtes à 49 cm n’est pas une erreur ? Ne faut-il pas les faire à 40 cm, comme devant ? Merci de m’éclairer
14.05.2025 - 18:22DROPS Design ha risposto:
Bonjour Patricia, les 5 rangs de côtes + le rang pour rabattre les mailles centrales pour l'encolure doivent mesurer environ 2 cm (sur la base de 30 rangs = 10 cm), vous continuerez donc 1 cm sur chaque épaule séparément, soit environ 3 rangs. Bon tricot!
15.05.2025 - 09:24
![]() Jytte Eriksen ha scritto:
Jytte Eriksen ha scritto:
I opskriften Blue Summer står der i diagram forklaring: strik 3 m sammen således fra retsiden uden at lade dem falde af venstre p: 3vr sm, 3r sm, 3 vr sm, slip m af venstre pind, Kan ikke få det til at fungere, kan i hjælpe mig. Venlig hilsen Jytte
06.05.2025 - 18:28DROPS Design ha risposto:
Hej Jytte, se videoen her: Hvordan strikkes knude over 3 masker
08.05.2025 - 08:35
![]() Chris Van Der Sijpt ha scritto:
Chris Van Der Sijpt ha scritto:
Hoe brei ik dit van onder naar boven??dank u
04.05.2025 - 09:06DROPS Design ha risposto:
Dag Chris,
Je kunt gewoon de beschrijving volgen en dan brei je het patroon al van onder naar boven.
04.05.2025 - 10:09
|
|||||||||||||||||||
Blue Summer |
|||||||||||||||||||
|
|
|||||||||||||||||||
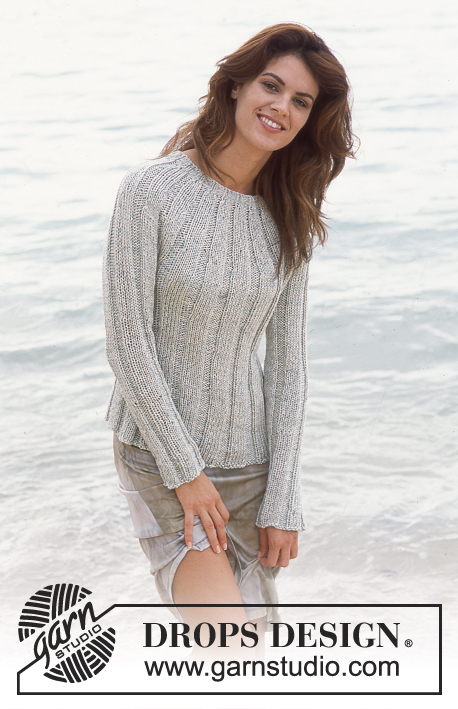
Maglione DROPS in "Safran" a maniche corte o lunghe
DROPS 77-19 |
|||||||||||||||||||
|
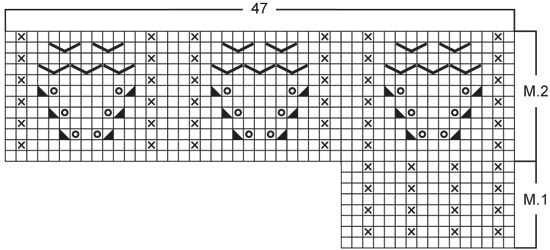
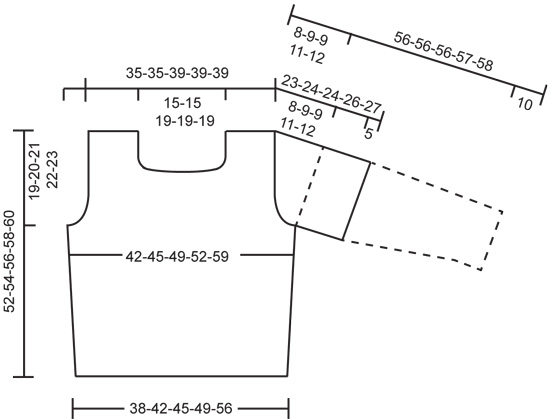
CAMPIONE: 23 m. x 30 f. = 10 x 10 cm con i ferri più grandi a m. rasata. COSTE: * 1 m.dir., 1 m.rov. *, ripetere da * - *. MOTIVO: vedere lo schema. Il motivo è visto dal diritto del lavoro. M. LEGACCIO (avanti e indietro sui ferri) lavorare tutti ferri a dir. SUGGERIMENTI PER IL LAVORO (per il bordo del collo): tutte le diminuzioni sono fatte dal diritto del lavoro. Diminuire all’interno delle 5 m. di vivagno lavorando come segue dal bordo (visto dal diritto del lavoro): 1 m. dir. (m. di vivagno a m. legaccio), 1 m. dir., 1 m. rov., 1 m. dir., 1 m. rov. Diminuire 1 m. come segue: dopo le 5 m. di vivagno: passare 1 m. a dir., sena lavorarla 1 m. dir., accavallare la m. passata sopra quella appena lavorata. Prima delle 5 m. di vivagno: lavorare 2 m. insieme a dir. CORPO: Avviare 176-192-208-224-256 m. con i ferri circolari più piccoli; unire e mettere un segnapunti alla giunzione. Lavorare 5 f. a coste. Passare ai ferri circolari più grandi e al motivo 1 – verificare che le colonne a grana di riso nel motivo siano direttamente sopra le m. a rov. nelle coste. Mettere un segnapunti da ogni lato (al centro delle 3 m. dir. a coste) – ci saranno 87-95-103-111-127 m. tra i segnapunti. Quando il lavoro misura 12 cm aumentare 1 m. da ogni lato delle m. con i segnapunti ogni 5 cm per un totale di 4 volte – lavorare le m. aumentate nel motivo mentre proseguite = 192-208-224-240-272 m. Leggere tutta la sezione seguente prima di continuare: MOTIVO: quando il lavoro misura 31-32-34-36-37 cm lavorare il motivo 2 sulle 47 m. centrali sul davanti (lavorare le m. rimaste come prima). Alla fine del motivo 2 lavorare ancora il motivo 1 su tutte le m. SCALFO: quando il lavoro misura 33-34-35-36-37 cm intrecciare 7-9-9-11-11 m. da ogni lato per lo scalfo (cioè, le m. con il segnapunti e le 3-4-4-5-5 m. a ogni lato della m. con il segnapunti). Lavorare ogni parte in modo separato. DAVANTI: = 89-95-103-109-125 m. Continuare il motivo e intrecciare per lo scalfo da ogni lato ogni 2 ferri: 3 m. 0-0-0-1-2 volte, 2 m. 1-2-2-2-4 volte e 1 m. 2-3-3-3-4 volte = 81-81-89-89-89 m. Quando il lavoro misura 40-41-42-44-45 cm lavorare 5 f. a coste sulle 29-29-37-37-37 m. centrali – iniziare con 1 m. rov. (lavorare le m. rimaste secondo il motivo come prima). Poi intrecciare le 19-19-27-27-27 m. centrali per il collo – intrecciare secondo il motivo. Tenere le 5 m. da ogni bordo del collo a coste, con le m. più esterne a m. legaccio, fino alla lunghezza finale. Diminuire 1 m. da ogni bordo del collo: ogni 2 ferri 4 volte e poi ogni 4 f. 4 volte – leggere i suggerimenti per il lavoro = 23 m. rimaste su ogni spalla. Intrecciare quando il lavoro misura 52-54-56-58-60 cm. DIETRO: = 89-95-103-109-125 m. Intrecciare per lo scalfo come sul davanti = 81-81-89-89-89 m. Quando il lavoro misura 49-51-53-55-57 cm lavorare 5 f. a coste sulle 45-45-53-53-53 m. centrali – iniziare con 1 m. rov. (lavorare le m. rimaste secondo il motivo come prima). Poi intrecciare le 35-35-43-43-43 m. centrali per il collo – intrecciare a coste = 23 m. rimaste sulla spalla. Lavorare le 5 m. sul bordo del collo come per il davanti e intrecciare quando il lavoro misura 52-54-56-58-60 cm. MANICHE CORTE: avviare 60-64-68-72-80 m. con i ferri a doppia punta più piccoli; unire e mettere un segnapunti alla giunzione. Lavorare 5 f. a coste. Passare ai ferri a doppia punta più grandi e lavorare il motivo 1 fino alla lunghezza finale. Quando il lavoro misura 5 cm aumentare 1 m. da ogni lato del segnapunti per un totale di 8-8-10-10-8 volte: Taglie S, M e XXL: in modo alternato ogni 3 e 4 ferri. Taglie L e XL: in modo alternato ogni 2 e 3 ferri. = 76-80-88-92-96 m. – lavorare le m. aumentate secondo il motivo mentre proseguite. Quando il lavoro misura 15 cm intrecciare 3 m. da ogni lato del segnapunti. Poi intrecciare per l’arrotondamento della manica ogni 2 ferri: 3 m. 1 volta, 2 m. 3-3-4-4-4 volte e 1 m. 3-3-2-5-7 volte, poi intrecciare 2 m. da ogni lato fino a quando il lavoro misura 22-23-23-25-26 cm, poi intrecciare 3 m. da ogni lato 1 volta. Intrecciare le m. rimaste, il lavoro misura circa 23-24-24-26-27 cm. MANICHE LUNGHE: avviare 48-52-52-56-56 m. con i ferri a doppia punta più piccoli; unire e mettere un segnapunti alla giunzione. Lavorare 5 f. a coste. Passare ai ferri a doppia punta più grandi e lavorare il motivo 1 fino alla lunghezza finale. Quando il lavoro misura 10 cm aumentare 1 m. da ogni lato del segnapunti ogni 8-8-6-6-5 f. per un totale di 14-14-18-18-20 volte = 76-80-88-92-96 m. – lavorare le m. aumentate secondo il motivo mentre proseguite. Quando il lavoro misura 48-47-47-46-46 cm intrecciare 3 m. da ogni lato del segnapunti. Poi intrecciare per l’arrotondamento della manica ogni 2 ferri: 3 m. 1 volta, 2 m. 3-3-4-4-4 volte e 1 m. 3-3-2-5-7 volte, poi intrecciare 2 m. da ogni lato fino a quando il lavoro misura 55-55-55-56-57 cm, poi intrecciare 3 m. da ogni lato 1 volta. Intrecciare le m. rimaste, il lavoro misura circa 56-56-56-57-58 cm. CONFEZIONE: cucire i margini delle spalle. Attaccare le maniche. ________________________________________ |
|||||||||||||||||||
Spiegazioni del diagramma |
|||||||||||||||||||
|
|||||||||||||||||||
 |
|||||||||||||||||||
 |
|||||||||||||||||||
Avete terminato questo modello?Allora taggate le vostre foto con #dropspattern o inviatele alla #dropsfan gallery. Avete bisogno di aiuto con questo modello?Troverete 23 video tutorial, una sezione per i commenti/domande e molto altro guardando il modello su www.garnstudio.com © 1982-2026 DROPS Design A/S. Ci riserviamo tutti i diritti. Questo documento, compreso tutte le sue sotto-sezioni, è protetto dalle leggi sul copyright. Potete leggere quello che potete fare con i nostri modelli alla fine di ogni modello sul nostro sito. |
|||||||||||||||||||


Con oltre 40 anni di esperienza nel design di modelli di maglia e uncinetto, DROPS Design offre la più estesa collezione di modelli gratuiti su internet - tradotti in 17 lingue. Ad oggi vi possiamo fornire 324 cataloghi e 12290 modelli - 9561 dei quali sono tradotti in Italiano.
Ci stiamo impegnando molto per darvi il meglio che vi possiamo offrire in termini di maglia e uncinetto, ispirazioni e consigli così come filati di grande qualità ad un prezzo incredibile! Volete utilizzare i nostri modelli per qualcosa d'altro oltre al vostro uso personale? Potete leggere tutto ciò che è consentito nel testo sul Copyright in basso su tutte le pagine dei nostri modelli. Buon lavoro!
Lasciare un commento sul modello DROPS 77-19
Noi saremmo felici di ricevere i tuoi commenti e opinioni su questo modello!
Se vuoi fare una domanda, fai per favore attenzione a selezionare la categoria corretta nella casella qui sotto per velocizzare il processo di risposta. I campi richiesti sono indicati da *.