
Categorie popolari
State cercando un filato?


Commenti / Domande (132)
![]() Birgit ha scritto:
Birgit ha scritto:
Das Modell ist wunderschön, die Strickanleitung verständlich, aber leider stimmt die Angabe der Wollmenge überhaupt nicht. Für Größe XXXL habe ich nur für das Rückenteil bereits 400g verstrickt (lt. Angabe sollten für den kompletten Pullover 1000g ausreichen). Das bedeutet, dass die Wollmenge für die Größe XXXL bei mindestens 1300-1400g liegt.
18.12.2013 - 09:49DROPS Design ha risposto:
Liebe Birgit, diesr Pullover wurde schon sehr oft nachgestrickt und wir haben noch keine Rückmeldung zur Garnmenge bekommen. Haben Sie das Originalgarn und stimmt die Maschenprobe?
18.12.2013 - 12:09
![]() Tania ha scritto:
Tania ha scritto:
Tengo una duda :cuando pone que hay que menguar 12 puntos equitativamente, como hago para que me de exacto si mi patron es de 134 puntos (talla l) ?
17.11.2013 - 00:51DROPS Design ha risposto:
Hola Tania. Tienes que dism aprox cada 11 pts.
19.11.2013 - 12:51
![]() Nancy ha scritto:
Nancy ha scritto:
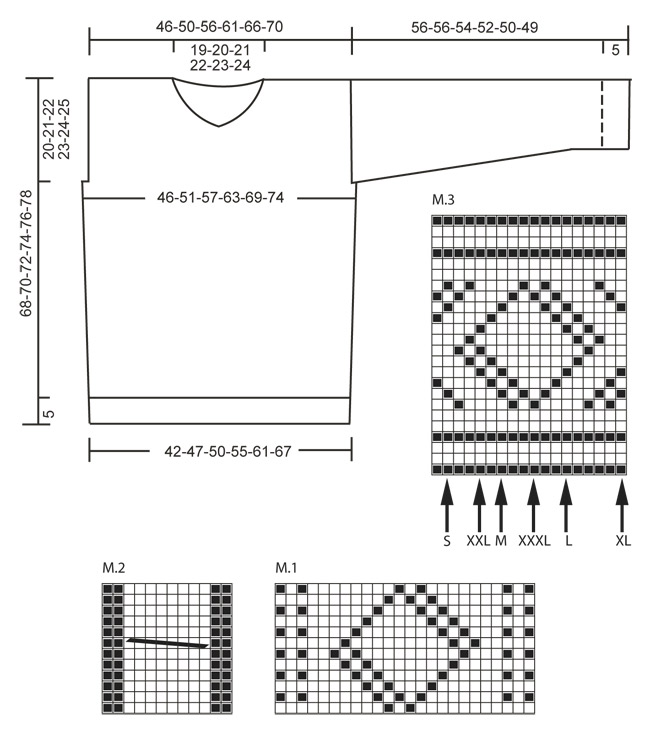
I'm confused about finish shoulder separately. So I have 62,4BO,62. I then will do back and forth knitting from that point on each shoulder separately following pattern M3 with XL arrow. How do I mirror on both sides? Do I start on my left shoulder at the XL arrow reading left to right? My other question is at the same time. Do I BO 2 at the neck and also decrease 1 at the end?
20.10.2013 - 21:44DROPS Design ha risposto:
Dear Nancy, you work M.3 on the front piece as you made for back piece, right shoulder start with XL arrow, and after the first 4 BO, you will continue binding off 7 times 2 sts and 5 times 1 st (size XL) at the beg of every row starting on the neck side. Happy knitting!
21.10.2013 - 10:24
![]() Nancy ha scritto:
Nancy ha scritto:
I'm confused about finish shoulder separately. So I have 62,4BO,62. I then will do back and forth knitting from that point on each shoulder separately following pattern M3 with XL arrow. How do I mirror on both sides? Do I start on my left shoulder at the XL arrow reading left to right? My other question is at the same time. Do I BO 2 at the neck and also decrease 1 at the end?
20.10.2013 - 17:20Ruth ha scritto:
How should WS be worked in the back piece? Should it also be worked *K1, P3* or *P1, K3*? or maybe some other way? Thanks!
28.08.2013 - 07:14DROPS Design ha risposto:
Dear Ruth, you work from RS : K1, P3. From WS, work K over K and P over P : P1, K3. Happy knitting!
28.08.2013 - 11:18
![]() Nel Uytterhoeven ha scritto:
Nel Uytterhoeven ha scritto:
Voor de telpatronen: is het rij 1 beginnen aan de goede kant van het breiwerk en rij 2 aan de slechte kant van het breiwerk?
02.08.2013 - 18:02DROPS Design ha risposto:
Als een telpatroon heen en weer wordt gebreid, zoals hier, leest u alle oneven naalden (1, 3, 5 etc) van rechts naar links en die breit u aan de goede kant en alle even naalden (2, 4, 6) leest u van links naar rechts en breit u aan de verkeerde kant.
04.08.2013 - 22:52
![]() Esther Jewett ha scritto:
Esther Jewett ha scritto:
Working on back. So far so good. Note: cable 1st and 13th row on M3 after the first 24 rows.
18.04.2013 - 17:14Nashwaahmed ha scritto:
Diagram M.3 is not working right with me, i am making a Large size sweater now and i have 118 stitches if i start from the arrow as indicated i will work over 13 stitches then i will start the whole 18 stitches again and repeat and this is not working for the 116 stitch i have( after excluding edge stitches)
01.03.2013 - 17:26DROPS Design ha risposto:
Dear Mrs Nashwaahmed, in size L, you will work : the last 13 sts in M.3, then repeat 5 times the 18 sts of the whole diagram and finish with the first 13 sts in M.3 + 2 edge st = 118 sts. Happy knitting!
02.03.2013 - 10:26Doris Gonzalez ha scritto:
En mi país, no hay tienda de lana drops, entonces con quién me contacto por dudas?...y hay respuestas a comentarios o preguntas por parte de ustedes?. gracias
01.03.2013 - 03:09Nashwaahmed ha scritto:
I am sorry but i have a new question...i am knitting the front side now of the sweater and i don't understand the part which says AT THE SAME TIME cast off on every row from neck: 2 sts then 1 st. how would i work it ? does it mean that every row starting from the neck i should bind off 2 stitches?? and where should i bind off that other stitch ? please help me as i am stuck at this point...thank you :)
24.02.2013 - 01:27DROPS Design ha risposto:
Dear Mrs Nashwaahmed, you are correct, every row starting from the neck you will bind off 2 sts 5 times in size S, 6 times in size M etc... then every row starting from the neck you will dec 1 st 8 times in size S, 7 times in size M etc... Happy knitting !
25.02.2013 - 10:56
|
||||||||||
Sir Lancelot#sirlancelotsweater |
||||||||||
|
|
||||||||||
Maglione da uomo lavorato ai ferri con motivo a punto fantasia e collo a V, in DROPS Karisma. Taglie: dalla S alla XXXL.
DROPS 135-36 |
||||||||||
|
PUNTO LEGACCIO (avanti e indietro sui ferri): Lavorare tutti i ferri a dir. PUNTO FANTASIA: Vedere i diagrammi da M.1 a M.3 – i diagrammi mostrano i motivi sul diritto del lavoro. M.1 = 24 m, M.2 = 12 m e M.3 = 18 m. -------------------------------------------------------- DIETRO: Si lavora avanti e indietro sui ferri. Avviare 110-122-134-146-158-170 m (comprese 1 m vivagno da ciascun lato) sui ferri n° 3 con il filato Karisma. Lavorare a coste come segue: (visto sul diritto del lavoro): 1 m vivagno a PUNTO LEGACCIO - vedere le spiegazioni sopra, * 1 m a dir, 3 m a rov *, ripetere da *-* e finire con 1 m vivagno a punto legaccio. Quando le coste misurano ca. 5 cm (fare in modo che il ferro successivo sia sul rovescio del lavoro), passare ai ferri n° 4 e lavorare 1 ferro a rovescio sul rovescio del lavoro e allo stesso tempo diminuire 12 m in modo uniforme = 98-110-122-134-146-158 m. Lavorare il ferro successivo (sul diritto del lavoro) come segue: TAGLIA S: 1 m vivagno a punto legaccio, diagrammi M.1, M.2, M.1, M.2, M.1 e 1 m vivagno a punto legaccio. TAGLIA M: 1 m vivagno a punto legaccio, 6 m a maglia rasata, diagrammi M.1, M.2, M.1, M.2, M.1, 6 m a maglia rasata e 1 m vivagno a punto legaccio. TAGLIA L: 1 m vivagno a punto legaccio, diagrammi M.2, M.1, M.2, M.1, M.2, M.1, M.2 e 1 m vivagno a punto legaccio. TAGLIA XL: 1 m vivagno a punto legaccio, 6 m a maglia rasata, diagrammi M.2, M.1, M.2, M.1, M.2, M.1, M.2, 6 m a maglia rasata e 1 m vivagno a punto legaccio. TAGLIA XXL: 1 m vivagno a punto legaccio, 12 m del diagramma M.1 – iniziare dalla 13a m partendo dalla destra del diagramma, diagrammi M.2, M.1, M.2, M.1, M.2, M.1, M.2 e 12 m del diagramma M.1 – iniziare dalla 1a m del diagramma - e 1 m vivagno a punto legaccio. TAGLIA XXXL: 1 m vivagno a punto legaccio, 18 m del diagramma M.1 – iniziare dalla 7a m partendo dalla destra del diagramma, diagrammi M.2, M.1, M.2, M.1, M.2, M.1, M.2 e18 m del diagramma M.1 – iniziare dalla 1a m del diagramma - e 1 m vivagno a punto legaccio. TUTTE LE TAGLIE: Proseguire lavorando come indicato finché il lavoro non misura 48-49-50-51-52-53 cm. RICORDARSI LA TENSIONE DEL LAVORO! Chiudere ora 1-2-2-3-4-5 m da ciascun lato per gli scalfi (quindi chiudere le m all’inizio dei 2 ferri successivi) = 96-106-118-128-138-148 m. Proseguire seguendo il motivo come prima e lavorando a punto legaccio la m vivagno da ciascun lato. Quando il lavoro misura ca. 58-60-62-64-66-68 cm (bisogna essere a metà di una ripetizione o aver completato un’intera ripetizione in verticale dei diagrammi M.1 e M.2), lavorare 2 ferri a m rasata; proseguire poi seguendo il diagramma M.3 su tutte le m (tranne le m vivagno) – vedere le frecce corrispondenti alla propria taglia; questa freccia indica dove iniziare con il diagramma. ALLO STESSO TEMPO quando rimangono da lavorare 4 ferri del diagramma M.3, chiudere le 36-38-40-42-44-46 m centrali per il collo e terminare ciascuna spalla separatamente. Al ferro successivo chiudere 2 m dal lato del collo = per la spalla rimangono 28-32-37-41-45-49 m. Terminato il diagramma M.3, lavorare ancora ca. 1 cm a m rasata e poi chiudere le m. Il lavoro misura ca. 68-70-72-74-76-78 cm. DAVANTI: Avviare le m e lavorare come per il dietro. Chiudere per gli scalfi come per il dietro e continuare finché il lavoro non misura ca. 58-60-62-64-66-68 cm. Lavorare poi 2 ferri a m rasata – allo stesso tempo, durante il 1° di questi ferri, chiudere le 4 m centrali per il collo e terminare ogni spalla separatamente. Lavorare il motivo come per il dietro (assicurarsi che il diagramma M.3 sia lavorato nello stesso modo da ciascuna parte del collo) – ALLO STESSO TEMPO chiudere ad ogni ferro per il collo come segue: 2 m per 5-6-7-8-9-10 volte e poi 1 m per 8-7-6-5-4-3 volte = per le spalle rimangono 28-32-37-41-45-49 m. Chiudere le m dopo aver lavorato lo stesso numero di ferri lavorati per il dietro. MANICHE: Si lavorano avanti e indietro sui ferri. Avviare 62 m per tutte le taglie (comprese 1 m vivagno da ciascun lato) sui ferri n° 3 con il filato Karisma. Lavorare a coste come segue (visto sul diritto del lavoro) : 1 m vivagno a punto legaccio , * 1 m a dir, 3 m a rov *, ripetere da *-*, finire con 1 m vivagno a punto legaccio. Quando il lavoro misura ca. 5 cm (fare in modo che il ferro successivo sia sul rovescio del lavoro), proseguire con i ferri n° 4. Lavorare 1 ferro a rov sul rovescio del lavoro. Lavorare il ferro successivo come segue: 1 m vivagno a punto legaccio, diagrammi M.1, M.2, M.1 e 1 m vivagno a punto legaccio; proseguire in questo modo. Quando il lavoro misura 9 cm, aumentare 1 m da ciascun lato. Ripetere gli aumenti ogni 9-8-6-5-4-4 ferri per 12-14-16-18-20-21 volte – lavorare le m aumentate a m rasata = 86-90-94-98-102-104 m. Quando il lavoro misura ca 46-46-44-42-40-39 cm (bisogna essere a metà di una ripetizione o aver completato un’intera ripetizione in verticale dei diagrammi M.1 e M.2 e gli aumenti devono essere terminati), lavorare 2 ferri a m rasata; proseguire poi seguendo il diagramma M.3 – cominciare con la 1a m a destra del diagramma (il motivo non sarà completato alla fine del ferro). Terminato il diagramma M.3, lavorare (se necessario) a m rasata finché la manica non misura 56-56-54-52-50-49 cm (misura più corta per le taglie grandi perché le spalle sono più larghe); chiudere le m. CONFEZIONE: Cucire le spalle. COLLO: Riprendere ca. 119 - 139 m (il numero delle m deve essere divisibile per 4 + 3 m ) attorno al collo con il ferro circolare n° 3 e il filato Karisma – cominciare al centro, sul davanti. Lavorare il collo avanti e indietro partendo dal centro davanti. Il 1° ferro è sul rovescio del lavoro e si lavora come segue: 1 m vivagno a punto legaccio, * 1 m a rov, 3 m a dir *, ripetere da *-* e finire con 1 m a rov e 1 m vivagno a punto legaccio. Proseguire lavorando le m come si presentano e con le m vivagno lavorate a punto legaccio finché il collo non misura ca. 6 cm. Chiudere le m lavorandole come si presentano. Collocare il lato sinistro del collo sopra il lato destro, cucire con qualche punto sia sul rovescio che sul diritto. Inserire le maniche e cucire all’interno della m vivagno. Cucire i lati della maglia e i lati delle maniche all’interno della m vivagno. |
||||||||||
Spiegazioni del diagramma |
||||||||||
|
||||||||||
 |
||||||||||
Avete terminato questo modello?Allora taggate le vostre foto con #dropspattern #sirlancelotsweater o inviatele alla #dropsfan gallery. Avete bisogno di aiuto con questo modello?Troverete 19 video tutorial, una sezione per i commenti/domande e molto altro guardando il modello su www.garnstudio.com © 1982-2026 DROPS Design A/S. Ci riserviamo tutti i diritti. Questo documento, compreso tutte le sue sotto-sezioni, è protetto dalle leggi sul copyright. Potete leggere quello che potete fare con i nostri modelli alla fine di ogni modello sul nostro sito. |
||||||||||


Con oltre 40 anni di esperienza nel design di modelli di maglia e uncinetto, DROPS Design offre la più estesa collezione di modelli gratuiti su internet - tradotti in 17 lingue. Ad oggi vi possiamo fornire 324 cataloghi e 12290 modelli - 9561 dei quali sono tradotti in Italiano.
Ci stiamo impegnando molto per darvi il meglio che vi possiamo offrire in termini di maglia e uncinetto, ispirazioni e consigli così come filati di grande qualità ad un prezzo incredibile! Volete utilizzare i nostri modelli per qualcosa d'altro oltre al vostro uso personale? Potete leggere tutto ciò che è consentito nel testo sul Copyright in basso su tutte le pagine dei nostri modelli. Buon lavoro!
Lasciare un commento sul modello DROPS 135-36
Noi saremmo felici di ricevere i tuoi commenti e opinioni su questo modello!
Se vuoi fare una domanda, fai per favore attenzione a selezionare la categoria corretta nella casella qui sotto per velocizzare il processo di risposta. I campi richiesti sono indicati da *.