
Categorie popolari
State cercando un filato?





























Commenti / Domande (135)
 Donna Reed ha scritto:
I understand which stitch to work from the WS but which stitch in M.1 should I have started from on the RS after binding off 4 stitches on each side? Until I bound off for the armholes I had 12 M.1 stitches at the beginning of each row, but now I have 8. Do I start on the RS in the middle of M.1 with stitch 13 or some other stitch?
01.11.2026 - 01:40DROPS Design ha risposto:
Hi Donna, You continue with 1 edge-stitch and then work M.1 from the 4th stitch in the diagram (so the pattern is continued vertically). Regards, Drops Team.
01.11.2026 - 14:29
Donna Reed ha scritto:
Please let me try to explain my confusion again: after binding off the 4 stitches on each side, do I begin M.1 in stitch 13 on the RS, and stitch 12 on the WS?
28.10.2026 - 00:43DROPS Design ha risposto:
Dear Mrs Reed, note in the diagram which is the last stitch M.1 worked from RS, this will be the first stitch you will have to work from WS when starting the row and read now diagram from the left towards the right. Happy knitting!
28.10.2026 - 08:29
Donna Reed ha scritto:
Knitting an XXL, I am confused about where to begin after binding off 4 stitches for the armholes in the front or back. On the RS do I start with stitch 13 or at 17? Thanks for your help!
24.10.2026 - 00:40DROPS Design ha risposto:
Der Mrs Reed, front and back pieces are here worked separately back and forth on needle so that you will cast off for both pieces as follows: 4 stitches at the beginning of next 2 rows (from both right and wrong side). Then continue as before (with 4 sts less than before) with 1 edge stitch in garter stitch on each side. Happy knitting!
26.10.2026 - 08:23
 Stefania ha scritto:
Buongiorno Ho terminato la maglia e mi piacerebbe inviarvi la foto Dove posso spedirla dopo averla fotografata? Grazie
19.04.2026 - 12:04DROPS Design ha risposto:
Buongiorno Stefania, può compilare il modulo che trova al : seguente link, Buon lavoro!
19.04.2026 - 13:35
Stefania ha scritto:
Quindi, se ho capito bene per la taglia S il diagramma M3 è composto di 20 maglie invece che 18 ? Grazie ancora e buona giornata
24.03.2026 - 08:18DROPS Design ha risposto:
Buonasera Stefania, è solo per l'inizio che si parte dalla taglia, poi si lavora il diagramma intero. Buon lavoro!
28.03.2026 - 20:45
Stefania ha scritto:
Scusate, sto facendo la parte alta del davanti dove si parla del diagramma M3. Sto eseguendo la taglia S. Voi dite di iniziare dove c’è la lettera S ma il diagramma poi lo termino dove c’è la lettera S o a fine diagramma.? Grazie
23.03.2026 - 20:08DROPS Design ha risposto:
Buonasera Stefania, poi deve lavorare il diagramma intero. Buon lavoro!
23.03.2026 - 22:11
Stefania ha scritto:
Ho eseguito diversi vostri maglioni . Ora però Non riesco a capire gli aumenti delle maniche. Cosa si intende quando dite di fare ogni 9/8/6/ecc ferri per 12 ecc volte? E i numero delle maglie 86/90/94 ecc sono maglie totali o quelle di aumento ? Grazie
04.03.2026 - 18:30DROPS Design ha risposto:
Buonasera Stefania, i diversi numeri sono le taglie del modello: deve fare riferimento al numero riportato per la taglia che sta lavorando. Buon lavoro!
04.03.2026 - 22:50
 Mariángeles ha scritto:
Buenos días, muchas gracias por el patrón, me parece muy bonito. Me extraña mucho que después del elástico o resorte haya que disminuir puntos, ¿no será más bien aumentarlos? Muchas gracias por la aclaración.
03.02.2026 - 14:23DROPS Design ha risposto:
Hola Mariángeles, normalmente tenemos más puntos en el elástico para que el elástico no quede tenso. Como se trabaja de abajo arriba, el borde elástico inferior en elástico no tiene que quedar prieto y la disminución de puntos después nos asegura que la sección en elástico y el comienzo del jersey tenga una anchura similar, a pesar de la diferencia en la textura de los puntos.
23.02.2026 - 00:36
Donna ha scritto:
Knitting an XXL I'm confused about where to start each row in M.3, and after repeating the design 7 times, where to start the finish of each row. On the RS, start at the arrow and reading from R to L, do 5 stitches; then , after 7 repeats, at the end of the row, do 6 stitches, reading from far R to L? Do I start every row on RS at the arrow? But not on WS? On WS, do I start 6 stitches in from the far right side of the diagram, and then finish the final 5 starting on the far left?
20.01.2026 - 02:04DROPS Design ha risposto:
Hi Donna, It is just starting the diagram which involves the arrow, you then work to the end of the round, repeating the full width of the diagram each side until you work the edge stitch at the end of the row (this will not be the end of a repeat as both sides are symmetrical). When you work back from the right side, you begin the diagram where you finished on the previous row, repeat full widths until you reach where you started on the diagram, then work 1 edge stitch. Hope this helps. Regards, Drops Team.
20.01.2026 - 08:00
Arlene ha scritto:
What does “adjust after one half repetition or one whole repetition of diagram m1 and m2 vertically” mean? Also when I start on size medium in m3 do I keep going back to where I started or the beginning of the row?
30.12.2025 - 17:46DROPS Design ha risposto:
Dear Arlene, it means that we don't need to exactly stop working charts M1 and M2 when piece measures 58-60-62-64-66-68 cm but rather we need to ensure that, around that measurement, we stop at a row that is the last row of the chart or the row in the middle of the chart, to avoid interrupting the stitch-pattern too much. The arrow show which stitch of the chart will be the first stitch of the row; afterwards you need to work the stitch in the same position in the next row, so you should consider the arrow the beginning/end of the chart (for the first/last repeat of the row). Happy knitting!
12.01.2026 - 00:16
|
||||||||||
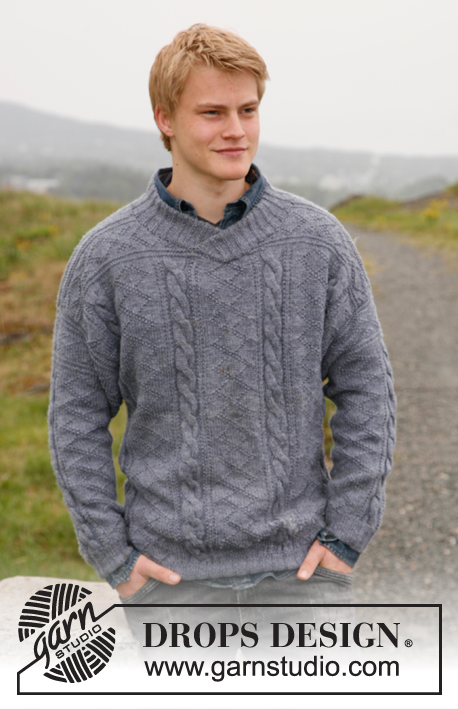
Sir Lancelot#sirlancelotsweater |
||||||||||
|
|
||||||||||
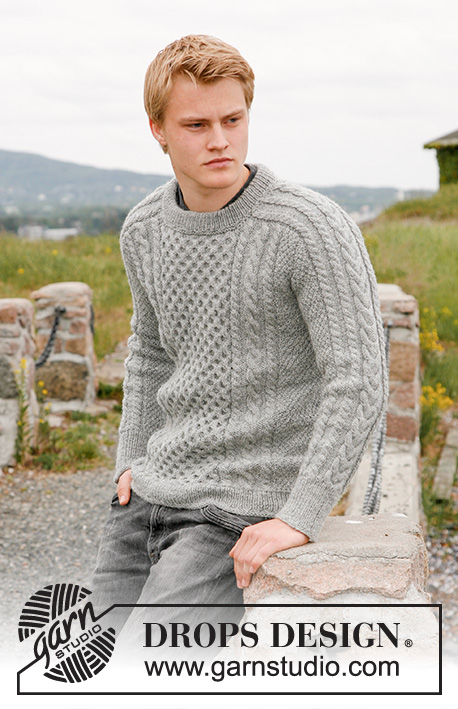
Maglione da uomo lavorato ai ferri con motivo a punto fantasia e collo a V, in DROPS Karisma. Taglie: dalla S alla XXXL.
DROPS 135-36 |
||||||||||
|
PUNTO LEGACCIO (avanti e indietro sui ferri): Lavorare tutti i ferri a dir. PUNTO FANTASIA: Vedere i diagrammi da M.1 a M.3 – i diagrammi mostrano i motivi sul diritto del lavoro. M.1 = 24 m, M.2 = 12 m e M.3 = 18 m. -------------------------------------------------------- DIETRO: Si lavora avanti e indietro sui ferri. Avviare 110-122-134-146-158-170 m (comprese 1 m vivagno da ciascun lato) sui ferri n° 3 con il filato Karisma. Lavorare a coste come segue: (visto sul diritto del lavoro): 1 m vivagno a PUNTO LEGACCIO - vedere le spiegazioni sopra, * 1 m a dir, 3 m a rov *, ripetere da *-* e finire con 1 m vivagno a punto legaccio. Quando le coste misurano ca. 5 cm (fare in modo che il ferro successivo sia sul rovescio del lavoro), passare ai ferri n° 4 e lavorare 1 ferro a rovescio sul rovescio del lavoro e allo stesso tempo diminuire 12 m in modo uniforme = 98-110-122-134-146-158 m. Lavorare il ferro successivo (sul diritto del lavoro) come segue: TAGLIA S: 1 m vivagno a punto legaccio, diagrammi M.1, M.2, M.1, M.2, M.1 e 1 m vivagno a punto legaccio. TAGLIA M: 1 m vivagno a punto legaccio, 6 m a maglia rasata, diagrammi M.1, M.2, M.1, M.2, M.1, 6 m a maglia rasata e 1 m vivagno a punto legaccio. TAGLIA L: 1 m vivagno a punto legaccio, diagrammi M.2, M.1, M.2, M.1, M.2, M.1, M.2 e 1 m vivagno a punto legaccio. TAGLIA XL: 1 m vivagno a punto legaccio, 6 m a maglia rasata, diagrammi M.2, M.1, M.2, M.1, M.2, M.1, M.2, 6 m a maglia rasata e 1 m vivagno a punto legaccio. TAGLIA XXL: 1 m vivagno a punto legaccio, 12 m del diagramma M.1 – iniziare dalla 13a m partendo dalla destra del diagramma, diagrammi M.2, M.1, M.2, M.1, M.2, M.1, M.2 e 12 m del diagramma M.1 – iniziare dalla 1a m del diagramma - e 1 m vivagno a punto legaccio. TAGLIA XXXL: 1 m vivagno a punto legaccio, 18 m del diagramma M.1 – iniziare dalla 7a m partendo dalla destra del diagramma, diagrammi M.2, M.1, M.2, M.1, M.2, M.1, M.2 e18 m del diagramma M.1 – iniziare dalla 1a m del diagramma - e 1 m vivagno a punto legaccio. TUTTE LE TAGLIE: Proseguire lavorando come indicato finché il lavoro non misura 48-49-50-51-52-53 cm. RICORDARSI LA TENSIONE DEL LAVORO! Chiudere ora 1-2-2-3-4-5 m da ciascun lato per gli scalfi (quindi chiudere le m all’inizio dei 2 ferri successivi) = 96-106-118-128-138-148 m. Proseguire seguendo il motivo come prima e lavorando a punto legaccio la m vivagno da ciascun lato. Quando il lavoro misura ca. 58-60-62-64-66-68 cm (bisogna essere a metà di una ripetizione o aver completato un’intera ripetizione in verticale dei diagrammi M.1 e M.2), lavorare 2 ferri a m rasata; proseguire poi seguendo il diagramma M.3 su tutte le m (tranne le m vivagno) – vedere le frecce corrispondenti alla propria taglia; questa freccia indica dove iniziare con il diagramma. ALLO STESSO TEMPO quando rimangono da lavorare 4 ferri del diagramma M.3, chiudere le 36-38-40-42-44-46 m centrali per il collo e terminare ciascuna spalla separatamente. Al ferro successivo chiudere 2 m dal lato del collo = per la spalla rimangono 28-32-37-41-45-49 m. Terminato il diagramma M.3, lavorare ancora ca. 1 cm a m rasata e poi chiudere le m. Il lavoro misura ca. 68-70-72-74-76-78 cm. DAVANTI: Avviare le m e lavorare come per il dietro. Chiudere per gli scalfi come per il dietro e continuare finché il lavoro non misura ca. 58-60-62-64-66-68 cm. Lavorare poi 2 ferri a m rasata – allo stesso tempo, durante il 1° di questi ferri, chiudere le 4 m centrali per il collo e terminare ogni spalla separatamente. Lavorare il motivo come per il dietro (assicurarsi che il diagramma M.3 sia lavorato nello stesso modo da ciascuna parte del collo) – ALLO STESSO TEMPO chiudere ad ogni ferro per il collo come segue: 2 m per 5-6-7-8-9-10 volte e poi 1 m per 8-7-6-5-4-3 volte = per le spalle rimangono 28-32-37-41-45-49 m. Chiudere le m dopo aver lavorato lo stesso numero di ferri lavorati per il dietro. MANICHE: Si lavorano avanti e indietro sui ferri. Avviare 62 m per tutte le taglie (comprese 1 m vivagno da ciascun lato) sui ferri n° 3 con il filato Karisma. Lavorare a coste come segue (visto sul diritto del lavoro) : 1 m vivagno a punto legaccio , * 1 m a dir, 3 m a rov *, ripetere da *-*, finire con 1 m vivagno a punto legaccio. Quando il lavoro misura ca. 5 cm (fare in modo che il ferro successivo sia sul rovescio del lavoro), proseguire con i ferri n° 4. Lavorare 1 ferro a rov sul rovescio del lavoro. Lavorare il ferro successivo come segue: 1 m vivagno a punto legaccio, diagrammi M.1, M.2, M.1 e 1 m vivagno a punto legaccio; proseguire in questo modo. Quando il lavoro misura 9 cm, aumentare 1 m da ciascun lato. Ripetere gli aumenti ogni 9-8-6-5-4-4 ferri per 12-14-16-18-20-21 volte – lavorare le m aumentate a m rasata = 86-90-94-98-102-104 m. Quando il lavoro misura ca 46-46-44-42-40-39 cm (bisogna essere a metà di una ripetizione o aver completato un’intera ripetizione in verticale dei diagrammi M.1 e M.2 e gli aumenti devono essere terminati), lavorare 2 ferri a m rasata; proseguire poi seguendo il diagramma M.3 – cominciare con la 1a m a destra del diagramma (il motivo non sarà completato alla fine del ferro). Terminato il diagramma M.3, lavorare (se necessario) a m rasata finché la manica non misura 56-56-54-52-50-49 cm (misura più corta per le taglie grandi perché le spalle sono più larghe); chiudere le m. CONFEZIONE: Cucire le spalle. COLLO: Riprendere ca. 119 - 139 m (il numero delle m deve essere divisibile per 4 + 3 m ) attorno al collo con il ferro circolare n° 3 e il filato Karisma – cominciare al centro, sul davanti. Lavorare il collo avanti e indietro partendo dal centro davanti. Il 1° ferro è sul rovescio del lavoro e si lavora come segue: 1 m vivagno a punto legaccio, * 1 m a rov, 3 m a dir *, ripetere da *-* e finire con 1 m a rov e 1 m vivagno a punto legaccio. Proseguire lavorando le m come si presentano e con le m vivagno lavorate a punto legaccio finché il collo non misura ca. 6 cm. Chiudere le m lavorandole come si presentano. Collocare il lato sinistro del collo sopra il lato destro, cucire con qualche punto sia sul rovescio che sul diritto. Inserire le maniche e cucire all’interno della m vivagno. Cucire i lati della maglia e i lati delle maniche all’interno della m vivagno. |
||||||||||
Spiegazioni del diagramma |
||||||||||
|
||||||||||
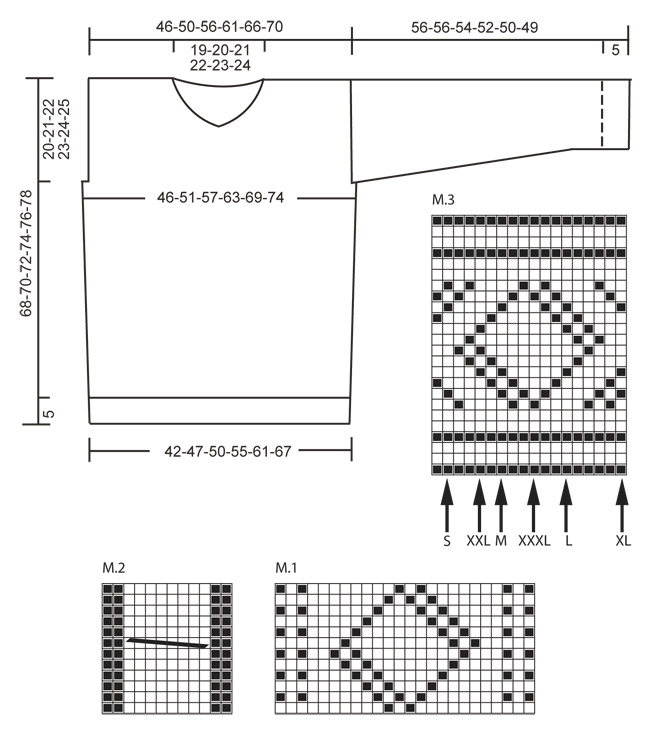 |
||||||||||
Avete terminato questo modello?Allora taggate le vostre foto con #dropspattern #sirlancelotsweater o inviatele alla #dropsfan gallery. Avete bisogno di aiuto con questo modello?Troverete 9 video tutorial, una sezione per i commenti/domande e molto altro guardando il modello su www.garnstudio.com © 1982-2026 DROPS Design A/S. Ci riserviamo tutti i diritti. Questo documento, compreso tutte le sue sotto-sezioni, è protetto dalle leggi sul copyright. Potete leggere quello che potete fare con i nostri modelli alla fine di ogni modello sul nostro sito. |
||||||||||






Con oltre 40 anni di esperienza nel design di modelli di maglia e uncinetto, DROPS Design offre la più estesa collezione di modelli gratuiti su internet - tradotti in 17 lingue. Ad oggi vi possiamo fornire 333 cataloghi e 12525 modelli - 9799 dei quali sono tradotti in Italiano.
Ci stiamo impegnando molto per darvi il meglio che vi possiamo offrire in termini di maglia e uncinetto, ispirazioni e consigli così come filati di grande qualità ad un prezzo incredibile! Volete utilizzare i nostri modelli per qualcosa d'altro oltre al vostro uso personale? Potete leggere tutto ciò che è consentito nel testo sul Copyright in basso su tutte le pagine dei nostri modelli. Buon lavoro!
Lasciare un commento sul modello DROPS 135-36
Noi saremmo felici di ricevere i tuoi commenti e opinioni su questo modello!
Se vuoi fare una domanda, fai per favore attenzione a selezionare la categoria corretta nella casella qui sotto per velocizzare il processo di risposta. I campi richiesti sono indicati da *.