
Categorie popolari
State cercando un filato?


Commenti / Domande (184)
![]() Nadia ha scritto:
Nadia ha scritto:
Please explain this part of pattern: When piece measures 46-47-48-49-50-51 cm, cast off the middle 7 sts in rib in each side I’m not sure which 7 sts this is referring to. I have 15 rib sts on each side. Which 7 sts ?
11.02.2026 - 21:22DROPS Design ha risposto:
Hi Nadia, You cast off the middle 7 of the 15 ribbed stitches (stitches 5-11). Regards, Drops Team.
12.02.2026 - 06:55
![]() Sabine ha scritto:
Sabine ha scritto:
Guten Morgen, ich möchte gerne den Pullover Firenze stricken, aber von oben nach unten. Mein Versuch mir selbst eine Anleitung zu schreiben, ist missglückt. Können Sie mir bitte einen Tipp geben. Dankeschön. Sabine
19.01.2026 - 11:19DROPS Design ha risposto:
Siehe Unten :)
20.01.2026 - 08:42
![]() Sabine Schmidt ha scritto:
Sabine Schmidt ha scritto:
Guten Morgen, ich möchte gerne den Pullover Firenze stricken, aber von oben nach unten. Mein Versuch mir selbst eine Anleitung zu schreiben, ist missglückt. Können Sie mir bitte einen Tipp geben. Dankeschön. Sabine
19.01.2026 - 10:28
![]() Sabine Schmidt ha scritto:
Sabine Schmidt ha scritto:
Guten Morgen, ich möchte gerne den Pullover Firenze stricken, aber von oben nach unten. Mein Versuch mir selbst eine Anleitung zu schreiben, ist missglückt. Können Sie mir bitte einen Tipp geben. Dankeschön. Sabine
19.01.2026 - 10:17DROPS Design ha risposto:
Liebe Frau Schmidt, hier finden Sie Pullover, die von oben nach unten gestrickt sind, das kann Ihnen sicher helfen bzw inspirieren. Viel Spaß beim Stricken!
20.01.2026 - 08:41
![]() Woudi ha scritto:
Woudi ha scritto:
Waar vind ik de Maattabel
03.01.2026 - 11:53DROPS Design ha risposto:
Dag Woudi,
Onderaan het patroon vind je een tekening met met de afmetingen van de trui in alle maten.
03.01.2026 - 14:13
![]() Gry Magritt Haugset ha scritto:
Gry Magritt Haugset ha scritto:
Hei🙂. Jeg vil strikke denne genseren til min sønn. Han ønsker Drops Alpaca, farge "hasselnøtt". Hvilken farge i Fabel kan passe til? Gjerne mix-farge i noe samme fargetone som "hasselnøtt". Lurte litt på "skog" eller "solkyst", eller "tex mex". Sistnevnte er kanskje veldig knall orange.. Tenker å bestille uten å gå i fysisk butikk, så trenger litt tips.. 🙂
29.12.2025 - 20:06DROPS Design ha risposto:
Hei Gry. Fargevalg er ganske personlig, så det er vanskelig å gi et "riktig" svar. Anbefaler å se på våre fargekart på nett. Evnt kan du søke på plagg med de fargene du ønsker å se for å få et bedre inntrykk. Du kan søke på plagg og farge med vår søkemotor. mvh DROPS Design
05.01.2026 - 09:54
![]() Lisdy ha scritto:
Lisdy ha scritto:
Hallo, ich bin nun bei der Passe angekommen. Wie sind nun die 9 Bündchenmaschen anzuschlagen? Übe wieviele Maschen der ehemaligen Ärmelmaschen erstrecken sich diese? Enden die Bündchenmaschen am ehemaligen Ärmel mit der letzten linken Masche oder beginnen die Bündchenmaschen erst beim Übergang? Und wie ist es dann am Ende der ehemaligen Ärmelmaschen, wann wird dort das Bündchenmuster integriert?
30.11.2025 - 22:27DROPS Design ha risposto:
Liebe Lisdy, diese 9 Maschen Bündchen sind die jenigen von Ärmel/Rumfpteil, die nach Abketten noch bleiben, die 3 M links, 1 M rechts am Ende Rücken/Vorderteil/Ärmel + 1 neu angeschlagene Masche + 1 M rechts, 3 M links vom Ärmel/Vorder/Rückenteil = 9 Maschen mit 1 neue Masche beim Übergang (siehe hier). Viel Spaß beim Stricken!
01.12.2025 - 10:55
![]() Anna ha scritto:
Anna ha scritto:
Dzien dobry, czy jest możliwość zamówienia welny DROPS Alpaca mix 5565, bordowo-brązowy. Widzę, ze jest na stanie u hurtownika.
05.11.2025 - 13:33DROPS Design ha risposto:
Witaj Aniu, oczywiście, tylko musisz sprawdzić, w którym sklepie jest dostępna. Listę sklepów znajdziesz TUTAJ. Pozdrawiamy!
05.11.2025 - 14:01
![]() Madison ha scritto:
Madison ha scritto:
I measured my partner's arm from his wrist to underarm as 54cm but pattern says to knit sleeve to 49cm up to armpit. Should I add more length or does it still work out for the right length after knitting the whole jumper?
27.10.2025 - 18:55DROPS Design ha risposto:
Hi Madison, The jumper is quite loose under the sleeve so the 49 cm should be ok (as the yoke gives it some extra length). Regards, Drops Team.
28.10.2025 - 07:00
![]() Stefania ha scritto:
Stefania ha scritto:
Buongiorno, se volessi fare il modello con un solo filato, sarebbe possibile? Invece di sommare le due quantità di filato dovrei prenderne la metà? Ad es. una taglia L in lana merinos invece di 400+400, ne dovrei usare solo 400? Grazie della disponibilità
14.08.2025 - 14:07DROPS Design ha risposto:
Buongiorno Stefania, il modello è progettato per essere lavorato con 2 filati, lavorando solo con un filato il risultato sarà diverso da quello riportato. Buon lavoro!
14.08.2025 - 22:03
|
|
Firenze#firenzesweater |
|
 |
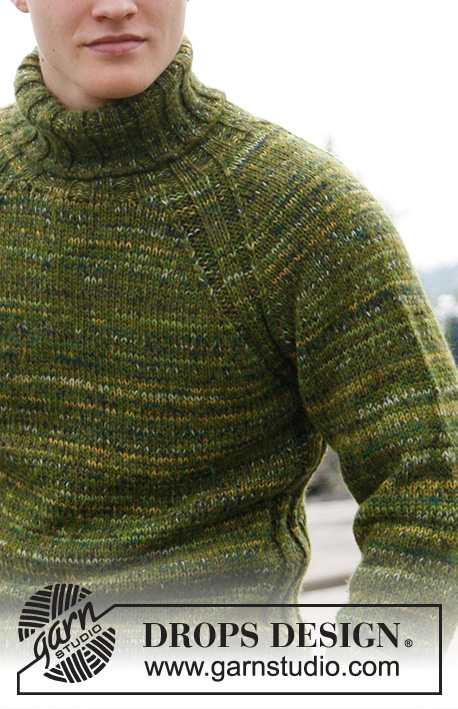 |
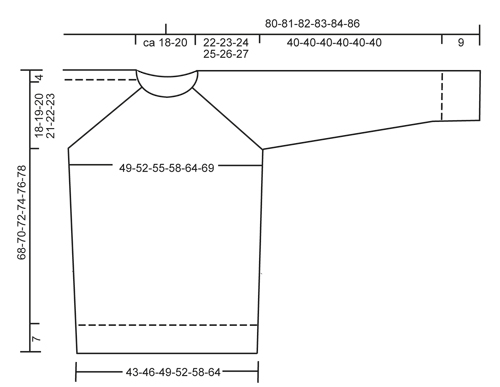
Maglione da uomo lavorato ai ferri con raglan e collo alto in DROPS Alpaca e DROPS Fabel. Taglie: Dalla S alla XXXL.
DROPS 135-13 |
|
|
RAGLAN: Diminuire da ciascun lato delle 9 m a coste in corrispondenza del passaggio tra il corpo e le maniche. Diminuire come segue sul DIRITTO del lavoro: PRIMA delle 9 m: lavorare 2 m insieme a dir. DOPO le 9 m: passare 1 m a dir senza lavorarla, 1 m a dir, accavallare la m passata sulla m lavorata. Diminuire come segue sul ROVESCIO del lavoro: PRIMA delle 9 m: lavorare 2 m insieme a rov ritorto (quindi prendere le m nell’asola posteriore e non in quella anteriore). DOPO le 9 m: lavorare 2 m insieme a rov. -------------------------------------------------------- DAVANTI/DIETRO: Si lavora in tondo sul ferro circolare. Avviare 168-180-192-204-228-252 m sul ferro circolare n° 4 con 1 capo di Alpaca e 1 capo di Fabel. Lavorare a coste = 3 m a dir/3 m a rov per 7 cm. Proseguire con il ferro circolare n°5 e lavorare il giro successivo come segue: * 4 m a dir, 2 m insieme a dir *, ripetere da *-* per 11-12-13-14-16-18 volte, 3 m a dir, continuare a coste come prima sulle 15 m successive (= lato del maglione), ripetere da *-* per 11-12-13-14-16-18 volte, 3 m a dir, lavorare poi a coste come prima sulle ultime 15 m (= l’altro lato) = 146-156-166-176-196-216 m. Proseguire lavorando a coste le 15 m da ciascun lato e a maglia rasata le restanti m. RICORDARSI LA TENSIONE DEL LAVORO! Quando il lavoro misura 18 cm, aumentare 1 m da ciascuna parte delle 15 m a coste ai lati. Ripetere gli aumenti ogni 6 cm per 5 volte – lavorare le m aumentate a maglia rasata = 166-176-186-196-216-236 m. Quando il lavoro misura 46-47-48-49-50-51 cm, chiudere le 7 m centrali lavorate a coste da ciascun lato = sul ferro rimangono 152-162-172-182-202-222 m. Lasciare il lavoro in sospeso e proseguire con le maniche. MANICHE: Si lavorano in tondo sui ferri a doppia punta. Avviare 48-48-54-54-60-60 m sui ferri a doppia punta n° 4 con 1 capo di Alpaca e 1 capo Fabel. Lavorare a coste = 3 m a dir/3 m a rov per 9 cm. Proseguire con i ferri a doppia punta n° 5. Lavorare il giro successivo come segue: lavorare le prime 33-33-39-39-45-45 m a maglia rasata e le ultime 15 m (= maglie centrali sotto la manica) a coste come prima. Quando il lavoro misura 11 cm, aumentare 1 m da ciascun lato delle 15 m lavorate a coste. Ripetere gli aumenti ogni 4-3-3½-3-3-3 cm per 10-12-11-13-12-13 volte = 68-72-76-80-84-86 m – lavorare le m aumentate a maglia rasata. Quando il lavoro misura 49 cm per tutte le taglie, chiudere le 7 m centrali lavorate a coste = sul ferro rimangono 61-65-69-73-77-79 m. Lasciare il lavoro in sospeso e proseguire con l’altra manica. SPRONE: Inserire le m delle maniche sul ferro circolare usato per lavorare il dietro e il davanti, in corrispondenza degli scalfi = 274-292-310-328-356-380 m. Lavorare 1 giro lavorando le m come si presentano – ALLO STESSO TEMPO aumentare 1 m in tutti i passaggi tra il corpo e le maniche (lavorare questa m a dir) = 278-296-314-332-360-384 m. In tutti i passaggi tra il corpo e le maniche ci sono ora : 3 m a rov, 3 m a dir e 3 m a rov = 9 m lavorate a coste. Proseguire lavorando le m come si presentano e allo stesso tempo diminuire per il RAGLAN - vedere le spiegazioni sopra! Ripetere le dim ogni 2 ferri per 17-18-18-18-18-19 volte e poi ad ogni ferro per 5-6-8-10-12-12 volte. ALLO STESSO TEMPO quando rimangono ancora da fare 5 diminuzioni, passare le 18-19-20-23-25-27 m centrali del davanti su un fermamaglie, per il collo. Lavorare avanti e indietro sul ferro fino alla fine del lavoro. ALLO STESSO TEMPO chiudere all’inizio di ciascun ferro 1 m per 2 volte da ciascun lato (= verso il collo). Terminate tutte le dim per il raglan e per il collo, sul ferro rimangono 80-81-82-81-91-105 m. COLLO: Lavorare con i ferri circolari n° 4. Riprendere ca 22 -31 m sul davanti per il collo (comprese le m sul fermamaglie) = in tutto ci sono da 102 a 136 m. Lavorare 1 giro lavorando le m come si presentano e allo stesso tempo portare il n° delle m a 102-102-102-114-114-114 (ci sono ora 21-21-21-27-27-27 m lavorate a m rasata per il dietro, 27-27-27-33-33-33 m lavorate a m rasata per il davanti e 9 m lavorate a m rasata per ciascun spalla). Proseguire a coste = 3 m a dir, 3 m a rov su tutte le m –fare in modo che tutte le m del raglan seguano le stesse coste di prima. Quando il collo misura ca. 20 cm, chiudere le m lavorandole come si presentano. Piegare il collo doppio verso il diritto del lavoro. CONFEZIONE: Cucire insieme le aperture sotto le maniche. |
|
 |
|
Avete terminato questo modello?Allora taggate le vostre foto con #dropspattern #firenzesweater o inviatele alla #dropsfan gallery. Avete bisogno di aiuto con questo modello?Troverete 16 video tutorial, una sezione per i commenti/domande e molto altro guardando il modello su www.garnstudio.com © 1982-2026 DROPS Design A/S. Ci riserviamo tutti i diritti. Questo documento, compreso tutte le sue sotto-sezioni, è protetto dalle leggi sul copyright. Potete leggere quello che potete fare con i nostri modelli alla fine di ogni modello sul nostro sito. |
|


Con oltre 40 anni di esperienza nel design di modelli di maglia e uncinetto, DROPS Design offre la più estesa collezione di modelli gratuiti su internet - tradotti in 17 lingue. Ad oggi vi possiamo fornire 324 cataloghi e 12290 modelli - 9561 dei quali sono tradotti in Italiano.
Ci stiamo impegnando molto per darvi il meglio che vi possiamo offrire in termini di maglia e uncinetto, ispirazioni e consigli così come filati di grande qualità ad un prezzo incredibile! Volete utilizzare i nostri modelli per qualcosa d'altro oltre al vostro uso personale? Potete leggere tutto ciò che è consentito nel testo sul Copyright in basso su tutte le pagine dei nostri modelli. Buon lavoro!
Lasciare un commento sul modello DROPS 135-13
Noi saremmo felici di ricevere i tuoi commenti e opinioni su questo modello!
Se vuoi fare una domanda, fai per favore attenzione a selezionare la categoria corretta nella casella qui sotto per velocizzare il processo di risposta. I campi richiesti sono indicati da *.