
Categorie popolari
State cercando un filato?


Commenti / Domande (15)
![]() Anne-Marie Romsaas Borgersen ha scritto:
Anne-Marie Romsaas Borgersen ha scritto:
Hei! Jeg har tenkt å strikke denne vesten, men lurer på om det er riktig at man kun skal strikke 1 pinne rett, etter opplegg. Skal det ikke være 2 p. rett, altså 1 rille nederst på vesten? Det står i oppskriften; se forkl. over. og i forklaringen over står det 1 rille= 2 p. rett. Dette ble jeg usikker på... Mvh. Anne-Marie Borgersen
05.03.2025 - 22:08DROPS Design ha risposto:
Hej Anne-Marie. Det ska kun vara 1 pinne rett som det står i oppskriften. Mvh DROPS Design
07.03.2025 - 08:25
![]() Maybritt Leonard ha scritto:
Maybritt Leonard ha scritto:
Hej Jeg ville høre om jeg kan lave denne vest i noget andet garn end bucle? Mvh Maybritt Leonard
09.10.2024 - 09:50DROPS Design ha risposto:
Hej Maybritt. Ja, du kan sticka den i ett annat garn i Garngrupp C, här kan du se en översikt över våra garngrupper. Se bara till att få den stickfasthet som uppges i opskriften. Mvh DROPS Design
11.10.2024 - 14:37
![]() Mies Heisterkamp ha scritto:
Mies Heisterkamp ha scritto:
Hi, I'm confused about the start of the pieces. It says after the cast-on to knit 1 row from the RS (right side). What is the right side? As I understand it, you would purl the row after the CO so that it looks like a knit on the other side. But then it will start to curl. The alternative would be to knit the row after CO and that would be then the right side? And you would then go on with a purl row? I really would like to have this explained as I'm eager to knit this nice looking vest.
11.03.2024 - 21:15DROPS Design ha risposto:
Dear Mrs Heisterkamp, just after the cast on, knit all stitches = this will be the right side of the piece, then continue working in stocking stitch, ie pur next row, then knit next row and repeat these 2 rows. Happy knitting!
12.03.2024 - 07:37
![]() Julia ha scritto:
Julia ha scritto:
Habe ich das richtig verstanden: Das Rückenteil wird glatt rechts und die Vorderteile kraus rechts gestrickt? Und was ist in der Anleitung für das Rückenteil beim Abnehmen mit Total gemeint? Das ist schwierig zu verstehen.
24.01.2019 - 14:43DROPS Design ha risposto:
Liebe Julia, Rückenteil und Vorderteile werden alle glatt rechts gestrikt. bei den Vorderteilen stricken Sie nur die Randmasche kraus rechts. "Total" bedeutet die gesamte Abnahmen- bzw Zunahmenanzahl =wieviel Mal Sie ab- bzw zunehmen sollen. Viel Spaß beim stricken!
25.01.2019 - 09:43
![]() Gisela ha scritto:
Gisela ha scritto:
Ist es richtig, dass man an der Blende " 80 und 98 Maschen" aufnehmen soll oder eher wie bei der Halskante "ca. 75 bis 85 Maschen"? Letzteres würde für mich eher einen Sinn ergeben ... Ich bitte um Hilfe, vielen Dank im Voraus.
09.01.2016 - 17:26DROPS Design ha risposto:
Ja Sie haben Recht, Sie fassen 80 bis 98 M auf. Das wird gleich korrigiert, danke für den Hinweis!
10.01.2016 - 22:58
![]() Maureen Bower ha scritto:
Maureen Bower ha scritto:
Sarah pattern Drops 132-27 Pattern No AB-011 This pattern uses Alpaca bouclé yarn. Is the right side of the fabric meant to be the purl side of the stocking stitch?
13.10.2015 - 22:40DROPS Design ha risposto:
Dear Mrs Bower, the whole pattern is worked in stocking st (= K from RS and P from WS). Happy knnitting!
14.10.2015 - 08:56
![]() Lillian Moe Meiholm ha scritto:
Lillian Moe Meiholm ha scritto:
Deilig vest som passer til alt!
05.06.2011 - 16:08
![]() Suzanne ha scritto:
Suzanne ha scritto:
Versatile and attractive. Like the pockets.
26.05.2011 - 18:51
![]() Doro ha scritto:
Doro ha scritto:
Die mag ich: schön schlicht und gemütlich!
26.05.2011 - 13:57
![]() Elisabeth ha scritto:
Elisabeth ha scritto:
Sød og enkel
23.05.2011 - 16:41
|
|
Sarah#sarahvest |
|
|
|
|
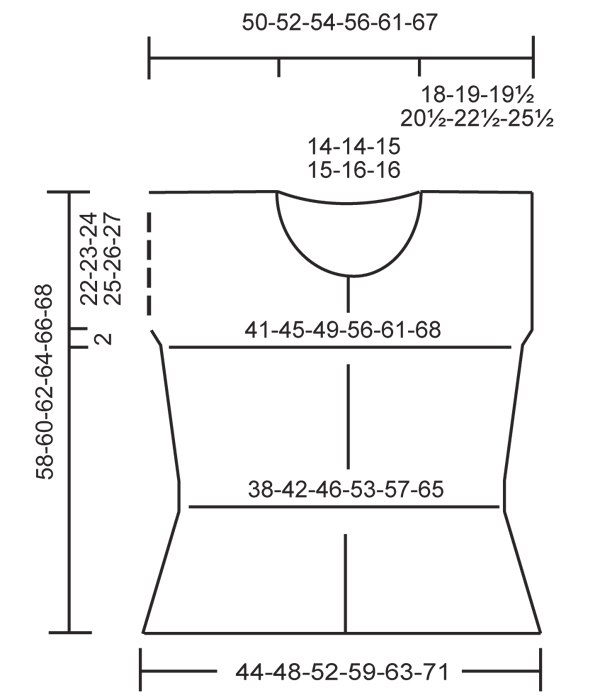
Gilet DROPS ai ferri, in "Alpaca Bouclé" con bordi in "Alaska". Taglie dalla S alla XXXL.
DROPS 132-27 |
|
|
PUNTO LEGACCIO (avanti e indietro sul ferro): Lavorare a dir tutti i ferri. SUGGERIMENTO PER PRENDERE LE MISURE: Misurare il lavoro dal ferro di avvio fino alla spalla sul lato più lungo. DIETRO: Avviare 76-82-88-100-108-120 m con i ferri n° 4,5 e il filato Alaska e lavorare 1 ferro a dir sul diritto del lavoro - vedere le spiegazioni sopra. Proseguire con i ferri n° 5 e il filato Alpaca Bouclé e lavorare a m rasata. RICORDARSI LA TENSIONE DEL LAVORO! Quando il lavoro misura 2-2-2-3-3-3 cm, dim 1 m da ciascun lato. Ripetere le dim ogni 2-2-2-2-2½-2½ cm per 3-3-3-3-4-3 volte e poi ogni 2½-2½-2½-2½-3-3 cm per 2 volte = 66-72-78-90-96-110 m. Quando il lavoro misura 15-16-16-17-18-18 cm, aumentare 1 m da ciascun lato; ripetere gli aumenti ogni 5-7-5-5-4-5 cm per 3-2-3-3-4-2 volte = 72-76-84-96-104-114 m. Continuare finché il lavoro non misura 34-35-36-37-38-39 cm. Aumentare ora per i bordi delle maniche all'inizio di ciascun ferro come segue: aumentare 1 m da ciascun lato per 2 volte = 76-80-88-100-108-118 m. Continuare a m rasata - lavorare le prime e le ultime 4 m di ciascun ferro a punto legaccio. Quando il lavoro misura 57-59-61-63-65-67 cm - vedere il SUGGERIMENTO PER PRENDERE LE MISURE sopra - chiudere le 24-24-26-26-28-28 m centrali per il collo e finire ogni spalla separatamente. Al ferro successivo, dim 1 m per il collo = per la spalla rimangono 25-27-30-36-39-44 m. Lavorare 2 ferri e chiudere le m. Il lavoro misura ca. 58-60-62-64-66-68 cm. DAVANTI SINISTRO: Avviare 43-46-49-55-59-66 m (compresa 1 m per il bordo davanti) con i ferri n° 4.5 e il filato Alaska; lavorare 1 ferro a dir sul diritto del lavoro. Proseguire con i ferri n° 5 e il filato Alpaca Bouclé e lavorare a m rasata - lavorare a punto legaccio la m del bordo davanti. Quando il lavoro misura 2-2-2-3-3-3 cm, diminuire al lato come fatto per il dietro = 38-41-44-50-53-61 m. Proseguire finche' il lavoro non misura 15-16-16-17-18-18 cm. Aumentare ora al lato come per il dietro = 41-43-47-53-57-63 m. Quando il lavoro misura 34-35-36-37-38-39 cm, aumentare per il bordo della manica sul lato come segue: aumentare 1 m ogni 2 ferri per 2 volte = 43-45-49-55-59-65 m. Proseguire a m rasata - lavorare le 4 m del bordo della manica e la m del bordo davanti a punto legaccio. Quando il lavoro misura 48-49-50-54-55-57 cm, chiudere per il collo, ogni 2 ferri, come segue: 6-6-7-7-8-8 m 1 volta, 3 m 1 volta, 2 m 2 volte, 3-3-3-3-3-4 m 1 volta; poi ogni 4 ferri : 1 m 2 volte = terminate tutte le dim, sul ferro rimangono 25-27-30-36-39-44 m per la spalla. Lavorare 2 ferri e chiudere le m. Il lavoro misura ca. 58-60-62-64-66-68 cm. DAVANTI DESTRO: Avviare le m e lavorare come per il davanti sinistro, ma in senso inverso. TASCA: Con i ferri n° 5 e il filato Alpaca Bouclé avviare 26 m. Lavorare 4 m a coste 1 m a dir/ 1 m a rov, 18 m a dir, 4 m a coste 1 m a dir/ 1 m a rov. Continuare a coste e a m rasata finché la tasca non misura ca. 6 cm in altezza. Lavorare 1 ferro a dir sul diritto del lavoro con il filato Alaska e chiudere le m. Lavorare la 2a tasca in modo uguale. CONFEZIONE: Cucire le spalle. Cucire i lati, fino ai bordi delle maniche, nell’asola anteriore della m più esterna per evitare una cucitura troppo spessa. Cucire le tasche; la riga in Alaska deve essere rivolta verso l’alto. COLLO: Con i ferri n° 4,5 e il filato Alaska, riprendere da 75 a 85 m sul diritto del lavoro attorno al collo. Lavorare 1 ferro a rovescio sul rovescio del lavoro. Chiudere le m a dir senza stringere troppo il filo. BORDI SUL DAVANTI: Con i ferri n° 4,5 e il filato Alaska, riprendere da 80 a 98 m e lavorare 1 ferro a rovescio sul rovescio del lavoro. Chiudere le m. Lavorare l’altro bordo nello stesso modo. |
|
 |
|
Avete terminato questo modello?Allora taggate le vostre foto con #dropspattern #sarahvest o inviatele alla #dropsfan gallery. Avete bisogno di aiuto con questo modello?Troverete 11 video tutorial, una sezione per i commenti/domande e molto altro guardando il modello su www.garnstudio.com © 1982-2026 DROPS Design A/S. Ci riserviamo tutti i diritti. Questo documento, compreso tutte le sue sotto-sezioni, è protetto dalle leggi sul copyright. Potete leggere quello che potete fare con i nostri modelli alla fine di ogni modello sul nostro sito. |


Con oltre 40 anni di esperienza nel design di modelli di maglia e uncinetto, DROPS Design offre la più estesa collezione di modelli gratuiti su internet - tradotti in 17 lingue. Ad oggi vi possiamo fornire 324 cataloghi e 12290 modelli - 9561 dei quali sono tradotti in Italiano.
Ci stiamo impegnando molto per darvi il meglio che vi possiamo offrire in termini di maglia e uncinetto, ispirazioni e consigli così come filati di grande qualità ad un prezzo incredibile! Volete utilizzare i nostri modelli per qualcosa d'altro oltre al vostro uso personale? Potete leggere tutto ciò che è consentito nel testo sul Copyright in basso su tutte le pagine dei nostri modelli. Buon lavoro!
Lasciare un commento sul modello DROPS 132-27
Noi saremmo felici di ricevere i tuoi commenti e opinioni su questo modello!
Se vuoi fare una domanda, fai per favore attenzione a selezionare la categoria corretta nella casella qui sotto per velocizzare il processo di risposta. I campi richiesti sono indicati da *.