
Categorie popolari
State cercando un filato?


Commenti / Domande (27)
![]() Cheri ha scritto:
Cheri ha scritto:
Is the back of the DROPS Touch of Mint pattern worked in two separate pieces? What is the placement of the part labeled Body and the part labeled Back?
09.04.2025 - 20:22DROPS Design ha risposto:
Dear Cheri, the part "Body" applies to the bottom of the cardigan, ie from cast on/bottom edge to armholes you work in just one part; then you divide piece at markers for armholes and finish each part separately, starting with back piece then both front pieces. Happy knitting!
10.04.2025 - 09:44
![]() Patricia McDonald ha scritto:
Patricia McDonald ha scritto:
Border for drops design R-596 has a chevron effect which makes peaks and valleys on both edges. This pulls the front edge of the jacket out of shape. How do you get a straight edge on the one side where it joins the body?
02.10.2022 - 14:40DROPS Design ha risposto:
Dear Mrs McDonald, make sure to pick up enough stitches along edges and keep the same tension as before to keep same measurements; you can always block the edge at the end if necessary. Happy knitting!
03.10.2022 - 09:22
![]() Ula ha scritto:
Ula ha scritto:
Dzień dobry wspaniały Team'ie Drops'a. Potrzebowała zaadaptować wzór do potrzeb mej nieco grubszej włóczki. Oczka przodu mam 4 powtorzenia wzoru wiec 29 na kazda polowe przodu. Jednak tyl w opisie ma 88 oczek-niepodzielna przez 7. Rozumiem ze 84o. jako 7x12 plus 4. Do czego potrzebne sa extra 4? Prosze o pomoc jako ze musze konwertowac wzor na potrzeby mojej włóczki. Pozdrawiam serdecznie. Ula
09.06.2020 - 14:57DROPS Design ha risposto:
Witaj Ulu! To jest po to aby wzór M1 był symetryczny na drugim przodzie. Cieszę się, że nasze starsze wzory cieszą się również powodzeniem :) Koniecznie pokaż nam gotowy sweterek na naszej grupie DROPS Workshop na facebooku. Pozdrawiamy!
10.06.2020 - 08:38
![]() Ulrike Hartmannschott ha scritto:
Ulrike Hartmannschott ha scritto:
Guten Morgen, Wieviele Maschen muss ich in M2 bei Grösse XXL stricken? Ich finde M2 in der Anleitung gar nicht. Danke für Ihre Hilfe.
16.05.2020 - 05:29DROPS Design ha risposto:
Liebe Frau Hartmannschott, M.2 wird über die Blende gestrickt. Sie sollen dann 313 Maschen haben, und diese Maschen so (bei den Hinreihen) stricken: die 12 Maschen von M.2 26 Mal wiederholen, und mit der 1. Masche von M.2 enden. Viel Spaß beim stricken!
18.05.2020 - 07:22
![]() Elisabeth Grahn ha scritto:
Elisabeth Grahn ha scritto:
Tack, för svaren. Förstår nu lite bättre, jag ska alltså lägga upp 260 m (efterom jag stickar L)??, då jag kommer till framkanten, framkanten =M2. Det som står under Bakstycke, Vä framstycke och höger framstycke gäller alltså efter 37 cm, då man utökar för ärmarna? Tacksam för kommentar/svar! Med vänlig hälsning, Elisabeth
26.04.2016 - 22:39DROPS Design ha risposto:
Hej. Det är riktigt att det som står under BAKST, VÄNSTER FRAMST och HÖGER FRAMST är efter att du stickat de 37 cm under FRAM- OCH BAKSTYCKE. När du kommer till framkanten stickar du upp mellan 260-320 m som sedan justeras till 301 m (strl L). Lycka till!
27.04.2016 - 12:10
![]() Johanna ha scritto:
Johanna ha scritto:
M2 är ju framkanten som stickas sist.
24.04.2016 - 11:47
![]() Elisabeth Grahn ha scritto:
Elisabeth Grahn ha scritto:
Jag har börjat sticka stl L, lagt upp 188 m o stickat rätstickning 2,5 cm, ska byta till grövre maskor. jag förstår inte!, när ska jag sticka mönster 2, är det inte i början o slutet av varven?? jag rycker det framgår inte alls när M 2 ska stickas!?!!
24.04.2016 - 08:18DROPS Design ha risposto:
Hej. M.2 är framkanten som du stickar när du är färdig med alla stycken och har monterat ihop de. Se under stycket "FRAMKANT". Lycka till!
26.04.2016 - 13:57Nashwaahmed ha scritto:
I am sorry again as i couldn't get it when i cast of while working the first row of M.2, how would i cast of a yo ? should i work the next stitch following it then pass the yo over it then pass the very first stitch over it ?
15.04.2013 - 15:27DROPS Design ha risposto:
Dear Mrs Nashwaahmed, you just make a you on right needle and cast off as a usual st. Happy Knitting!
15.04.2013 - 16:13Nashwaahmed ha scritto:
Quick question : how to bind off and at the same time work the first row of M.2 ??
14.04.2013 - 17:46DROPS Design ha risposto:
Dear Mrs Nashwaahmed, just work all sts as stated in 1st row in M.2 and cast off as usual, don't forget to make the yos and cast of them as sts. Happy knitting!
15.04.2013 - 10:09
![]() Drops Design ha scritto:
Drops Design ha scritto:
Diagrammerne stemmer, så det er bare at komme igang! God fornöjelse!
19.07.2011 - 18:30
|
|||||||||||||||||||
Touch of Mint#touchofmintcardigan |
|||||||||||||||||||
 |
 |
||||||||||||||||||
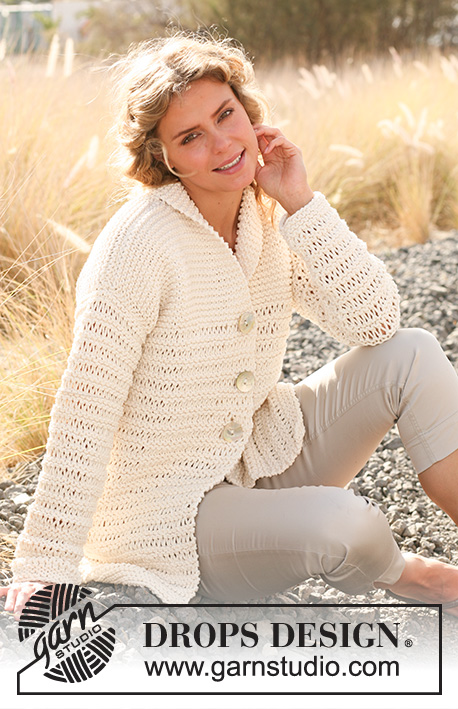
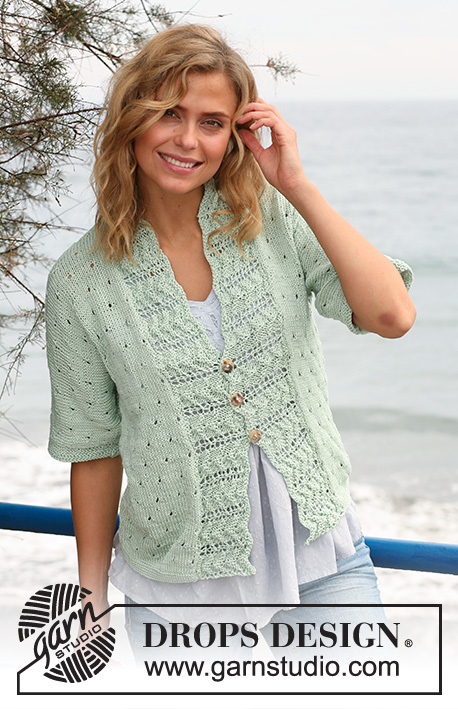
Giacca DROPS lavorata ai ferri con motivo traforato in "Muskat". Taglie: S - XXXL.
DROPS 129-25 |
|||||||||||||||||||
|
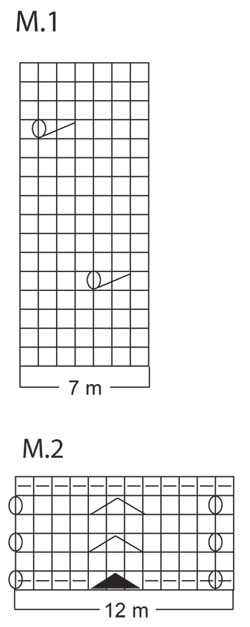
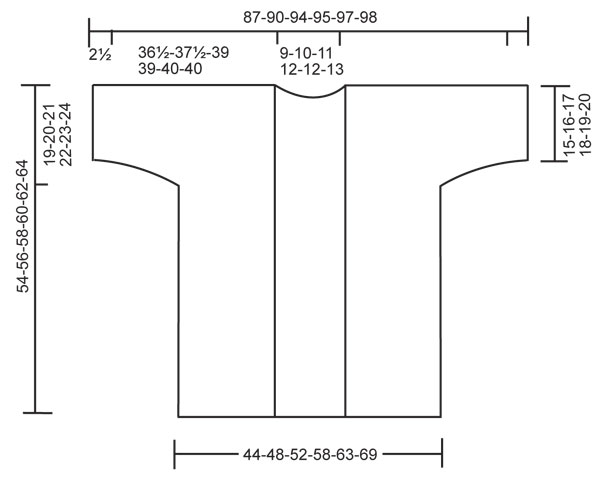
M LEGACCIO (avanti e indietro sui f): lavorare tutti i f a dir. MOTIVO: Vedere i diagrammi M.1 e M.2. Il diagramma mostra il motivo dal diritto del lavoro. -------------------------------------------------------- CORPO: Lavorato avanti e indietro sui f circolari dal centro davanti. Avviare 160-174-188-209-230-251 m (compresa 1 m di vivagno a ogni lato) con i f circolari n° 3 mm con Muskat. Lavorare a m legaccio per circa 2,5 cm – leggere la spiegazione sopra. Passare ai f circolari n° 4 mm e continuare come segue (1° f = diritto del lavoro): 1 m di vivagno a m legaccio, ripetere M.1 fino a quando rimangono 5 m, lavorare le m 1-4 di M.1, 1 m di vivagno a m legaccio – leggere la spiegazione sopra. Inserire 2 segnapunti nel lavoro all’interno di 36-39-42-47-52-57 m da ogni lato. FARE ATTENZIONE ALLA TENSIONE DEL LAVORO! Continuare a lavorare in questo modo fino a quando il lavoro misura circa 35-36-37-38-39-40 cm. Ora dividere il lavoro all’altezza dei segnapunti e finire ogni parte in modo separato. DIETRO: = 88-96-104-115-126-137 m. Lavorare M.1 come prima – ALLO STESSO TEMPO avviare nuove m per le maniche alla fine di ogni f a ogni lato come segue: 4 m per un totale di 1-1-1-3-4-5 volte, 6 m per un totale di 4-4-4-2-1-0 volte (lavorare le nuove m con il motivo) = 144-152-160-163-170-177 m. Poi avviare 11-10-10-9-8-5 nuove m alla fine dei 2 f successivi = 166-172-180-181-186-187 m (compresa 1 m di vivagno a ogni lato lavorata a m legaccio fino alla fine del lavoro). Continuare con il motivo come prima. Quando il lavoro misura circa 52-54-56-58-60-62 cm, intrecciare le 16-18-20-21-22-23 m centrali per il collo = 75-77-80-80-82-82 m rimaste su ogni spalla (compresa 1 m di vivagno a ogni lato lavorata a m legaccio fino alla fine del lavoro). Ora finire ogni spalla in modo separato. Continuare con il motivo e 1 m a m legaccio verso il collo fino a quando il lavoro misura 54-56-58-60-62-64 cm. Intrecciare. DAVANTI SINISTRO: = 36-39-42-47-52-57 m. Ora avviare nuove m per la manica a lato come sul dietro e ALLO STESSO TEMPO lavorare le nuove m con il motivo. Alla fine di tutti gli aumenti, ci sono 75-77-80-80-82-82 m sulla spalla (compresa 1 m di vivagno a ogni lato lavorata a m legaccio fino alla fine del lavoro). Continuare a lavorare fino a quando il lavoro misura 54-56-58-60-62-64 cm. Intrecciare. DAVANTI DESTRO: Lavorare come per il davanti sinistro ma a specchio. CONFEZIONE: Cucire i margini delle braccia e delle spalle. Sulla parte inferiore della manica all’interno della m di vivagno riprendere 64-68-72-76-80-84 m con i f circolari n° 3 mm con Muskat. Lavorare a m legaccio avanti e indietro sui f per 2,5 cm. Intrecciare senza stringere. Lavorare nello stesso modo attorno al bordo dell’altra manica. Cucire i bordi sotto le braccia all’interno della m di vivagno. BORDO DAVANTI: Riprendere 260-320 m all’interno della m di vivagno con i f circolari n° 3 mm con Muskat. Iniziare sulla parte inferiore del davanti, su lungo il davanti, attorno al collo sul dietro e giù lungo il davanti sinistro. Lavorare 1 f dir dal rovescio del lavoro – e ALLO STESSO TEMPO aggiustare il n° di m a 277-289-301-313-325-337 (il n° può essere diviso per 12 + 1). Poi lavorare M.2 – vedere il diagramma, lavorare l’ultima m sul f come la 1° m in M.2. Continuare fino a quando M.2 è stato lavorato 4 volte in verticale. Ora intrecciare e ALLO STESSO TEMPO lavorare il 1° f di M.2. CONFEZIONE: Attaccare i bottoni sul bordo davanti sinistro come segue: TAGLIE S, M, L: attaccare un bottone nella 5°, 6° e 7° punta dal bordo inferiore della giacca. TAGLIE XL, XXL, XXXL: cucire un bottone nella 5°, 6°, 7° e 8° punta dal bordo inferiore della giacca. I buchi (gettati in M.2) sul bordo davanti destro vengono usati come asole. |
|||||||||||||||||||
Spiegazioni del diagramma |
|||||||||||||||||||
|
|||||||||||||||||||
 |
|||||||||||||||||||
 |
|||||||||||||||||||
Avete terminato questo modello?Allora taggate le vostre foto con #dropspattern #touchofmintcardigan o inviatele alla #dropsfan gallery. Avete bisogno di aiuto con questo modello?Troverete 18 video tutorial, una sezione per i commenti/domande e molto altro guardando il modello su www.garnstudio.com © 1982-2026 DROPS Design A/S. Ci riserviamo tutti i diritti. Questo documento, compreso tutte le sue sotto-sezioni, è protetto dalle leggi sul copyright. Potete leggere quello che potete fare con i nostri modelli alla fine di ogni modello sul nostro sito. |
|||||||||||||||||||


Con oltre 40 anni di esperienza nel design di modelli di maglia e uncinetto, DROPS Design offre la più estesa collezione di modelli gratuiti su internet - tradotti in 17 lingue. Ad oggi vi possiamo fornire 324 cataloghi e 12290 modelli - 9561 dei quali sono tradotti in Italiano.
Ci stiamo impegnando molto per darvi il meglio che vi possiamo offrire in termini di maglia e uncinetto, ispirazioni e consigli così come filati di grande qualità ad un prezzo incredibile! Volete utilizzare i nostri modelli per qualcosa d'altro oltre al vostro uso personale? Potete leggere tutto ciò che è consentito nel testo sul Copyright in basso su tutte le pagine dei nostri modelli. Buon lavoro!
Lasciare un commento sul modello DROPS 129-25
Noi saremmo felici di ricevere i tuoi commenti e opinioni su questo modello!
Se vuoi fare una domanda, fai per favore attenzione a selezionare la categoria corretta nella casella qui sotto per velocizzare il processo di risposta. I campi richiesti sono indicati da *.