
Categorie popolari
State cercando un filato?


Commenti / Domande (15)
![]() Barbara ha scritto:
Barbara ha scritto:
Guten Tag Ich habe eine Frage zu den verkürzten Reihen. Ist es richtig, dass über die ganzen 4 x Verkürzen die 10 M auf dem Hilfsfaden bleiben und ich 8 Maschen stricken soll, wenden, zurück und das 4 x? Vielen Dank für Ihre Antwort und herzlichen Gruss Danke auch für die immer tollen Anleitungen!
20.08.2023 - 16:16DROPS Design ha risposto:
Liebe Barbara, am Anfang einer Hinreihe stricken Sie die ersten 10 Maschen und legen Sie diese Maschen still, dann stricken Sie diese Hinreihe bis zur Ende, wenden Sie und stricken Sie die Rückreihe. Diese 2 Reihen insgesamt 4 Mal stricken (es sind dann 10 M x 4 = 40 Maschen auf dem Faden) und 8 bis 20 M (siehe Größe) übrig auf der Nadel. Viel Spaß beim stricken!
21.08.2023 - 09:07
![]() MSHARRY ha scritto:
MSHARRY ha scritto:
I am working on th e section where I hav just finished all the cast offs and cast ons and I have 56 sts on the needle. The next step says to work in stocking stwhen piece measures 20 cm work short rows Does that mean I measure from where I have the 56 sts to do the stocking st. till I have 20 cm and then work the short rows?
06.11.2019 - 21:24DROPS Design ha risposto:
Dear MSHarry, the 20 cm should be measured from the markers added on each side after 13 cm ie where pattern says to measure piece from here. Happy knitting!
07.11.2019 - 09:06
![]() MSHARRY ha scritto:
MSHARRY ha scritto:
I am at the section of the pattern where it says repeat inc when edge measure 5 and 8 cm. When I have done the increases every third p section to 3 sts and I have 224 sts I do not understand where to displace inc . Can you make this a little more clearly?
02.10.2019 - 03:10DROPS Design ha risposto:
Dear MsHarry, after first increase you should have: *K3, P3, K3, P2, K3, P2*, repeat from *-* all the round - after 2nd increase you should have *K3, P3, K3, P3, K3, P2*, repeat from *-* all the round and after last increase you should have *K3, P3, K3, P3, K3, P3**, repeat from *-* all the round = K3/P3 on the round. Happy knitting!
02.10.2019 - 08:25
![]() MSHARRY ha scritto:
MSHARRY ha scritto:
IF YOU READ THE SECTION WHERE IT SAYS TOWARDS FRONT PIECE, WOULDN'T THE 4 ROW BE ON TOWARD THE BACK PIECE, OR AM I NOT READING THIS PROPERLY. ANY HELP WILL BE APPRECIATED
16.07.2019 - 16:13DROPS Design ha risposto:
Dear Mrs Msharry, the right hand side of piece seen from RS is the front piece, while the left hand side of the piece seen from RS is back piece. For front piece, you will cast off at the beg of a RS row, and for back piece you will cast on new stitches at the end of a RS row. Happy knitting!
17.07.2019 - 10:56
![]() MSHARRY ha scritto:
MSHARRY ha scritto:
When you are doing cast off and dec. how can the pattern read dec on every 4th row? Wouldn't that be on the towards the back instead of towards the front?
16.07.2019 - 03:04DROPS Design ha risposto:
Hi MSHARRY, The first decrease is from the right side, so all the following 4th rows will also be from the right side. Happy knitting!
16.07.2019 - 06:58
![]() Charlotte Lücking ha scritto:
Charlotte Lücking ha scritto:
Jeg har striket modellen i Paris str. M - det er ikke nok med 250 g. Jeg måtte købe et nøgle ekstra - surt når man handler online, og derved kommer til at betale porto to gange 😔
15.01.2016 - 13:58
![]() Drops Design ha scritto:
Drops Design ha scritto:
Hi Stephanie, yes, make sure last row you work is worked from WS so that next row will begin a RS row.
19.12.2011 - 17:45
![]() Stephanie Gum ha scritto:
Stephanie Gum ha scritto:
Does "adjust so that last row is from WS" mean to the next row should begin a RS row? Or does it mean the next row should begin a WS row?
19.12.2011 - 13:49Myriam ha scritto:
Beautiful shape
02.02.2011 - 18:02
![]() Carole ha scritto:
Carole ha scritto:
I love shrugs. This one looks wonderful.
31.01.2011 - 03:32
|
||||
Spring Flutter#springflutterbolero |
||||
 |
 |
|||
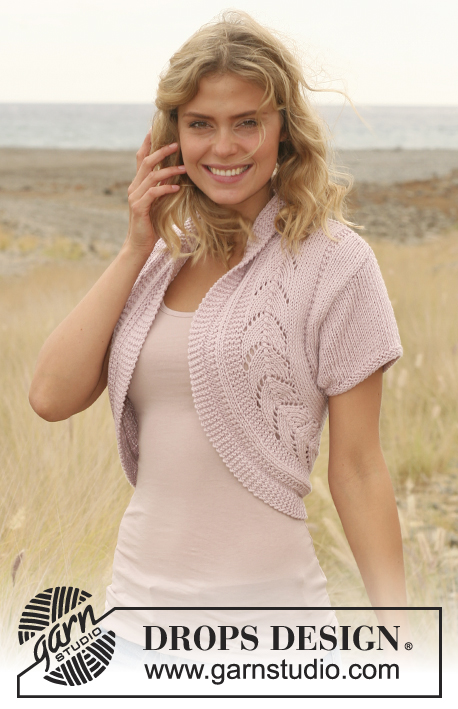
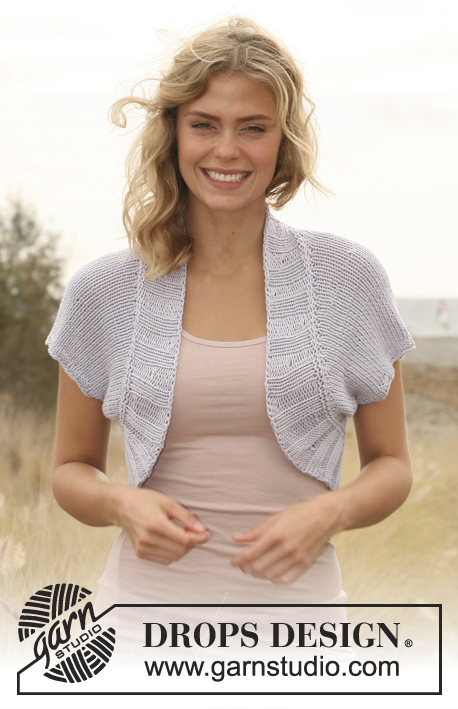
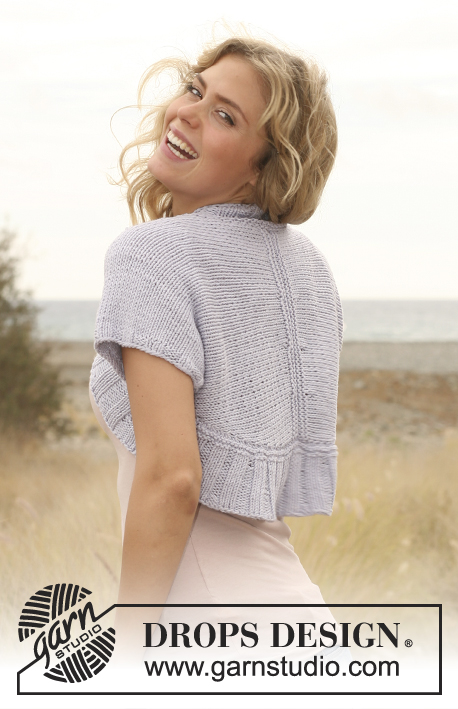
Bolero DROPS ai ferri, in "Paris". Taglie: Dalla S alla XXL.
DROPS 130-13 |
||||
|
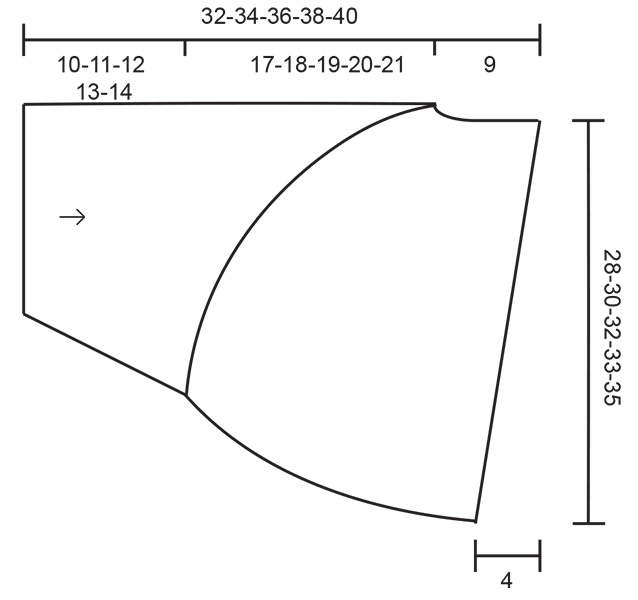
PUNTO LEGACCIO (avanti e indietro sui ferri): lavorare tutti i ferri a dir. (in tondo sui ferri circolari): * 1 giro dir, 1 giro rov *, ripetere da *-*. --------------------------------------------------------- PARTE DESTRA: Si lavora avanti e indietro sui ferri. Avviare 54-54-60-66-72 m sui ferri circolari n° 4,5 con il filato Paris e lavorare 1 ferro a rov sul rovescio del lavoro; proseguire a coste, iniziando sul diritto del lavoro, come segue: 1 m vivagno a punto legaccio, 2 m dir, * 3 m rov, 3 m dir *, ripetere da *-* per un totale di 8-8-9-10-11 volte, finire con 2 m rov, 1 m vivagno a punto legaccio. Quando il lavoro misura 2 cm, passare ai ferri n° 5 e lavorare a maglia rasata e, ALLO STESSO TEMPO, distribuire degli aumenti ad intervalli regolari in modo da portare il n° delle m a 56-58-62-68-72. Quando il lavoro misura 3 cm, aumentare 1 m da ciascun lato; ripetere questi aumenti ogni 1,5-1,5-1,5-2-2 cm per un totale di 5-6-6-5-5 volte = 66-70-74-78-82 m. Quando il lavoro misura 10-11-12-13-14 cm, inserire un segno da ciascun lato (assicurarsi che l’ultimo ferro sia sul rovescio del lavoro) - da adesso in avanti, misurare il lavoro da questo punto ! Intrecciare ora e diminuire sulla destra (= davanti) e, ALLO STESSO TEMPO, avviare nuove m sulla sinistra (= dietro) come segue: Davanti: Intrecciare ogni 2 ferri: 3 m per 4 volte e 2 m per 9-10-11-12-13 volte; diminuire poi ogni 4 ferri: 1 m per 3 volte. Dietro: Ogni 2 ferri avviare: 2 m per 3 volte e 1 m per 5-6-7-6-9 volte; poi ogni 4 ferri: 1 m per 4-4-4-5-4 volte. Terminate tutte le diminuzioni e gli aumenti, sul ferro ci sono 48-51-54-56-60 m. Proseguire a maglia rasata. Quando il lavoro misura 17-18-19-20-21 cm (assicurarsi che l’ ultimo ferro sia sul diritto del lavoro), lavorare a ferri accorciati per il dietro, come segue: Lavorare 10 m e mettere queste m in attesa su un ferma maglie (= parte inferiore del dietro) - ripetere in tutto 4 volte all’inizio di ogni ferro sul rovescio del lavoro (in tutto sul ferma maglie ci sono 40 m) = sui ferri rimangono 8-11-14-16-20 m. Al ferro successivo, sul diritto del lavoro, riportare sui ferri di lavoro, tutte le m messe in attesa sul ferma maglie e lavorare 4 ferri a punto legaccio (vedere le spiegazioni sopra) su tutte le m. Intrecciare tutte le m. Non rimuovere ancora i segni. PARTE SINISTRA: Avviare le m e lavorare come indicato per la parte destra, ma a specchio. CONFEZIONE: Cucire le maniche all’interno della m vivagno fino ai segni. Cucire i bordi di chiusura delle due parti insieme al centro, sul dietro. Con i ferri circolari n° 4,5 ed il filato Paris, riprendere le m sul diritto del lavoro lungo tutta l’apertura del bolero - quindi lungo il davanti destro, intorno al collo, lungo il davanti sinistro e sul bordo inferiore del dietro = 180-195-210-225-240 m (il n° delle m deve essere divisibile per 15) - (riprendere ca. 38-43-48-53-58 m lungo ogni davanti, 16 m intorno al collo, 88-93-98-103-108 m lungo il dietro) - ATTENZIONE: Se sono state riprese meno/più m, aumentare / diminuire a intervalli regolari nel corso del primo giro. E’ inoltre importante riprendere sufficienti m a livello delle cuciture delle maniche da ciascun lato in modo che il bordo non sia troppo stretto sotto le braccia. Lavorare in tondo sui ferri circolari come segue (visto sul diritto del lavoro): 4 giri a punto legaccio (vedere le spiegazioni sopra), proseguire a coste (= 3 m dir / 2 m rov). Quando il bordo misura 2 cm, aumentare 1 m rov in 1 gruppo di 2 maglie rov ogni 3 (aumentare quindi in un gruppo sì e in due no)= 192-208-224-240-256 m. Ripetere questi aumenti quando il bordo misura 5 e 8 cm, ma aumentare 1 m rov nel gruppo di 2 m rov successivo a quello in cui è stata aumentata una m in precedenza = 216-234-252-270-288 m. Dopo l’ultimo giro di aumenti, le coste sono 3 m dir / 3 rov su tutto il giro. Intrecciare le m senza stringere troppo il filo, lavorando a dir le m dir e a rov le m rov. |
||||
Spiegazioni del diagramma |
||||
|
||||
 |
||||
Avete terminato questo modello?Allora taggate le vostre foto con #dropspattern #springflutterbolero o inviatele alla #dropsfan gallery. Avete bisogno di aiuto con questo modello?Troverete 17 video tutorial, una sezione per i commenti/domande e molto altro guardando il modello su www.garnstudio.com © 1982-2026 DROPS Design A/S. Ci riserviamo tutti i diritti. Questo documento, compreso tutte le sue sotto-sezioni, è protetto dalle leggi sul copyright. Potete leggere quello che potete fare con i nostri modelli alla fine di ogni modello sul nostro sito. |
||||


Con oltre 40 anni di esperienza nel design di modelli di maglia e uncinetto, DROPS Design offre la più estesa collezione di modelli gratuiti su internet - tradotti in 17 lingue. Ad oggi vi possiamo fornire 324 cataloghi e 12290 modelli - 9561 dei quali sono tradotti in Italiano.
Ci stiamo impegnando molto per darvi il meglio che vi possiamo offrire in termini di maglia e uncinetto, ispirazioni e consigli così come filati di grande qualità ad un prezzo incredibile! Volete utilizzare i nostri modelli per qualcosa d'altro oltre al vostro uso personale? Potete leggere tutto ciò che è consentito nel testo sul Copyright in basso su tutte le pagine dei nostri modelli. Buon lavoro!
Lasciare un commento sul modello DROPS 130-13
Noi saremmo felici di ricevere i tuoi commenti e opinioni su questo modello!
Se vuoi fare una domanda, fai per favore attenzione a selezionare la categoria corretta nella casella qui sotto per velocizzare il processo di risposta. I campi richiesti sono indicati da *.