
Categorie popolari
State cercando un filato?


Commenti / Domande (36)
![]() Anna ha scritto:
Anna ha scritto:
Hej igen, skulle uppskatta ett svar av frågan jag ställde för en månad sen!
14.11.2019 - 17:30
![]() Anna ha scritto:
Anna ha scritto:
Jag får inte rätt på del 1 för storlek S. Ser i frågetråden att man ska sticka två varv, göra omslag på tredje, sen sticka 3 varv, omslag på fjärde -sen börja om med två varv igen. Så det är en upprepning på 7 varv hela tiden? Det måste vara något tokigt för när jag mäter min färdiga stickningen av del 1 så stämmer den i bred (18cm) men inte i höjd (endast 32 cm, när det ska vara 41!). Vore väldigt tacksam för ett förtydligande, tack!
15.10.2019 - 20:20
![]() Yvonne Görmar ha scritto:
Yvonne Görmar ha scritto:
Das Muster ist ja eine schöne Herausforderung, und ich glaube, ich habe fast alles verstanden. Eine Frage: Warum muss man bei den Teilen 2, 4, 6 und 8 die Maschen auf einen HIlfsfaden legen? Zum Zusammennähen im Maschenstich? Oder kann man auch abketten und "normal" zusammennähen? Danke!
10.06.2019 - 13:10DROPS Design ha risposto:
Liebe Frau Görmar, die Maschen werden dann im Maschentstich zusammengenäht, abketten können Sie, aber beachten Sie, das die Arbeit nicht zu eng wird. Viel Spaß beim stricken!
11.06.2019 - 11:50
![]() Reix ha scritto:
Reix ha scritto:
Bonsoir, j'aimerais savoir combien de pelotes il me faut pour ce modèle en taille 40 (L). De plus je voudrais que la jupe m'arrive à hauteur du genou, c'est à dire en longueur 52 cm. Combien de pelotes il faut rajouter? Merci de votre réponse. Cordialement
22.03.2018 - 19:22DROPS Design ha risposto:
Bonjour Mme Reix, vous trouverez la quantité totale nécessaire pour chaque taille, au poids, sous l'en-tête des explications, soit 5 pelotes en taille L. Nous ne sommes malheureusement pas en mesure de pouvoir ajuster chacun de nos modèles à chaque demande individuelle, vous pouvez volontiers vous adresser à votre magasin DROPS ou à un forum de tricot pour toute assistance complémentaire pour adapter cette jupe à vos envies. Bon tricot!
26.03.2018 - 09:56Katerina ha scritto:
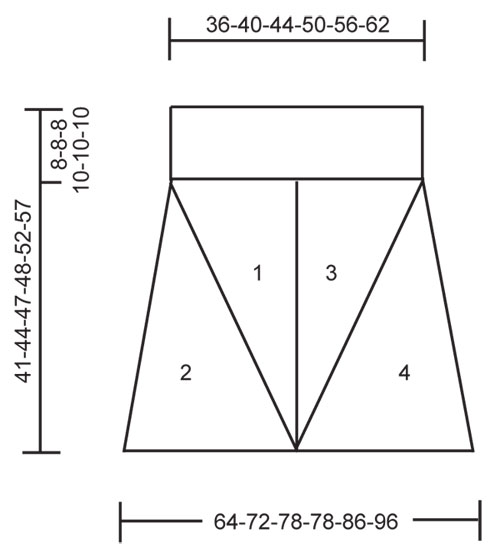
Hi! As far as I understand, first, in this pattern parts 1 and 3 are knitted from top to bottom, part 2 from right to left and part 4 from left to right. And second, the stitches from the stitch holder on part 2 are grafted with the stitches on the stitch holder from part 8. Am I right? Thank you.
03.01.2018 - 19:03DROPS Design ha risposto:
Dear Katerina, part 1 and 3 are worked from the tip (= cast on 3 sts) to the top (= increase until there are 47-77 sts - see size). Part 2 and 4 are worked top down (= cast on 2 sts and increase until there are 78-115 sts). See also measurement chart with all parts. Happy knitting!
04.01.2018 - 13:25
![]() Tanja ha scritto:
Tanja ha scritto:
Hallo, wie ist das bei Teil 3 und 4 mit dem spiegelverkehrt stricken gemeint? Ist es so gemeint das ich da mit der hohen Maschenzahl anfange und dann entsprechend abnehme? LG Tanja
03.12.2017 - 16:21DROPS Design ha risposto:
Liebe Tanja, spiegelverkehr bedeutet wenn Sie vor bzw nach der Markierer zugenommen haben, jetzt werden Sie nach bzw vor der Markierer zunehmen. Viel Spaß beim stricken!
04.12.2017 - 09:48
![]() Stephanie ha scritto:
Stephanie ha scritto:
Hi, do I work 3 rows and increase on that 3rd row, then work 4 rows and work inc on that row (2 inc at same side) Then again on following 3rd then again on following 4th (2 inc now at opposite side of marker). Can you explain the line on pattern, "inc 1 stitch on 3rd and 4th row alternately" please as I can't get this to work out. Thanks again for helping out.
27.06.2016 - 12:23DROPS Design ha risposto:
Dear Stephanie, when inc alternately every 3rd and every 4th row, work as follows: *work 2 rows, inc on next row (= 3rd row), work 3 rows, inc on next row (= 4th row)* and repeat from *-*. Happy knitting!
27.06.2016 - 17:39
![]() Stephanie ha scritto:
Stephanie ha scritto:
Hi, confused starting section 1. If I inc on 3rd row, then 4th etc I'm inc 2 stitches on one side of marker then 2 stitches at other side, resulting in piece being a triangle. On chart, piece one has an angle at left and straight edge at right. Piece 3 being a mirror image and two pieces sewn together. Cannot understand why inc are not done at same side to give angle. Also can't figure out how a total of 104 stitches is enough for the waist of medium size. Help appreciated.
25.06.2016 - 13:24DROPS Design ha risposto:
See answer below :)
27.06.2016 - 09:41
![]() Stephanie ha scritto:
Stephanie ha scritto:
Hi, confused starting section 1. If I inc on 3rd row, then 4th etc I'm inc 2 stitches on one side of marker then 2 stitches at other side, resulting in piece being a triangle. On chart, piece one has an angle at left and straight edge at right. Piece 3 being a mirror image and two pieces sewn together. Cannot understand why inc are not done at same side to give angle. Also can't figure out how a total of 104 stitches is enough for the waist of medium size. Help appreciated.
25.06.2016 - 12:26DROPS Design ha risposto:
Dear Stephanie, you inc before last st seen from RS, so that right side of piece will be straight and left side of piece will create a diagonal. Part 1 and 3 are for front piece, you will work 2 similar pieces for back piece = 104 sts x 2 = 208 sts around the waist. Happy knitting!
27.06.2016 - 09:33
![]() Jess ha scritto:
Jess ha scritto:
Just to clarify size. Is the cm measurement on chart given for garment lying flat. So size Small would measure 64 cm from left to right and 128cm all the way around. Waist 36 flat left to right and 72cm all around waist. Thanks.
17.06.2016 - 15:46DROPS Design ha risposto:
Dear Jess,you're right, these are the measurement for the bottom part; for size S waist measurement are 36 cm lying flat and 72 cm all the way round. Happy knitting!
17.06.2016 - 19:54
|
|
Evening Diamond#eveningdiamondskirt |
|
|
|
|
Gonna DROPS lavorata a maglia legaccio in ”Delight”. Taglie: S - XXXL.
DROPS 121-4 |
|
|
SUGGERIMENTO PER GLI AUMENTI: Aumentare facendo 1 gettato, sul f successivo lavorare il gettato a dir ritorto per evitare un buco. ASOLE: Fare le asole sul bordo per i bottoni. 1 asola = intrecciare la 3° e la 4° m del bordo per i bottoni e avviare 2 nuove m sul f successivo. Fare le asole quando il bordo per i bottoni misura: TAGLIE S + M + L: 1, 4 e 7 cm. TAGLIE XL + XXL + XXXL: 1, 4, 6 e 9 cm. -------------------------------------------------------- GONNA: Lavorata a m legaccio, cioè lavorare tutti i f a dir. La gonna è lavorata in 8 parti, avanti e indietro sui f, e le parti vengono cucite insieme alla fine. PARTE 1: Avviare 2 m con i f circolari n° 3 mm con Delight. Lavorare 1 f dir dal rovescio del lavoro. Inserire un segnapunti nella 2° m dal diritto del lavoro. Continuare avanti e indietro sui f, ALLO STESSO TEMPO aumentare come segue prima del segnapunti - leggere il SUGGERIMENTO PER GLI AUMENTI: TAGLIE S + M + L: aumentare 1 m ogni 3 e 4 f in modo alternato. TAGLIA XL + XXL + XXXL: aumentare 1 m ogni 3 f. Continuare in questo modo fino quando ci sono 47-52-56-63-69-77 m in totale sul f. Trasferire le m su un fermamaglie. PARTE 2: Avviare 2 m con i f circolari n° 3 mm con Delight. Lavorare 1 f dir dal rovescio del lavoro. Inserire un segnapunti nella 1° m dal diritto del lavoro. Continuare avanti e indietro e ALLO STESSO TEMPO aumentare dopo il segnapunti: 1 m a f alterni. Continuare in questo modo fino quando ci sono 78-87-94-94-103-115 m in totale sul f. Trasferire le m su un altro fermamaglie. Cucire la parte 1 alla 2, margine a margine nei fili più esterni delle m per evitare una cucitura spessa. PARTE 3: Come la parte 1 ma a specchio. PARTE 4: Come la parte 2, ma a specchio. Cucire la parte 3 alla 4, margine a margine nei fili più esterni delle m per evitare una cucitura spessa. PARTI 5, 6, 7 e 8: Come le parti 1, 2, 3 e 4. CONFEZIONE: Cucire le parti 1/2 e 3/4 (= centro davanti) e le parti 5/6 e 7/8 (= centro dietro). Cucire margine a margine nei fili più esterni delle m per evitare una cucitura spessa. Cucire a punto maglia dal rovescio del lavoro le m sui fermamaglie a ogni lato. BORDO IN VITA: Iniziare sul lato sinistro del lavoro al centro della cucitura. Lavorare tutte le m dei fermamaglie sui f di lavoro, e riprendere 1-2 m in ogni cucitura tra tutte le parti. Lavorare 1 f dir dal rovescio del lavoro e 1 f dir dal diritto del lavoro, ALLO STESSO TEMPO aggiustare il n° di m a 182-202-224-250-274-302 m e ALLO STESSO TEMPO avviare 6 nuove m alla fine di questo f per il bordo per i bottoni = 188-208-230-256-280-308 m. Continuare avanti e indietro su tutte le m. ALLO STESSO TEMPO quando il bordo per i bottoni misura circa 1 cm fare le ASOLE - leggere sopra. ALLO STESSO TEMPO quando il bordo della vita misura circa 7-7-7-8-8-8 cm distribuire 10-10-10-10-5-5 diminuzioni in modo uniforme (non diminuire sui bordi per i bottoni) = 178-198-220-246-275-303 m. Continuare fino a quando il bordo per i bottoni misura 8-8-8-10-10-10 cm. Intrecciare. Attaccare i bottoni. |
|
 |
|
Avete terminato questo modello?Allora taggate le vostre foto con #dropspattern #eveningdiamondskirt o inviatele alla #dropsfan gallery. Avete bisogno di aiuto con questo modello?Troverete 11 video tutorial, una sezione per i commenti/domande e molto altro guardando il modello su www.garnstudio.com © 1982-2026 DROPS Design A/S. Ci riserviamo tutti i diritti. Questo documento, compreso tutte le sue sotto-sezioni, è protetto dalle leggi sul copyright. Potete leggere quello che potete fare con i nostri modelli alla fine di ogni modello sul nostro sito. |


Con oltre 40 anni di esperienza nel design di modelli di maglia e uncinetto, DROPS Design offre la più estesa collezione di modelli gratuiti su internet - tradotti in 17 lingue. Ad oggi vi possiamo fornire 324 cataloghi e 12290 modelli - 9561 dei quali sono tradotti in Italiano.
Ci stiamo impegnando molto per darvi il meglio che vi possiamo offrire in termini di maglia e uncinetto, ispirazioni e consigli così come filati di grande qualità ad un prezzo incredibile! Volete utilizzare i nostri modelli per qualcosa d'altro oltre al vostro uso personale? Potete leggere tutto ciò che è consentito nel testo sul Copyright in basso su tutte le pagine dei nostri modelli. Buon lavoro!
Lasciare un commento sul modello DROPS 121-4
Noi saremmo felici di ricevere i tuoi commenti e opinioni su questo modello!
Se vuoi fare una domanda, fai per favore attenzione a selezionare la categoria corretta nella casella qui sotto per velocizzare il processo di risposta. I campi richiesti sono indicati da *.