
Categorie popolari
State cercando un filato?


Commenti / Domande (39)
![]() Aggie ha scritto:
Aggie ha scritto:
Hello, Can you tell me why you use more stiches for the bottom (172) than for the front and back (144) Isn\'t the board (bottem) than too wilde? Thank you for your reaction. Sincerely Aggie
27.10.2024 - 19:41DROPS Design ha risposto:
Dear Aggie, for the same width/circumference you will need more stitches with the needles size 4,5 mm for ribbing edge than with the needle size 5 mm with stocking stitch/pattern, reason why you will need to decrease stitches after rib. Should you tension be right in width then the circumference of piece should match. Happy knitting!
28.10.2024 - 10:11
![]() Sølvi Rand Brevig ha scritto:
Sølvi Rand Brevig ha scritto:
Når man begynner å strikke mønster så står det f.eks. M1/M3. Disse to er nesten like men har ulikt antall masker. Hvordan vet man hvilke av de to man skal velge. Har dette med størrelsen å gjøre? Jeg strikker str. medium. Betyr det at jeg skal velge M1 og M2 og ikke M3 og M4?
21.10.2024 - 23:49DROPS Design ha risposto:
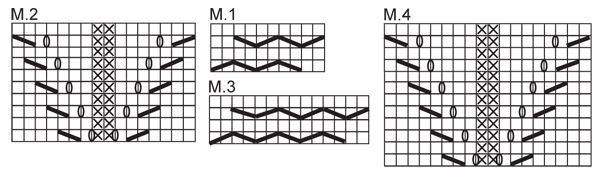
Hej Sølvi. Ja det stämmer, det står såhär i början av opskriften: MØNSTER: Se diag M.1 til M.4. Diag viser mønsteret sett fra retten. I str S, M, L, XL strikkes M.1 og M.2, i str XXL og XXXL strikkes M.3 og M.4. Mvh DROPS Design
23.10.2024 - 14:27
![]() Aggie ha scritto:
Aggie ha scritto:
Waarom brei je bij dit model de boord met veel meer steken dan de Rest? Wordt de onderkant dan niet veel te wijd? Ik zie uw reactie graag onder mijn vraag in het Nederlands.
19.10.2024 - 16:11
![]() Aggie ha scritto:
Aggie ha scritto:
Ziet er prachtig uit
19.10.2024 - 16:03
![]() Evelyne Greverand ha scritto:
Evelyne Greverand ha scritto:
Bonjour sur l'envers du travail pour le devant doit on tricoter les mailles comme elles se présentent ou tout à l'envers merci d'avance
23.01.2024 - 14:17DROPS Design ha risposto:
Bonjour Mme Greverand, sur l'envers, tricotez les diagrammes en les lisant de gauche à droite, autrement dit, 1 case blanche = 1 m jersey endroit qui va se tricoter à l'envers sur l'envers et 1 croix = 1 m jersey envers qui va se tricoter à l'endroit sur l'envers. Bon tricot!
24.01.2024 - 08:06
![]() Eb ha scritto:
Eb ha scritto:
Heureusement que je vous ai demandé confirmation! Je ne m'étais pas rendue compte que le dos était en jersey et ai commencé à tricoter en point fantaisie...Du coup, je dois détricoter... Merci bcp!
01.03.2021 - 18:43
![]() Eb ha scritto:
Eb ha scritto:
PS: je tricote la taille L.
28.02.2021 - 20:46DROPS Design ha risposto:
Ok. J'ai deja repondu a votre question precedente. Bon tricot!
28.02.2021 - 21:10
![]() Eb ha scritto:
Eb ha scritto:
Bonjour Madame et merci d'avance pour votre aide. Je débute le tricot et le motif fantaisie dos/devant:je crois comprendre qu'il faut tricoter M3/M4 pour le devant de 90mailles et M1/M2 pour le devant de 82mailles? Et il y a bien 17m de part et d'autre des 2 marqueurs ? Merci bcp! Cordialement, Eb.
27.02.2021 - 13:59DROPS Design ha risposto:
Bonjour! Pour la taille L il faut tricoter M.1 et M.2. M.3 et M.4 sont pour les tailles XXL et XXXL. Le devant a 90 m.= 17 m jersey end, 5 m jersey envers, M.1 (10 m), 5 m jersey envers, M.2 (16 m), 5 m jersey envers, M.1 (10 m), 5 m jersey envers et 17 m jersey end. Le dos est de 82 m = 82 m jersey end. Bon tricot!
28.02.2021 - 21:09
![]() Angela ha scritto:
Angela ha scritto:
Good morning. I am just about to start the collar - after the first round, which includes the pick-up stitches and the increase stitches, it then says to knit 3 rows. Do I understand correctly, therefore, that the 1st 4 rows are in plain knit stitch, and that the K2/P2 rib does not begin until row 5? Thought I'd check first, as 4 rows equate to approximately 2 cm's, which seems quite a big base before the rib starts.
22.06.2020 - 11:06DROPS Design ha risposto:
Dear Angela, you knit 1 row from RS picking up the 5 new stitches at the end of the round then knit 1 row from WS increasing 19 sts evenly, 1 row from RS and 1 row from WS. There are now 2 ridges. Now work from RS: 5 sts in garter st, K2/P2 ending with K2 and 5 sts in garter st. Happy knitting!
22.06.2020 - 14:22
![]() Anne Sage ha scritto:
Anne Sage ha scritto:
I have 2 questions (knitting the large size): 1. I have completed where back and front are worked separately - does this mean that the front part stitches are placed on scrap yarn and the back worked back and forth? 2. The back says to bind off for armhole at beginning of every row 2 sts. X 3. And then 1 st. X 1 - I count 8 stitches total but I’m supposed to have 10 stitches less - am I reading this wrong? Thanks!
08.02.2020 - 22:02DROPS Design ha risposto:
Dear Mrs Sage, yes correct, you will slip the stitches for front on a scrap yarn or on a stitch holder, then work back piece first: 76 stitches, you cast off then 2 sts at the beg of next 4 rows (= 2 sts on each side 2 times) and 1 stitch at the beginning of next 2 rows (1 st on each side 1 time) = you have cast off 5 sts on each side = 66 sts remain. Happy knitting!
10.02.2020 - 08:46
|
||||||||||||||||||||||
Snowy Branches#snowybranchessweater |
||||||||||||||||||||||
|
|
||||||||||||||||||||||
Maglione DROPS lavorato ai ferri con trecce in "Nepal". Taglie: dalla S alla XXXL.
DROPS 122-9 |
||||||||||||||||||||||
|
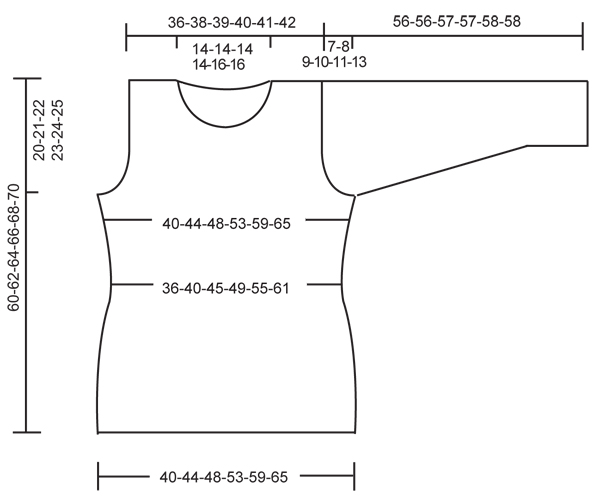
MOTIVO: Vedere i diagrammi M.1-M.4. I diagrammi mostrano il motivo dal diritto del lavoro. Nelle taglie S, M, L, XL lavorare M.1 e M.2, nelle taglie XXL e XXXL lavorare M.3 e M.4. M. LEGACCIO (avanti e indietro sui f.): lavorare tutti i f. a dir. -------------------------------------------------------- -------------------------------------------------------- MAGLIONE: Lavorato in tondo. Avviare 172-184-204-224-252-276 m. con i f. circolari n° 4,5 mm con il filato Nepal. Lavorare 1 giro a dir. e continuare a coste 2 m. dir./2 m. rov. Quando il lavoro misura 8 cm passare ai f. circolari n° 5 mm, lavorare 1 giro a dir., ALLO STESSO TEMPO distribuire 28-28-32-36-44-48 diminuzioni in modo uniforme = 144-156-172-188-208-228 m. Lavorare 1 f. a rov. Inserire 2 segnapunti nel lavoro, 1 all’inizio del giro e 1 dopo 76-82-90-98-108-118 m. = davanti (dietro = 68-74-82-90-100-110 m.). Continuare come segue – vedere il MOTIVO: 10-13-17-21-19-24 m. a m. rasata, 5-5-5-5-6-6 m. a m. rasata rovescia, M.1/M.3, 5-5-5-5-6-6 m. a m. rasata rovescia, M.2/M.4, 5-5-5-5-6-6 m. a m. rasata rovescia, M.1/M.3, 5-5-5-5-6-6 m. a m. rasata rovescia, 78-87-99-111-119-134 a m. rasata. Continuare con il motivo in questo modo. FARE ATTENZIONE ALLA TENSIONE DEL LAVORO! Quando il lavoro misura 12 cm diminuire 1 m. a ogni lato di entrambi i segnapunti, e ripetere le diminuzioni a ogni lato ogni 4 cm per un totale di 3 volte (= 4 diminuzioni per giro) = 132-144-160-176-196-216 m. Quando il lavoro misura 26 cm aumentare 1 m. a ogni lato di entrambi i segnapunti, ripetere gli aumenti ogni 5-5-5-6-6-6 cm per un totale di 3 volte (= 4 aumenti per giro) = 144-156-172-188-208-228 m. Quando il lavoro misura 40-41-42-43-44-45 cm – aggiustarlo a un f. con le trecce – intrecciare 3 m. a ogni lato di entrambi i segnapunti (= 6 m. a ogni lato) per lo scalfo e finire ogni parte in modo separato. DIETRO: = 62-68-76-84-94-104 m. Intrecciare per lo scalfo a ogni lato all’inizio di ogni f. come segue: 2 m. 0-1-2-3-4-6 volte e 1 m. 0-0-1-2-4-4 volte = 62-64-66-68-70-72 m. Quando il lavoro misura 58-60-62-64-66-68 cm intrecciare le 22-22-22-22-26-26 m. centrali per il collo e finire ogni spalla in modo separato. Intrecciare 1 m. sulla scollatura sul f. successivo = 19-20-21-22-21-22 m. rimaste sulla spalla. Intrecciare quando il lavoro misura 60-62-64-66-68-70 cm. DAVANTI: = 70-76-84-92-102-112 m. Intrecciare per lo scalfo come descritto per il dietro = 70-72-74-76-78-80 m. Quando il lavoro misura 50-52-54-54-56-58 cm – aggiustarlo a dopo un’intera ripetizione di M.2/M.4 – trasferire le 12-12-12-12-16-16 m. centrali su un fermamaglie per il collo e finire ogni spalla in modo separato. Intrecciare per modellare la scollatura all’inizio di ogni f. dalla scollatura: 2 m. 2 volte e 1 m. 2 volte. Alla fine di tutte le diminuzioni ci sono 23-24-25-26-25-26 m. sul f. Quando il lavoro misura 59-61-63-65-67-69 cm distribuire 4 diminuzioni in modo uniforme su M.1/M.3 = 19-20-21-22-21-22 m. rimaste sulla spalla. Intrecciare quando il lavoro misura 60-62-64-66-68-70 cm. MANICA: Lavorata in tondo. Avviare 52-52-52-56-56-60 m. con i f. a doppia punta n° 4,5 mm con il filato Nepal. Lavorare 1 f. a dir. e continuare a coste 2 m. dir./2 m. rov. Quando il lavoro misura 8 cm passare ai f. a doppia punta n° 5 mm, lavorare 1 f. a dir., ALLO STESSO TEMPO distribuire 12-12-10-12-10-12 diminuzioni in modo uniforme = 40-40-42-44-46-48 m. Lavorare 1 f. a rov. Inserire un segnapunti all’inizio del giro. Ora finire il lavoro a m. rasata. Quando il lavoro misura 9 cm aumentare 1 m. a ogni lato del segnapunti, e ripetere gli aumenti ogni 4,5-3,5-3-2,5-2-2 cm per un totale di 9-11-13-14-16-17 volte = 58-62-68-72-78-82 m. Quando il lavoro misura 49-48-48-47-47-45 cm - NOTA! Misure più piccole per le taglie più grandi a causa dell’arrotondamento della manica più lungo e della maggiore ampiezza delle spalle – intrecciare 3 m. a ogni lato del segnapunti e finire il lavoro avanti e indietro sui f. Intrecciare per l’arrotondamento della manica all’inizio di ogni f. come segue: 2 m. 3 volte e 1 m. 0-1-2-4-5-7 volte, quindi 2 m. a ogni lato fino a quando il lavoro misura 55-55-56-56-57-57 cm. Ora intrecciare 3 m. all’inizio dei 2 f. successivi e intrecciare le m. rimaste, il lavoro misura circa 56-56-57-57-58-58 cm. CONFEZIONE: Cucire i margini delle spalle. Attaccare le maniche. COLLETTO: Riprendere circa 68-68-68-68-72-72 m. attorno al collo (comprese le m. sul fermamaglie sul davanti) con i f. circolari n° 4,5 mm con il filato Nepal. Continuare avanti e indietro sui f. come segue (la prima m. sul giro è la prima m. trasferita dal fermamaglie): lavorare 1 giro a dir. dal diritto del lavoro, alla fine del giro riprendere 5 nuove m. dietro le prime 5 m. = 73-73-73-73-77-77 m. Lavorare 3 f. a dir., ALLO STESSO TEMPO sul primo f. distribuire 19 aumenti in modo uniforme = 92-92-92-92-96-96 m. Continuare come segue – dal diritto del lavoro: 5 m. a m. legaccio (= bordo davanti), * 2 m. dir./2 m. rov. *, ripetere *-* e finire con 2 m. dir. e 5 m. a m. legaccio (= bordo davanti) – leggere sopra. Quando il lavoro misura 2 cm fare un’asola lavorando insieme la 3° e la 4° m. sul bordo davanti destro, sul f. successivo avviare 1 nuova m. Ripetere quando il lavoro misura 6 e 10 cm. Quando le coste misurano 12 cm, intrecciare con dir. su dir. e rov. su rov. Attaccare i bottoni sul bordo davanti sinistro. |
||||||||||||||||||||||
Spiegazioni del diagramma |
||||||||||||||||||||||
|
||||||||||||||||||||||
 |
||||||||||||||||||||||
 |
||||||||||||||||||||||
Avete terminato questo modello?Allora taggate le vostre foto con #dropspattern #snowybranchessweater o inviatele alla #dropsfan gallery. Avete bisogno di aiuto con questo modello?Troverete 23 video tutorial, una sezione per i commenti/domande e molto altro guardando il modello su www.garnstudio.com © 1982-2026 DROPS Design A/S. Ci riserviamo tutti i diritti. Questo documento, compreso tutte le sue sotto-sezioni, è protetto dalle leggi sul copyright. Potete leggere quello che potete fare con i nostri modelli alla fine di ogni modello sul nostro sito. |
||||||||||||||||||||||


Con oltre 40 anni di esperienza nel design di modelli di maglia e uncinetto, DROPS Design offre la più estesa collezione di modelli gratuiti su internet - tradotti in 17 lingue. Ad oggi vi possiamo fornire 324 cataloghi e 12290 modelli - 9561 dei quali sono tradotti in Italiano.
Ci stiamo impegnando molto per darvi il meglio che vi possiamo offrire in termini di maglia e uncinetto, ispirazioni e consigli così come filati di grande qualità ad un prezzo incredibile! Volete utilizzare i nostri modelli per qualcosa d'altro oltre al vostro uso personale? Potete leggere tutto ciò che è consentito nel testo sul Copyright in basso su tutte le pagine dei nostri modelli. Buon lavoro!
Lasciare un commento sul modello DROPS 122-9
Noi saremmo felici di ricevere i tuoi commenti e opinioni su questo modello!
Se vuoi fare una domanda, fai per favore attenzione a selezionare la categoria corretta nella casella qui sotto per velocizzare il processo di risposta. I campi richiesti sono indicati da *.