
Categorie popolari
State cercando un filato?


Commenti / Domande (217)
![]() Christa Niehuis ha scritto:
Christa Niehuis ha scritto:
Gut
31.05.2026 - 12:21
![]() Moinet ha scritto:
Moinet ha scritto:
Bonjour, je ne comprends pas au niveau des emmanchures, je dois monter 32 mailles au dessus de chaque emmanchures faut il ensuite mettre les marqueurs sur ses mailles et augmenter en alternant ? Ou les tricoter sans augmentation ? Merci Cordialement
17.08.2024 - 11:39DROPS Design ha risposto:
Bonjour Mme Moinet, placez vos marqueurs dans les nouvelles mailles pour qu'ils correspondent à l'endroit où ils étaient auparavant et continuez à augmenter exactement comme avant. Bon tricot!
19.08.2024 - 07:56
![]() Bernice Nicholl ha scritto:
Bernice Nicholl ha scritto:
I need a little help understanding how to knit the sleeves. Small sleeves: Knit 6rows of 45. Do I knit or purl the next row (row7)? Sorry still a beginner.
26.05.2024 - 00:10DROPS Design ha risposto:
Dear Bernice, you continue as indicated. "Continue as follows (first row, which is the 7th row = WS): 1 edge st, 19-20-21-22 sts in reverse stocking st , M.3, 19-20-21-22 sts in reverse stocking st and 1 edge st. The edge stitches are knitted and the sts in reverse stocking st are purled from the RS and knitted from the WS; M.3 is the chart below. Happy knitting!
27.05.2024 - 01:08
![]() Katarzyna ha scritto:
Katarzyna ha scritto:
Ile motków potrzeba tylko na rekawy w rozmiarze XL/XXL ?
13.05.2021 - 01:55DROPS Design ha risposto:
Witaj Kasiu, niestety nie potrafię odpowiedzieć na twoje pytanie. Czy chcesz zrobić kamizelkę? W takim razie możesz wyszukać wzory na kamizelki dla tej włóczki i tak porównać ilość potrzebnej włóczki? Pozdrawiamy!
13.05.2021 - 12:58
![]() Regina ha scritto:
Regina ha scritto:
Hallo, erst einmal vielen Dank für die bisherige Hilfe. Die Ärmel sind ganz schnell fertig geworden und nun habe ich auch schon das Muster (5 Blätter) vom Vorder und Rückenteil fertig. Jetzt wird ja in Krausrippe (1 Runde re, 1 Runde li,) weitergestrickt. Die Aufnahme bei den 10 markierten Maschen ist die immer rechts und links der markierten Masche. Oder nur auf der rechten Seite und nach 4 Runden dann auf der linke Seite? So immer im Wechsel?
24.07.2019 - 09:48DROPS Design ha risposto:
Liebe Regina, letzteres ist zutreffend - Sie nehmen pro Zunahmerunde 10 Maschen zu, d.h. 1 Masche an jedem Markierer (es sind ja 10 Markierer vorhanden). In der ersten Zunahmerunde erfolgt die Zunahme auf der rechten Seite jedes Markierers, in der nächsten Zunahmerunde auf der linken Seite jedes Markierers usw. Viel Spaß beim Weiterstricken!
24.07.2019 - 17:11
![]() Regina ha scritto:
Regina ha scritto:
Versuche seit über 2 Jahren diese herrliche Jacke zu stricken, aber leider ohne Erfolg. Dachte fang mit den Ärmeln an, die sehen einfach aus, aber nichts war. Um Ihren Hinweis von 06.02.2017 noch einmal aufzugreifen. Ich beginne mit der Rückreihe rechts gestrickt) von links nach rechts und dann die Hinreihe (links gestrickt) von rechts nach links. Wenn ich M3 fertig habe sieht es aber nicht so aus wie auf dem Bild, wo das Muster auf der Vorderseite rechts gestrickt aussieht. Was ist falsch?
25.06.2019 - 18:21DROPS Design ha risposto:
Liebe Regina, für die Ärmel stricken Sie zuerst 6 Reihen rechts (= 3 Krausrippen), dann stricken Sie glatt lilnks mit M.3 in der Mitte, das Blatt in M.3 (= die leere Kästchen) sind glatt rechts gestrickt, nur die 2 (1. Mitte vom Blatt) dann die 1 ersten und letzten Maschen sind glatt links - gestrickt. hier lesen Sie mehr über Diagramme. Viel Spaß beim stricken!
26.06.2019 - 06:22
![]() Ann Kristin Aaker ha scritto:
Ann Kristin Aaker ha scritto:
Kan jeg få et bilde av hvordan mønsteret M3 på armen blir i fht resten?
20.06.2018 - 19:10Orsi ha scritto:
I am finished with the body piece, and starting with the sleeves. I have a question regarding M3... The first row of M3 is 5 stitches. Row nr.2 ends up 5 stitches again with decreasing 2 and 2 YO. Yet, the third row is 7 stitches. Should I include stitches from the reverse stocking on the sides? Or is there something I'm missing?
10.06.2018 - 13:31DROPS Design ha risposto:
Dear Mrs Orsi, that's because you will work always more sts in the pattern, ie on row 3 in 1st size for example you will work: 1 edge st, P 18, M.3 (= P2,K3, P2), P18, 1 edge st. Happy knitting!
11.06.2018 - 09:39
![]() Samantha ha scritto:
Samantha ha scritto:
I’ve finished the M1 & M2 sections and now am working in garter to the sleeves. I have 10 markets in my round. When it says ‘increase by all markers’ does that mean increase ONE by each marker or ONE each side of markers? (Ex: increase 10 each increase round or 20?)
14.02.2018 - 20:37DROPS Design ha risposto:
Hi Samantha, It means increase 1 stitch by each marker by making 1 YO. Alternate each increase by making the YO first before and then after the markers. Work into the back loop of the YOs on the next round to avoid holes. Happy knitting!
15.02.2018 - 06:28
![]() Gisela ha scritto:
Gisela ha scritto:
Hallo, habe die Jacke nun fertig gestrickt. Sieht gut aus! Nur mit den Maßangeben für die Knöpfe komme ich leider nicht zurecht. Mit den 5 cm nach unten ist klar - nur wieviel cm im rechten Winkel? Kann ich ggf. auch noch nachträglich für einen schönen Abschluss eine Knopfleiste anbringen? Wenn ja, wie sind da ca. die Maße? Vielen Dank für die Hilfe.
21.11.2017 - 00:00DROPS Design ha risposto:
Liebe Gisela, messen Sie 5 cm unter den Armloch, dann 10 cm links (am linken Vorderteil) messen - siehe auch Stern in der Maßskizze. Als Knopfleiste wird dann ein Schlaufe gehäkelt, siehe SCHLAUFEN. Viel Spaß beim fertigstellen!
21.11.2017 - 08:38
|
|||||||||||||||||||||||||
Fleur du Népal#fleurdunepaljacket |
|||||||||||||||||||||||||
 |
 |
||||||||||||||||||||||||
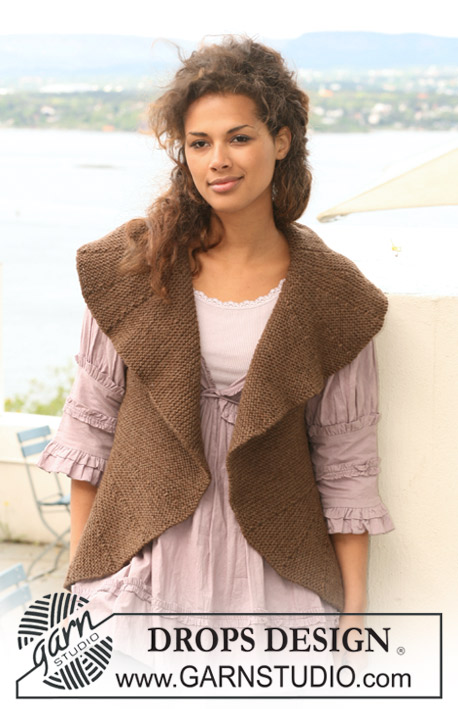
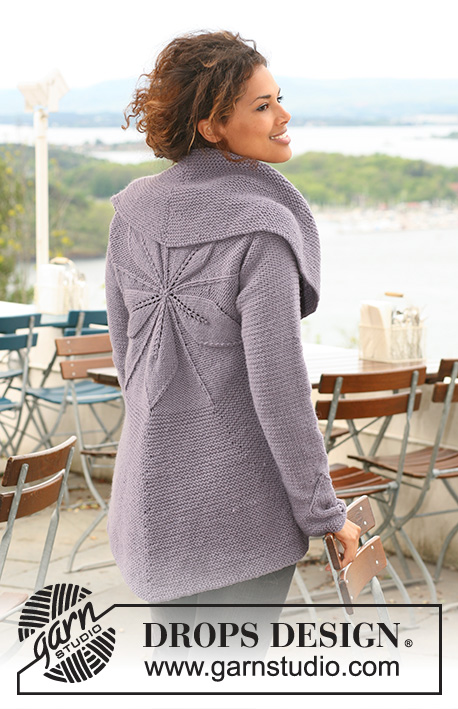
Giacca DROPS lavorato in tondo in ”Nepal”, con motivo di foglie. Dal S al XXXL
DROPS 126-1 |
|||||||||||||||||||||||||
|
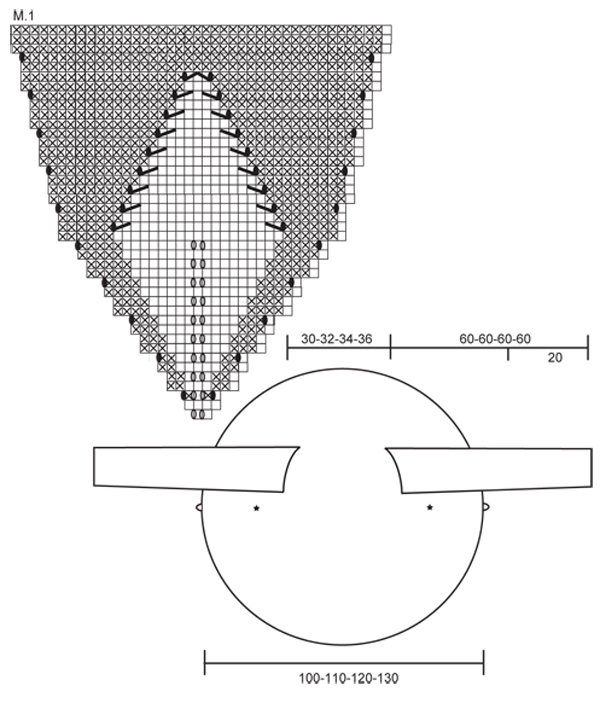
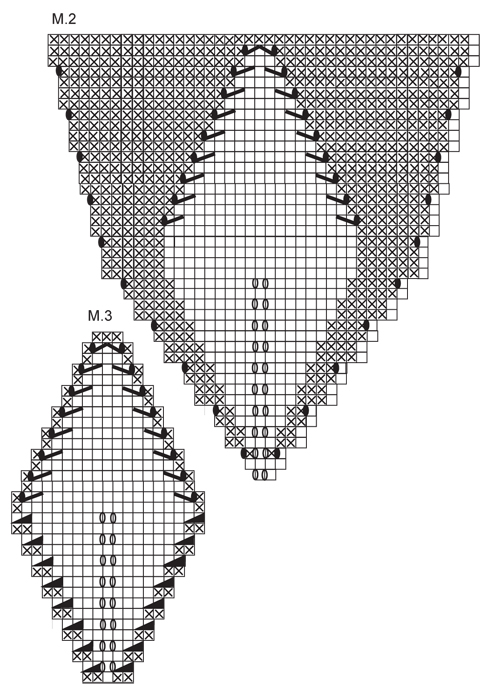
MOTIVO: Ved diag M.1, M.2 e M.3 - il diag mostra 1 motivo sul diritto. PUNTO LEGACCIO (in tondo sul ferro circolare): 1 giro dir e 1 giro rov. CONSIGLIO AUMENTI (dopo M.1 e M.2): Aumentare 1 m ad ogni segno per ogni aumento (vuol dire aumentare 10 m per giro) – aumentare alternativamente a sinistra e a destra di tutti i segni facendo 1 gett – al giro seguente, lavorare il gettato ritorto per evitare un buco (lavorare l’anello della maglia nella parte posteriore e non sul davanti come si fa abitualmente). -------------------------------------------------------- CORPO (DAVANTI&DIETRO): Si lavora in tondo, in cerchio a partire dal centro dietro. Avviare 10 m con il filo Nepal e distribuire le m su 4 ferri a doppia punta n 5. Lasciare 1 segno all’inizio del giro = in mezzo verso lato collo. Lavorare così in tondo: M.1, M.2, M.2, M.2 e M.1 (= in totale 5 motivi tutto il giro). Continuare con il ferro circolare man mano che ci sono abbastanza maglie dopo gli aumenti. RICORDATI LA TENSIONE DELLA MAGLIA! Dopo M.1/M.2, il lavoro misura ca 19 cm dal centro e ci sono 210 m sul f. Lasciare 1 segno in ognuna delle 5 m a maglia rasata all’inizio di ogni motivo (gli aumenti sono stati effettuati da ogni lato di queste maglie) e 1 segno nella m in mezzo tra ognuna di questi 5 segni (= in totale 10 segni). LEGGERE ATTENTAMENTE TUTTO IL PARAGRAFO SUCCESSIVO PRIMA DI CONTINUARE! MOTIVO: Continuare al PUNTO LEGACCIO – ved spieg sopra – ALLO STESSO TEMPO, al 1° giro dopo M.1/M.2, aumentare ad ogni segno - VED CONSIGLIO AUMENTI, ripetere questi aumenti ogni 4 giri fino alla fine. SCALFI: Allo stesso tempo, dopo 2-6-10-14 giri a punto legaccio (ci sono ora 220-230-240-250 m sul f) lavorare il giro seguente così (questo è 1 giro senza aumenti): Lavorare 25-27-29-31 m, intrecciare 32-34-37-40 m (= scalfo), lavorare 106-108-108-108 m, intrecciare 32-34-37-40 m (= scalfo) e lavorare 25-27-29-31 m. Al giro seguente, avviare 32-34-37-40 nuove m sopra ogni scalfo. Lavorare ed aumentare come prima finché non ci siano 480-520-560-600 m sul f – il lavoro misura ora ca 50-55-60-65 cm a partire dal centro, terminare dopo 1 giro rov. Intrecciare a diritto SENZA stringere troppo. MANICHE: Si lavorano avanti e indietro. Avviare 45-47-49-51 m (incl 1 m vivagno ad ogni lato) con il f 5 e il filo Nepal, lavorare 6 f dir (1° f = rovescio). Continuare così (1° f = rovescio): 1 m vivagno, 19-20-21-22 m maglia rasata rovescia, M.3, 19-20-21-22 m maglia rasata rovescia e 1 m vivagno. Continuare con M.3 con m ad ogni lato del motivo a maglia rasata rovescia. Dopo M.3, continuare a maglia rasata rovescia su tutte le maglie fino alle fine - ALLO STESSO TEMPO, quando il lavoro misura 20 cm, aumentare 1 m ad ogni lato, ripetere questi aumenti ogni 4-3,5-3-2,5 cm in totale 8-9-11-13 volte = 61-65-71-77 m. Quando il lavoro misura 52 cm per tutte le taglie, intrecciare per l’arrotondamento della manica all’inizio di ogni f: 4 m 1 volta ad ogni lato, poi 2 m ad ogni lato finché il lavoro non misuri ca 60 cm. Intrecciare le m rimanenti. CONFEZIONE: Cucire le maniche nella m vivagno. Posizionare le maniche centrando la parte in mezzo dell’arrotondamento al livello dove la distanza tra gli scalfi è più corta (questo vuol dire là dove la 1° m è stata intrecciata per il 1° scalfo e là dove l’ultima m è stata intrecciate per l’altro scalfo), e la cucitura delle maniche là dove la distanza tra gli scalfi è più lunga (vuol dire sul lato opposto). BOTTONI: Porre la giacca come indicato nello schema, cioè con il diritto verso di te, misurare ca 5 cm sotto lo scalfo lato sinistro del lavoro e 10 cm in un’angolazione di 90° – attaccare 1 bottone qui sul dir – (vedere la stella sullo schema). Attaccare l’altro bottone dall’altro lato, ma sul rovescio. ASOLE ESTERNE: Lavorare all’uncinetto 1 asola esterna con l’uncinetto 4 nell’ultimo giro di ogni lato al livello dei bottoni (ved schema). 1 ASOLA ESTERNA = 1 m.b nell’ultimo giro della giacca, 5 cat, saltare ca 1 cm, 1 m.b nell’ultimo giro della giacca. |
|||||||||||||||||||||||||
Spiegazioni del diagramma |
|||||||||||||||||||||||||
|
|||||||||||||||||||||||||
 |
|||||||||||||||||||||||||
 |
|||||||||||||||||||||||||
Avete terminato questo modello?Allora taggate le vostre foto con #dropspattern #fleurdunepaljacket o inviatele alla #dropsfan gallery. Avete bisogno di aiuto con questo modello?Troverete 27 video tutorial, una sezione per i commenti/domande e molto altro guardando il modello su www.garnstudio.com © 1982-2026 DROPS Design A/S. Ci riserviamo tutti i diritti. Questo documento, compreso tutte le sue sotto-sezioni, è protetto dalle leggi sul copyright. Potete leggere quello che potete fare con i nostri modelli alla fine di ogni modello sul nostro sito. |
|||||||||||||||||||||||||


Con oltre 40 anni di esperienza nel design di modelli di maglia e uncinetto, DROPS Design offre la più estesa collezione di modelli gratuiti su internet - tradotti in 17 lingue. Ad oggi vi possiamo fornire 325 cataloghi e 12298 modelli - 9569 dei quali sono tradotti in Italiano.
Ci stiamo impegnando molto per darvi il meglio che vi possiamo offrire in termini di maglia e uncinetto, ispirazioni e consigli così come filati di grande qualità ad un prezzo incredibile! Volete utilizzare i nostri modelli per qualcosa d'altro oltre al vostro uso personale? Potete leggere tutto ciò che è consentito nel testo sul Copyright in basso su tutte le pagine dei nostri modelli. Buon lavoro!
Lasciare un commento sul modello DROPS 126-1
Noi saremmo felici di ricevere i tuoi commenti e opinioni su questo modello!
Se vuoi fare una domanda, fai per favore attenzione a selezionare la categoria corretta nella casella qui sotto per velocizzare il processo di risposta. I campi richiesti sono indicati da *.