
Categorie popolari
State cercando un filato?


Commenti / Domande (19)
![]() Leslie ha scritto:
Leslie ha scritto:
So I've gotten to the hood and I'm confused how to increase by 4 on each side in the middle of the back with the 3rd row of the pattern. The 3rd row is P3tog and (k1, p1, k1) into one stitch. Shouldn't the increase be on row 2 or 4? If the increase is on row 3, please explain. Thank you
20.09.2021 - 21:46DROPS Design ha risposto:
Dear Leslie, increases have to be worked from right side, when you have to purl all stitches, ie knit 1 row from WS, then 2 rows in pattern (= first row = RS), and on next row = RS, increase on each side of the middle 2 sts. Happy knitting!
21.09.2021 - 09:06
![]() Leslie ha scritto:
Leslie ha scritto:
Which Berry pattern are you using and what are the multiples for the gauge? I'm looking on YouTube for the Berry pattern to follow, but I can't find anything that starts with P3. Could you please give me the actual stitches by row as the chart description is confusing. It's really beautiful and I would love to knit it. Thank you in advance.
01.09.2021 - 21:12DROPS Design ha risposto:
Dear Leslie, this video shows how to work the blackberry stitch. Hope this will help, happy knitting!
02.09.2021 - 08:36
![]() Robin D Bell ha scritto:
Robin D Bell ha scritto:
I would love to make this but can't seem to see on the pattern how many skeins of yarn are needed, and since having to substitute to the Drops Melody yarn I'm not sure how many to order. Thanks so much!
26.12.2015 - 23:17DROPS Design ha risposto:
Dear Mrs D Bell, you will find requested amount of yarn under tab "materials", ie in 1st size you need 250 g Melody / 50 g a ball Melody = 5 balls. Happy knitting!
02.01.2016 - 13:53
![]() Evelin Bürger ha scritto:
Evelin Bürger ha scritto:
Würde diese Model gern stricken, nur mit anderer (glatter Wolle) ist das machbar? Bekommt man dann trotzdem den Schnitt?
25.08.2014 - 12:12DROPS Design ha risposto:
Liebe Evenlin, das Muster fällt durch die luftige Vienna-Wolle natürlich besonders locker und schön. Wenn Sie eine glattere und schwerere Wolle verwenden, hängt sich das Muster wahrscheinlich stärker aus und wirkt nicht mehr so luftig. Am besten stricken Sie ein Probestück, um zu sehen, wie sich Ihre bevorzugte Wolle dabei verhält.
01.09.2014 - 13:10Nadia ha scritto:
Very feminine!!
27.03.2010 - 13:16
![]() Gabriele ha scritto:
Gabriele ha scritto:
Kann Patricia nur Recht geben! Schaue jeden Tag, ob die Anleitung schon eingestellt ist.
27.01.2010 - 08:19
![]() Jacqui ha scritto:
Jacqui ha scritto:
There are so many nice designs. I don't know where to start,but this is outstanding!!!!!!
18.01.2010 - 23:31
![]() Patricia ha scritto:
Patricia ha scritto:
Scheint so leicht und angenehm, man möchte gleich hineinschlüpfen. Ich hoffe die Anleitung ist bald verfügbar.
18.01.2010 - 21:05
![]() Hélène ha scritto:
Hélène ha scritto:
Un très beau modèle pour flâner à la maison.
07.01.2010 - 02:41Laila ha scritto:
Modèle très classe
06.01.2010 - 17:47
|
||||||||||
Powder Dreams#powderdreamscardigan |
||||||||||
 |
 |
|||||||||
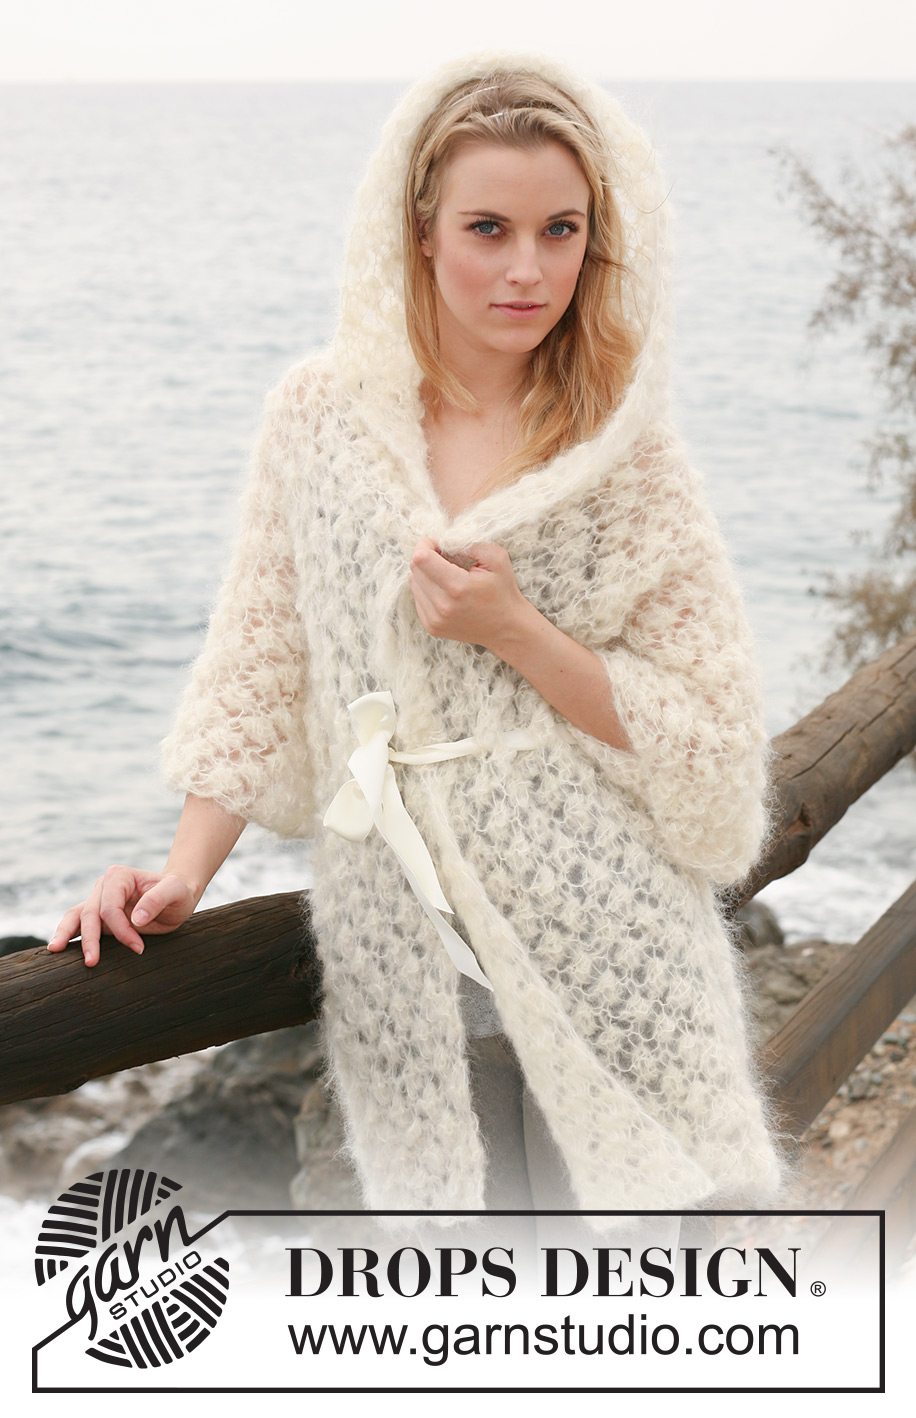
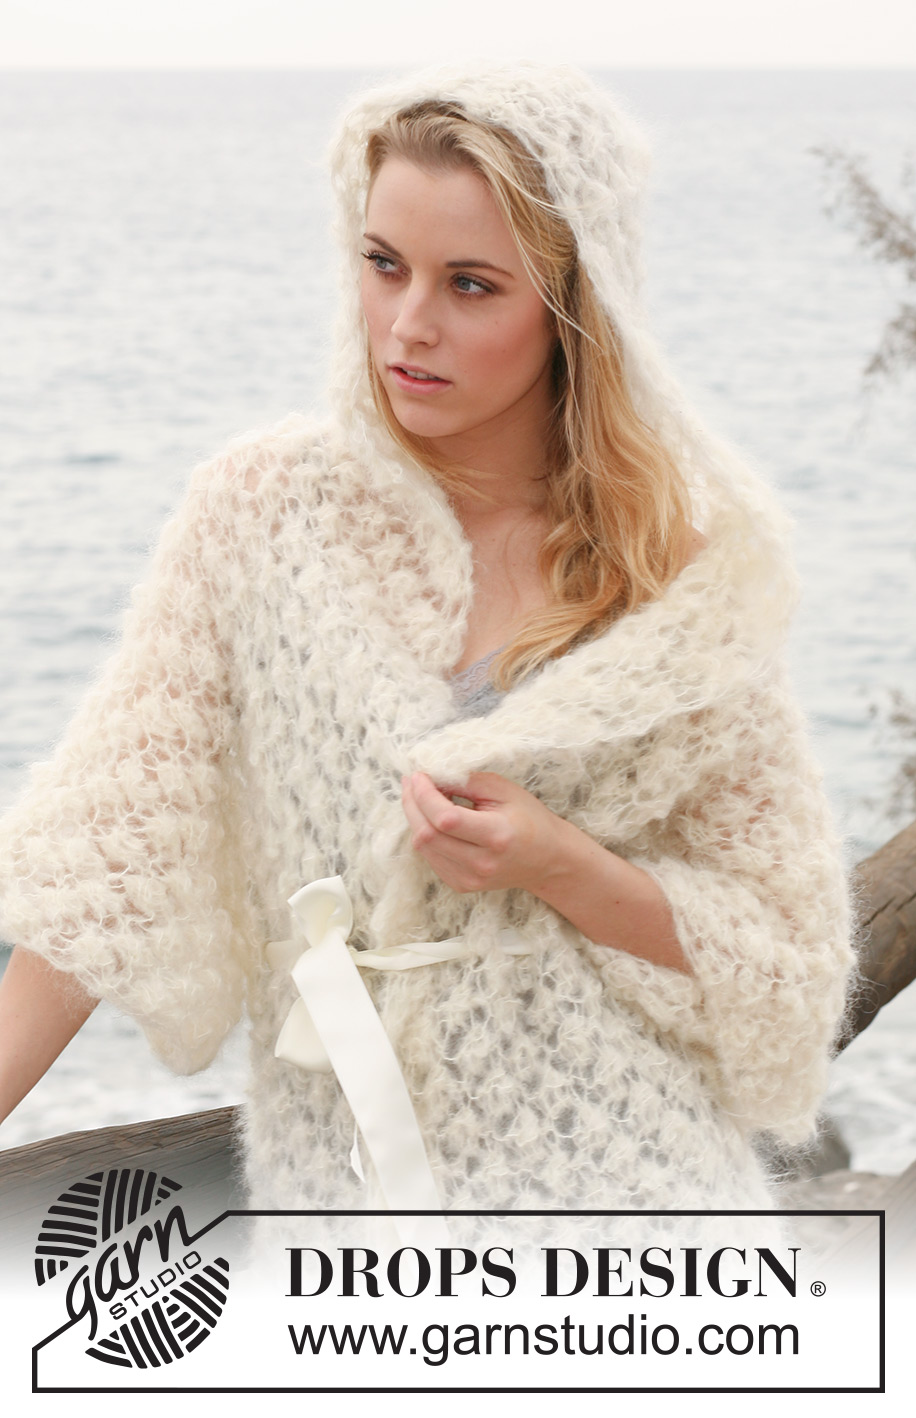
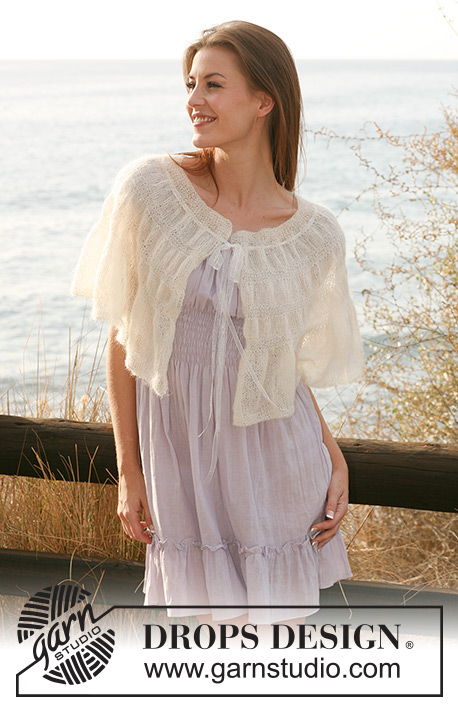
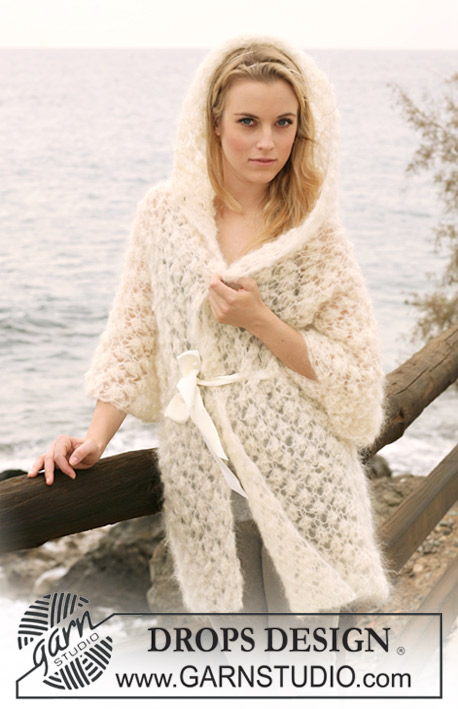
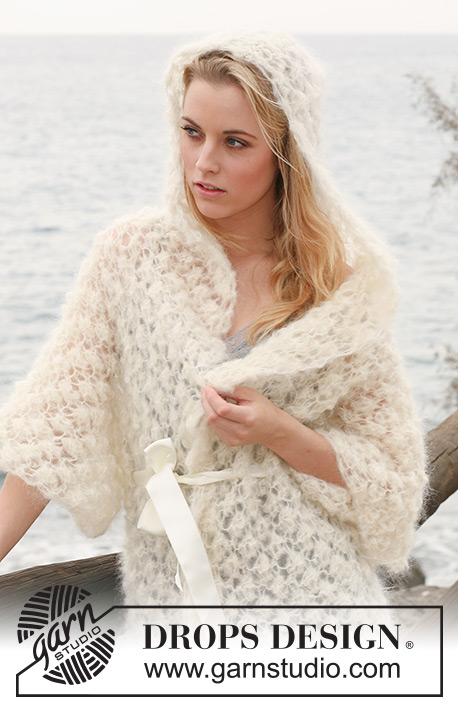
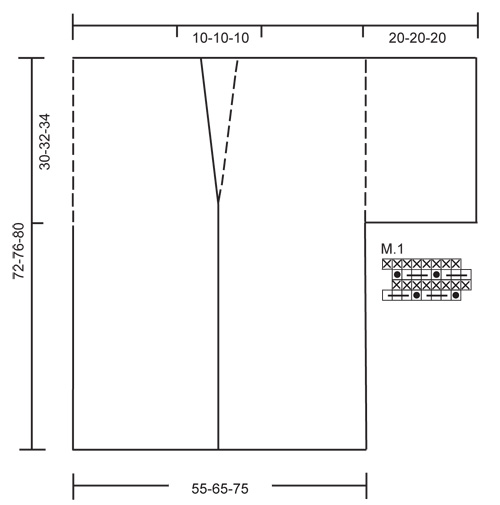
Cardigan DROPS in ”Vienna” o "Melody" a punto mimosa e largo cappuccio. Taglie: S - XXXL.
DROPS 119-13 |
||||||||||
|
PUNTO MIMOSA: Vedere il diagramma M.1 – il motivo è visto dal diritto del lavoro. 1 ripetizione = 4 m. M LEGACCIO (avanti e indietro sui f): Lavorare tutti i f a dir. SUGGERIMENTO PER GLI AUMENTI: Aumentare 4 m lavorando 5 m in 1 m come segue dal diritto del lavoro: 1 m rov, 1 gettato, 1 m rov, 1 gettato, 1 m rov. -------------------------------------------------------- -------------------------------------------------------- DIETRO: Lavorato avanti e indietro sui f circolari per avere spazio per tutte le m. Avviare 46-54-62 m (compresa 1 m di vivagno a ogni lato) con i f circolari n° 12 mm con Vienna o Melody. Lavorare a PUNTO MIMOSA – leggere sopra, con 1 m di vivagno a ogni lato a M LEGACCIO – leggere sopra! Quando il lavoro misura 42-44-46 cm avviare 16 nuove m a ogni lato per le maniche (quindi alla fine dei 2 f successivi) = 78-86-94 m. Continuare a punto mimosa su tutte le m con 1 m a m legaccio a ogni lato sui bordi delle maniche. FARE ATTENZIONE ALLA TENSIONE DEL LAVORO! Quando il lavoro misura 70-74-78 cm intrecciare senza stringere le 8 m centrali per il collo e finire ogni spalla (= 35-39-43 m) in modo separato. Continuare fino a quando il lavoro misura circa 72-76-80 cm (aggiustarlo dopo 1 f dal rovescio del lavoro) e intrecciare a dir dal diritto del lavoro. DAVANTI SINISTRO: Lavorato avanti e indietro sui f circolari. Avviare 30-34-38 m (compresa 1 m di vivagno a lato e 1 m per il bordo davanti verso il centro davanti) con i f circolari n° 12 mm con Vienna o Melody. Lavorare a punto mimosa con 1 m a m legaccio a ogni lato. Quando il lavoro misura 42-44-46 cm avviare 16 nuove m per la manica alla fine del f successivo verso il lato = 46-50-54 m. Continuare il motivo con 1 m a m legaccio a ogni lato. Quando il lavoro misura circa 44-46-48 cm aumentare 4 m nella m all’interno della m di vivagno verso il centro davanti – LEGGERE IL SUGGERIMENTO PER GLI AUMENTI = 50-54-58 m. Sul f successivo lavorare gli aumenti a punto mimosa. Ripetere gli aumenti quando il lavoro misura circa 58-60-62 cm = 54-58-62 m. Quando il lavoro misura circa 72-76-80 cm (aggiustarlo dopo un f dal rovescio del lavoro) lavorare il f successivo come segue: 19 m rov e ora trasferirle su un fermamaglie per il cappuccio, intrecciare le 35-39-43 m rimaste a dir dal diritto del lavoro, tagliare il filo. DAVANTI DESTRO: Come il davanti sinistro, ma a specchio. CONFEZIONE: Cucire le spalle/bordi sulle maniche margine a margine. Cucire il lato e i margini sotto le braccia all’interno della m di vivagno. CAPPUCCIO: Lavorare le m del fermamaglie sul davanti destro sui f circolari n° 12 mm, riprendere 8 m lungo la scollatura sul dietro e lavorare le m del fermamaglie sul davanti sinistro sui f = 46 m. Lavorare 1 f dir dal rovescio del lavoro e poi lavorare 2 f con il punto mimosa con 1 m di vivagno a m legaccio a ogni lato. Sul f successivo (= diritto del lavoro) aumentare 4 m in ognuna delle 2 m centrali sul dietro – LEGGERE IL SUGGERIMENTO PER GLI AUMENTI = 54 m. Continuare a punto mimosa con 1 m di vivagno a m legaccio fino a quando il cappuccio misura circa 45 cm (aggiustarlo dopo un f dal rovescio del lavoro), e intrecciare a dir dal diritto del lavoro. Piegare il cappuccio a metà e cucire in cima, margine a margine. Far passare il filo in un ferro a livello della vita del cardigan e allacciarlo. |
||||||||||
Spiegazioni del diagramma |
||||||||||
|
||||||||||
 |
||||||||||
Avete terminato questo modello?Allora taggate le vostre foto con #dropspattern #powderdreamscardigan o inviatele alla #dropsfan gallery. Avete bisogno di aiuto con questo modello?Troverete 14 video tutorial, una sezione per i commenti/domande e molto altro guardando il modello su www.garnstudio.com © 1982-2026 DROPS Design A/S. Ci riserviamo tutti i diritti. Questo documento, compreso tutte le sue sotto-sezioni, è protetto dalle leggi sul copyright. Potete leggere quello che potete fare con i nostri modelli alla fine di ogni modello sul nostro sito. |
||||||||||


Con oltre 40 anni di esperienza nel design di modelli di maglia e uncinetto, DROPS Design offre la più estesa collezione di modelli gratuiti su internet - tradotti in 17 lingue. Ad oggi vi possiamo fornire 324 cataloghi e 12290 modelli - 9561 dei quali sono tradotti in Italiano.
Ci stiamo impegnando molto per darvi il meglio che vi possiamo offrire in termini di maglia e uncinetto, ispirazioni e consigli così come filati di grande qualità ad un prezzo incredibile! Volete utilizzare i nostri modelli per qualcosa d'altro oltre al vostro uso personale? Potete leggere tutto ciò che è consentito nel testo sul Copyright in basso su tutte le pagine dei nostri modelli. Buon lavoro!
Lasciare un commento sul modello DROPS 119-13
Noi saremmo felici di ricevere i tuoi commenti e opinioni su questo modello!
Se vuoi fare una domanda, fai per favore attenzione a selezionare la categoria corretta nella casella qui sotto per velocizzare il processo di risposta. I campi richiesti sono indicati da *.