
Categorie popolari
State cercando un filato?


Commenti / Domande (176)
![]() Carrie ha scritto:
Carrie ha scritto:
Salve..mi chiedevo se fosse possibile lavorare questo modello solo con uno dei due filati anzich¨¦ tutti e due Grazie
25.04.2015 - 06:41DROPS Design ha risposto:
Buongiorno Carrie, usando uno solo dei due filati il risultato potrebbe cambiare molto rispetto a quello del modello, però può provare ad esempio ad usare 3 capi di Alpaca (Vivaldi è un filato del gruppo C, che corrisponde a 2 capi di un filato di gruppo A); se invece vuole proprio cambiare filato, deve utilizzarne uno che le permette di lavorare il campione indicato. Buon lavoro!
26.04.2015 - 17:57
![]() Van ha scritto:
Van ha scritto:
For a small sized sweater starting from the shortened row section to create extra width for the mid back, every time we slip stitches(starting from 30 then 11(7x)), do we cut the yarn and attach new yarn in order to continue with the rest of the stitches for that row? It seems logical but just want to confirm that there will be a lot of yarn loose ends to weave in for this last section of the sweater. Thank you for your guidance.
11.11.2014 - 03:45DROPS Design ha risposto:
Dear Mrs Van, there is no need to cut the yarn, you work as follows: work the first 30 sts from neck towards bottom edge and put them on a thread and work the remaining sts to the bottom edge. Then *work 11 sts, put them on a thread, work remaining sts, turn and work back row* repeat from *-* a total of 7 times (= 107 sts on the thread) work the remaining 6 sts and work the 107 sts from the thread back. Happy knitting!
11.11.2014 - 09:28
![]() Georgia Shirley ha scritto:
Georgia Shirley ha scritto:
Love this pattern. It looks like "Angel Wings".
01.11.2014 - 19:16
![]() Amalia León ha scritto:
Amalia León ha scritto:
Creo que las medidas del patrón tiene errores. No soy capaz de salir del punto en el que hay que hacer el huevo para la sisa (quedan pocos puntos en la parte de la espalda)
17.09.2014 - 12:21
![]() Lydia ha scritto:
Lydia ha scritto:
Hello, Does anyone have a suggestion for a yarn substitution for the pattern 119-1? I cannot wear mohair or wool at all. I do not have a problem with alpaca. I love the look of this wrap and would love to make one. Could I use two strands of the alpaca? Thank you.
24.05.2013 - 22:27DROPS Design ha risposto:
Dear Lydia, we are used to work with another tension with 2 threads Alpaca (17 sts/10 cm), but what about 1 strand Alpaca+ 1 strand Safran or Cotton Viscose ? Please ask your Drops store that will be sure helpfull. Happy knitting!
25.05.2013 - 09:40
![]() Lillie Checknita ha scritto:
Lillie Checknita ha scritto:
Just starting to knit this for my daughter who bought your kit buthas no time orknowledge to knit this
14.04.2013 - 17:08
![]() Ava ha scritto:
Ava ha scritto:
Just started this beautiful sweater. I'm a little confused, on the left front piece where you have to bind off the 29 stitches is this done from the inner piece or outer edge when put back on the needles? Do you still do garter stitch on both edges?
21.03.2013 - 14:30DROPS Design ha risposto:
Dear Ava, when you take back the 44 sts (size S) from st holder back, you cast off the first 29 sts from the inner side, turn and on next row, cast on 29 sts at the end of row, then work back the 69 sts from bottom part. Happy knitting!
25.03.2013 - 10:50
![]() Cheryl ha scritto:
Cheryl ha scritto:
I really need to know if when you get to the part for the arm hole if after you do the eight rows if you bind off and attach new yarn to work the 54 sts you put on the stitch holder. Then rejoin back to finish the rest of the sweater. Nowhere does it tell you to bind off and reattach when you are doing the arm hole.
02.03.2013 - 20:21DROPS Design ha risposto:
Dear Cheryl, after you have worked the 8 rows for the underarm, you have to cut the thread and join to the 54 sts you put on the st holder. After you have worked the upper part of the armhole, you cast on sts for the armhole and knit the sts from the lower part back. Happy knitting!
04.03.2013 - 09:08
![]() Rosemary Dougherty ha scritto:
Rosemary Dougherty ha scritto:
Am interesting in knitting a lovely sweater in this pattern; however, I cannot locate a sizing chart to reference. I am wondering if I am an XL, XXL or XXXL. Please help me locate a sizing chart for this. Thank you so very much :)
20.02.2012 - 21:56DROPS Design ha risposto:
There is a measure chart at the bottom of the pattern. The measures are in centimeters. Compare these measures with your body measures.
29.02.2012 - 00:08Vcjlevt ha scritto:
?????? |?????? ????? |?????? Sociale netværkssider som . Design Delhi , hvor lanceret for at hjælpe folk bliver forbundet skabt af gamle venner, møde nye venner. ???? |???? |????
29.09.2011 - 11:13
|
|||||||||||||
Fly Away#flyawaycardigan |
|||||||||||||
 |
 |
||||||||||||
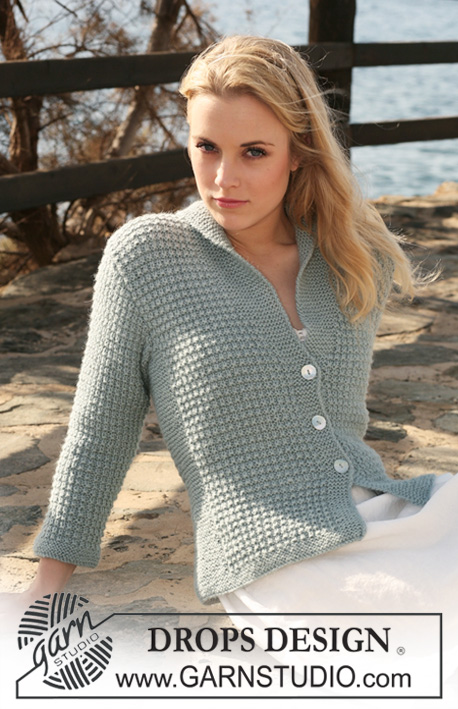
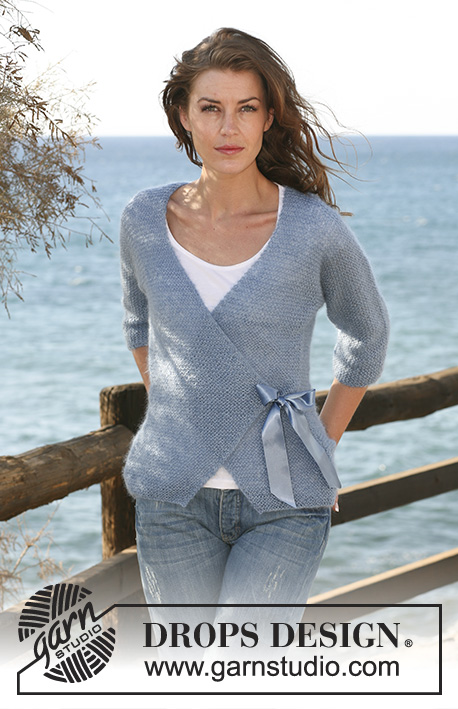
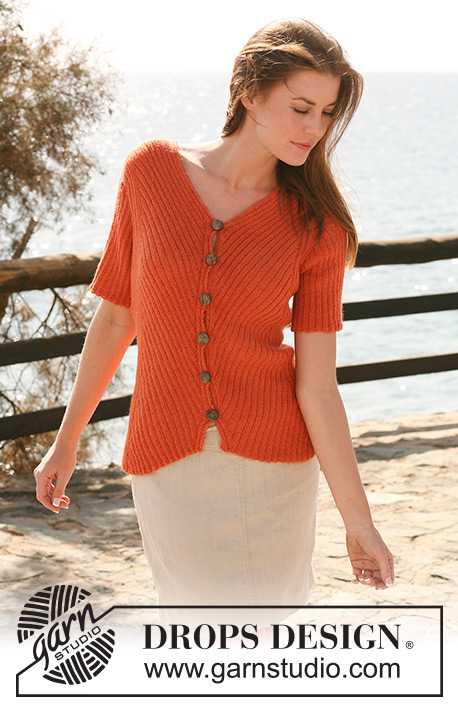
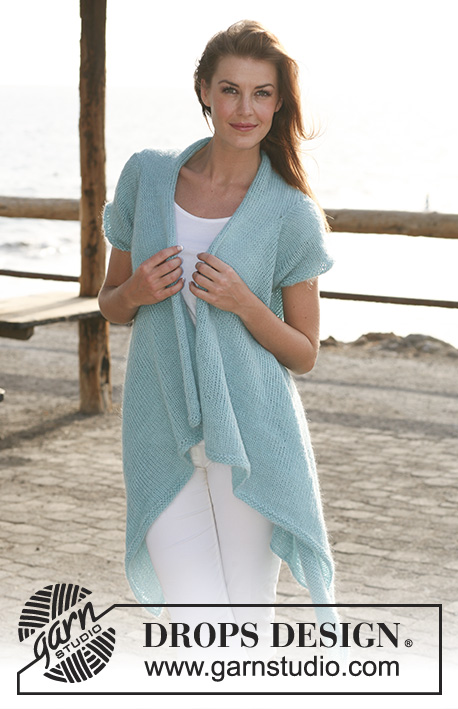
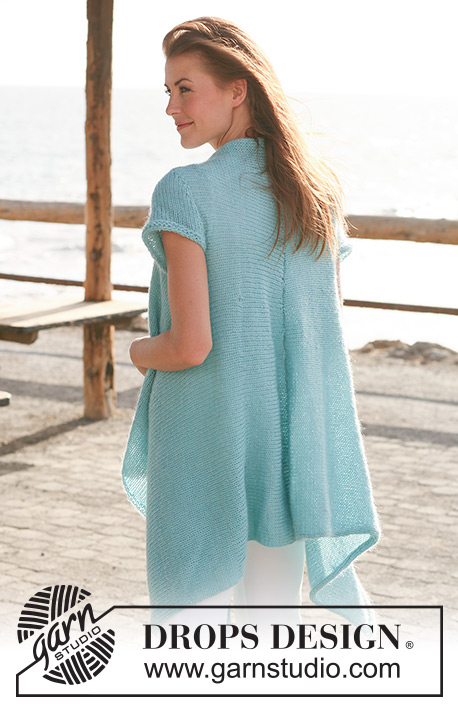
Giacca lunga DROPS, con maniche corte, lavorata da lato a lato, in Alpaca e Vivaldi o Brushed Alpaca Silk. Taglie: Dalla S alla XXXL.
DROPS 119-1 |
|||||||||||||
|
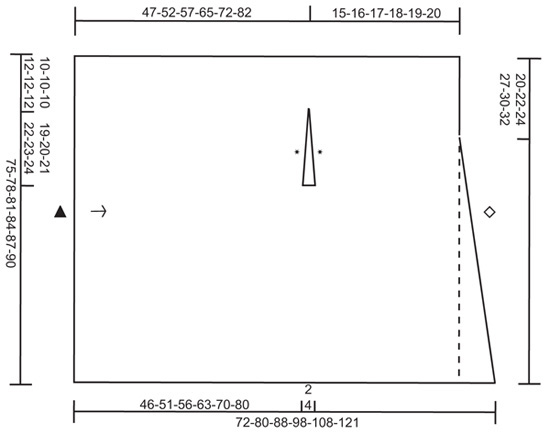
PUNTO LEGACCIO (avanti e indietro sui ferri): Lavorare tutti i ferri a dir. --------------------------------------------------------- GIACCA: Si lavora avanti e indietro sui ferri circolari per avere sufficiente spazio per tutte le m. Iniziare al centro davanti, lavorando il davanti sinistro, procedere verso il lato, intrecciare le m per lo scalfo e proseguire fino al centro sul dietro; intrecciare le m. Lavorare il davanti destro in modo uguale ma a specchio e cucire insieme i 2 pezzi al centro, sul dietro. Lavorare le maniche separatamente e cucirle. DAVANTI SINISTRO: Avviare, senza stringere troppo il filo, 113-117-121-126-130-135 m sui ferri circolari n° 5 con 1 capo del filato Alpaca e 1 capo del filato Vivaldi o Brushed Alpaca Silk (= 2 capi). Lavorare 4 ferri a PUNTO LEGACCIO - vedere le spiegazioni sopra (1° ferro = diritto del lavoro). Passare ai ferri circolari n° 6 e proseguire a maglia rasata con 2 m a punto legaccio da ciascun lato. RICORDARSI LA TENSIONE DEL LAVORO! Quando il lavoro misura ca. 46-51-56-63-70-80 cm – assicurarsi che il ferro successivo sia sul diritto del lavoro – mettere in attesa su un ferma maglie le 44-45-46-51-52-54 m sulla sinistra (viste sul diritto del lavoro). Sulle restanti 69-72-75-75-78-81 m, lavorare 4-4-4-8-8-8 ferri (= 2-2-2-4-4-4 cm) a maglia rasata con 2 m a punto legaccio da ciascun lato. Mettere ora queste m in attesa su un ferma maglie. Riportare sui ferri circolari n° 6 le prime 44-45-46-51-52-54 m messe in attesa sul ferma maglie e lavorare lo scalfo come segue, sul diritto del lavoro: Taglie S + M + L: Intrecciare le prime 29-30-31 m all’inizio del ferro, lavorare le restanti 15 m sul ferro come prima. Inserire un segno nella m più esterna sulla destra del lavoro (vista sul diritto del lavoro – il segno indica dove verrà cucita la manica). Girare il lavoro e lavorare le 15 m sul ferro come prima; avviare poi 29-30-31 m alla fine della riga. Taglie XL + XXL + XXXL: Intrecciare le prime 16-17-18 m all’inizio del ferro, lavorare le restanti 35-35-36 m sul ferro come prima, girare il lavoro. Lavorare le 35-35-36 m sul ferro come prima, girare il lavoro. Intrecciare le prime 17-17-18 m all’inizio del ferro e lavorare le restanti 18 m come prima. Inserire un segno nella m più esterna sulla destra del lavoro (vista sul diritto del lavoro – il segno indica dove verrà cucita la manica). Girare il lavoro e lavorare le 18 m come prima, avviare 17-17-18 nuove m alla fine della riga; girare il lavoro. Lavorare le 35-35-36 m sul ferro come prima, girare il lavoro. Lavorare le 35-35-36 m sul ferro come prima e avviare 16-17-18 nuove m alla fine dela riga. TUTTE LE TAGLIE: Riportare sui ferri di lavoro le 69-72-75-75-78-81 m messe in attesa sul ferma maglie e proseguire a maglia rasata su tutte le 113-117-121-126-130-135 m, con 2 m a punto legaccio da ciascun lato. Quando il lavoro misura 61-67-73-82-90-101 cm (misurati sulla sinistra del lavoro, sul diritto del lavoro; il lavoro misura ca. 62-68-74-84-92-103 cm sulla destra) lavorare a ferri accorciati per creare una larghezza supplementare al centro, sul dietro, come segue (iniziare sul rovescio del lavoro = a partire quindi dallo scollo): Lavorare le prime 30-33-36-41-45-48 m del ferro e poi mettere queste m in attesa su un ferma maglie, lavorare le restanti m del ferro, girare il lavoro e lavorare il ferro di ritorno, * lavorare le prime 11-8-7-7-6-5 m del ferro, mettere queste m in attesa sullo stesso ferma maglie e lavorare le restanti m sul ferro, girare il lavoro e lavorare il ferro di ritorno *, ripetere da *-* per un totale di 7-9-11-11-13-15 volte. Girare il lavoro, lavorare le restanti 6-12-8-8-7-12 m. Riportare sui ferri di lavoro le 107-105-113-118-123-123 m messe in attesa sul ferma maglie e lavorare 2 ferri a punto legaccio su tutte le m, intrecciare le m SENZA STRINGERE TROPPO IL FILO = centro, sul dietro. Il lavoro misura ca. 62-68-74-83-91-102 cm sulla sinistra (vista sul diritto del lavoro) e 72-80-88-98-108-121 cm sulla destra – misurare nella direzione del lavoro. DAVANTI DESTRO: Avviare le m e lavorare come indicato per il davanti sinistro, ma a specchio, quindi prendere tutte le misure sulla destra del lavoro – vista sul diritto del lavoro. Quando si lavorano i 4-4-4-8-8-8 ferri sotto le maniche, assicurarsi che il primo ferro sia sul rovescio del lavoro (e non sul diritto del lavoro) e mettere in attesa su un ferma maglie le 44-45-46-51-52-54 m sulla sinistra del lavoro, vista sul rovescio del lavoro (e non sul diritto del lavoro). Lavorare gli scalfi come indicato per il davanti sinistro, ma sul rovescio del lavoro (e non sul diritto del lavoro). Iniziare a lavorare i ferri accorciati al centro, sul dietro, sul diritto del lavoro (e non sul rovescio del lavoro). MANICHE: Si lavorano avanti e indietro sui ferri circolari. Avviare 41-43-44-47-50-53 m (compresa 1 m vivagno da ciascun lato) sui ferri circolari n° 5 con 1 capo del filato Alpaca e 1 capo del filato Vivaldi o Brushed Alpaca Silk (= 2 capi). Lavorare 4 ferri a punto legaccio; passare ai ferri circolari n° 6 e lavorare a maglia rasata. Quando il lavoro misura 5 cm, diminuire 1 m all’inizio dei 2 ferri successivi; ripetere queste diminuzioni quando il lavoro misura 10 cm; diminuire poi 1 m all’inizio di ogni ferro, da ciascun lato, per un totale di 4-4-5-6-7-8 volte. Intrecciare 4 m all’inizio dei 2 ferri successivi; intrecciare poi le restanti m. Le maniche misurano ca. 15-15-16-17-18-19 cm. CONFEZIONE: Cucire le due parti della giacca insieme al centro, sul dietro all’interno del bordo di chiusura delle m. Inserire le maniche -ATTENZIONE: Cucire la manica in corrispondenza dei segni sulla spalla e cucire le maniche da ciascun lato dello scalfo come indicato dalla stella nel diagramma (non c’e’ cucitura sotto la manica, quindi lasciare aperti i 4-4-4-8-8-8 ferri lavorati). |
|||||||||||||
Spiegazioni del diagramma |
|||||||||||||
|
|||||||||||||
 |
|||||||||||||
Avete terminato questo modello?Allora taggate le vostre foto con #dropspattern #flyawaycardigan o inviatele alla #dropsfan gallery. Avete bisogno di aiuto con questo modello?Troverete 18 video tutorial, una sezione per i commenti/domande e molto altro guardando il modello su www.garnstudio.com © 1982-2026 DROPS Design A/S. Ci riserviamo tutti i diritti. Questo documento, compreso tutte le sue sotto-sezioni, è protetto dalle leggi sul copyright. Potete leggere quello che potete fare con i nostri modelli alla fine di ogni modello sul nostro sito. |
|||||||||||||


Con oltre 40 anni di esperienza nel design di modelli di maglia e uncinetto, DROPS Design offre la più estesa collezione di modelli gratuiti su internet - tradotti in 17 lingue. Ad oggi vi possiamo fornire 324 cataloghi e 12290 modelli - 9561 dei quali sono tradotti in Italiano.
Ci stiamo impegnando molto per darvi il meglio che vi possiamo offrire in termini di maglia e uncinetto, ispirazioni e consigli così come filati di grande qualità ad un prezzo incredibile! Volete utilizzare i nostri modelli per qualcosa d'altro oltre al vostro uso personale? Potete leggere tutto ciò che è consentito nel testo sul Copyright in basso su tutte le pagine dei nostri modelli. Buon lavoro!
Lasciare un commento sul modello DROPS 119-1
Noi saremmo felici di ricevere i tuoi commenti e opinioni su questo modello!
Se vuoi fare una domanda, fai per favore attenzione a selezionare la categoria corretta nella casella qui sotto per velocizzare il processo di risposta. I campi richiesti sono indicati da *.