
Categorie popolari
State cercando un filato?


Commenti / Domande (46)
![]() Hilde ha scritto:
Hilde ha scritto:
Hei, Er fargekodene på garnet i denne oppskriften endret fra originaloppskriften (farge 3770 i Drops Alpaca og frage 13 i Drops Kid Silk)? For når jeg går inn på disse fargene så ser det mer sjokkrosa ut enn bringebærrød. Hvis ja, kan dere anbefale fargekoder som ligner originalen?
20.01.2026 - 13:13
![]() Katharina ha scritto:
Katharina ha scritto:
Bei der nächsten R. auf beiden Seiten des 2., 3., 5. und 6. Markierungsfadens (Abnäher) je 1 M. abn. – SIEHE TIPP ZUM ABNEHMEN. Bei jeder 8. R. total 7 Mal wiederholen = 124-136-148-164-176-192 M. (auf den Seiten nicht abn.). Sollen da dann in der 1-7 in jeder Reihe die Abnahmen sein oder in der 1. und dann 7 Reihen normal und dann wieder abnehmen?
01.01.2026 - 23:14DROPS Design ha risposto:
Liebe Katharina, Sie stricken 1 Runde mit Abnahmen, dann 7 Runden ohne Abnahmen, in der 8. Runde stricken Sie wieder Abnahmen, dann wieder 7 Runden ohne Abnahmen, dann wieder 1 Abnahme-Runde, wieder 7 ohne, wieder 1 mit usw., bis Sie 8 Abnahmerunden gestrickt haben.
24.02.2026 - 17:48
![]() Claudine ha scritto:
Claudine ha scritto:
Bonjours, j'ai un souci avec ce modèle , en effet, nous avons 6 marqueurs, 1 er à 31m , le 2ème: à 62 m., le 3ème: 31m , le 4ème à 31m, le 5ème 62m, le 6ème ???? merci de votre réponse meilleurs salutations gaillard claudine
09.06.2025 - 16:38DROPS Design ha risposto:
Bonjour Claudine, tout à fait, c'est bien ainsi que vous placez vos marqueurs, après le 6ème, il vous restera 31 mailles, vous aurez ainsi:31+62+31+31+62+31=248. Bon tricot!
10.06.2025 - 08:56
![]() Schünke Caroline ha scritto:
Schünke Caroline ha scritto:
In der Anleitung steht: „Nach 25 cm wie folgt 6 Markierungsfäden einziehen.“ Ist mit „25 cm“ die Gesamtlänge der Arbeit gemeint oder soll man nach 1 R. li., 1 R. re., 1 R. li. noch zusätzlich weitere 25 cm stricken bevor man die Fäden einzieht…?
01.10.2023 - 13:56DROPS Design ha risposto:
Liebe Frau Schünke, die 25 cm messen Sie ab der Anschlagskante. Viel Spaß beim stricken!
02.10.2023 - 10:30
![]() Margaret Higgins ha scritto:
Margaret Higgins ha scritto:
What weight of yarn would I use to knit this dress if I only want to use one strand of yarn?
18.01.2020 - 17:58DROPS Design ha risposto:
Dear Margaret, the modell uses two yarns from the yarn group A, and could be substituted with a yarn from the thicker side of yarn group B or the thinner side of yarn group C. However you should always do a swatch and check the gauge and decide if you need to recalculate some numbers. Happy Knitting!
19.01.2020 - 00:39
![]() Rachael Ayres ha scritto:
Rachael Ayres ha scritto:
If my bust is 38 should I size up to 41 or down to 37?
21.07.2019 - 11:13DROPS Design ha risposto:
Dear Mrs Ayres, the best way to find the matching size is to measure a similar garment you have and like the shape and compare these measurements with the ones from the chart. read more about sizing here. Happy knitting!
06.08.2019 - 09:03
![]() Eileen Popplewell ha scritto:
Eileen Popplewell ha scritto:
I would like to make this dress longer as I am an older individual. Where would you suggest I add rows in the pattern to make the dress longer? Should I add rows between decreases? Please advise.
07.01.2019 - 17:45DROPS Design ha risposto:
Dear Mrs Popplewell, we are unfortunately not able to adjust every pattern to every individual request. You can compare a similar dress you have and like the shape to the measurement chart - maybe add rather extra length at the bottom before the decrease to keep the shape? your DROPS store may have also more tips & advices for you, just contact them even per mail or telephone. Happy knitting!
08.01.2019 - 08:46
![]() Sandomingo Lois Norette ha scritto:
Sandomingo Lois Norette ha scritto:
Bonjour, Je souhaite commander de la laine drops kild-silk pour confectionner le modèle Raspberry marmalade mais la couleur n°13, cerise, n'existe pas/plus. Est-ce que le rose vif qui le remplace peut faire l'affaire?ou dois-je préférer le N°17, rose foncé. Merci d'avance
11.10.2017 - 15:16DROPS Design ha risposto:
Bonjour Mme Sandomingo, le coloris n°13 existe toujours, son nom a simplement été modifié. Votre magasin DROPS saura également toujours vous assister pour choisir les couleurs, même par mail ou téléphone, n'hésitez pas à le contacter. Bon tricot!
11.10.2017 - 16:48
![]() BORGNIEZ Jeanine ha scritto:
BORGNIEZ Jeanine ha scritto:
Bonjour, j'ai réalisé cette robe en rouge mais j'ai allongé les manches avec le motif du bas de la robe. Elle est magnifique !
26.11.2015 - 09:59Shiva ha scritto:
Can you please make more clear by what you mean with : AT THE SAME TIME bind off for armhole at beg of every row each side: 3 sts 0-0-0-1-1-2 times, 2 sts 1-1-2-2-3-3 times and 1 st 3-3-4-4-5-5 times and also what do you mean by : 4-4-5-5-5-6 times and finish with 0-3-1-4-4-2 K sts = 16-19-21-24-24-26 sts. Bind off all sts on next row.
11.12.2013 - 13:27DROPS Design ha risposto:
Dear Shiva, you continue on front piece in M.1 as before, and at the same time you shape armhole binding off each side every 2 rows: 3 sts 0-0-0-1-1-2 times, 2 sts 1-1-2-2-3-3 times and 1 st 3-3-4-4-5-5 times (see size). When piece measures 82-92 cm, work then on shoulder sts from RS: *K3,K2 tog*, repeat 4-6 times from *-* and finish row with K sts, and bind off on next row. Happy knitting!
11.12.2013 - 14:12
|
||||||||||
Raspberry Marmalade#raspberrymarmaladedress |
||||||||||
|
|
||||||||||
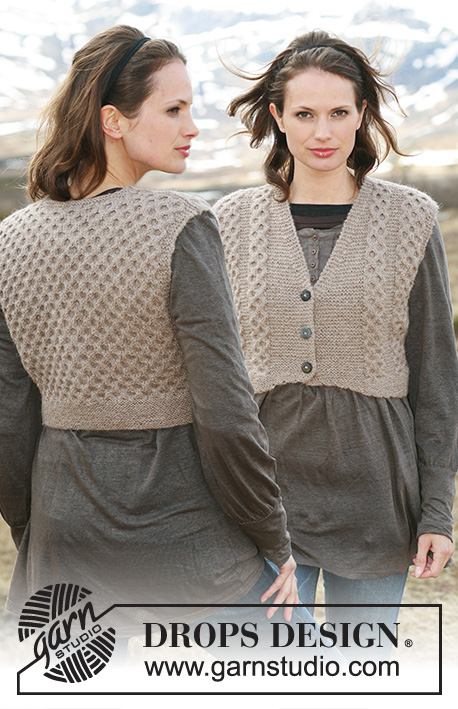
Vestitino DROPS in ”Alpaca” e ”Kid-Silk” con maniche 3/4 e sprone e bordo in nido d’ape. Dal XS al XXL
DROPS 117-39 |
||||||||||
|
MOTIVO: Ved diag M.1 – Il diag mostra il modello sul diritto. CONSIGLI DIMINUZIONI (per le pince del vestitino): Lavorare fino a 2 m prima del segno: Passare 1 m dir senza lavorarla, 1 m dir, accavallare la m passata sopra quella lavorata, (segno) 2 m dir insieme. ---------------------------------------------------------- ---------------------------------------------------------- VESTITINO: Si lavora in tondo sul ferro circolare. Con 1 filo di ogni qualità e il ferro circolare 4,5, avviare 228-246-264-282-300-318 m. Lavorare 1 giro rov, 1 giro dir, 1 giro rov e 1 giro dir e continuare con M.1 finché il lavoro non misuri ca 10 cm – aggiustare dopo 1 giro di maglia rasata dopo l’ultima treccia. Lavorare 1 giro dir, ALLO STESSO TEMPO, distribuire uniformemente 48-54-60-62-68-70 m diminuzioni = 180-192-204-220-232-248 m. Lavorare 1 giro ro, 1 giro dir e 1 giro rov, continuare con maglia rasata. RICORDATI LA TENSIONE DELLA MAGLIA! Quando il lavoro misura 25 cm, lasciare 6 segni distribuiti così: il 1° SEGNO all’inizio del giro (= al lato), lavorare 23-24-26-28-29-31 m, lasciare il 2° SEGNO, lavorare 44-48-50-54-58-62 m, lasciare il 3° SEGNO, lavorare 23-24-26-28-29-31 m, lasciare il 4° SEGNO (= l’altro lato), lavorare 23-24-26-28-29-31 m, lasciare il 5° SEGNO, lavorare 44-48-50-54-58-62 m, lasciare il 6° SEGNO. Al giro seguente, diminuire 1 m ad ogni lato del 2°, 3°, 5° e 6° segno per formare le pince – VED CONSIGLI DIMINUZIONI. Ripetere le diminuzioni in totale 7 volte ogni 8 giri = rimangono 124-136-148-164-176-192 m sul f (non diminuire sui lati). Togliere il 2°, 3°, 5° e il 6° segno, lasciare solo i 2 segni dei lati. Lavorare a maglia rasata finché il lav non misuri 52 cm. Lavorare 1 giro rov, 1 giro dir, 1 giro rov e 1 giro dir e poi 1 giro a foretti così: * 2 m dir insieme, 1 gett *, ripetere da *-* tutto il giro. Lavorare poi 1 giro dir, 1 giro rov, 1 giro dir, 1 giro rov e 1 giro dir. Continuare con 1 giro dir, ALLO STESSO TEMPO, distribuire uniformemente 56-56-68-76-76-84 m aumenti su tutto il giro - aumentare riprendendo la m del giro precedente e lavorarla a dir. NOTA: Fare attenzione a aumentare un numero uguale di maglie sul davanti e sul dietro = 180-192-216-240-252-276 m. Continuare con M.1. Quando il lavoro misura 64-65-66-67-68-69 cm, intrecciare 6 m ad ogni lato per gli scalfi (= 3 m ad ogni lato di ogni segno). Terminare il dietro e il davanti separatamente. DAVANTI: = 84-90-102-114-120-132 m. Continuare con M.1 – ALLO STESSO TEMPO, intrecciare per gli scalfi all’inizio di ogni f ad ogni lato: 3 m 0-0-0-1-1-2 volte, 2 m 1-1-2-2-3-3 volte e 1 m 3-3-4-4-5-5 volte = 74-80-86-92-92-98 m. Continuare con M.1 con 1 m vivagno ad ogni lato (lavorare la m vivagno a dir tutti i f). Quando il lavoro misura 74-76-78-80-82-84 cm, mettere in attesa su un filo le 20 m centrali per lo scollo e terminare ogni spalla separatamente. Intrecciare per formare lo scollo all’inizio di ogni f a partire del centro davanti: 2 m 2 volte e 1 m 3 volte = rimangono 20-23-26-29-29-32 m per la spalla. Continuare con M.1 con 1 m vivagno ad ogni lato. Quando il lavoro misura 82-84-86-88-90-92 cm, lavorare le m della spalla così sul dir: * 3 m dir, 2 m dir insieme *, ripetere da *-* 4-4-5-5-5-6 volte e terminare con 0-3-1-4-4-2 m dir = 16-19-21-24-24-26 m. Al f seguente, intrecciare tutte le m. DIETRO: = 84-90-102-114-120-132 m. Intrecciare per gli scalfi come per il davanti = 74-80-86-92-92-98 m. Continuare finché il lavoro non misuri 79-81-83-85-87-89 cm. Diminuire ora 8 m uniformemente sulle 34 m centrali. Al f seguente, intrecciare per lo scollo le 24 m centrali e terminare ogni spalla separatamente. All’inizio del giro seguente, intrecciare 1 m dal lato scollo = rimangono 20-23-26-29-29-32 m per la spalla. Quando il lavoro misura 82-84-86-88-90-92 cm, lavorare le spalle come per il davanti = 16-19-21-24-24-26 m. Intrecciare tutte le m al f seguente. MANICHE: Si lavora in tondo. Con 1 filo di ogni qualità e i ferri a doppia punta 4,5 (giro di ferri), avviare 46-48-50-52-54-56 m. Lavorare 1 giro rov, 1 giro dir e 1 giro rov. Continuare a maglia rasata – lasciare 1 segno all’inizio del giro = in mezzo sotto la manica. Quando il lavoro misura 2 cm, diminuire 1 m ad ogni lato del segno, ripetere queste diminuzioni ogni 2 cm in totale 4 volte = 38-40-42-44-46-48 m. Quando il lavoro misura 10 cm, aumentare 1 m ad ogni lato del segno, ripetere questi aumenti ogni 2,5-2-2-2-1,5-1,5 cm in totale 10-11-11-12-13-14 volte = 58-62-64-68-72-76 m. Quando il lavoro misura 35-35-34-33-32-31 cm (misura più corta per le taglie grandi perché l’arrotondamento della manica è più lungo e le spalle più larghe), intrecciare 6 m in mezzo sotto la manica e terminare il lavoro lavorando avanti e indietro sul f. Intrecciare 2 m all’inizio di ogni f ad ogni lato fino a quando il lavoro non misuri 42 cm, poi intrecciare 3 m 1 volta ad ogni lato. Al f seguente, intrecciare le m rimanenti. Il lavoro misura ca 43 cm. CONFEZIONE: Cucire le spalle. COLLO: Con 2 filo di ogni qualità e un piccolo ferro circolare 4,5, riprendere ca 76 til 90 m intorno allo scollo (incl le m in attesa sul filo davanti). Lavorare a maglia rasata. Quando il collo misura 10 cm, distribuire uniformemente 10 aumenti, ripetere questi aumenti quando il collo misura 20 e 25 cm. Lavorare poi 1 giro rov, 1 giro dir e 1 giro rov, intrecciare tutte le m a diritto senza stringere troppo. Attaccare le maniche. Infilare il nastro di seta nel giro di foretti del vestitino, cominciando e finendo davanti. |
||||||||||
Spiegazioni del diagramma |
||||||||||
|
||||||||||
 |
||||||||||
Avete terminato questo modello?Allora taggate le vostre foto con #dropspattern #raspberrymarmaladedress o inviatele alla #dropsfan gallery. Avete bisogno di aiuto con questo modello?Troverete 26 video tutorial, una sezione per i commenti/domande e molto altro guardando il modello su www.garnstudio.com © 1982-2026 DROPS Design A/S. Ci riserviamo tutti i diritti. Questo documento, compreso tutte le sue sotto-sezioni, è protetto dalle leggi sul copyright. Potete leggere quello che potete fare con i nostri modelli alla fine di ogni modello sul nostro sito. |
||||||||||


Con oltre 40 anni di esperienza nel design di modelli di maglia e uncinetto, DROPS Design offre la più estesa collezione di modelli gratuiti su internet - tradotti in 17 lingue. Ad oggi vi possiamo fornire 324 cataloghi e 12290 modelli - 9561 dei quali sono tradotti in Italiano.
Ci stiamo impegnando molto per darvi il meglio che vi possiamo offrire in termini di maglia e uncinetto, ispirazioni e consigli così come filati di grande qualità ad un prezzo incredibile! Volete utilizzare i nostri modelli per qualcosa d'altro oltre al vostro uso personale? Potete leggere tutto ciò che è consentito nel testo sul Copyright in basso su tutte le pagine dei nostri modelli. Buon lavoro!
Lasciare un commento sul modello DROPS 117-39
Noi saremmo felici di ricevere i tuoi commenti e opinioni su questo modello!
Se vuoi fare una domanda, fai per favore attenzione a selezionare la categoria corretta nella casella qui sotto per velocizzare il processo di risposta. I campi richiesti sono indicati da *.