
Categorie popolari
State cercando un filato?


Commenti / Domande (80)
![]() DROPS Design ha scritto:
DROPS Design ha scritto:
R2 : K1, *place yarn in front of work, slip next st as if to P, K tog yo + sl st from previous row (the yarn will wrap the right needle = yo)*, end with placing yarn in front of work, sl 1 as if to P, K1. R3: K1, *K tog yo + sl st from previous row, place yarn in front of work, slip next st as if to P (yarn will wrap the right needle)*, end with K tog yo and sl st, K1. Happy knitting!
10.01.2013 - 10:58
![]() DROPS Design ha scritto:
DROPS Design ha scritto:
This is how to work English ribs with yarn in the right hand and yos : R1 : K1, *K1, place yarn in front work, slip next st as if to P* (the yarn will wrap the right needle and you'll get the yo), end with K2. (set up row)
10.01.2013 - 10:58Renée ha scritto:
I checked the video before I sent my first question to you & it's very confusing. Furthermore, it is not English/Fisherman's rib that's being knitted in the video. As previously stated, no k1b (knit 1 into stitch below) is being performed in the video, so I do not see how this is English/Fisherman's rib. Also, I knit in the English not continental style, so your videos can be hard to follow for English style knitters. Also, I do not see the function of the YO in English/Fisherman's rib?
10.01.2013 - 10:07DROPS Design ha risposto:
Dear Renée, English ribs can be worked different ways, either with K1b, or with yos. We use that method with yos, and I'll explain you row after row in the comments. Hope it will help you ! Happy knitting !
10.01.2013 - 10:54Renée ha scritto:
This pattern states English/Fisherman's rib. These are 2 different types of knitting that use p1, k1 and k1b stitches in different alternating formats. This pattern does not resemble either of these and does not use the classic k1b stitch which forms both English and Fisherman's rib. Can you please explain what type of stitch you are advocating here and why it does not include the k1b stitch? Thank you!
09.01.2013 - 16:52DROPS Design ha risposto:
Dear Renée, there is a video linked at the very bottom of the pattern explaining how to work this kind of English rib. It should help you to figure out how to work this pattern. Happy Knitting !
09.01.2013 - 17:50Renée ha scritto:
On row 1 of the pattern it states: 1 garter stitch. I am assuming this mean to do 1 knit stitch, as garter stitch is not an actual type of stitch but a type of knitting composed of only knit stitches. Your patterns though quite creative and beautiful are unfortunately very vague and often quite poorly translated into English and consequentially often difficult to follow. Therefore, clarification would be greatly appreciated. Thank you.
09.01.2013 - 16:21DROPS Design ha risposto:
Dear Renée, 1 garter st means actually K1 from RS and from WS. Please have a look on the video linked if it can help. Happy knitting !
09.01.2013 - 17:42
![]() Caro-H ha scritto:
Caro-H ha scritto:
P.S.: Das Patentmuster kommt wunderbar fluffig raus, ist nur insgesamt zu eng. Werde es mit ein paar Maschen mehr versuchen.
04.01.2013 - 13:29
![]() Caro-H ha scritto:
Caro-H ha scritto:
...nein, nicht rundgestrickt. Anschlag auf 2 Nadeln Nr. 3. Keine Ahnung warum das bei mir nicht richtig rauskommt. Aber danke für deine Mühe.
04.01.2013 - 13:00
![]() Marion ha scritto:
Marion ha scritto:
Caro,hast du das doch rundgestrickt? Da würde das Muster nicht fluffig rauskommen u.nicht stimmen. Habs eben ausprobiert---Anschlag auf 2 Nadeln?
03.01.2013 - 13:48
![]() Caro-H ha scritto:
Caro-H ha scritto:
Danke Marion! Bei mir hat das Bündchen - ungedehnt - leider nur 30cm und der Patentteil ca. 46cm. Werde ich wohl noch mal aufmachen müssen, sitzt sehr stramm. Ich versteh trotzdem nicht, warum die Maschenprobe bei mir ok war...
03.01.2013 - 12:25
![]() Caro-H ha scritto:
Caro-H ha scritto:
Danke für die rasche Info, dann werde ich erst mal weitermachen, obwohl ein Rest Skepsis bleibt, optisch und rechnerisch: Bei 21M=10cm lande ich mit 95M nur bei 45cm und in der Anleitung für das Modell Nr. U-605 (das ich mir zunächst ausgesucht hatte) schlägt man immerhin bei gleicher Maschenprobe 117-129M an. Ziehen sich die Muster so verschieden in die Breite?
02.01.2013 - 19:14DROPS Design ha risposto:
Liebe Caro, da haben Sie natürlich recht! Dennoch dehnt sich das Patentmuster enorm und die Maschenprobe wird ungedehnt gemessen. Ich habe diese Mütze selbst schon nachgearbeitet und sie sitzt sehr gut – das Bündchen liegt an und der obere Teil hat Volumen durch das Patentmuster.
03.01.2013 - 10:35
|
|
Cathrine#cathrinehat |
|
|
|
|
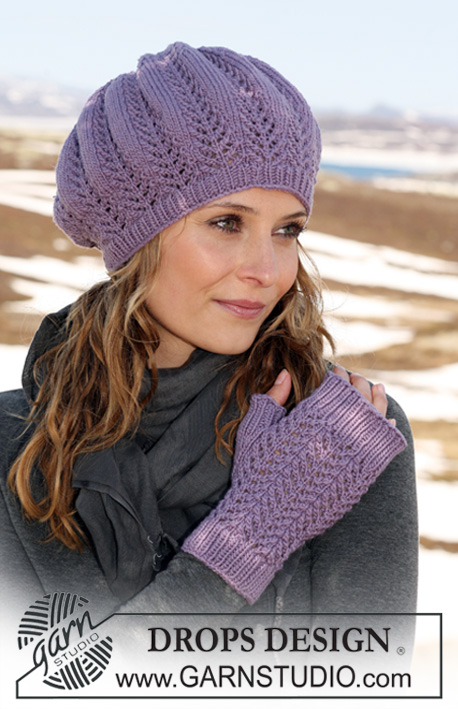
Cappello DROPS rigato lavorato in coste inglesi, in "Karisma" oppure in "DROPS Loves You III".
DROPS 114-30 |
|
|
PUNTO LEGACCIO (avanti e indietro sul f): Lavorare tutti i ferri sul diritto. COSTE INGLESI (avanti e indietro sul ferro): 1° f: 1 m a punto legaccio, * 1 m dir, 1 gettato, passare 1 m a rov senza lavorarla *, ripetere da *-* fino a quando non rimangano 2 m, finire con 1 m dir e 1 m a punto legaccio. 2° f: 1 m a punto legaccio, *1 gettato, passare 1 m a rov senza lavorarla, lavorare insieme a dir il gettato e la m passata *, ripetere da *-* fino a quando non rimangano 2 m, finire con 1 gettato, passare 1 m a rov senza lavorarla, 1 m a punto legaccio. 3° f: 1 m a punto legaccio, * lavorare insieme a dir il gettato e la m passata, 1 gettato, passare 1 m a rov senza lavorarla *, ripetere da *-* fino a quando non rimangano 3 m, lavorare insieme a dir il gettato e la m passata, 1 m a punto legaccio. Ripetere il 2° e il 3° f. -------------------------------------------------------- -------------------------------------------------------- CAPPELLO: Si lavora avanti e indietro sui ferri circolari. Avviare 89-95 m con i ferri circolari 3 ed il filo beige Karisma. Lavorare 1 f rov sul rovescio del lavoro, poi sul diritto del lavoro lavorare così: 1 m PUNTO LEGACCIO – vedere spiegazioni sopra, coste 1 m dir/1 m rov finché non rimangano 2 m, terminare con 1 m dir, 1 m punto legaccio. Quando le coste misurano 3 cm, continuare con bianco. Quando le coste misurano 6 cm (aggiustare dopo un ferro sul rovescio) continuare con beige e i ferri circolari 4. Continuare poi con le COSTE INGLESI sul f seguente sul diritto – vedere le spiegazioni sopra! Continuare così, ALLO STESSO TEMPO, cambiare colore ogni 3 cm fino alla fine (aggiustare in modo da terminare ogni colore sul rovescio). RICORDARSI DELLA TENSIONE DELLA MAGLIA! Quando il lavoro misura 24 cm (aggiustare dopo 1 riga), cambiare colore, ALLO STESSO TEMPO, lavorare a coste 1 m dir/1 m rov con 1 m punto legaccio ad ogni lato. Continuare così finché la riga misura 3 cm, poi lavorare 1 f a maglia rasata, ALLO STESSO TEMPO, lavorare insieme tutte le maglie a dir 2 e 2 alla volta. Il lavoro misura ora ca 28 cm. Stringere le maglie rimanenti in alto e cucire il cappello, punto legaccio contro punto legaccio. |
|
Avete terminato questo modello?Allora taggate le vostre foto con #dropspattern #cathrinehat o inviatele alla #dropsfan gallery. Avete bisogno di aiuto con questo modello?Troverete 11 video tutorial, una sezione per i commenti/domande e molto altro guardando il modello su www.garnstudio.com © 1982-2026 DROPS Design A/S. Ci riserviamo tutti i diritti. Questo documento, compreso tutte le sue sotto-sezioni, è protetto dalle leggi sul copyright. Potete leggere quello che potete fare con i nostri modelli alla fine di ogni modello sul nostro sito. |


Con oltre 40 anni di esperienza nel design di modelli di maglia e uncinetto, DROPS Design offre la più estesa collezione di modelli gratuiti su internet - tradotti in 17 lingue. Ad oggi vi possiamo fornire 324 cataloghi e 12290 modelli - 9561 dei quali sono tradotti in Italiano.
Ci stiamo impegnando molto per darvi il meglio che vi possiamo offrire in termini di maglia e uncinetto, ispirazioni e consigli così come filati di grande qualità ad un prezzo incredibile! Volete utilizzare i nostri modelli per qualcosa d'altro oltre al vostro uso personale? Potete leggere tutto ciò che è consentito nel testo sul Copyright in basso su tutte le pagine dei nostri modelli. Buon lavoro!
Lasciare un commento sul modello DROPS 114-30
Noi saremmo felici di ricevere i tuoi commenti e opinioni su questo modello!
Se vuoi fare una domanda, fai per favore attenzione a selezionare la categoria corretta nella casella qui sotto per velocizzare il processo di risposta. I campi richiesti sono indicati da *.