
Categorie popolari
State cercando un filato?


Commenti / Domande (27)
![]() Marianne Bendtsen ha scritto:
Marianne Bendtsen ha scritto:
Jeg har strikket denne model i bomuld (Drops muskat). Den er blevet SÅ lækker
29.12.2025 - 23:23
![]() Birgitte Kræhmer ha scritto:
Birgitte Kræhmer ha scritto:
Findes denne opskrift også til herrer
30.12.2023 - 11:26DROPS Design ha risposto:
Hej Birgitte, her ser du alle vores herreopskrifter med nordisk mønster: Herre - Nordisk mønster Du kan følge opskriften i den rigtige brystvidde og så følge målene fra en herreopskrift i samme kvalitet og strikkefasthed :)
03.01.2024 - 08:11
![]() Catherine ha scritto:
Catherine ha scritto:
In size XL the stitching for the back armhole does not compute. If I cast off 2 stitches at the BEGINNING of each row 6 times, I have only reduced by 12 stitches, plus 3 more when I cast of 1 stitch at the BEGINNING of each row. I end up with 100 stitches on the needle, although the directions say I should have 85. Its only possible to get 85 stitches by casting off staches at BOTH ENDS OF EACH ROW. Can you confirm that this is correct?
16.04.2023 - 15:36DROPS Design ha risposto:
Dear Catherine, you cast off at the beginning of each row on each side 6 times, so in total you cast off 12 times (6 at the beginning of right side rows and 6 at the beginning of wrong side rows). So you cast off 24 stitches. The same with the next instructions: 1 stitch 3 times from the right side and 3 times from the wrong side, so 6 times. Therefore, you should have cast off 30 stitches; 115-30 = 85. Happy knitting!
16.04.2023 - 19:27
![]() Ingeborg ha scritto:
Ingeborg ha scritto:
Goedendag, ik ga voor het eerst rondbreien. Als ik de panden verder apart moet breien, is dit dan met rechte pennen?
15.07.2021 - 12:58DROPS Design ha risposto:
Dag Ingeborg,
Het vest wordt heen en weer gebreid met een rondbreinaald, van middenvoor naar midden voor. Als je alle steken op rechte naalden zet wordt het erg proppen, zeker in de grotere maten, vandaar er een rondbreinaald geadviseerd wordt.
20.07.2021 - 15:50
![]() Rosema ha scritto:
Rosema ha scritto:
Moet dit patroon ook op de averechts kant gebreid worden? Of is het op de rechte pen patroon breien en dan averechts pen overbreien.?
08.10.2019 - 18:13
![]() Marjorie Kemp ha scritto:
Marjorie Kemp ha scritto:
Continued The overall sleeve length was as specified but the sleeve cap was way too short and would never have matched the opening in the sweater body.
26.03.2017 - 23:06DROPS Design ha risposto:
Dear Mrs Kemp, after you cast off 6 sts mid under sleeve continue M.2A (and B, C see size), then work M.2D while casting off for sts on each side for sleeve cap. Happy knitting!
27.03.2017 - 09:58
![]() Marjorie Kemp ha scritto:
Marjorie Kemp ha scritto:
Continued After decreasing the 6 stitches I started on the next row doing 2 decreases on each side for the specified number of times and then 1 decrease each side for the number of rows indicated. Then on the next rows I deceased 2 stitches each side until the specified overall length was accomplished. I finished as the pattern said.
26.03.2017 - 23:05
![]() Marjorie Kemp ha scritto:
Marjorie Kemp ha scritto:
I tried that, as the directions seemed to specify, but as I said in my first post, following these steps netted a very short sleeve cap. Any further elucidation?
26.03.2017 - 23:04
![]() Marjorie Kemp Kemp ha scritto:
Marjorie Kemp Kemp ha scritto:
Having trouble with the directions on the sleeve cap. I decreased the 6 stitches then started the decreased but the cap ended up being too short. Then I tried doing the 6 stitches decrease and following with completing the chart pattern before doing the (10 rows plus) decreases. Then the cap was pretty long. And I'm not sure when to start the "then 2 stitches each side until piece measures (22-3/4"). Can you restate that part so it's more clear?
20.03.2017 - 04:25DROPS Design ha risposto:
Dear Mrs Kemp, after binding off the 6 sts mid under sleeve, continue back and forth (see pattern & diagram in written pattern) casting off at the beg of each row on each side: 2 sts 3-4-4-4-5-3 times, 1 st 1-2-4-6-6-14 times, then 2 sts each side until piece measures 56-57-57-58-58-58 cm, now cast off 3 sts 1 time each side, and cast off remaining sts. Sleeve should now measure approx. 57-59 cm (see size). Happy knitting!
20.03.2017 - 10:23
![]() Ruby Jones ha scritto:
Ruby Jones ha scritto:
On the decrease for the back piece for the armholes. The pattern clearly says at the BEGINING or each row 6 times! Which adds up to 12 stitches and then 1 st at the Beginning of a row 3 times. How do you get 24 sts decreased. how is this possible if we are only to decrease at the beginning of each row? Should I be decreasing 2 sts at each end and not just at the beginning of each row & pattern is wrong
08.10.2016 - 13:35DROPS Design ha risposto:
Dear Mrs Jones, in 4th size you have to cast off at the beg of every row on each side, ie at the beg of row both from RS and from WS: 2 sts 6 times (= 12 sts on each side) + 1 st 3 times (= 3 sts on each side). There were 115 sts - (12+3x2 sides) = 85 sts. Happy knitting!
10.10.2016 - 09:05
|
|||||||
DROPS 116-11 |
|||||||
|
|
|||||||
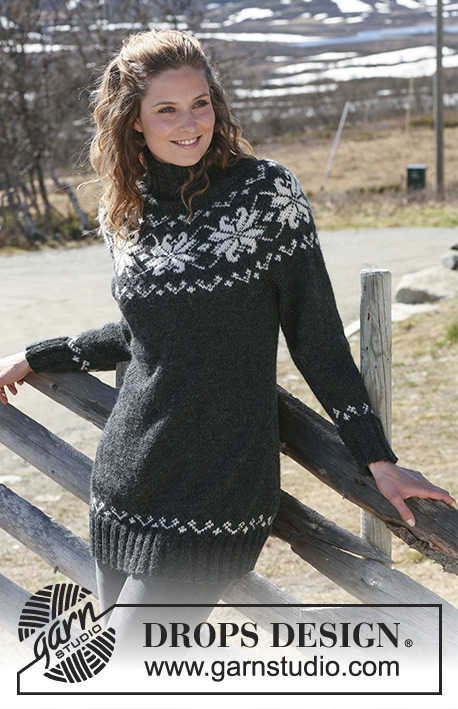
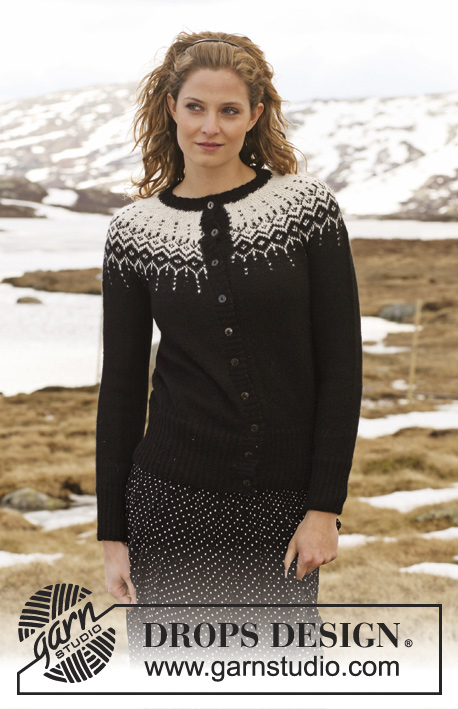
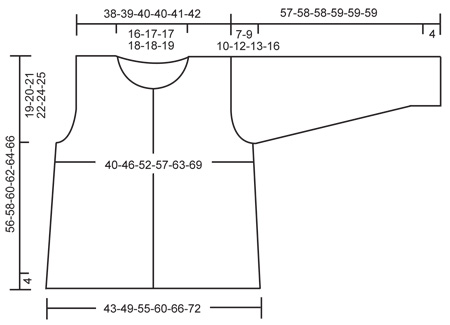
Cardigan DROPS lavorato ai ferri con motivo norvegese in ”Karisma”. Taglie: S-XXXL.
DROPS 116-11 |
|||||||
|
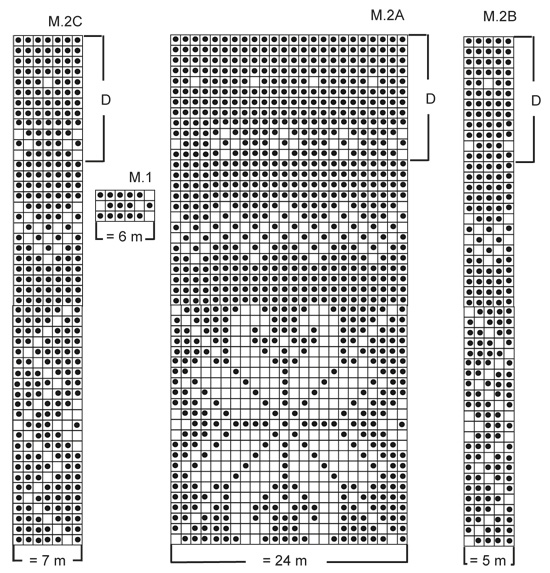
M LEGACCIO (avanti e indietro sui f): Lavorare tutti i f a dir. ASOLE: Fare le asole sul bordo davanti destro. 1 asola = intrecciare la 6° m dal centro davanti e avviare 1 nuova m sul f di ritorno. Fare le asole quando il bordo misura: TAGLIA S: 7, 14, 21, 28, 35, 42 e 49 cm. TAGLIA M: 9, 16, 23, 30, 37, 44 e 51 cm. TAGLIA L: 5, 13, 21, 29, 37, 45 e 53 cm. TAGLIA XL: 7, 15, 23, 31, 39, 47 e 55 cm. TAGLIA XXL: 9, 17, 25, 33, 41, 49 e 57 cm. TAGLIA XXXL: 5, 14, 23, 32, 41, 50 e 59 cm. MOTIVO: Vedere i diagrammi M.1 e M.2. I diagrammi mostrano il motivo dal diritto del lavoro. -------------------------------------------------------- -------------------------------------------------------- CARDIGAN: Lavorato avanti e indietro sui f circolari dal centro davanti. Avviare 250-278-310-338-370-398 m con i f circolari n° 3,5 mm con l'antracite. Continuare come segue dal diritto del lavoro: 10 m a M LEGACCIO - leggere sopra, coste 2 m dir/2 m rov fino a quando rimangono 12 m, finire con 2 m dir e 10 m a m legaccio. Continuare a coste con 10 m a m legaccio a ogni lato verso il centro davanti (= bordi davanti, lavorati a m legaccio per tutto il lavoro). Quando le coste misurano 4 cm lavorare 1 f a m rasata, ALLO STESSO TEMPO distribuire 49-53-61-65-73-77 diminuzioni in modo uniforme (non diminuire sui bordi davanti) = 201-225-249-273-297-321 m. Passare ai f circolari n° 4 mm e continuare a m rasata con 10 m a m legaccio a ogni lato. FARE ATTENZIONE ALLA TENSIONE DEL LAVORO! Quando il lavoro misura 5 cm continuare con il MOTIVO – leggere sopra – sul f successivo dal diritto del lavoro come segue: 10 m a m legaccio, M.1 (= 6 m) per tutto il f fino a quando rimangono 11 m, finire con la 1° m di M.1 e 10 m a m legaccio. ALLO STESSO TEMPO quando il lavoro misura 7-9-5-7-9-5 cm fare le ASOLE sul bordo davanti destro – leggere sopra. Dopo 1 ripetizione verticale di M.1 continuare in antracite. Inserire 2 segnapunti nel lavoro, all'interno di 55-61-67-73-79-85 m da ogni lato (dietro = 91-103-115-127-139-151 m). Quando il lavoro misura 10 cm diminuire 1 m a ogni lato di entrambi i segnapunti, e ripetere le diminuzioni ogni 8-9-9-10-10-11 cm per un totale di 3 volte = 189-213-237-261-285-309 m. Quando il lavoro misura 28-29-30-31-31-32 cm lavorare il motivo sul f successivo dal diritto del lavoro come segue: 10 m a m legaccio, M.2A (= 24) per un totale di 7-8-9-10-11-12 volte lungo il f, e finire con la 1° m di M.2A e 10 m a m legaccio. Continuare con il motivo in questo modo. Quando il lavoro misura 37-38-39-40-40-41 cm intrecciare 6 m a ogni lato per lo scalfo (= 3 m a ogni lato del segnapunti). Ora finire ogni parte in modo separato. DIETRO: = 79-91-103-115-127-139 m. Continuare in M.2A come prima, ALLO STESSO TEMPO intrecciare per lo scalfo a ogni lato all'inizio di tutti i f: 2 m 0-2-4-6-8-10 volte e 1 m 0-1-2-3-4-5 volte = 79-81-83-85-87-89 m. Quando il lavoro misura 54-56-58-60-62-64 cm intrecciare le 31-33-33-35-35-37 m centrali per il collo e finire ogni spalla in modo separato. Intrecciare 1 m sulla scollatura sul f successivo = 23-23-24-24-25-25 m rimaste sulla spalla. Dopo 1 ripetizione verticale di M.2A finire il lavoro in M.2D. Intrecciare quando il lavoro misura 56-58-60-62-64-66 cm. DAVANTI SINISTRO: = 49-55-61-67-73-79 m. Continuare con il motivo come prima, ALLO STESSO TEMPO intrecciare per lo scalfo a lato come descritto per il dietro = 49-50-51-52-53-54 m. Quando il lavoro misura 50-52-54-56-58-60 cm trasferire 18-19-19-20-20-21 m verso il centro davanti su un fermamaglie. Intrecciare per modellare la scollatura all'inizio di ogni f dal centro davanti: 2 m 4 volte = 23-23-24-24-25-25 m rimaste sulla spalla. Intrecciare quando il lavoro misura 56-58-60-62-64-66 cm. DAVANTI DESTRO: Come il davanti sinistro, ma a specchio. Ricordarsi delle ASOLE – leggere sopra! MANICA: Lavorata in tondo con i f a doppia punta. Avviare 60-60-68-68-68-68 m con i f a doppia punta n° 3,5 mm con l'antracite. Lavorare 1 giro a m rasata e continuare a coste 2 m dir/2 m rov. Quando le coste misurano 4 cm lavorare 1 giro a m rasata e ALLO STESSO TEMPO distribuire 12-12-14-14-14-14 diminuzioni in modo uniforme= 48-48-54-54-54-54 m. Passare ai f a doppia punta n° 4 mm e inserire un segnapunti all'inizio del giro. Continuare a m rasata. Quando il lavoro misura 5 cm continuare il motivo sul giro successivo come segue: M.1 per un totale di 8-8-9-9-9-9 volte lungo il giro. Dopo 1 ripetizione verticale di M.1 continuare a m rasata in antracite. Quando il lavoro misura 6-6-8-8-6-8 cm aumentare 1 m a ogni lato del segnapunti e ripetere gli aumenti ogni 3-3-2-2-1,5-1 cm per un totale di 12-12-15-15-21-21 volte = 72-72-84-84-96-96 m. Quando il lavoro misura 41-40-39-38-37-34 cm continuare con il motivo sul giro successivo come segue: Taglie S/M: M.2A per un totale di 3-3 volte. Taglie L/XL: M.2B (= 5 m), M.2A 3 volte, M.2C (= 7 m). Taglie XXL/XXXL: M.2A per un totale di 4-4 volte. Quando il lavoro misura 50-49-48-47-46-43 cm (meno per le taglie più grandi a causa dell'arrotondamento della manica più lungo e della maggiore ampiezza delle spalle) intrecciare 6 m al centro sotto la manica (= 3 m a ogni lato del segnapunti - aggiustarlo al corpo - cioè allo stesso f del motivo) e finire la manica avanti e indietro sui f. Alla fine di 1 ripetizione verticale finire il lavoro in M.2D per tutte le taglie. ALLO STESSO TEMPO intrecciare per l'arrotondamento della manica a ogni lato all'inizio di ogni f: 2 m 3-4-4-4-5-3 volte, 1 m 1-2-4-6-6-14 volte, poi 2 m a ogni lato fino a quando il lavoro misura 56-57-57-58-58-58 cm, ora intrecciare 3 m 1 volta a ogni lato, e intrecciare le m rimaste. Il lavoro misura circa 57-58-58-59-59-59 cm. CONFEZIONE: Cucire i margini delle spalle. Attaccare le maniche. Attaccare i bottoni. SCOLLATURA: Lavorato avanti e indietro con i f circolari. Riprendere 102-106-106-110-110-114 m (comprese le m sui fermamaglie) attorno alla scollatura con i f circolari n° 3,5 mm con l'antracite. Lavorare 1 f dir dal rovescio del lavoro e continuare come segue dal diritto del lavoro: 10 m a m legaccio, coste 2 m dir/2 m rov fino a quando rimangono 12 m, finire con 2 m dir, 10 m a m legaccio, ALLO STESSO TEMPO distribuire 24 aumenti in modo uniforme sul f (non aumentare sui bordi davanti) = 126-130-130-134-134-138 m. Continuare a coste fino a quando il collo misura 3 cm. Intrecciare con dir su dir e rov su rov. |
|||||||
Spiegazioni del diagramma |
|||||||
|
|||||||
 |
|||||||
 |
|||||||
Avete terminato questo modello?Allora taggate le vostre foto con #dropspattern o inviatele alla #dropsfan gallery. Avete bisogno di aiuto con questo modello?Troverete 25 video tutorial, una sezione per i commenti/domande e molto altro guardando il modello su www.garnstudio.com © 1982-2026 DROPS Design A/S. Ci riserviamo tutti i diritti. Questo documento, compreso tutte le sue sotto-sezioni, è protetto dalle leggi sul copyright. Potete leggere quello che potete fare con i nostri modelli alla fine di ogni modello sul nostro sito. |
|||||||


Con oltre 40 anni di esperienza nel design di modelli di maglia e uncinetto, DROPS Design offre la più estesa collezione di modelli gratuiti su internet - tradotti in 17 lingue. Ad oggi vi possiamo fornire 324 cataloghi e 12290 modelli - 9561 dei quali sono tradotti in Italiano.
Ci stiamo impegnando molto per darvi il meglio che vi possiamo offrire in termini di maglia e uncinetto, ispirazioni e consigli così come filati di grande qualità ad un prezzo incredibile! Volete utilizzare i nostri modelli per qualcosa d'altro oltre al vostro uso personale? Potete leggere tutto ciò che è consentito nel testo sul Copyright in basso su tutte le pagine dei nostri modelli. Buon lavoro!
Lasciare un commento sul modello DROPS 116-11
Noi saremmo felici di ricevere i tuoi commenti e opinioni su questo modello!
Se vuoi fare una domanda, fai per favore attenzione a selezionare la categoria corretta nella casella qui sotto per velocizzare il processo di risposta. I campi richiesti sono indicati da *.