
Categorie popolari
State cercando un filato?


Commenti / Domande (41)
![]() Katarzyna ha scritto:
Katarzyna ha scritto:
Czy ten wzór będzie kiedyś przetłumaczony na polski ?
27.02.2020 - 22:57DROPS Design ha risposto:
Witaj Kasiu, będzie gotowy na początku przyszłego tygodnia. Pozdrawiamy
28.02.2020 - 08:35
![]() Zahide ha scritto:
Zahide ha scritto:
In de teltekening wordt recht samenbreien weergegeven als 2 hokjes met een naar links wijzend diagonaal streepje er over. Het tegengestelde, namelijk voor 1st r. afhalen, 1 breien en de afgehaalde staan overhalen. . Wordt in tel tekening weergegeven als 2 hokjes met een naar rechts wijzend diagonaal streepje erover. Dit moet toch andersom zijn? Naar links wijzend diagonaal streep is recht afhalen 1 breien en de afgehaalde st. overheen. En bij recht samenbreien .naar links wijzend streep toch?
21.01.2017 - 01:41DROPS Design ha risposto:
Hoi Zahide. Ik ben het met je eens. Normaal is dit ook bij ons andersom. Ik zal het aanpassen. Bedankt voor het melden!
07.02.2017 - 14:55
![]() Heidi ha scritto:
Heidi ha scritto:
Hallo, das Muster ist von der rechten Seite abgebildet. Sind das die Reihen 1, 3 , 5 7 usw. oder sind alle Reihen 1, 2, 3 usw abgebildet? In der 1. Reihe habe ich einen Umschlag und 2 Maschen werden zusammen gestrickt, was ja auch Sinn macht. In der nächsten Reihe stricke ich nur 2 Maschen zusammen, stimmt das? Sind ja dann Abnahmen.
15.06.2016 - 08:11DROPS Design ha risposto:
Liebe Heidi, die Arbeit wird ja zunächst in Runden gestrickt und im Diagramm ist jede Runde dargestellt. In Runde 1 machen Sie 2 Umschläge aber nur 1 Abnahme und nehmen damit 1 M zu, die in der nächsten Runde wieder abgenommen wird. Somit bleibt die Maschenzahl gleich.
16.06.2016 - 08:30
![]() Linda Campion ha scritto:
Linda Campion ha scritto:
Re the chart M1... Line 1 for example.... YO between 2 sts.... What do you mean...at the very beginning...between what two sts....? Is it knit 1, YO, Knit 1....is that what you mean at the very first stitch please because it does not seem at all clear to me and there is no video to show me. I would like you to put in words what the first line actually is please...stitch by stitch....thank you for your help.
17.05.2015 - 14:55DROPS Design ha risposto:
Dear Mrs Campion, on 1st row in M.1 you work (YO, K1 into back of loop, YO, slip 1 st as if to K, K1, psso, K5) and repeat around. Pattern (= Round) starts with YO between last st of previous round and next st worked K into back of loop. Happy knitting!
18.05.2015 - 09:57Christine ha scritto:
I just finished the front piece section of directions. It said when piece measures 9 cm divide mid front and complete each side separately. The directions for the left front piece says to work back and forth in st st with 5 garter. And at the same time when the piece measures 9 cm to work 9 garter stitches at side with remaining stitches. Does that mean to add another 9 cm on to of the 9 cm I did already for the front piece? Also not 100 percent sure about how to decrease for v neck. thanks
15.02.2015 - 21:19DROPS Design ha risposto:
Dear Christine, you divide front piece when piece measures 9 cm (2nd size) and will work from now on 5 sts in garter sts towards neckline - at the same time, you work 9 sts in garter st towards the side for armhole. Dec for armhole as stated under "Decreasing tip 1", ie from RS on left front piece: work until 7 sts remain (= 2 sts in st st + 5 sts in garter st), K2 tog and work the 5 remaining sts in garter st. Happy knitting!
16.02.2015 - 11:16
![]() Pamela ha scritto:
Pamela ha scritto:
I see you list your yarns in categories A, B, C, ect... How do the categories relate to Worsted weight 4, sport weight 3 ...??
21.03.2013 - 18:20
![]() Bertie Wirring ha scritto:
Bertie Wirring ha scritto:
Ik wil dit patroon graag met twee naalden ipv rondbreinaalden breien. Is dit dan (op het paatroon) de heengaande nald en alles averecht op de twruggaande ??
19.03.2013 - 20:17DROPS Design ha risposto:
De telpatronen geeft het motief weer van de goede kant, maar alle naalden worden weergegeven. Dat zou betekenen dat elke 2e nld (2, 4, 6 enz) op de verkeerde kant moet komen. Dat betekent dan ook dat kies je om deze heen en weer te breien, dan moet je inderdaad de r st av breien, maar ook 2 st samen breien (op de verkeerde kant dan av samen breien ipv r). Vergeet niet om 1 kantst op te zetten aan beide zijkanten voor de naad. Het zal even puzzelen zijn, maar volgens mij goed mogelijk om te doen.
20.03.2013 - 15:54
![]() Rose-Marie Ejermo ha scritto:
Rose-Marie Ejermo ha scritto:
Har stickat den i jeansblått storlek M till mitt barnbarn. Köpte 550 g enligt beskrivningen gjorde den 5 cm längre och har ändå fått 200 g över !
12.05.2010 - 22:19
![]() Mariska ha scritto:
Mariska ha scritto:
Precies wat ik zocht.Ik ben zo blij met deze site, heb het al aan verschillende mensen doorgegeven! Bedankt
05.05.2009 - 15:17
![]() Strikkfant ha scritto:
Strikkfant ha scritto:
Denne var helt nydelig, den skal jeg strikke:)
05.04.2009 - 09:32
|
||||||||||||||||
Pink Lemonade#pinklemonadetunic |
||||||||||||||||
|
|
||||||||||||||||
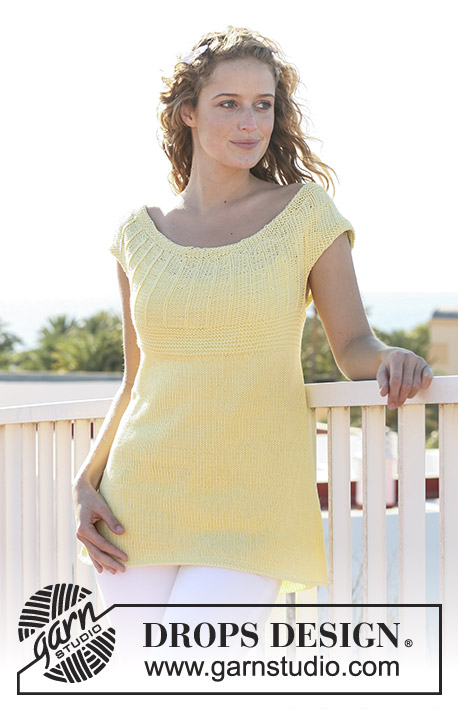
Tunica DROPS in "Safran" con gonna con motivo a pizzo e sprone a m. rasata con collo a V davanti e dietro. Taglie: dalla S alla XXXL.
DROPS 113-24 |
||||||||||||||||
|
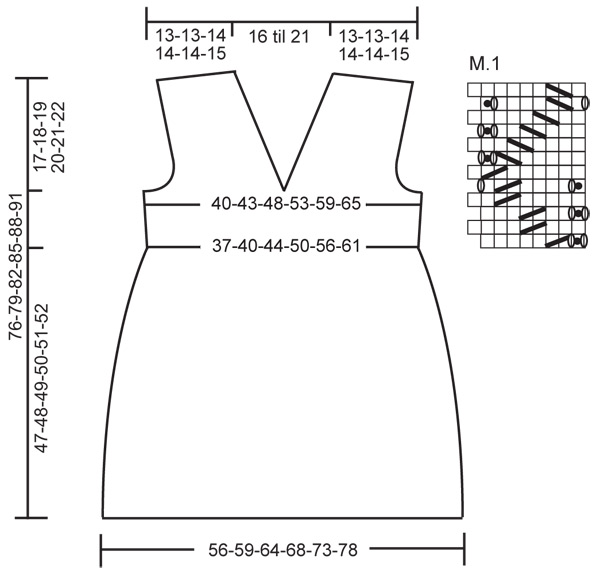
M. LEGACCIO (avanti e indietro sui f.): lavorare tutti i f. a dir. M. LEGACCIO (in tondo): 1 giro dir., 1 giro rov. MOTIVO: Vedere il diagramma M.1. Il diagramma mostra il motivo dal diritto del lavoro. SUGGERIMENTO PER LE DIMINUZIONI: Diminuire all’interno delle 5 m. a m. legaccio. Dopo le 5 m. a m. legaccio: passare 1 m. a dir. senza lavorarla, 1 m. dir., accavallare la m. passata sopra quella appena lavorata. Prima delle 5 m. a m. legaccio: lavorare 2 m. insieme a dir. SUGGERIMENTO PER GLI AUMENTI: Aumentare 1 m. all’interno delle 5 m. a m. legaccio facendo 1 gettato. Lavorare il gettato a dir. nel filo dietro della m. sul f. di ritorno per evitare un buco. ---------------------------------------------------------- GONNA: Lavorata in tondo con i f. circolari. Avviare 268-288-308-326-350-374 m. con i f. circolari n° 3 mm con il Safran. Lavorare 2 giri a m. legaccio – leggere sopra. Passare ai f. circolari n° 3,5 mm, lavorare 1 giro dir., ALLO STESSO TEMPO distribuire 12-16-12-14-14-14 diminuzioni in modo uniforme = 256-272-296-312-336-360 m. Ora continuare in M.1 su tutte le m. Quando il lavoro misura circa 47-48-49-50-51-52 cm passare ai f. circolari n° 3 mm. Lavorare 10 giri a m. legaccio, ALLO STESSO TEMPO sul 1° f. distribuire 88-88-92-84-80-80 diminuzioni in modo uniforme = 168-184-204-228-256-280 m. Tornare ai f. circolari n° 3,5 mm e lavorare 1 giro dir. Inserire un segnapunti all’inizio del giro e un segnapunti dopo 84-92-102-114-128-140 m. (indicano i lati). Ora dividere il lavoro e finire il davanti e il dietro in modo separato, avanti e indietro sui f. DAVANTI: = 84-92-102-114-128-140 m. Continuare a m. rasata con 1 m. di vivagno a ogni lato. ALLO STESSO TEMPO sul 1° f. aumentare 1 m. a ogni lato, e ripetere gli aumenti ogni 6 f. per un totale di 4-4-4-4-4-5 volte = 92-100-110-122-136-150 m. Quando il lavoro misura 7-8-9-10-11-12 cm dal segnapunti continuare a m. legaccio sulle 10 m. centrali con le m. rimaste come prima. Quando il lavoro misura 8-9-10-11-12-13 cm dividere il lavoro al centro davanti (= 5 m. a m. legaccio a ogni lato) e finire ogni lato in modo separato. DAVANTI SINISTRO: LEGGERE TUTTA LA SEZIONE SEGUENTE PRIMA DI CONTINUARE! Continuare avanti e indietro sui f. a m. rasata con 5 m. a m. legaccio verso il centro davanti. ALLO STESSO TEMPO quando il lavoro misura 8-9-10-11-12-13 cm lavorare 9-9-9-13-17-21 m. a m. legaccio a lato con le m. rimaste come prima. ALLO STESSO TEMPO diminuire per il collo a V all’interno delle 5 m. a m. legaccio verso il centro davanti – leggere il suggerimento per le diminuzioni – a f. alterni: 1 m. per un totale di 12-13-13-13-13-14 volte. ALLO STESSO TEMPO quando il lavoro misura 9-10-11-12-13-14 cm intrecciare 4-4-4-8-12-16 m. a lato per lo scalfo. Inserire un segnapunti nel lavoro e ora misurare il lavoro da qui. Intrecciare per modellare lo scalfo all’interno di 5 m. a m. legaccio: 1 m. a f. alterni per un totale di 1-2-6-8-10-10 volte – leggere il suggerimento per le diminuzioni! Alla fine delle diminuzioni per lo scalfo il collo, ci sono 29-31-32-32-33-35 m. sul f. Ora continuare a diminuire 1 m. per il collo a V ogni 4 f., ma ALLO STESSO TEMPO, per ogni diminuzione aumentare anche 1 m. all’interno delle 5 m. a m. legaccio a lato. Continuare in questo modo fino a quando il lavoro misura 17-18-19-20-21-22 cm dal segnapunti. Ora interrompere le diminuzioni/aumenti per la scollatura e i lati, e intrecciare per modellare la spalla dal lato verso la scollatura a f. alterni: 5-6-6-6-7-7 m. 3 volte e 14-13-14-14-12-14 m. 1 volta. DAVANTI DESTRO: come il davanti sinistro. DIETRO: = 84-92-102-114-128-140 m. Come il davanti sinistro. CONFEZIONE: cucire i margini delle spalle. Cucire i margini dei lati all’interno della m. di vivagno da dove sono state intrecciate le m. per gli scalfi. |
||||||||||||||||
Spiegazioni del diagramma |
||||||||||||||||
|
||||||||||||||||
 |
||||||||||||||||
Avete terminato questo modello?Allora taggate le vostre foto con #dropspattern #pinklemonadetunic o inviatele alla #dropsfan gallery. Avete bisogno di aiuto con questo modello?Troverete 16 video tutorial, una sezione per i commenti/domande e molto altro guardando il modello su www.garnstudio.com © 1982-2026 DROPS Design A/S. Ci riserviamo tutti i diritti. Questo documento, compreso tutte le sue sotto-sezioni, è protetto dalle leggi sul copyright. Potete leggere quello che potete fare con i nostri modelli alla fine di ogni modello sul nostro sito. |
||||||||||||||||


Con oltre 40 anni di esperienza nel design di modelli di maglia e uncinetto, DROPS Design offre la più estesa collezione di modelli gratuiti su internet - tradotti in 17 lingue. Ad oggi vi possiamo fornire 324 cataloghi e 12290 modelli - 9561 dei quali sono tradotti in Italiano.
Ci stiamo impegnando molto per darvi il meglio che vi possiamo offrire in termini di maglia e uncinetto, ispirazioni e consigli così come filati di grande qualità ad un prezzo incredibile! Volete utilizzare i nostri modelli per qualcosa d'altro oltre al vostro uso personale? Potete leggere tutto ciò che è consentito nel testo sul Copyright in basso su tutte le pagine dei nostri modelli. Buon lavoro!
Lasciare un commento sul modello DROPS 113-24
Noi saremmo felici di ricevere i tuoi commenti e opinioni su questo modello!
Se vuoi fare una domanda, fai per favore attenzione a selezionare la categoria corretta nella casella qui sotto per velocizzare il processo di risposta. I campi richiesti sono indicati da *.