
Categorie popolari
State cercando un filato?


Commenti / Domande (90)
Karen' ha scritto:
Dear Drops, thanks again for your help. I have some questions about the sleeves. 1) I have cast on sleeves and worked the next 2 rows. for the next row it says to 'Continue as follows: 5 front band sts in garter st, 25-28-32-36-41-46 stocking sts, 4 garter sts, 4 stocking sts, M.1 on 60-60-60-72-72-72 sts, etc'. What are these stocking stitches? since the last row was done in purl on the sides and back, I presume those stitches should be garter on this row?
21.05.2014 - 21:26DROPS Design ha risposto:
Dear Karen, the sts worked in stocking st on this row will be K from RS and then P from WS - you have 4 sts K every round for each raglan (4 sts in garter st) and on sleeve 4 sts before M1 and 5 sts after M1 worked in stocking st (K from RS, P from WS). Happy knitting!
22.05.2014 - 08:35Karen ha scritto:
Dear Drops, me again! I have managed to cast on my sleeves after your help, thank you. I'm struggling now to read M1. I understand that I read the pattern from the bottom right hand side? Does this mean I should repeat M1 across six times because I should work M1 on 60 stitches according to the pattern. Also, I am little confused about why the top 3 rows appear to have less stitches? Are there written instructions available for DROPS patterns instead of diagrams?
20.05.2014 - 08:33DROPS Design ha risposto:
Dear Karen, on the sleeve you will repeat M.1 (= 12 sts) a total of 5 times (= over 60 sts). on the last rows, you will have less sts because there will be more dec than yos. Happy knitting!
20.05.2014 - 09:16Karen ha scritto:
Dear Drops, I have a question about casting on stitches over the armholes. When it says in the pattern 'On next row (from RS) loosely cast on 69-69-69-81-81-81 new sts for sleeves over each armhole = 264-276-292-332-352-372 sts ', where exactly do I cast on these stitches? It might be a silly question but I'm fairly new to reading patterns. Hopefully you can help me :) Best wishes, Karen
16.05.2014 - 21:39DROPS Design ha risposto:
Dear Karen, after binding off sts for armholes at each marker, work a new row from RS and cast on 69-81 sts (see size) over the 18 sts bound off over each armhole, ie, work first front piece, cast on sts for sleeve, work back piece, cast on sts for sleeve and work 2nd front piece. Happy knitting!
17.05.2014 - 09:26Karen ha scritto:
For the increases at the beginning would it be okay to knit into the back and front of a stitch? I find this an easy way to make an increase
12.05.2014 - 16:01DROPS Design ha risposto:
Dear Karen, you may use the increase technique you are more at ease with, ie, knit into back and front will also work. Happy knitting!
13.05.2014 - 09:05
![]() Paula ha scritto:
Paula ha scritto:
In this video, I clearly see a hole made by the yarn over, but the pattern instructions say there is a way to avoid the hole. Is there a video for that?
17.01.2014 - 16:19
![]() Hatice ha scritto:
Hatice ha scritto:
Vielen Dank. Sie haben Recht, nach ein paar Reihen legt sich das wieder. Für mich war abzuklären, ob es da einen Trick gibt. Was man auf jeden Fall beachten sollte ist, LOCKERE Maschen anzuschlagen. Hilft sehr. Danke und LG.
15.01.2014 - 18:32
![]() Hatice ha scritto:
Hatice ha scritto:
"Nach diesen 2 R. auf beiden Seiten 10 M. für das Armloch abk. [...] Bei der nächsten R. (= rechte Seite) über dem Ärmel locker je 69-69-69-81-81-81 neue M. anschlagen " Diese Stelle meine ich. Die neuen Maschen werden über dem Ärmel angeschlagen. Aber über dem Ärmel (über den 10 abgeketteten M.?) ist es sehr mit den neuen M. sehr eng, so dass ich nicht weiter stricken kann, weil die neuen M. viel länger sind (als die Stelle mit den zehn abgeketteten M.). LG
13.01.2014 - 15:14DROPS Design ha risposto:
Liebe Hatice, das stimmt, bei neu angeschlagenen Maschen sind die ersten 2-3 Reihen manchmal etwas schwierig zu stricken. Schieben Sie die Maschen auf der Rundnadel so zurecht, dass es geht (evtl. etwas Seil zwischen den Maschen herausziehen, dass die M nach vorne gleiten). Es legt sich schon in der 2. R und man kann bald ganz normal weiter stricken.
14.01.2014 - 07:51
![]() Hatice ha scritto:
Hatice ha scritto:
Hallo. Ich habe ein Problem damit über dem Ärmel neue Maschen anzuschlagen. Damit ist gemeint, dass man über den 10 abgeketteten Maschen neue anschlagen soll, allerdings ist es danach schwer zu stricken, weil die Spitzen der Naseln sich nicht mehr berühren können, da die Spannweite nicht ausreicht. Ich weiß leider nicht mehr, wie ich weiter machen soll. LG
12.01.2014 - 21:57DROPS Design ha risposto:
Liebe Hatice, leider habe ich Ihr Problem nicht ganz verstanden. Könnten Sie das bitte genauer erklären oder sich die Ausführung von dem Laden erklären lassen, in dem Sie die Wolle gekauft haben.
13.01.2014 - 10:03
![]() Valeria ha scritto:
Valeria ha scritto:
Grazie per la risposta veloce.per le asole tutto ok.non avevo ben capito...invece per gli aumenti nn trovo riscontro.-Sto realizzando per la taglia M. e alla fine mi ritrovo non con 158 m. 148 maglie.Dove sbaglio? grazie
25.03.2013 - 16:31DROPS Design ha risposto:
Buongiorno, vediamo di analizzare insieme gli aumenti, magari troviamo la soluzione. Allora, gli aumenti iniziano con 1° f. a m. rasata, 1 aumento per lato per 12 volte, quindi da 114 m. dovremmo averne 138 per la taglia M. Poi quando il lavoro misura 4 cm bisogna aumentare 1 m. a entrambi i lati dei due segnapunti ai lati, quindi 4 aumenti per f., per 5 volte, per cui 20 aumenti in totale: da 138 si passa a 158 m.. Spero che sia tutto chiaro e che possa proseguire nel suo lavoro. Buon lavoro!!
25.03.2013 - 18:03
![]() Valeria ha scritto:
Valeria ha scritto:
Non è spiegato le asole ogni quanti ferri vanno distribuiti..
25.03.2013 - 12:33DROPS Design ha risposto:
Buongiorno, le asole fanno fatte secondo le indicazioni presenti nelle spiegazioni, sono indicati i cm, non i f.. Buon lavoro!
25.03.2013 - 13:22
|
||||||||||||||||
Spanish Flower#spanishflowercardigan |
||||||||||||||||
|
|
||||||||||||||||
Bolero DROPS in "Paris" con maniche corte e larghe, lavorate con un motivo traforato. Taglie: Dalla S alla XXXL.
DROPS 113-23 |
||||||||||||||||
|
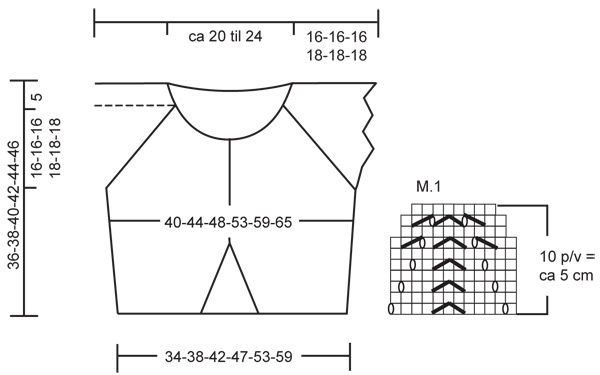
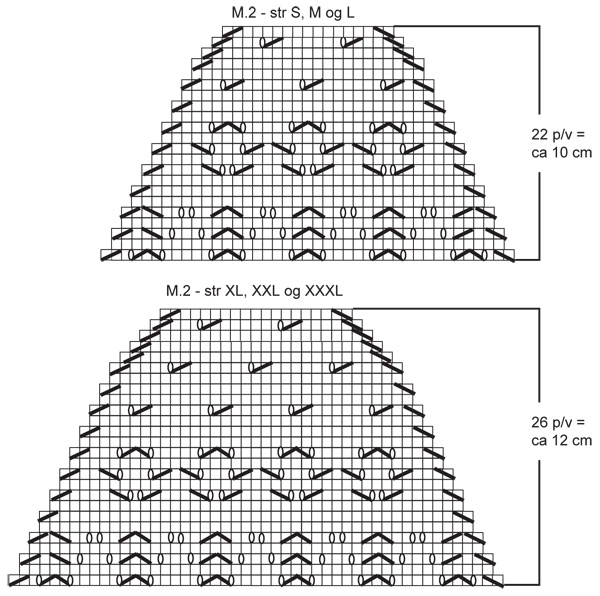
PUNTO LEGACCIO (avanti e indietro sui ferri): Lavorare tutti i ferri a dir. SUGGERIMENTO PER GLI AUMENTI: Aumentare 1 m sul davanti, verso il centro, sul diritto del lavoro, all’interno delle 5 m a punto legaccio, facendo 1 m gettata. Al ferro successivo, lavorare la m gettata ritorta per evitare che si formi un buco. MOTIVO: Vedere i diagrammi M.1 e M.2. I diagrammi mostrano il motivo sul diritto del lavoro. ASOLE: Intrecciare le m per le asole sul bordo davanti destro. 1 asola = lavorare insieme a dir la 2° e la 3° m dal bordo e fare 1 m gettata. Intrecciare le m per le asole quando il lavoro misura: TAGLIA S: 14, 20 e 26 cm. TAGLIA M: 15, 21 e 27 cm. TAGLIA L: 15, 22 e 29 cm. TAGLIA XL: 16, 23 e 30 cm. TAGLIA XXL: 16, 24 e 32 cm. TAGLIA XXXL: 17, 25 e 33 cm. DIMINUZIONI PER IL RAGLAN: Diminuire 1 m da ciascun lato delle 4 m a punto legaccio. Sul diritto del lavoro, diminuire come segue: Prima delle 4 m a punto legaccio: lavorare 2 m insieme a dir. Dopo le 4 m a punto legaccio: passare 1 m a dir senza lavorarla, 1 m dir, accavallare la m passata sulla m lavorata. Sul rovescio del lavoro, diminuire come segue: Prima delle 4 m a punto legaccio: lavorare 2 m insieme a rov ritorto. Dopo le 4 m a punto legaccio: lavorare 2 m insieme a rov. --------------------------------------------------------------------- DAVANTI & DIETRO: Si lavorano avanti e indietro sui ferri circolari, dal centro davanti. Avviare 102-114-130-146-166-186 m (comprese 5 m da ciascun lato, per i bordi verso il centro) sui ferri circolari n° 5 con il filato Paris. Inserire un segno dopo le prime 22-25-29-33-38-43 m e un segno prima delle ultime 22-25-29-33-38-43 m (= tra i due segni ci sono 58-64-72-80-90-100 m per il dietro). Lavorare 4 ferri a punto legaccio – vedere le spiegazioni sopra - (1° ferro = diritto del lavoro). Proseguire a maglia rasata con 5 m a punto legaccio da ciascun lato per i bordi. ALLO STESSO TEMPO, durante il 1° ferro a maglia rasata, aumentare 1 m all’interno delle 5 m dei bordi, da ciascun lato – vedere il SUGGERIMENTO PER GLI AUMENTI – e ripetere questi aumenti ogni 2 ferri per 12 volte. ALLO STESSO TEMPO, quando il lavoro misura 4 cm, aumentare 1 m da entrambe le parti di ognuno dei 2 segni ai lati; ripetere questi aumenti ogni 2-2,5-3-3-3,5-3,5 cm per 5 volte. ALLO STESSO TEMPO, quando il lavoro misura 14-15-15-16-16-17 cm, intrecciare le m per le asole sul davanti destro – vedere le spiegazioni sopra. RICORDARSI LA TENSIONE DEL LAVORO! Terminati gli aumenti verso il centro e ai lati, sul ferro ci sono 146-158-174-190-210-230 m. Quando il lavoro misura ca. 15-17-19-19-21-23 cm – assicurarsi che il ferro successivo sia sul rovescio del lavoro – lavorare 2 ferri a punto legaccio sulle 18 m da ciascun lato (= 9 m da entrambe le parti di ognuno dei 2 segni); lavorare le restanti m come prima. Dopo questi 2 ferri, intrecciare 10 m da ciascun lato (= intrecciare quindi 5 m da entrambe le parti di ognuno dei 2 segni) per gli scalfi – intrecciare lavorando a dir sul rovescio del lavoro. Al ferro successivo (sul diritto del lavoro), avviare 69-69-69-81-81-81 nuove m lente, per le maniche, sopra ogni scalfo = 264-276-292-332-352-372 m – proseguire lavorando a punto legaccio le 4 m da ciascun lato delle maniche. LAVORARE IL FERRO SUCCESSIVO COME SEGUE (= rovescio del lavoro): 5 m a punto legaccio, 25-28-32-36-41-46 m rov, 77-77-77-89-89-89 m dir, 50-56-64-72-82-92 m rov, 77-77-77-89-89-89 m dir, 25-28-32-36-41-46 m rov, 5 m a punto legaccio. Lavorare ora 2 ferri a maglia rasata sulle 69-69-69-81-81-81 m delle maniche, da ciascun lato; lavorare le restanti m come prima. LEGGERE TUTTE LE INDICAZIONI SUCCESSIVE PRIMA DI PROSEGUIRE! Proseguire come segue: 5 m a punto legaccio per il bordo al centro, 25-28-32-36-41-46 m a maglia rasata, 4 m a punto legaccio, 4 m a maglia rasata, diagramma M.1 sulle 60-60-60-72-72-72 m successive, 5 m a maglia rasata, 4 m a punto legaccio, 50-56-64-72-82-92 m a maglia rasata, 4 m a punto legaccio, 4 m a maglia rasata, diagramma M.1 sulle 60-60-60-72-72-72 m successive, 5 m a maglia rasata, 4 m a punto legaccio, 25-28-32-36-41-46 m a maglia rasata e 5 m a punto legaccio per il bordo al centro. DIMINUZIONI PER IL RAGLAN: ALLO STESSO TEMPO, durante il 3° ferro del diagramma M.1, diminuire per il RAGLAN – vedere le spiegazioni sopra – ogni 2 ferri per 14-14-14-15-15-15 volte e poi ogni ferro per 3-3-3-5-5-5 volte. ALLO STESSO TEMPO, terminato il diagramma M.1 (rimangono 41-41-41-49-49-49 m per ogni manica), lavorare il diagramma M.2 (seguire il diagramma corrispondente alla propria taglia) sulle m delle maniche – ALLO STESSO TEMPO, proseguire con le diminuzioni per il raglan (indicate nel diagramma M.2). SCOLLO: ALLO STESSO TEMPO, quando il lavoro misura 27-28-30-31-33-34 cm (dal ferro di avvio delle m), mettere in attesa su un fermamaglie 7-8-9-11-11-12 m da ciascun lato, per lo scollo. Intrecciare poi 1 m dalla parte del collo, all’inizio di ogni ferro, finché non sono terminate le diminuzioni per il raglan. Dopo aver completato il diagramma M.2, sul ferro ci sono ca 68-78-92-98-116-134 m. COLLO: Riprendere da 12 a 17 m (sul diritto) (comprese le m messe in attesa sul fermamaglie) all'inizio del ferro davanti allo scollo, lavorare tutte le m sul ferro a dir e riprendere da 12 a 17 m (comprese le m messe in attesa sul fermamaglie) alla fine del ferro = ca 92 - 168 m. Lavorare 1 ferro a dir sul rovescio del lavoro, ALLO STESSO TEMPO, diminuire in modo uniforme in modo da portare il n° delle m a 90-94-96-104-108-112 (non diminuire in corrispondenza dei bordi verso il centro e sul raglan). Lavorare 2 ferri a dir; intrecciare le m senza stringere troppo il filo. BORDO ALL’UNCINETTO: Con l’uncinetto n° 4, lavorare un bordo sul ferro di avvio delle m per le maniche, come segue: 1 m.b nella 1° m, * 3 cat, saltare ca. 1 cm, 1 m.b nella m successiva *, ripetere da *-*. Attaccare i bottoni. |
||||||||||||||||
Spiegazioni del diagramma |
||||||||||||||||
|
||||||||||||||||
 |
||||||||||||||||
 |
||||||||||||||||
Avete terminato questo modello?Allora taggate le vostre foto con #dropspattern #spanishflowercardigan o inviatele alla #dropsfan gallery. Avete bisogno di aiuto con questo modello?Troverete 25 video tutorial, una sezione per i commenti/domande e molto altro guardando il modello su www.garnstudio.com © 1982-2026 DROPS Design A/S. Ci riserviamo tutti i diritti. Questo documento, compreso tutte le sue sotto-sezioni, è protetto dalle leggi sul copyright. Potete leggere quello che potete fare con i nostri modelli alla fine di ogni modello sul nostro sito. |
||||||||||||||||


Con oltre 40 anni di esperienza nel design di modelli di maglia e uncinetto, DROPS Design offre la più estesa collezione di modelli gratuiti su internet - tradotti in 17 lingue. Ad oggi vi possiamo fornire 324 cataloghi e 12290 modelli - 9561 dei quali sono tradotti in Italiano.
Ci stiamo impegnando molto per darvi il meglio che vi possiamo offrire in termini di maglia e uncinetto, ispirazioni e consigli così come filati di grande qualità ad un prezzo incredibile! Volete utilizzare i nostri modelli per qualcosa d'altro oltre al vostro uso personale? Potete leggere tutto ciò che è consentito nel testo sul Copyright in basso su tutte le pagine dei nostri modelli. Buon lavoro!
Lasciare un commento sul modello DROPS 113-23
Noi saremmo felici di ricevere i tuoi commenti e opinioni su questo modello!
Se vuoi fare una domanda, fai per favore attenzione a selezionare la categoria corretta nella casella qui sotto per velocizzare il processo di risposta. I campi richiesti sono indicati da *.