
Categorie popolari
State cercando un filato?


Commenti / Domande (90)
![]() Jenni Marsh ha scritto:
Jenni Marsh ha scritto:
What does p/v mean on the sleeve pattern M1 and M2?\\r\\n22 p/v=ca10cm.\\r\\n I have been a knitter for over 60 years and have not come across this.
17.07.2025 - 21:04DROPS Design ha risposto:
Hi Jenni, it means that for example the pattern M2 (for sizes S, M and L) consists of 22 rows which is equivalent to 10 cm in height. Happy knitting!
18.07.2025 - 08:06
![]() Véronique ha scritto:
Véronique ha scritto:
Merci beaucoup pour votre réponse rapide. Meilleures salutations, Véronique
04.04.2022 - 12:33
![]() Véronique ha scritto:
Véronique ha scritto:
Bonjour! Je ne comprends pas comment mettre les mailles en attente pour l'encolure? Sur le devant? Et comment diminuer ensuite? Merci de m aider pour que je puisse continuer ce modèle. Véronique
02.04.2022 - 21:29DROPS Design ha risposto:
Bonjour Véronique, tricotez les 7-8-9-11-11-12 premières mailles en début de rang sur l'endroit et glissez-les en attente, tricotez jusqu'à la fin du rang comme avant, tournez, tricotez les 7-8-9-11-11-12 premières mailles en début de rang sur l'envers et glissez-les en attente, terminer le rang comme avant, tournez et tricotez comme avant en rabattant 1 m au début de chaque rang de chaque côté jusqu'à ce que toutes les diminutions des raglans soient finies (attention à bien diminuer le même nombre de mailles sur l'endroit et sur l'envers pour les 2 devants). Bon tricot!
04.04.2022 - 09:30
![]() Véronique ha scritto:
Véronique ha scritto:
Bonjour. Merci pour ce modèle. Question 1: doit on continuer raglan tous les rangs avant et après 4mailles mousse, simultanément au diagramme M2? Je n arrive jamais au nombre de mailles indiqué. Merci de votre aide. Véronique
02.04.2022 - 21:26DROPS Design ha risposto:
Bonjour Véronique, en même temps que vous tricotez M.2 vous devez diminuer sur les devants et le dos (avant/après les 4 mailles point mousse), les diminutions des manches figurent dans M.2. Bon tricot!
04.04.2022 - 09:28
![]() Ilja ha scritto:
Ilja ha scritto:
Ik ben met M1 begonnen en moet nu op rij 3 beginnen met minderen voor de raglan. Ik snap alleen niet goed hoe ik verder moet na de samengebreide steken op de mouw: moet ik daarna nog 2 steken breien of 4? De eerste 2 naalden was t steeds 4 r en daarna M1 patroon en daarna 5r: moet ik na de twee samengebreide steken van die 4 steken r 2 st afhalen en dus nog maar 2 r breien..? Of gewoon 4r aanhouden..(dus 2st samenbreien en dan 4r en dan M1 of 2st samenbreien, nog 2r en dan M1)
24.06.2020 - 17:48DROPS Design ha risposto:
Dag Ilja,
Het is de bedoeling dat je de 4 ribbelsteken in tact laat en mindert op de manden en de muwen, dus vlak voor en na de 4 ribbelsteken. Je breit dus 2 steken samen (de laatste 2 steken van het telpatroon op de mouw of het pand), dan brei je de 4 ribbelstenken en dan 1 steek afhalen, 1 breien, 1 overhalen.
04.07.2020 - 17:07
![]() Marianne Rygaard Sørensen ha scritto:
Marianne Rygaard Sørensen ha scritto:
Kan ikke få maske antallet til at stemme ? Strikker i str. Xl. Har slået 146m op, ta'r ud ved kanterne 2x12m. Og 2x10m. i siderne ialt: 190m, lukker så 2x20m. af til ærmegab: 150 m. Så slås 2x 81 m. Op til ærmer : ialt 312 m. Og i opskriften står der 332 masker ?
13.08.2014 - 20:02DROPS Design ha risposto:
Hej Marianne. Du skal lukke 10 m af i hver side til aermegab (totalt 20). Dvs, du har 190 m, lukker af til aermegab (= 20) og slaar 2 x 81 m op over begge aermegab til aermer: 190-20-162 = 332 m.
14.08.2014 - 16:32Karen ha scritto:
Dear Drops, You say that 'the raglan dec are marked in M2 at the beg + end of sleeve, so that you work M2 for sleeves between the sts in garter st and dec sts as in diagram'. This is what I am doing, i.e. I am decreasing before and after the 4 garter stitches at each side of each sleeve. However, I still have 40 stitches between the raglan on each sleeve, it's just the number of stitches being knit in pattern that is decreasing but the overall number of stitches is the same. Is that right?
26.05.2014 - 15:28DROPS Design ha risposto:
Dear Karen, after M.1, 41 sts remain for sleeve, follow diagram M.2 over these sts (= 41 sts on 1st row). You dec from 1st row in M.2 1 st at the beg + 1 st at the end of M.2 so that 39 sts remain in M.2 at the end of row 1. Continue decrease as shown in diagram (more dec than yo will make the sleeve). Happy knitting!
26.05.2014 - 15:49Karen ha scritto:
Dear drops, I am working the M2 part, and I notice that the number of stitches on the sleeves is not decreasing. The number of stitches knit in M2 is decreasing but I end up with stitches after M2 which I am just knitting in Garter. The pattern looks ok, but I am wondering if I am doing something wrong. The decreases that are marked each side of M2- where should they be made? I am doing these either side of the 4 garter stitches for the raglan. Thanks for your help once again :)
25.05.2014 - 10:32DROPS Design ha risposto:
Dear Karen, the raglan dec are marked in M2 at the beg + end of sleeve, so that you work M2 for sleeves between the sts in garter st and dec sts as in diagram. Happy knitting!
26.05.2014 - 09:36Karen ha scritto:
I still don't understand what you mean when you say when M1 has been worked one time in height - M1 seems to contain 10 rows, so if I decrease every second row after row 3, this would only be 4 decreases (rows 3, 5, 7 and 9) before I have done M1. I'm so sorry for being a nuisance!
22.05.2014 - 11:39DROPS Design ha risposto:
Dear Karen, You work M1 on the sts for sleeves, and at the same dec for raglan starting dec on 3rd row in M1 then every other row (every row from RS) as stated. After the 10 rows of M1 have been worked 1 time in height, continue following M2 and at the same time, continue dec for raglan as before. Happy knitting!
22.05.2014 - 13:23Karen ha scritto:
And one more question about M1 decreases: In the pattern, it states to do 'RAGLAN DECREASES: at the same time on row 3 of M.1 dec for RAGLAN on every other row a total of 14-14-14-15-15-15 times and then on every row 3-3-3-5-5-5 times' As I understand, M1 is made over 10 rows. If I decrease on row 3 and should do this 14 times, that would be 140 rows of knitting, making very long sleeves! I think I am reading this wrong? Thanks in advance, Karen
21.05.2014 - 21:29DROPS Design ha risposto:
Dear Karen, you start dec for raglan on row 3 in M.1 then repeat these dec every 2 rows (every row from RS) 13 more times, then 3 times every row, and then after M1 has been worked 1 time in height, you work M.2 (choose diagram for your size) still working raglan dec. Happy knitting!
22.05.2014 - 08:40
|
||||||||||||||||
Spanish Flower#spanishflowercardigan |
||||||||||||||||
|
|
||||||||||||||||
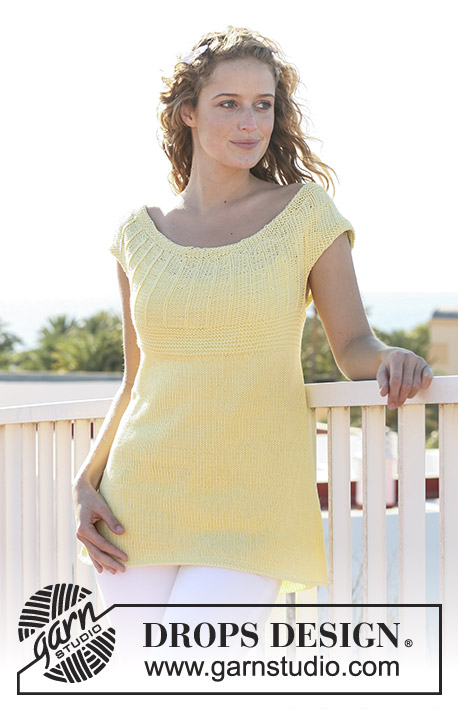
Bolero DROPS in "Paris" con maniche corte e larghe, lavorate con un motivo traforato. Taglie: Dalla S alla XXXL.
DROPS 113-23 |
||||||||||||||||
|
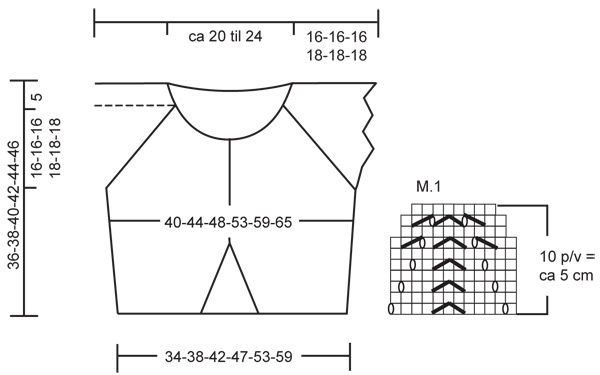
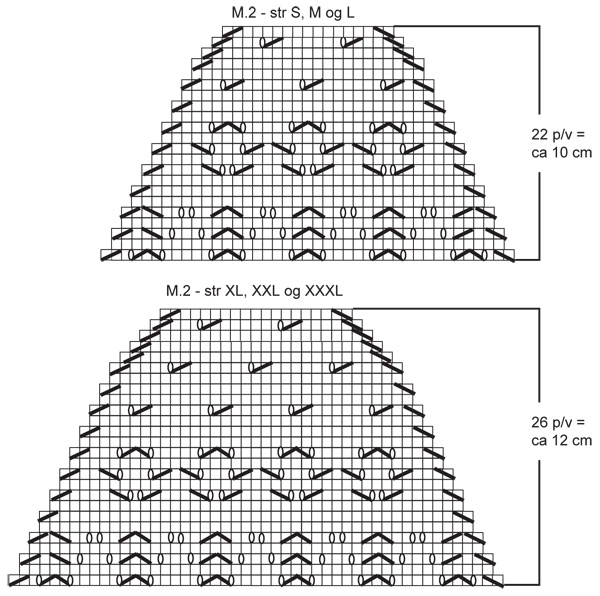
PUNTO LEGACCIO (avanti e indietro sui ferri): Lavorare tutti i ferri a dir. SUGGERIMENTO PER GLI AUMENTI: Aumentare 1 m sul davanti, verso il centro, sul diritto del lavoro, all’interno delle 5 m a punto legaccio, facendo 1 m gettata. Al ferro successivo, lavorare la m gettata ritorta per evitare che si formi un buco. MOTIVO: Vedere i diagrammi M.1 e M.2. I diagrammi mostrano il motivo sul diritto del lavoro. ASOLE: Intrecciare le m per le asole sul bordo davanti destro. 1 asola = lavorare insieme a dir la 2° e la 3° m dal bordo e fare 1 m gettata. Intrecciare le m per le asole quando il lavoro misura: TAGLIA S: 14, 20 e 26 cm. TAGLIA M: 15, 21 e 27 cm. TAGLIA L: 15, 22 e 29 cm. TAGLIA XL: 16, 23 e 30 cm. TAGLIA XXL: 16, 24 e 32 cm. TAGLIA XXXL: 17, 25 e 33 cm. DIMINUZIONI PER IL RAGLAN: Diminuire 1 m da ciascun lato delle 4 m a punto legaccio. Sul diritto del lavoro, diminuire come segue: Prima delle 4 m a punto legaccio: lavorare 2 m insieme a dir. Dopo le 4 m a punto legaccio: passare 1 m a dir senza lavorarla, 1 m dir, accavallare la m passata sulla m lavorata. Sul rovescio del lavoro, diminuire come segue: Prima delle 4 m a punto legaccio: lavorare 2 m insieme a rov ritorto. Dopo le 4 m a punto legaccio: lavorare 2 m insieme a rov. --------------------------------------------------------------------- DAVANTI & DIETRO: Si lavorano avanti e indietro sui ferri circolari, dal centro davanti. Avviare 102-114-130-146-166-186 m (comprese 5 m da ciascun lato, per i bordi verso il centro) sui ferri circolari n° 5 con il filato Paris. Inserire un segno dopo le prime 22-25-29-33-38-43 m e un segno prima delle ultime 22-25-29-33-38-43 m (= tra i due segni ci sono 58-64-72-80-90-100 m per il dietro). Lavorare 4 ferri a punto legaccio – vedere le spiegazioni sopra - (1° ferro = diritto del lavoro). Proseguire a maglia rasata con 5 m a punto legaccio da ciascun lato per i bordi. ALLO STESSO TEMPO, durante il 1° ferro a maglia rasata, aumentare 1 m all’interno delle 5 m dei bordi, da ciascun lato – vedere il SUGGERIMENTO PER GLI AUMENTI – e ripetere questi aumenti ogni 2 ferri per 12 volte. ALLO STESSO TEMPO, quando il lavoro misura 4 cm, aumentare 1 m da entrambe le parti di ognuno dei 2 segni ai lati; ripetere questi aumenti ogni 2-2,5-3-3-3,5-3,5 cm per 5 volte. ALLO STESSO TEMPO, quando il lavoro misura 14-15-15-16-16-17 cm, intrecciare le m per le asole sul davanti destro – vedere le spiegazioni sopra. RICORDARSI LA TENSIONE DEL LAVORO! Terminati gli aumenti verso il centro e ai lati, sul ferro ci sono 146-158-174-190-210-230 m. Quando il lavoro misura ca. 15-17-19-19-21-23 cm – assicurarsi che il ferro successivo sia sul rovescio del lavoro – lavorare 2 ferri a punto legaccio sulle 18 m da ciascun lato (= 9 m da entrambe le parti di ognuno dei 2 segni); lavorare le restanti m come prima. Dopo questi 2 ferri, intrecciare 10 m da ciascun lato (= intrecciare quindi 5 m da entrambe le parti di ognuno dei 2 segni) per gli scalfi – intrecciare lavorando a dir sul rovescio del lavoro. Al ferro successivo (sul diritto del lavoro), avviare 69-69-69-81-81-81 nuove m lente, per le maniche, sopra ogni scalfo = 264-276-292-332-352-372 m – proseguire lavorando a punto legaccio le 4 m da ciascun lato delle maniche. LAVORARE IL FERRO SUCCESSIVO COME SEGUE (= rovescio del lavoro): 5 m a punto legaccio, 25-28-32-36-41-46 m rov, 77-77-77-89-89-89 m dir, 50-56-64-72-82-92 m rov, 77-77-77-89-89-89 m dir, 25-28-32-36-41-46 m rov, 5 m a punto legaccio. Lavorare ora 2 ferri a maglia rasata sulle 69-69-69-81-81-81 m delle maniche, da ciascun lato; lavorare le restanti m come prima. LEGGERE TUTTE LE INDICAZIONI SUCCESSIVE PRIMA DI PROSEGUIRE! Proseguire come segue: 5 m a punto legaccio per il bordo al centro, 25-28-32-36-41-46 m a maglia rasata, 4 m a punto legaccio, 4 m a maglia rasata, diagramma M.1 sulle 60-60-60-72-72-72 m successive, 5 m a maglia rasata, 4 m a punto legaccio, 50-56-64-72-82-92 m a maglia rasata, 4 m a punto legaccio, 4 m a maglia rasata, diagramma M.1 sulle 60-60-60-72-72-72 m successive, 5 m a maglia rasata, 4 m a punto legaccio, 25-28-32-36-41-46 m a maglia rasata e 5 m a punto legaccio per il bordo al centro. DIMINUZIONI PER IL RAGLAN: ALLO STESSO TEMPO, durante il 3° ferro del diagramma M.1, diminuire per il RAGLAN – vedere le spiegazioni sopra – ogni 2 ferri per 14-14-14-15-15-15 volte e poi ogni ferro per 3-3-3-5-5-5 volte. ALLO STESSO TEMPO, terminato il diagramma M.1 (rimangono 41-41-41-49-49-49 m per ogni manica), lavorare il diagramma M.2 (seguire il diagramma corrispondente alla propria taglia) sulle m delle maniche – ALLO STESSO TEMPO, proseguire con le diminuzioni per il raglan (indicate nel diagramma M.2). SCOLLO: ALLO STESSO TEMPO, quando il lavoro misura 27-28-30-31-33-34 cm (dal ferro di avvio delle m), mettere in attesa su un fermamaglie 7-8-9-11-11-12 m da ciascun lato, per lo scollo. Intrecciare poi 1 m dalla parte del collo, all’inizio di ogni ferro, finché non sono terminate le diminuzioni per il raglan. Dopo aver completato il diagramma M.2, sul ferro ci sono ca 68-78-92-98-116-134 m. COLLO: Riprendere da 12 a 17 m (sul diritto) (comprese le m messe in attesa sul fermamaglie) all'inizio del ferro davanti allo scollo, lavorare tutte le m sul ferro a dir e riprendere da 12 a 17 m (comprese le m messe in attesa sul fermamaglie) alla fine del ferro = ca 92 - 168 m. Lavorare 1 ferro a dir sul rovescio del lavoro, ALLO STESSO TEMPO, diminuire in modo uniforme in modo da portare il n° delle m a 90-94-96-104-108-112 (non diminuire in corrispondenza dei bordi verso il centro e sul raglan). Lavorare 2 ferri a dir; intrecciare le m senza stringere troppo il filo. BORDO ALL’UNCINETTO: Con l’uncinetto n° 4, lavorare un bordo sul ferro di avvio delle m per le maniche, come segue: 1 m.b nella 1° m, * 3 cat, saltare ca. 1 cm, 1 m.b nella m successiva *, ripetere da *-*. Attaccare i bottoni. |
||||||||||||||||
Spiegazioni del diagramma |
||||||||||||||||
|
||||||||||||||||
 |
||||||||||||||||
 |
||||||||||||||||
Avete terminato questo modello?Allora taggate le vostre foto con #dropspattern #spanishflowercardigan o inviatele alla #dropsfan gallery. Avete bisogno di aiuto con questo modello?Troverete 25 video tutorial, una sezione per i commenti/domande e molto altro guardando il modello su www.garnstudio.com © 1982-2026 DROPS Design A/S. Ci riserviamo tutti i diritti. Questo documento, compreso tutte le sue sotto-sezioni, è protetto dalle leggi sul copyright. Potete leggere quello che potete fare con i nostri modelli alla fine di ogni modello sul nostro sito. |
||||||||||||||||


Con oltre 40 anni di esperienza nel design di modelli di maglia e uncinetto, DROPS Design offre la più estesa collezione di modelli gratuiti su internet - tradotti in 17 lingue. Ad oggi vi possiamo fornire 324 cataloghi e 12290 modelli - 9561 dei quali sono tradotti in Italiano.
Ci stiamo impegnando molto per darvi il meglio che vi possiamo offrire in termini di maglia e uncinetto, ispirazioni e consigli così come filati di grande qualità ad un prezzo incredibile! Volete utilizzare i nostri modelli per qualcosa d'altro oltre al vostro uso personale? Potete leggere tutto ciò che è consentito nel testo sul Copyright in basso su tutte le pagine dei nostri modelli. Buon lavoro!
Lasciare un commento sul modello DROPS 113-23
Noi saremmo felici di ricevere i tuoi commenti e opinioni su questo modello!
Se vuoi fare una domanda, fai per favore attenzione a selezionare la categoria corretta nella casella qui sotto per velocizzare il processo di risposta. I campi richiesti sono indicati da *.