
Categorie popolari
State cercando un filato?


Commenti / Domande (42)
![]() Senecal ha scritto:
Senecal ha scritto:
Bonsoir j aimerais savoir si le dos se tricote de la même façon que le devant
12.09.2018 - 19:15DROPS Design ha risposto:
Bonjour Mme Senecal, le dos se tricote comme pour le devant jusqu'à ce que l'encolure mesure 12 cm, puis on va continuer à diminuer et on va rabattre en même temps 1 m au début de chaque rang (pas d'encolure V dans le dos). Bon tricot!
13.09.2018 - 08:27
![]() Senecal ha scritto:
Senecal ha scritto:
Bonsoir après avoir séparé en deux parti de quel côté je dois augmente s il vous plais et pour le dos je dois faire exactement pareil que le devant ou pas
11.09.2018 - 20:42DROPS Design ha risposto:
Bonjour Mme Senecal, pour le devant droit, on augmente côté B (comme avant côté encolure) puis on diminue du même côté. En même temps, 2 cm après la fin des augmentations, vous diminuez de chaque côté du marqueur. Il reste 21-49 m (cf taille). Diminuez ensuite côté encolure (= B) et augmentez côté A (sur le côté). Suivez bien les indications pour votre taille pour bien faire les bonnes augmentations/diminutions au bon moment. Bon tricot!
12.09.2018 - 07:51
![]() Luz ha scritto:
Luz ha scritto:
Estoy intentando hacer este patrón pero me he liado a la hora de saber cuál es el lado B y el A para hacer las disminuciones. Por favor ruego me ayuden
13.02.2018 - 15:36DROPS Design ha risposto:
Hola Luz. Mirando con el lado derecho hacia tí, el inicio de la fila = lado-A (hacia el centro de la espalda), final de la fila = lado-B (hacia el lado).
17.02.2018 - 17:16
![]() Sara ha scritto:
Sara ha scritto:
When measuring neckline to the 12cm mark do you measure from centre of v where the decreases are or from sides where the 25 stitches are cast on because they have different measurements.
30.05.2016 - 01:43DROPS Design ha risposto:
Dear Sara, measure along the new sts cast on (the 12 cm = strap/shoulder - see measurement chart). Happy knitting!
30.05.2016 - 10:22
![]() Sally ha scritto:
Sally ha scritto:
I'm really keen on this top but surely the instructions could be written in a clearer way? So many complicated increases and decreases on different numbered rows all at once! I'm not surprised people are struggling here! It's a gorgeous pattern and very on-trend. Please consider a way to present the pattern in an easier form!
20.05.2016 - 16:32DROPS Design ha risposto:
Dear Sally, you can write all dec/inc you are making to not miss any "at the same time" and be sure you will get correct number of sts. Happy knitting!
20.05.2016 - 16:41
![]() Sara ha scritto:
Sara ha scritto:
I understand the directions and when to place markers and when and where to increase/ decrease....what I am saying is there are not enough stitches in my size 21 stitches to do the increases before the b side decreases are past the marker! Thanks
17.05.2016 - 19:34DROPS Design ha risposto:
Dear Sara, as previously answered on Cindy, you will pass marker when continuing the dec towards B side, the dec at marker are then already done. In first size, there are 58 sts - 33 dec towards B - 4 sts at marker = 21 sts remaining. Happy knitting!
18.05.2016 - 10:12
![]() Sara ha scritto:
Sara ha scritto:
I agree with question asked by Cindy ....there are 10 stitches on each side of marker at this point....I need at least 6 rows to get 2 cm all while decreasing on b side 10-3 4 stitches.... Increase 1 on b side 5 stitches on b side.... Decrease another 9 stitches before another increase on b side if increasing every 8 rows???????? Help please
16.05.2016 - 20:34DROPS Design ha risposto:
Dear Sara, inc first towards B, then insert a marker. Then dec 1 st towards B and 2 cm after marker dec at the same time 1 st at the marker. You should have 21-49 sts (see size) when all dec have been done. Then insert a new marker in the middle and continue dec towards B, at the same time, inc 1 st towards A and inc 1 st at the marker (first before the marker, then after the marker). Happy knitting!
17.05.2016 - 11:20
![]() Lyn Johnson ha scritto:
Lyn Johnson ha scritto:
Love the look of this top. I started the front and everything was fine until I started the directions for the right front. I was unable to follow all the directions "at the same time" so put my project in time out. I would love to try again but even after studying the directions further, I can't understand how all the directions work together. Can you give me any suggestions?
07.06.2015 - 06:32DROPS Design ha risposto:
Dear Mrs Johnson, on right front piece inc 1-11 times (see size) as before first towards B - then insert a marker after 29-43 sts and inc 33 times towards B and 2 cm after marker dec 4 times 1 st at marker. You should have 21-49 sts. Insert then a marker in the mid st and dec towards B + inc towards A + 2 cm after marker inc at the marker. Then bind off sts towards B while continuing inc towards A. Happy knitting!
08.06.2015 - 08:34
![]() Tone Gustavsen ha scritto:
Tone Gustavsen ha scritto:
Det var den tunikaen jeg lette etter! Ivrig etter å komme i gang, men oppdager at garnet er merket 'utgått'. Er det noe alternativ i flammegarn?
13.02.2015 - 17:55
![]() Cindy ha scritto:
Cindy ha scritto:
Pattern drops #112-13. I am having trouble understanding the directions for right front after completing decreases to 25 sts (medium size) I've inserted the marker on the thirteenth st. Decreasing 24 times will put me way past 2 cm from marker. Can someone clarify the remaining directions for the right front? Thanks so much
25.02.2013 - 04:15DROPS Design ha risposto:
Yes, you will pass marker in some point, and continue dec on the side B. Middle inc's should be done already for that time.
25.02.2013 - 15:43
|
|
Grape Valley#grapevalleytunic |
|
|
|
|
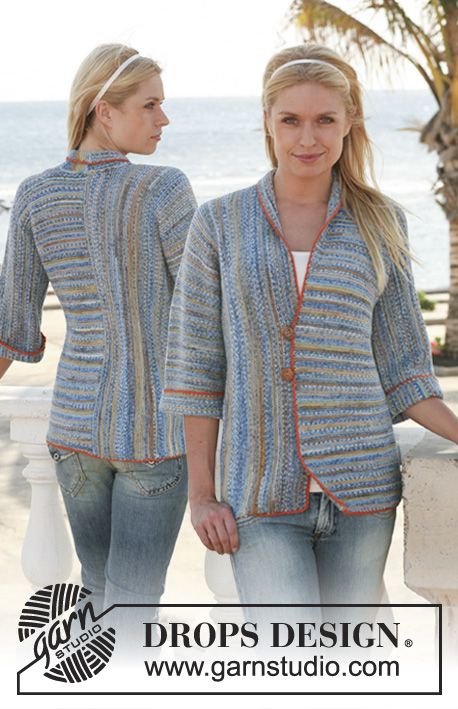
Top DROPS a maglia legaccio in ”Muskat Soft”. Taglie: S - XXXL.
DROPS 112-13 |
|
|
DAVANTI: Lavorato a m legaccio per tutto il lavoro, cioè lavorare tutti i f a dir. Avviare 6 m con i f n° 4 mm con Muskat Soft. Inserire un segnapunti al centro del ferro = 3 m a ogni lato del segnapunti. Il segnapunti indica il centro davanti. Continuare come segue: Ferro 1(= diritto del lavoro): 1 m dir, 1 gettato, lavorare il f fino al segnapunti, 1 gettato, 2 m dir (il segnapunti è tra queste 2 m), 1 gettato, lavorare il f fino a quando rimane 1 m, 1 gettato e 1 m dir. Ferro 2 (= rovescio del lavoro): lavorare tutte le m a dir, lavorare tutti i gettati a dir ritorto per evitare i buchi. Ferro 3: come il ferro 1. Ferro 4: come il ferro 2. Ferro 5: lavorare tutte le m a dir. Ferro 6: come il ferro 5. Ripetere i ferri 1-6 fino a quando ci sono 114-118-122-130-142-150 m in totale sul f. Ora dividere il lavoro e trasferire le prime 57-59-61-65-71-75 m su un fermamaglie. Finire ogni parte in modo separato. DAVANTI DESTRO: = 57-59-61-65-71-75. m. Dal diritto del lavoro: inizio del f = lato-A (verso il centro davanti), fine del f = lato-B (verso il lato). LEGGERE TUTTA LA SEZIONE SEGUENTE PRIMA DI CONTINUARE! Continuare a m legaccio su tutte le m, ALLO STESSO TEMPO aumentare 1 m sul lato B come prima per un totale di 1-3-5-7-9-11 volte = 58-62-66-72-80-86 m. Alla fine di tutti gli aumenti inserire un segnapunti dopo 29-31-33-36-40-43 m. Ora diminuire 1 m a f alterni sul lato-B per un totale di 33 volte. ALLO STESSO TEMPO quando il lavoro misura circa 2 cm dal segnapunti diminuire 1 m ogni 10 f per un totale di 4 volte lavorando 2 m insieme a dir prima/dopo il segnapunti in modo alternato. Alla fine di tutte le diminuzioni ci sono 21-25-29-35-43-49 m rimaste sul f. Inserire un segnapunti nella m centrale sul f. Continuare a diminuire 1 m a f alterni sul lato-B per un totale di 21-24-24-27-28-28 volte, ALLO STESSO TEMPO aumentare 1 m ogni 6-8-8-8-10-10 f sul lato-A per un totale di 6 volte e ALLO STESSO TEMPO quando il lavoro misura circa 2 cm dal segnapunti aumentare 1 m ogni 8 f per un totale di 4 volte lavorando 2 m dir nella 1° m prima/dopo il segnapunti in modo alternato. Alla fine di tutti gli aumenti e diminuzioni ci sono 10-11-15-18-25-31 m rimaste sul f. Intrecciare 4-3-7-10-17-23 m sul lato-B = 6-8-8-8-8-8 m rimaste. Ora intrecciare per modellare lo scalfo sul lato-B a f alterni: 2 m 3-4-4-4-4-4 volte e 1 m 2 volte, e ALLO STESSO TEMPO continuare ad aumentare 1 m ogni 6 f sul lato-A per un totale di 2 volte. Alla fine di tutte le diminuzioni non ci sono m rimaste sul f. DAVANTI SINISTRO: Riportare le m dal fermamaglie sui f di lavoro = 57-59-61-65-71-75 m. Lavorare come il davanti destro, ma a specchio. SCOLLATURA: Avviare 25-24-23-22-21-20 m, riprendere 67-70-73-76-81-88 m lungo la scollatura sul davanti sinistro, riprendere 1 m al centro davanti dove è stato diviso il lavoro, poi riprendere 67-70-73-76-81-88 m lungo la scollatura sul davanti destro e ora avviare 25-24-23-22-21-20 m alla fine di questo f = 185-189-193-197-205-217 m in totale. Lavorare 1 f dir dal rovescio del lavoro. Inserire un segnapunti nella m centrale sul f e continuare come segue: Ferro 1 (= diritto del lavoro): lavorare il ferro fino a 1 m prima del segnapunti, passare 1 m a dir senza lavorarla, 2 m insieme a dir, accavallare la m passata sopra quella appena lavorata e lavorare le m rimaste sul f. Ferro 2 (= rovescio del lavoro): come il ferro 1. Ferro 3: come il ferro 1. Ferro 4: lavorare tutte le m a dir. Ferri 5, 6 e 7: come il ferro 1. Ferro 8: come il ferro 4. Ferri 9 e 10: come il ferro 1. Ripetere dai ferro 1 al 10 fino a quando la scollatura misura circa 12 cm = circa 105-109-113-117-125-137 m sul f. Ora continuare a diminuire come sopra, ALLO STESSO TEMPO intrecciare 4 m all'inizio di ogni f fino a quando ci sono circa 5 m rimaste. Intrecciare queste m. DIETRO: Avviare e lavorare come il davanti fino a quando la scollatura misura circa 12 cm = circa 105-109-113-117-125-137 m sul f. Continuare a diminuire, ALLO STESSO TEMPO intrecciare 1 m all’inizio di ogni f fino a quando rimangono circa 5 m. Intrecciare queste m. CONFEZIONE: Cucire i margini delle spalle. Cucire i margini dei lati. BORDO ALL’UNCINETTO: Lavorare un bordo attorno alla scollatura, agli scalfi e lungo il bordo inferiore come segue: 1 m.b nella 1° m, * 2 cat, saltare circa 1-1,5 cm, 1 m.b *, ripetere *-*, e finire con 1 m.bss nella m.b dall’inizio del giro. Tagliare e affrancare il filo. |
|
 |
|
Avete terminato questo modello?Allora taggate le vostre foto con #dropspattern #grapevalleytunic o inviatele alla #dropsfan gallery. Avete bisogno di aiuto con questo modello?Troverete 22 video tutorial, una sezione per i commenti/domande e molto altro guardando il modello su www.garnstudio.com © 1982-2026 DROPS Design A/S. Ci riserviamo tutti i diritti. Questo documento, compreso tutte le sue sotto-sezioni, è protetto dalle leggi sul copyright. Potete leggere quello che potete fare con i nostri modelli alla fine di ogni modello sul nostro sito. |


Con oltre 40 anni di esperienza nel design di modelli di maglia e uncinetto, DROPS Design offre la più estesa collezione di modelli gratuiti su internet - tradotti in 17 lingue. Ad oggi vi possiamo fornire 324 cataloghi e 12239 modelli - 9509 dei quali sono tradotti in Italiano.
Ci stiamo impegnando molto per darvi il meglio che vi possiamo offrire in termini di maglia e uncinetto, ispirazioni e consigli così come filati di grande qualità ad un prezzo incredibile! Volete utilizzare i nostri modelli per qualcosa d'altro oltre al vostro uso personale? Potete leggere tutto ciò che è consentito nel testo sul Copyright in basso su tutte le pagine dei nostri modelli. Buon lavoro!
Lasciare un commento sul modello DROPS 112-13
Noi saremmo felici di ricevere i tuoi commenti e opinioni su questo modello!
Se vuoi fare una domanda, fai per favore attenzione a selezionare la categoria corretta nella casella qui sotto per velocizzare il processo di risposta. I campi richiesti sono indicati da *.