
Categorie popolari
State cercando un filato?


Commenti / Domande (58)
![]() JMoses ha scritto:
JMoses ha scritto:
This is my interpretation of the heel, based on previous projects. It's far more simple than the tutorial video. [Onto the edge of the previous round, add rows which span a little more than half of the round (ex. If last round was 20sts, add rows of approx 12sts each). When the whole thing (toe cap and flap) equals the desired foot length, fold the end of the flap in half and sl st together along the last row completed.]
28.11.2012 - 22:56
![]() Anneli ha scritto:
Anneli ha scritto:
Hej! Nybörjare på detta, men fattar inte hur ni beskriver mönstret i hälen ;( förstår att man ska dela dé, men fattar som man tar ihop dé iallafall & då blir det ju inte delat med sm i lm i början på varvet. Vill verkligen försöka göra detta, skulle ju vara kuligt att há så niceiga tofflor till jul. Tacksam för hjälp. Videon visar ju end hur man virkar ihop, de fattar jag men inte början hur de kan dela sej./A
21.11.2012 - 17:51
![]() Shelby ha scritto:
Shelby ha scritto:
I finally figured out how to do the heel and it is actually easy. When you change to red, start working in rows instead of rounds. Work until the desired measurement and then slip stitch the end rows together to form the back of the heel. That will leave an opening for you to start the leg.
03.11.2012 - 23:03
![]() Juani ha scritto:
Juani ha scritto:
Me dirijo a vds para darles la enhorabuena por su pagina tan maravillosa,pues de ella se pueden sacar muchas ideas. Pero lo que yo veo que falta y que a las aficiondas al ganchillo como yo nos vendria fenomenal es que en las explicaciones del patron aparecieran los graficos de como se hace,espero me puedan ayudar reciban un saludo y felicitaciones por tantas paginas maravillosas. Un saludo. Juani
28.10.2012 - 02:35
![]() Yvonne ha scritto:
Yvonne ha scritto:
Um das "brennen" vom Muster her wäre es vielleicht doch möglich die Schuhe zu Filzen oder ???? Wieviel größer sollte man/frau sie dann machen. Ist eine ganze schuhgröße genug????
09.10.2012 - 21:05DROPS Design ha risposto:
Hallo Yvonne, Sie können kein normales Modell grösser stricken und dann filzen, da das Stück in Höhe und Länge unterschiedlich filzt. Dafür sind spezielle Anleitungen (siehe Musterdatenbank) nötig.
10.10.2012 - 08:22
![]() Carmen ha scritto:
Carmen ha scritto:
I have spent hours trying to understand how the heel comes togther with no luck.
10.04.2012 - 00:32DROPS Design ha risposto:
There is a video linked from the pattern how to crochet the heel together.
13.04.2012 - 00:47
![]() Lilli ha scritto:
Lilli ha scritto:
Jeg forstår ikke det med hælen, Kan det passe at arbejdet skal dele straks med skifter farve og hele vejen op? og hvis, til hvad formål??
08.01.2012 - 09:24
![]() Nancy Grew ha scritto:
Nancy Grew ha scritto:
I want to make the santa slippers but do not understand the directions for the heel. I am not sure what stitches to slip stitch together, nor do the instructions state how many stitches? Can you help me?
29.10.2011 - 00:03
![]() Nadine ha scritto:
Nadine ha scritto:
Super weihnachtsgeschenk. jedoch habe ich im nachhinein erfahren, dass sie nicht sehr praktisch sind, da die füße nach einer gewissen zeit auf grund des musters anfangen zu brennen... also alles andere als nützlich!
27.02.2011 - 20:55
![]() DROPS Deutsch ha scritto:
DROPS Deutsch ha scritto:
Ja, das stimmt.
06.12.2010 - 10:48
|
|
Sneaky Santa#sneakysantaslippers |
|
|
|
|
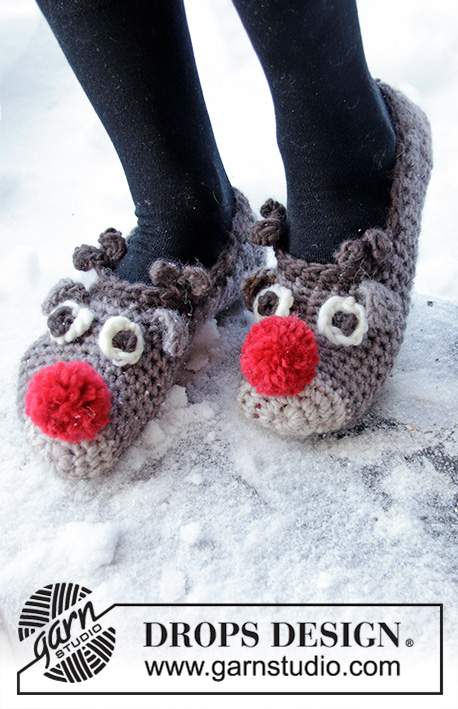
Pantofole lavorate all'uncinetto per bambini e donne in DROPS Snow. Le pantofole sono lavorate a forma di Babbo Natale, con occhi, naso e pompoms. Taglie: 22 - 44. Tema: Natale.
DROPS Extra 0-523 |
|
|
INFORMAZIONI PER IL LAVORO: Sostituire la 1° m.b. all’inizio del giro/riga con 1 cat. Finire ogni giro/riga con 1 m.bss nella cat. di inizio giro dall’inizio della riga precedente. -------------------------------------------------------- -------------------------------------------------------- PIEDE: Iniziare dalle dita e lavorare con il panna e l’uncinetto n° 7 (8) mm. GIRO 1: Lavorare 3 cat. e formare un anello con 1 m.bss. nella 1° cat. GIRO 2: Lavorare 4-4-5-5 (5-5-6) m.b. nell’anello – leggere il SUGGERIMENTO PER IL LAVORO! GIRO 3: 2 m.b. in ogni m.b. = 8-8-10-10 (10-10-12) m.b. GIRO 4: * 1 m.b. nella 1° m.b., 2 m.b. nella m.b. successiva *, ripetere *-* = 12-12-15-15 (15-15-18) m.b. GIRI 5-6: 1 m.b. in ogni m.b. GIRO 7 (applicato solo alle taglie 35/37, 38/40 e 42/44): 1 m.b. in ogni m.b. GIRI 7-8: * 1 m.b. in ognuna delle prime 2 m.b., 2 m.b. nella m.b. successiva *, ripetere *-* = 16-16-20-20 (20-20-24) m.b. Continuare con 1 m.b. in ogni m.b. FARE ATTENZIONE ALLA TENSIONE DEL LAVORO! Quando il lavoro misura 5-5-6-7 (7-8-10) cm passare al cammello e continuare fino a quando il lavoro misura 7-8-9-10 (10-12-14) cm. TALLONE: Passare al rosso, ALLO STESSO TEMPO dividere il lavoro e lavorare avanti e indietro dal centro sopra il piede – ricordarsi delle INFORMAZIONI PER IL LAVORO! Quando la pantofola misura 15-17-19-21 (23-25-28) cm metterla distesa e cucire al centro dietro con una riga di m.bss. attraverso entrambi gli strati. Tagliare e affrancare il filo. GAMBA: Lavorare 1 giro a m.b. con il rosso attorno all’apertura (iniziare al centro davanti) = circa 22-26-28-30 (26-28-30) m.b. Continuare in tondo con 1 m.b. in ogni m.b. fino a quando la gamba misura circa 3-3-4-4 (5-5-6) cm. Ora continuare avanti e indietro solo su metà delle m. – cioè dal centro davanti al centro dietro – lavorare a m.b., ALLO STESSO TEMPO diminuire per creare un punto come segue: * girare con 1 cat., saltare la 1° m.b. e lavorare 1 m.b. in ogni m.b. fino a quando rimane 1 m.b. *, ripetere *-* fino a quando rimangono 2 m., tagliare e affrancare il filo. CONFEZIONE: Fare un piccolo pompon con un diametro di circa 2-2-2-2 (3-3-3) cm e attaccarlo alla cima del punto sulla gamba (= cima del cappello di Babbo Natale). Piegare la gamba in basso verso il diritto del lavoro. Fare un altro pompon in rosso e cucirlo al centro sopra del piede nel passaggio tra il panna e il cammello = naso di Babbo Natale. Ricamare gli occhi a ogni lato del naso con il nero. Lavorare l’altra pantofola nello stesso modo, ma fare il cappello di Babbo Natale dall’altra parte della pantofola. |
|
Avete terminato questo modello?Allora taggate le vostre foto con #dropspattern #sneakysantaslippers o inviatele alla #dropsfan gallery. Avete bisogno di aiuto con questo modello?Troverete 10 video tutorial, una sezione per i commenti/domande e molto altro guardando il modello su www.garnstudio.com © 1982-2026 DROPS Design A/S. Ci riserviamo tutti i diritti. Questo documento, compreso tutte le sue sotto-sezioni, è protetto dalle leggi sul copyright. Potete leggere quello che potete fare con i nostri modelli alla fine di ogni modello sul nostro sito. |


Con oltre 40 anni di esperienza nel design di modelli di maglia e uncinetto, DROPS Design offre la più estesa collezione di modelli gratuiti su internet - tradotti in 17 lingue. Ad oggi vi possiamo fornire 324 cataloghi e 12290 modelli - 9561 dei quali sono tradotti in Italiano.
Ci stiamo impegnando molto per darvi il meglio che vi possiamo offrire in termini di maglia e uncinetto, ispirazioni e consigli così come filati di grande qualità ad un prezzo incredibile! Volete utilizzare i nostri modelli per qualcosa d'altro oltre al vostro uso personale? Potete leggere tutto ciò che è consentito nel testo sul Copyright in basso su tutte le pagine dei nostri modelli. Buon lavoro!
Lasciare un commento sul modello DROPS Extra 0-523
Noi saremmo felici di ricevere i tuoi commenti e opinioni su questo modello!
Se vuoi fare una domanda, fai per favore attenzione a selezionare la categoria corretta nella casella qui sotto per velocizzare il processo di risposta. I campi richiesti sono indicati da *.