
Categorie popolari
State cercando un filato?


Commenti / Domande (53)
![]() MTL ha scritto:
MTL ha scritto:
Bonjour, Pourriez-vous me communiquer le croquis des mesures pour savoir quelle taille je dois tricoter en lettre afin d'obtenir la taille 46. Merci
18.10.2015 - 18:36DROPS Design ha risposto:
Bonjour Mme MTL, pour trouver votre taille, comparez les mesures du schéma en bas de page à celles d'un vêtement similaire que vous avez et dont vous aimez la taille. Voir aussi ici. Bon tricot!
19.10.2015 - 10:10
![]() MTL ha scritto:
MTL ha scritto:
Je souhaiterais exécuter ce modèle avec une seule laine. Laquelle me conseillez-vous en remplacement. Cordialement;
11.10.2015 - 11:38DROPS Design ha risposto:
Bonjour MTL, cliquez ici pour plus d'information sur les alternatives entre les groupes et calculez la quantité nécessaire. Rappelez-vous que votre magasin DROPS saura également vous conseiller, même par mail ou téléphone. Bon tricot!
12.10.2015 - 09:51Jessica Beaghen ha scritto:
OK. I have been doing the right front. As I expected I have ended up with the wrong amount of stitches (see my previous query). I have checked and double checked. I wrote out very clear instructions on what to do by each measurement. I know I haven't gone wrong, so why at 56cm do I have 19 garter stitches and 29 stockinette? Knut also mentions there are only increases on the front, so its not just me. This is not happy knitting, this is a frustrating disaster
30.10.2014 - 15:53DROPS Design ha risposto:
Dear Mrs Beaghen, after M1 you have 41 sts + inc at the side as for back piece (+ 3 sts) + inc for collar (+4sts) - dec for armhole - 6 sts = 42 sts after all dec and inc are done. Number of sts worked in stockinette : (41-8 sts front band) = 33 sts + inc at the side (+3 sts) - sts worked in garter st for collar (-7sts) - dec for armhole (6sts) = 23 sts. Number of sts worked in garter st: 8 (front band) + inc for collar (+4sts) + sts in stockinette worked in garter st (+7 sts)= 19sts. Happy knitting!
31.10.2014 - 09:44
![]() Christine ha scritto:
Christine ha scritto:
Hallo, was bedeutet“Gleichzeitig … vorne in der Mitte in der äussersten M. 1 M. Aufnehmen“? Welche Masche ist gemeint? Die Randmasche? Oder die erste Masche nach den Blendenmaschen? Vielen Dank!
09.07.2014 - 17:41DROPS Design ha risposto:
Es bedeutet, dass Sie aus der äußersten M der Blenden-M 2 M herausstricken, also aus der M direkt am Rand. Wenn Ihnen das zu unregelmäßig aussieht, können Sie die Zunahme auch nach dieser ersten M arbeiten.
15.07.2014 - 10:45Knut ha scritto:
There are increases only at the front.
30.05.2014 - 14:02
![]() Jessica Beaghen ha scritto:
Jessica Beaghen ha scritto:
Where are the decreases on the right side front? I have made a comprehensive list of all the instructions and at what length, but there are no decreases, so how does it possibly work out with there being 42 sts left on needle before bind off for shoulder???? Help!!!!
30.05.2014 - 13:23DROPS Design ha risposto:
Dear Mrs Beaghen, 41 sts remain after M1, you inc as for the back on 1 side (+3sts), inc for collar (+4 sts) and bind off for armhole (-6 sts): 41+3+4-6=42 sts for shoulder (23 sts in st st) & collar (19 sts in garter st). Happy knitting!
03.06.2014 - 08:53
![]() Veronica ha scritto:
Veronica ha scritto:
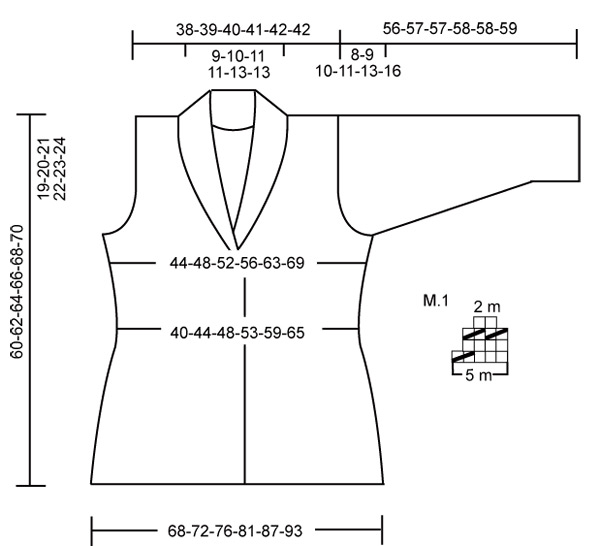
Trying to work out this pattern: can you explain the diagram M.1. I have assumed that after a row, the next row will be a decrease row by knitting 2 stitches together along the 75 stitches ( odd number of stitches?). The row after that will be a row with no alterations and the one after that will be: knit 2 together work 3 then knit 2 tog. along the same area of the original 75 stitches. Correct? Should the 75 be 74?
02.04.2014 - 09:47DROPS Design ha risposto:
Dear Veronica, start reading diagram at the bottom corner left towards the right (from RS), you will repeat the 5 sts of M.1 a total of 15 times over the next 75 sts (1st row= *K3, K2tog* repeat from *-*). When M.1 has been worked, you will have 30 sts: 15 times M.1 which has been decreased to 2 sts. Happy knitting!
02.04.2014 - 10:03
![]() Anne ha scritto:
Anne ha scritto:
Hallo! geht das muster M1 über 5 reihen oder 10 reihen (also kommen noch rückreihen hinzu?)oder ist die rückreihe die jeweils zweite eingezeichnete reihe? danke!
15.12.2012 - 19:50DROPS Design ha risposto:
Liebe Anne, das Muster geht über 4 Reihen und es sind Hin- und Rück-R dargestellt.
16.12.2012 - 09:59
![]() DROPS Design ha scritto:
DROPS Design ha scritto:
Hi Marie, so happy to hear you learned something new with our videos. On this design we are knitting 2 tog slanting the same way all around, but you could chose to make the first half slanting one way, then the other half the other way, or every other all around if you like it that way.
12.03.2010 - 18:09
![]() Marie ha scritto:
Marie ha scritto:
Thanks to your video, I learned for the first time that K2 tog's can slant right or left! For the back piece in this design, does the direction of the slant in the chart indicate, they should all face the same direction, or should I divide the number of K2tog stitches in half, and have half slanting right and half slanting left? Thank you.
12.03.2010 - 14:51
|
|||||||
DROPS 109-28 |
|||||||
 |
 |
||||||
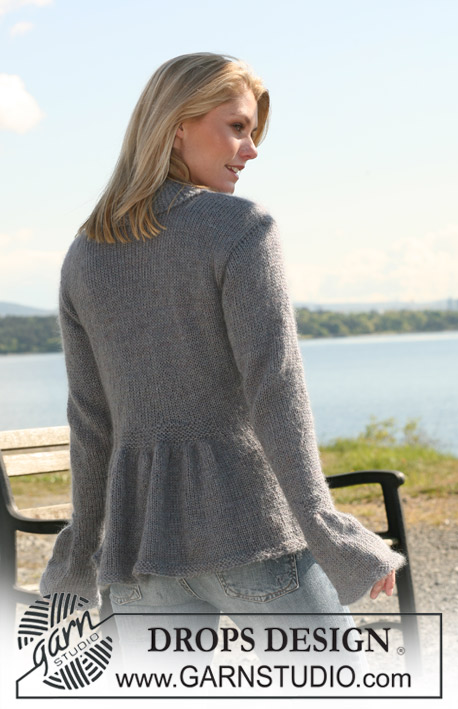
Giacca DROPS a maglia rasata, con pieghe e collo a scialle in "Alpaca" e "Kid-Silk". Taglie: Dalla S alla XXXL.
DROPS 109-28 |
|||||||
|
PUNTO LEGACCIO (avanti e indietro sui ferri): Lavorare tutti i ferri a dir. PUNTO LEGACCIO (in tondo): *1 giro a dir, 1 giro a rov*, ripetere da *-*. MOTIVO: Vedere il diagramma M1. Il diagramma mostra il motivo sul diritto del lavoro. ASOLE: Intrecciare le m per le asole lungo il davanti destro. 1 asola = intrecciare la 4° m a partire dal bordo; al ferro successivo, avviare 1 m in corrispondenza della m chiusa. Intrecciare le m per le asole quando il lavoro misura: Taglia S: 26, 29 e 32 cm. Taglia M: 26, 30 e 34 cm. Taglia L: 26, 31 e 36 cm. Taglia XL: 26, 32 e 38 cm. Taglia XXL: 26, 33 e 40 cm. Taglia XXXL: 26, 34 e 42 cm. DIETRO: Avviare 111-117-123-131-141-151 m (compresa 1 m vivagno da ciascun lato) sui ferri n° 5,5 con 1 capo di ciascuna qualità. Lavorare 4 ferri a punto legaccio – vedere le spiegazioni precedenti. Proseguire a maglia rasata con 1 m vivagno da ciascun lato. Ricordarsi la tensione del lavoro! Quando il lavoro misura 23 cm, lavorare il ferro successivo, sul diritto del lavoro, come segue: 1 m vivagno, 17-20-23-27-32-37 m a maglia rasata, M.1 sulle 75 m successive, 17-20-23-27-32-37 m a maglia rasata, 1 m vivagno. Dopo aver completato 1 intera ripetizione del diagramma M.1 in verticale, sul ferro ci sono 66-72-78-86-96-106 m. Lavorare ora 10 ferri a punto legaccio sulle 30 m centrali (sopra il motivo M.1), lavorare le altre m a maglia rasata. Quando il lavoro misura 30 cm, aumentare 1 m da ciascun lato e ripetere questi aumenti ogni 4-4-5-5-6-6 cm per un totale di 3 volte = 72-78-84-92-102-112 m. Quando il lavoro misura 41-42-43-44-45-46 cm, intrecciare da ciascun lato per gli scalfi, all’inizio di ogni ferro, come segue: 3 m 1 volta, 2 m 1-2-2-3-5-7 volte e 1 m 1-1-3-4-4-5 volte = 60-62-64-66-68-68 m. Quando il lavoro misura 58-60-62-64-66-68 cm , intrecciare le 12-14-16-16-18-18 m centrali per il collo; al ferro successivo diminuire 1 m per il collo = per la spalla rimangono 23-23-23-24-24-24 m. Quando il lavoro misura 60-62-64-66-68-70 cm, intrecciare le m. DAVANTI DESTRO: Avviare 65-68-71-75-80-85 m (comprese 8 m per il bordo verso il centro e 1 m vivagno al lato) sui ferri n° 5,5 con un capo di ciascuna qualità. Lavorare 4 ferri a punto legaccio e proseguire a maglia rasata con 1 m vivagno al lato e 8 m a punto legaccio verso il centro (bordo davanti). Quando il lavoro misura 23 cm, lavorare il ferro successivo come segue, sul diritto del lavoro: 8 m a punto legaccio, 8-9-11-13-15-18 m a maglia rasata, M.1 sulle 40 m successive, 8-10-11-13-16-18 m a maglia rasata e 1 m vivagno. Dopo aver completato 1 intera ripetizione del diagramma M.1 in verticale, sul ferro ci sono 41-44-47-51-56-61 m. Ricordarsi di intrecciare le m per le asole – vedere le spiegazioni precedenti. Lavorare ora 10 ferri a punto legaccio sulle 16 m centrali (sopra il motivo M.1); lavorare le altre m come prima. Leggere tutte le indicazioni successive prima di proseguire! Quando il lavoro misura 30 cm, aumentare al lato come per il dietro. Allo stesso tempo, quando il lavoro misura 32-34-36-38-40-42 cm, aumentare 1 m nella m più esterna del bordo verso il centro, ogni 8 cm per un totale di 4 volte. Lavorare le m aumentate a punto legaccio. Allo stesso tempo, quando il lavoro misura 34-36-38-40-42-44 cm, aggiungere 1 m al bordo davanti (il n° delle m rimane lo stesso, ma aumenta il n° delle m lavorate a punto legaccio e diminuisce quello delle m lavorate a maglia rasata) ogni 3,5-3,5-3-2,5-2,5-2 cm per un totale di 7-8-9-9-10-10 volte. Allo stesso tempo, quando il lavoro misura 41-42-43-44-45-46 cm, intrecciare per lo scalfo al lato, come per il dietro. Terminate tutte le diminuzioni e tutti gli aumenti, sul ferro ci sono 42-43-44-45-46-46 m (19-20-21-21-22-22 m a punto legaccio per il bordo e il collo e 23-23-23-24-24-24 m a maglia rasata per la spalla). Quando il lavoro misura 60-62-64-66-68-70 cm intrecciare 23-23-23-24-24-24 m per la spalla e lavorare le restanti 19-20-21-21-22-22 m a punto legaccio per il collo. Lavorare ora le m del collo a ferri accorciati, sul diritto del lavoro , come segue: * lavorare 2 ferri a punto legaccio avanti e indietro sulle prime 10 m, lavorare 2 ferri a punto legaccio avanti e indietro su tutte le m *, ripetere da *-* finché il collo non misura 7-7-8-8-9-9 cm (misurato sul lato più corto) a partire dalla spalla. Intrecciare le m senza stringere il filo. DAVANTI SINISTRO: Lavorare come il davanti destro, ma a specchio. MANICHE: Si lavorano in tondo sui ferri a doppia punta. Avviare 51-53-55-57-59-61 m sui ferri a doppia punta n° 5,5 con 1 capo di ciascuna qualità. Lavorare 4 giri a punto legaccio – vedere le spiegazioni precedenti. Inserire un segno all’inizio del giro. Proseguire a maglia rasata. Quando il lavoro misura 15 cm, lavorare il giro successivo, come segue: 13-14-15-16-17-18 m dir, M.1 sulle 25 m successive, 13-14-15-16-17-18 m dir. Dopo aver completato 1 intera ripetizione del diagramma M.1 in verticale, sul ferro ci sono 36-38-40-42-44-46 m. Lavorare ora 10 giri a punto legaccio sulle 10 m centrali (sopra il motivo M.1); lavorare le altre m come prima. Allo stesso tempo, quando il lavoro misura 18 cm, aumentare 1 m da ciascun lato del segno, ogni 3,5-3-2,5-2,5-2-1,5 cm per un totale di 8-9-10-11-13-13 volte = 52-56-60-64-70-72 m. Quando il lavoro misura 48-48-47-47-45-43 cm – misure minori per le taglie maggiori perché l’arrotondamento della manica è più lungo e le spalle sono più larghe – intrecciare 3 m da ciascun lato del segno per lo scalfo e finire il lavoro avanti e indietro sui ferri. Intrecciare per l’arrotondamento della manica, da ciascun lato, all’inizio di ogni ferro, come segue: 2 m 2-2-2-2-3-3 volte, 1 m 2-3-4-5-5-8 volte, poi 2 m da ciascun lato finché il lavoro non misura 55-56-56-57-57-58 cm; intrecciare poi 3 m da ciascun lato per 1 volta. Intrecciare le m rimaste. La manica misura ca. 56-57-57-58-58-59 cm. CONFEZIONE: Cucire le spalle. Cucire i lati all’interno della m vivagno. Cucire le maniche. Cucire i lembi del colletto insieme e cucire il colletto al collo. Cucire i bottoni. |
|||||||
Spiegazioni del diagramma |
|||||||
|
|||||||
 |
|||||||
Avete terminato questo modello?Allora taggate le vostre foto con #dropspattern o inviatele alla #dropsfan gallery. Avete bisogno di aiuto con questo modello?Troverete 19 video tutorial, una sezione per i commenti/domande e molto altro guardando il modello su www.garnstudio.com © 1982-2026 DROPS Design A/S. Ci riserviamo tutti i diritti. Questo documento, compreso tutte le sue sotto-sezioni, è protetto dalle leggi sul copyright. Potete leggere quello che potete fare con i nostri modelli alla fine di ogni modello sul nostro sito. |
|||||||


Con oltre 40 anni di esperienza nel design di modelli di maglia e uncinetto, DROPS Design offre la più estesa collezione di modelli gratuiti su internet - tradotti in 17 lingue. Ad oggi vi possiamo fornire 324 cataloghi e 12290 modelli - 9561 dei quali sono tradotti in Italiano.
Ci stiamo impegnando molto per darvi il meglio che vi possiamo offrire in termini di maglia e uncinetto, ispirazioni e consigli così come filati di grande qualità ad un prezzo incredibile! Volete utilizzare i nostri modelli per qualcosa d'altro oltre al vostro uso personale? Potete leggere tutto ciò che è consentito nel testo sul Copyright in basso su tutte le pagine dei nostri modelli. Buon lavoro!
Lasciare un commento sul modello DROPS 109-28
Noi saremmo felici di ricevere i tuoi commenti e opinioni su questo modello!
Se vuoi fare una domanda, fai per favore attenzione a selezionare la categoria corretta nella casella qui sotto per velocizzare il processo di risposta. I campi richiesti sono indicati da *.