
Categorie popolari
State cercando un filato?


Commenti / Domande (11)
![]() Clou ha scritto:
Clou ha scritto:
Gefällt mir sehr gut!!! Werde ich als eines meiner nächsten Projekte stricken
05.04.2024 - 16:00
![]() Jessie ha scritto:
Jessie ha scritto:
Comment savoir combien mesure les grandeur? car je porte du large ou x large tout dépendant des modèles et je me fit plus au mesure des mensurations!
05.05.2021 - 02:54DROPS Design ha risposto:
Bonjour Jessie, mesurez un vêtement similaire que vous avez et dont vous aimez la forme et comparez ces mesures à celles du schéma - retrouvez plus d'infos sur le schéma & les tailles ici. Bon tricot!
05.05.2021 - 08:42
![]() Mari ha scritto:
Mari ha scritto:
I also discovered that only 350g was necessary for size S (saw comment about this after ordering). Also had to make the straps shorter and attach closer together than pattern said (16 cm between inside edges at front) to avoid exposing bosom. (I'm a bra size 32A ) Wish I had made straps thinner, as I thought they were a little too chunky. But loved knitting this, so quick and easy.
08.08.2020 - 15:45
![]() Claudi ha scritto:
Claudi ha scritto:
Hallo! Was, bitte bedeutet „2 verschränkt re. zusammen du 2 M. Krausrippe”? Das steht bei der Anleitung für den Träger im vorletzten Satz. Bitte um Hilfe! Danke, liebe Grüße!
14.02.2019 - 16:57DROPS Design ha risposto:
Liebe Claudi, es ist hier nur kleine Typo, es sollte "und" sein, dh Sie stricken 2 verschränkte Maschen zusammen und enden mit 2 M Krausrippe. Viel Spaß beim stricken!
15.02.2019 - 08:36
![]() Mirjam ha scritto:
Mirjam ha scritto:
Goede middag. Ik brei met garen naald 4. Maat xxl (borstomvang 105cm). Hoe breed is het pand op het punt dat je op 38 cm hoogte 10 steken moet gaan meerderen? M.vr.gr. Mirjam
13.05.2018 - 13:46DROPS Design ha risposto:
Hallo Mirjam, Uitgaande van de stekenverhouding van het patroon (19 st. = 10 cm) en 194 steken op de naald, kom je op dat punt op een breedte van 51 cm (omtrek 102 cm).
14.05.2018 - 19:02Sara ha scritto:
For the S size: just 50 g (not 100 g) of Paris petrol and 300 g (not 450 g!) of Paris white were necessary. The measures for the tunic are perfect. The straps need to be 18 cm apart (not 22) (internal edge) both at the back and front. The best way to attach the straps is to make the correct number of sts for each strap with the crochet on the bound off brim of the tunic, so that you don't have to make any sewing in this model (apart from the buttons).
12.03.2017 - 17:48
![]() Sara ha scritto:
Sara ha scritto:
Qual è il modo migliore per cucire le bretelle al top? Grazie!
07.03.2017 - 20:36DROPS Design ha risposto:
Buonasera Sara, per avere una cucitura piatta, può attaccare le bretelle prendendo solo il filo più esterno delle maglie. Buon lavoro!
07.03.2017 - 20:59
![]() Ms Miller ha scritto:
Ms Miller ha scritto:
Hello I want to make the Goodbye Sailor vest/tank top; however, could you please confirm the sizing since there is a difference between the top of the written pattern size and the schematic bust measurements (last page). My bust is 37.5" Thanks
04.03.2016 - 04:30DROPS Design ha risposto:
Dear Mrs Miller, the measurement chart shows all measurements taken flat from side to side, in cm, ie 70 cm around (= 35x2) / 27½" (= 13"3/4) - read more here. Happy knitting!
04.03.2016 - 10:48
![]() Bettina ha scritto:
Bettina ha scritto:
In der Anleitung steht, Maschen zunehmen !!. Aber es wird minus gerechnet, was ja auch richtig ist, laut Diagramm. Was stimmt denn nun ?? Bitte überprüft das mal.
15.07.2013 - 12:02DROPS Design ha risposto:
Liebe Bettina, genau, es wird abgenommen. Danke für den Hinweis.
15.07.2013 - 16:18
![]() DROPS Design ha scritto:
DROPS Design ha scritto:
We are publishing a measure chart with each design. There you see the actual garments finished measures. So to figure out which size to make, the best is to measure a garment you already have and like the size of and then compare with the chart. The measures in the chart is in cm and measured from side to side.
10.11.2008 - 16:31
|
|||||||
Goodbye Sailor |
|||||||
|
|
|||||||
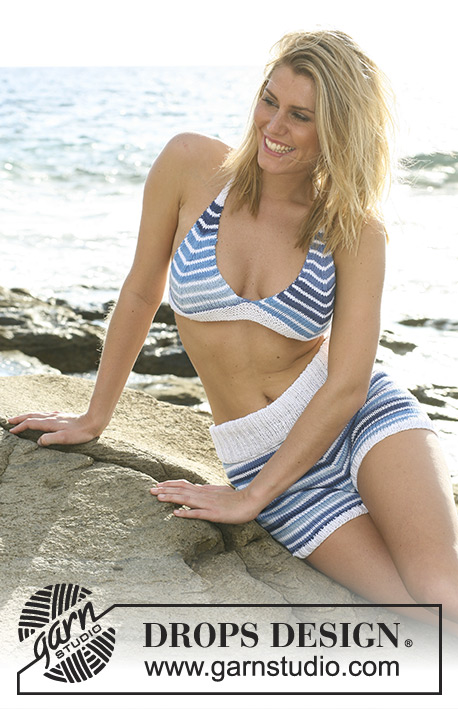
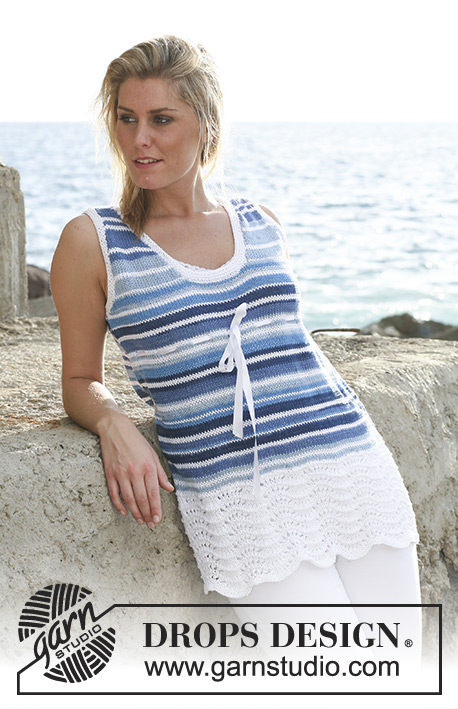
Top DROPS con bretelle, in "Paris". Taglie: Dalla S alla XXXL.
DROPS Extra 0-442 |
|||||||
|
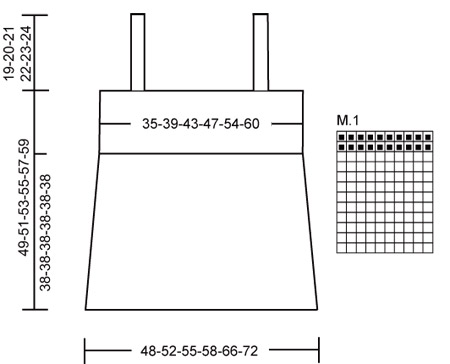
PUNTO LEGACCIO (avanti e indietro sui ferri): Lavorare tutti i ferri a dir. PUNTO LEGACCIO (in tondo): * 1 giro a dir e 1 giro a rov *, ripetere da *-*. STRISCE: Vedere il diagramma M.1. Il diagramma mostra il motivo sul diritto del lavoro. TOP: Si lavora in tondo. Avviare 162-176-188-196-226-246 m sui ferri circolari n° 5 con il colore bianco. Inserire 1 segno all’inizio del giro e 1 segno dopo 81-88-94-98-113-123 m (= lati). Lavorare 1 giro a dir e proseguire con 4 giri a punto legaccio – vedere sopra. Proseguire ora a maglia rasata e a strisce seguendo il diagramma M.1. Quando il lavoro misura 7 cm, diminuire 1 m da ciascun lato di ognuno dei 2 segni (= 4 diminuzioni ad ogni giro) ogni 4 cm per un totale di 8 volte = 130-144-156-164-194-214 m. Quando il lavoro misura 38 cm, aumentare 2-6-6-16-10-14 m in modo uniforme nel corso del giro = 132-150-162-180-204-228 m (il motivo a strisce è ora completato). Passare ai ferri circolari n° 4 e proseguire a coste, 2 m dir / 4 m rov con il colore bianco. Quando le coste misurano 10-12-14-16-18-20 cm, lavorare 4 giri a punto legaccio; intrecciare ora le m. Il lavoro misura 49-51-53-55-57-59 cm. BRETELLE: Si lavorano avanti e indietro sui ferri. Avviare 12 m sui ferri n° 4 con il colore bianco. Lavorare il primo ferro come segue, sul diritto del lavoro: 2 m a punto legaccio, 2 m dir, 4 m rov, 2 m dir, 2 m a punto legaccio. Proseguire in questo modo finché il lavoro non misura ca. 36-38-40-42-44-46 cm. Lavorare ora 2 asole come segue: 2 m a punto legaccio, 2 m insieme a dir, 1 m gettata, 4 m rov, 1 m gettata, 2 m insieme a dir ritorto, 2 m a punto legaccio. Lavorare 2 ferri lavorando a dir le m dir e a rov le m rov; intrecciare ora le m. Lavorare la seconda bretella in modo uguale. CONFEZIONE: Cucire le bretelle sul dietro a distanza di ca. 22-26-28-30-32-36 cm l'una dall'altra. Attaccare i bottoni sul davanti. |
|||||||
Spiegazioni del diagramma |
|||||||
|
|||||||
 |
|||||||
Avete terminato questo modello?Allora taggate le vostre foto con #dropspattern o inviatele alla #dropsfan gallery. Avete bisogno di aiuto con questo modello?Troverete 21 video tutorial, una sezione per i commenti/domande e molto altro guardando il modello su www.garnstudio.com © 1982-2026 DROPS Design A/S. Ci riserviamo tutti i diritti. Questo documento, compreso tutte le sue sotto-sezioni, è protetto dalle leggi sul copyright. Potete leggere quello che potete fare con i nostri modelli alla fine di ogni modello sul nostro sito. |
|||||||


Con oltre 40 anni di esperienza nel design di modelli di maglia e uncinetto, DROPS Design offre la più estesa collezione di modelli gratuiti su internet - tradotti in 17 lingue. Ad oggi vi possiamo fornire 324 cataloghi e 12290 modelli - 9561 dei quali sono tradotti in Italiano.
Ci stiamo impegnando molto per darvi il meglio che vi possiamo offrire in termini di maglia e uncinetto, ispirazioni e consigli così come filati di grande qualità ad un prezzo incredibile! Volete utilizzare i nostri modelli per qualcosa d'altro oltre al vostro uso personale? Potete leggere tutto ciò che è consentito nel testo sul Copyright in basso su tutte le pagine dei nostri modelli. Buon lavoro!
Lasciare un commento sul modello DROPS Extra 0-442
Noi saremmo felici di ricevere i tuoi commenti e opinioni su questo modello!
Se vuoi fare una domanda, fai per favore attenzione a selezionare la categoria corretta nella casella qui sotto per velocizzare il processo di risposta. I campi richiesti sono indicati da *.