
Categorie popolari
State cercando un filato?


Commenti / Domande (50)
![]() Franca ha scritto:
Franca ha scritto:
Hi! I'm knitting this jacket and I'm working on the assembly, but I'm quite confused about the last decreases on the sleeves. It says in the last round to dec 5 on each side of the MT, so 10 in total and I did that, but now the assembly doesn't make sense for me. In the instruction video they have casted off a few st on the sleeve, so it lines up with the casted off stitches from the body. Was I supposed to CO instead of dec on the last row of the sleeve?
28.03.2025 - 12:46DROPS Design ha risposto:
Dear Franca, correct you should rather cast off these 5 stitches on each side of marker. Happy knitting!
28.03.2025 - 13:41
![]() Franca ha scritto:
Franca ha scritto:
Hi! I'm knitting this jacket and I'm working on the assembly, but I'm quite confused about the last decreases on the sleeves. It says in the last round to dec 5 on each side of the MT, so 10 in total and I did that, but now the assembly doesn't make sense for me. In the instruction video they have casted off a few st on the sleeve, so it lines up with the casted off stitches from the body. Was I supposed to CO instead of dec on the last row of the sleeve?
28.03.2025 - 12:45
![]() T-B Handberg ha scritto:
T-B Handberg ha scritto:
Jeg strikker i XL og får ikke masketallene til å stemme når jeg skal starte på mønsterstrikk. En skal ha 5stolpemasker,7glattstrikk,M1,14r,M1,14r, 6 r og så er en ved merketråden sier mønsteret. Aberet er bare at det fortsatt er 10 masker igjen til merketråden.... Ergo blir det også feil på den andre siden..... Kan dere rette opp i dette mønsteret snarest?
30.01.2020 - 02:00DROPS Design ha risposto:
Hej, du sætter mærketråden efter 52 masker. Og strikker i Str XL: 5 stolpem, 7 m glstrikk, M.1, 14 m glstrikk, M.1, 14 m glstrikk, M.1 og 6 glstrikk, merketråden sitter her = 52 masker. God fornøjelse!
11.02.2020 - 08:59
![]() Wendy-Lynne ha scritto:
Wendy-Lynne ha scritto:
I am knitting Large size. Page 3, Paragraph 2, 2nd line - it states that I am to “dec. 1 st on each side of both MT on every 1 and 1/8th”. I did the decrease on Row 3 of my counted row of M.1’s , that equals one stitch on either side of the MT for a total of 4 decreased, 1 each on the two side and two on the back, for a total of 174 stitches on my needle. When I get to Row 11 on the M.1, the K2 YO comes at the MT, so what am I to do? Please help.
23.01.2019 - 20:45DROPS Design ha risposto:
Dear Mrs Lynne, you can add a marker before and after each M.1 so that you will be sure to work the stitches in M.1 always on the right place, and they will that way not be displaced when decreasing. In size L after 1st decrease you will have: 5 front band sts, 7 sts in stocking st, M1, 14 sts stocking st, M.1, 16 sts stocking (after 1st dec = 46 sts before 1st marker) (side) 16 sts stocking st (after 1st dec) etc.. Happy knitting!
24.01.2019 - 09:49
![]() Wendy-Lynne ha scritto:
Wendy-Lynne ha scritto:
I am now on Row 11 of M.1. There are 174 sts. on the needle as I did the 1sr decrease on Row 9 (2nd dec. will be 1 1/8 inches). What am I supposed to do? I knitted as follows: 5; 7; M.1; 14 M.1; there are 16 stitches and at that point is my Marker Tnread, but I am supposed to knot 16 (if, in fact we are decreasing), then an M.1 and then 14; M.1; (3 times) and so forth, but these eyelets don’t match up???? Help please!
22.01.2019 - 23:41DROPS Design ha risposto:
Dear Mrs Lynne, you should still have 14 sts stocking st between M.1, since the decreases are done on the side, the eyelet in M.1 should be lined up all the way. On the sides, depending on your size and the number of decreases done you will have 2 sts less after 1st dec, 4 sts less after 3rd dec and so on. so if you got before 16 sts stocking st, side, 16 sts stocking st, after first dec there are 15 sts stocking st, side, 15 sts stocking st. Happy knitting!
23.01.2019 - 09:44
![]() Wendy-Lynne ha scritto:
Wendy-Lynne ha scritto:
In the Drops pattern 107-9 it refers to M.1. Am I to follow the pattern chart M.1 or am I to make a stitch each time this is referred to? Thanks.
20.01.2019 - 01:43DROPS Design ha risposto:
Dear Weny-Lynne, the chart is made up from three stitches (K2TOG and a YO), you have to knit (-) every time patter M.1 is mentioned. Happy Knitting!
20.01.2019 - 09:14
![]() Barbara Dares ha scritto:
Barbara Dares ha scritto:
I am making the sweater in a size Small. How many rows are plain knit/purl when the pattern row is the one where you M1. It doesn't say in the pattern, but looking at the picture, there are at least 5-6 rows plain purl/knit between the M1 rows.... thanks Barbara
31.12.2018 - 05:23DROPS Design ha risposto:
Dear Mrs Dares, when workinjg M.1 you work the first eyelet row on 3rd row, then on 11th row. When M.1 has been worked one time in height, repeat M.1 from row 1 = 7 rows between each eyelet row. Happy knitting!
02.01.2019 - 11:00
![]() Wendy-Lynne MacKinnon ha scritto:
Wendy-Lynne MacKinnon ha scritto:
Looking at the diagrams. please tell me what the solid dark bars are (looks like they are connecting the stitches).
31.10.2018 - 18:19DROPS Design ha risposto:
Dear Wendy-Lynne, you find it between stitch explanations above the schema - see "K2tog" and "slip 1 st as if to K, K1, psso". Happy knitting!
31.10.2018 - 20:35
![]() Andrea ha scritto:
Andrea ha scritto:
I am at the beginning of the pattern just after the ribbing and with the description given that says( 5 stitches for band then7 stocking stitches,M1,14stocking stitches, M 1,14stocking st. for the side. I always have 2 more stitches left at side before I start for the back part. What am I doing wrong. It says. 44 stitches for the side. Thank u for you help
08.07.2018 - 01:53DROPS Design ha risposto:
Dear Andrea, in size M you have a first marker after the first 44 sts. Work first front piece as follows: 5 garter sts, 7 stockinette sts, M.1 (= 2 sts), 14 stockinette sts, M.1, 14 stockinette sts (side) = 5+7+2+14+2+14=44 sts, maybe you forget to work M.1 one time? Happy knitting!
09.07.2018 - 09:24
![]() Cettolin Bernadette ha scritto:
Cettolin Bernadette ha scritto:
Je voudrai savoir s il était possible de réaliser ce modèle 107-9 avec la laine kid Silk
25.02.2018 - 19:45DROPS Design ha risposto:
Bonjour Mme Cettolin, vous pouvez tout à fait utiliser Kid-silk pour ce modèle, à la place de Cotton Viscose ou d'Alpaca. Vous trouverez ici plus d'infos sur les alternatives. Bon tricot!
26.02.2018 - 09:56
|
||||||||||||||||
DROPS 107-9 |
||||||||||||||||
|
|
||||||||||||||||
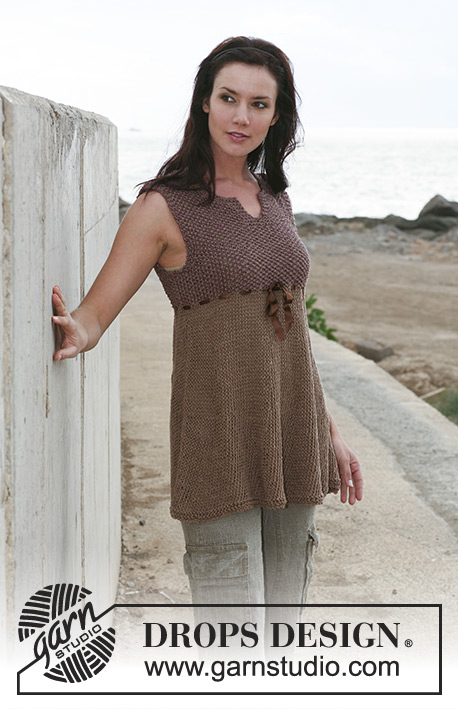
Giacchino DROPS con modello a pizzo e sprone rotondo in "Cotton Viscose" e "Alpaca"”. Taglie: dalla S alla XXXL.
DROPS 107-9 |
||||||||||||||||
|
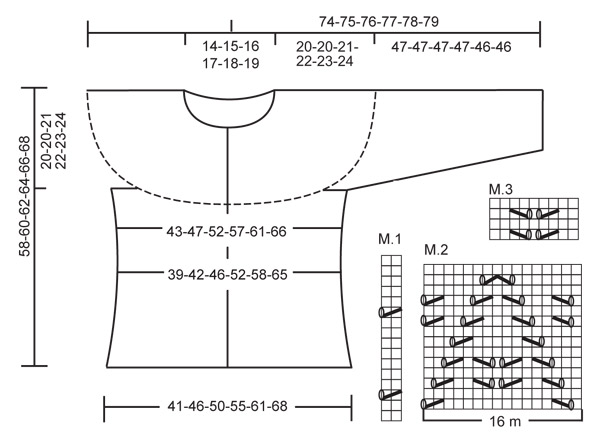
Davanti e dietro: lavorati avanti e indietro sui f. circolari dal centro davanti. Avviare 198-222-238-262-286-318 m. (comprese 5 m. per il bordo davanti a ogni lato) con i ferri circolari n° 5 mm con 1 capo di ogni qualità. Lavorare 2 f. a m. legaccio – leggere sopra. Continuare a coste (primo f. = diritto del lavoro) come segue: 5 m. per il bordo davanti a m. legaccio fino alla fine del lavoro, *4 m. dir., 4 m. rov.*, ripetere *-* e finire con 4 m. dir. e 5 m. per il bordo davanti a m. legaccio fino alla fine del lavoro. Lavorare 1 f. a coste dal rovescio del lavoro, e quindi sul f. successivo dal diritto del lavoro diminuire da 4 m. dir. a 2 m. dir. – leggere il suggerimento per le diminuzioni = 150-168-180-198-216-240 m. Continuare a coste, 2 m. dir./4 m. rov. (visto dal diritto del lavoro), fino a quando il lavoro misura 4-4-4-6-6-6 cm. Lavorare 1 f. a dir. dal diritto del lavoro, allo stesso tempo distribuire 0-2-2-0-2-2 diminuzioni in modo uniforme (non diminuire sui bordi davanti) = 150-166-178-198-214-238 m. Lavorare 1 f. a rov. dal rovescio del lavoro. Ora inserire 2 segnapunti nel lavoro, 1 segnapunti dopo 40-44-47-52-56-62 m. e 1 segnapunti dopo 110-122-131-146-158-176 m. (per indicare i lati) = 70-78-84-94-102-114 m. sul dietro. Continuare come segue: Taglie S + M + L: 5 m. a m. legaccio (bordo davanti), 7 m. a m. rasata, M.1 (= 2 m.), 14 m. a m. rasata, M.1, 10-14-17 m. a m. rasata (lato), 10-14-17 m. a m. rasata, *M.1, 14 m. a m. rasata*, ripetere *-* un totale di 3 volte, M.1, 10-14-17 m. a m. rasata, (lato), 10-14-17 m. a m. rasata, M.1, 14 m. a m. rasata, M.1, 7 m. a m. rasata e 5 m. a m. legaccio (bordo davanti). Taglie XL + XXL + XXXL: 5 m. a m. legaccio (bordo davanti), 7 m. a m. rasata, M.1, 14 m. a m. rasata, M.1, 14 m. a m. rasata, M.1, 6-10-16 m. a m. rasata (lato), 6-10-16 m. a m. rasata, *M.1, 14 m. a m. rasata *, ripetere *-* per un totale di 5 volte, M.1, 6-10-16 m. a m. rasata, (lato), 6-10-16 m. a m. rasata, M.1, 14 m. a m. rasata, M.1, 14 m. a m. rasata, M.1, 7 m. a m. rasata e 5 m. a m. legaccio (bordo davanti). Continuare in questo modo a m. rasata e M.1. Fare attenzione alla tensione del lavoro! Allo stesso tempo quando il lavoro misura 8 cm diminuire 1 m. a ogni lato di entrambi i segnapunti ogni 6-3-3-3-6-7 cm per un totale di 2-3-3-3-2-2 volte = 142-154-166-186-206-230 m. Continuare a m. rasata e M.1. NB! Ricordarsi delle asole sul bordo davanti destro – leggere sopra. Quando il lavoro misura 19-19-19-20-21-22 cm aumentare 1 m. a ogni lato di entrambi i segnapunti ogni 5-4-3-4-6-14 cm per un totale di 3-4-5-4-3-1 volte = 154-170-186-202-218-234 m. (lavorare le m. aumentate a m. rasata). Continuare a m. rasata e M.1 fino a quando il lavoro misura 30-32-33-34-35-36 cm. Lavorare 1 f. dal diritto del lavoro come prima, allo stesso tempo aumentare 1 m. alla fine del f. (aumentare prima del bordo davanti) = 155-171-187-203-219-235 m. Lavorare 1 f. dal rovescio del lavoro, e continuare come segue: 5 m. a m. legaccio, M.2 (=16 m.) ripetuti fino a quando rimangono 6 m. sul f., lavorarle come segue: 1 m. dir., 5 m. per il bordo davanti. Lavorare 1 ripetizione verticale di M.2 in questo modo. Ora lavorare 1 f. dal rovescio del lavoro, allo stesso tempo intrecciare 5 m. a ogni lato di entrambi i segnapunti per lo scalfo = 135-151-167-183-199-215 m. sul f. Il lavoro misura circa 38-40-41-42-43-44 cm. Metterlo da parte e lavorare le maniche. Maniche: lavorate in tondo con i f. circolari da 40 cm. Avviare 56-56-56-64-64-64 m. con i f. n° 5 mm con 1 capo di ogni qualità. Lavorare 2 giri a m. legaccio – leggere sopra. Continuare a coste, 4 m. dir./4 m. rov. Dopo 2 giri diminuire tutte le sezioni a 4 m. dir. a 2 m. dir. – leggere il suggerimento per le diminuzioni = 42-42-42-48-48-48 m. Continuare a coste, 2 m. dir./4 m. rov., fino a quando il lavoro misura 4-4-4-6-6-6 cm. Ora lavorare 2 giri a m. rasata. Inserire 1 segnapunti all’inizio del giro e continuare come segue: Taglie S + M + L: 4 m. dir., M.1, 14 m. dir., M.1, 14 m. dir., M.1, 4 m. dir. Continuare in questo modo. Taglie XL + XXL + XXXL: 7 m. dir., M.1, 14 m. dir., M.1, 14 m. dir., M.1, 7 m. dir. Continuare in questo modo. Allo stesso tempo quando il lavoro misura circa 5-6-8-7-7-9 cm aumentare 1 m. a entrambi i lati del segnapunti ogni 5,5-4-3-3,5-3-2,5 cm per un totale di 7-9-11-9-10-12 volte = 56-60-64-66-68-72 m. (lavorare le m. aumentate a m. rasata). Continuare fino a quando il lavoro misura 40-40-40-40-39-39 cm (meno per le taglie più grandi a causa dell’arrotondamento della manica più lungo e della maggiore ampiezza delle spalle). Ora continuare come segue: 4-6-0-1-2-4 m. dir., M.2 sulle 48-48-64-64-64-64 m. successive e finire il giro con 4-6-0-1-2-4 m. dir. Dopo 1 ripetizione verticale di M.2 lavorare 1 giro a dir., allo stesso tempo diminuire 5 m. a entrambi i lati del segnapunti = 46-50-54-56-58-62 m. La manica misura circa 47-47-47-47-46-46 cm. Mettere il lavoro da parte e lavorare l’altra manica. Sprone: lavorato avanti e indietro sui f. Mettere le maniche sullo stesso f. circolare del corpo dove sono state intrecciate le m. per gli scalfi = 227-251-275-295-315-339 m. Lavorare 1-1-1-1-3-3 f. a m. rasata (primo f. = rovescio del lavoro). Ora lavorare 1 f. a rov. dal diritto del lavoro e 1 f. a dir. dal rovescio del lavoro. Lavorare 1 f. a dir. dal diritto del lavoro, allo stesso tempo distribuire 10-16-22-24-26-23 diminuzioni in modo uniforme (non diminuire sui bordi davanti) = 217-235-253-271-289-316 m. Lavorare 1 f. a rov. dal rovescio del lavoro. Ora continuare in M.3 (= 9 m.) ripetuto per tutto il f. con 5 m. per il bordo a ogni lato. Dopo 1 ripetizione verticale di M.3, lavorare 1 f. a dir. dal diritto del lavoro, allo stesso tempo distribuire 18 diminuzioni in modo uniforme = 199-217-235-253-271-298 m. Lavorare 1 f. a rov. dal rovescio del lavoro, lavorare 1 f. a rov. dal diritto del lavoro e 1 f. a dir. dal rovescio del lavoro. Ora lavorare 1 f. a dir. dal diritto del lavoro, allo stesso tempo distribuire 18-18-18-18-18-27 diminuzioni in modo uniforme = 181-199-217-235-253-271 m. Lavorare 7-7-7-9-9-9 f. a m. rasata e quindi 1 f. a dir. dal diritto del lavoro, allo stesso tempo distribuire 18-18-18-18-18-27 diminuzioni in modo uniforme = 163-181-199-217-235-244 m. Lavorare 1 f. a rov. dal rovescio del lavoro, 1 f. a rov. dal diritto del lavoro e 1 f. a dir. dal rovescio del lavoro. Ora lavorare 1 f. a dir. dal diritto del lavoro, allo stesso tempo distribuire 18-18-18-18-18-27 diminuzioni in modo uniforme = 145-163-181-199-217-217 m. Lavorare 1 f. a rov. dal rovescio del lavoro e continuare in M.3 ripetuto per tutto il f. con 5 m. per il bordo a ogni lato. Dopo 1 ripetizione verticale di M.3, lavorare 1 f. a dir. dal diritto del lavoro, allo stesso tempo distribuire 18-18-18-18-27-27 diminuzioni in modo uniforme = 127-145-163-181-190-190 m. Lavorare 1 f. a rov. dal rovescio del lavoro, 1 f. a rov. dal diritto del lavoro e 1 f. a dir. dal rovescio del lavoro. Ora lavorare 1 f. a dir. dal diritto del lavoro, allo stesso tempo distribuire 18-18-18-27-27-27 diminuzioni in modo uniforme = 109-127-145-154-163-163 m. Lavorare 1-1-3-3-3-3 f. a m. rasata. Lavorare 1 f. a dir. dal diritto del lavoro, allo stesso tempo distribuire 18-18-18-27-27-27 diminuzioni in modo uniforme = 91-109-127-127-136-136 m. Lavorare 1 f. a rov. dal rovescio del lavoro, lavorare 1 f. a dir. dal diritto del lavoro e 1 f. a rov. dal rovescio del lavoro. Ora lavorare 1 f. a dir. dal diritto del lavoro, allo stesso tempo distribuire 18-18-27-27-27-27 diminuzioni in modo uniforme = 73-91-100-100-109-109 m. Lavorare 1 f. a rov. dal rovescio del lavoro, 1 f. a rov. dal diritto del lavoro e 1 f. a dir. dal rovescio del lavoro. Lavorare 1 f. a dir. dal diritto del lavoro, allo stesso tempo distribuire 15-29-34-32-37-33 diminuzioni in modo uniforme = 58-62-66-68-72-76 m. Lavorare 1-1-1-1-1-3 f. a m. rasata. Lavorare 4 f. a m. legaccio su tutte le m. e intrecciare senza stringere. Confezione: cucire le aperture sotto le maniche. Attaccare i bottoni. |
||||||||||||||||
Spiegazioni del diagramma |
||||||||||||||||
|
||||||||||||||||
 |
||||||||||||||||
Avete terminato questo modello?Allora taggate le vostre foto con #dropspattern o inviatele alla #dropsfan gallery. Avete bisogno di aiuto con questo modello?Troverete 23 video tutorial, una sezione per i commenti/domande e molto altro guardando il modello su www.garnstudio.com © 1982-2026 DROPS Design A/S. Ci riserviamo tutti i diritti. Questo documento, compreso tutte le sue sotto-sezioni, è protetto dalle leggi sul copyright. Potete leggere quello che potete fare con i nostri modelli alla fine di ogni modello sul nostro sito. |
||||||||||||||||


Con oltre 40 anni di esperienza nel design di modelli di maglia e uncinetto, DROPS Design offre la più estesa collezione di modelli gratuiti su internet - tradotti in 17 lingue. Ad oggi vi possiamo fornire 324 cataloghi e 12290 modelli - 9561 dei quali sono tradotti in Italiano.
Ci stiamo impegnando molto per darvi il meglio che vi possiamo offrire in termini di maglia e uncinetto, ispirazioni e consigli così come filati di grande qualità ad un prezzo incredibile! Volete utilizzare i nostri modelli per qualcosa d'altro oltre al vostro uso personale? Potete leggere tutto ciò che è consentito nel testo sul Copyright in basso su tutte le pagine dei nostri modelli. Buon lavoro!
Lasciare un commento sul modello DROPS 107-9
Noi saremmo felici di ricevere i tuoi commenti e opinioni su questo modello!
Se vuoi fare una domanda, fai per favore attenzione a selezionare la categoria corretta nella casella qui sotto per velocizzare il processo di risposta. I campi richiesti sono indicati da *.