
Categorie popolari
State cercando un filato?


Commenti / Domande (48)
![]() Fink ha scritto:
Fink ha scritto:
Alles gut, habe einfach angefangen zu stricken. Bin gespannt, wenns ferig ist.
05.12.2024 - 18:34
![]() Fink ha scritto:
Fink ha scritto:
Sorry, nicht nach 6 cm abnahme für den Armloch. War jetzt etwas irritiert.
05.12.2024 - 12:42DROPS Design ha risposto:
Liebe Frau Fink, siehe Antwort unten - man wird zuerst das Rumfpteil und die Ärmel separat bis Armlöcher stricken, dann alle Teile zusammen auf dieselbe Nadel stricken - siehe Video und die Passe stricken. Viel Spaß beim Stricken!
06.12.2024 - 07:38
![]() Fink ha scritto:
Fink ha scritto:
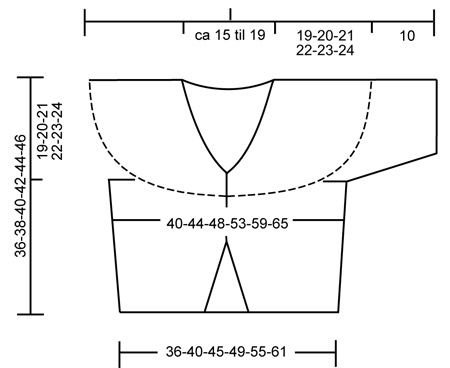
Guten Tag, erstmal vielen Dank. Das Diagramm mit den Zahlen, was bedeuten die Zahlen? Cm oder Maschenzahl? Nach 6cm abnahme für den Armloch, gemessen ab Markierung? oder ab Anschlag? Sowie die 17 cm höhe, ist verwirrend für mich. Möchte schon die Jacke stricken, scheint mir alles zu kompliziert. Wenn ich mir das Diagramm anschaue, sieht für mich nach 30 cm hoch stricken ab da 6 cm stricken bis zur Armloch abnahme. :(( Sorry
05.12.2024 - 12:36DROPS Design ha risposto:
Liebe Frau Fink, die Zahlen in der Skizze sind die Höhe/Länge in cm für jede Größe - hier lesen Sie mehr. Nach 6 cm beim Rumpfteil wird man für die Seiten vom Bolero zunehmen, dh zwischen Vorder und Rückenteil, damit die Arbeit vor dem Armlöcher breiter (40 bis 65 cm) als am Anfang bei der Anschlagskante (36 bis 61 cm). Die gesamte Höhe ist 36 bis 46 cm vom Schulter, einschl. 19-24 cm Passe und 17 bis 22 cm Rumfpteil (wenn man die Maschen für die Armlöcher abkettet). Viel Spaß beim Stricken!
06.12.2024 - 07:36
![]() Fink ha scritto:
Fink ha scritto:
Guten Tag, ich stricke zum 1.mal nach Anleitung. Da fehlt es mir etwas schwer, dieses hier zu verstehen. Wenn Sie schreiben, Gleichzeitig gegen Mitte aufnehmen, soll heißen? Zunahme in der Mitte von den 110 M ? Wenn ich die Mitte markiert habe, auf beiden Seiten eine M zunehme? Komme trotzdem nicht auf die Gesamtzahl von 146 M. Bei jeder 2.R 1 M zunehmen und das 9x und danach bei jeder 4 R. 3x. Die 6 cm, ab wo?
03.12.2024 - 17:30DROPS Design ha risposto:
Liebe Frau Fink, diese Zunahmen sind für die Vorderteile und entstehen nach den 5 ersten Maschen + vor den 5 letzten Maschen einer Hinreihe; gleichzeitig, nach 6 cm nehmen Sie beidseitig von jeder Markierung (Seite der Jacke) 2 Maschen (1 für jedes Vorderteil und 2 für Rückenteil) zu. So sind es 110+(9 Mal in jeder 2. Reihe +3 Mal in jeder 4. Reihe 1 M beidseitig für jedes Vorderteil)+ (3 Mal in jeder 4. cm 1 Masche beidseitig jeder Markierung = jeweils 4 Maschen)=110+24+12=146 Maschen. Viel Spaß beim Stricken!
04.12.2024 - 07:01
![]() Ruth Krokmo Jensen ha scritto:
Ruth Krokmo Jensen ha scritto:
Vad skall jag göra med dom 5 maskorna i framkanten som sitter på säkerhetsnål?????
01.03.2017 - 15:49DROPS Design ha risposto:
Hej Ruth. Se nederst i opskriften under "Framkant". Her staar hvad du gör med maskerne.
01.03.2017 - 16:03
![]() Rebecca Field ha scritto:
Rebecca Field ha scritto:
When the pattern says one thread of each quality, how many threads does that mean you're knitting with?
05.11.2016 - 12:59DROPS Design ha risposto:
Dear Mrs Field, you've to work all the bolero with 1 strand of Fabel and 1 strand of Cotton Viscose. Happy knitting!
05.11.2016 - 18:27
![]() M.Claire ha scritto:
M.Claire ha scritto:
Je pense qu'il y a une erreur dans le nombre de mailles totales. Par ex. Pour la taille XL, je trouve 184 m et non 190 ou alors j'en oublie. Cordialement
14.08.2014 - 22:55DROPS Design ha risposto:
Bonjour Mme M.Claire, en taille XL, on commence avec 154 m, on augmente pour chaque devant: 9+3 = 12 m soit 24 m au total + sur les côtés 3 x 2 m x 2 côtés = 12 m. 154 + 24 + 12 = 190 m. Bon tricot!
15.08.2014 - 10:05
![]() Paula ha scritto:
Paula ha scritto:
Hi, I made this bolero and it is so cute...except that it rolls at the bottom, despite the garter stitch. If I were to make it again, I think I would add a couple rows of garter stitch.
04.04.2014 - 18:07
![]() Annie B ha scritto:
Annie B ha scritto:
Den er bare så flot,kan man ikke få opskriften i str.8 år,det ville være lykken for mit barnebarn,jeg har garnet klar
22.08.2008 - 17:13
![]() Angel ha scritto:
Angel ha scritto:
Un grand merci pour votre aide si rapide et efficace suite à ma demande. Ce modèle est magnifique et avec vos explications, c'est décidé je me lance. Bravo pour vos modèles.
16.06.2008 - 13:05
|
|
DROPS 107-19 |
|
|
|
|
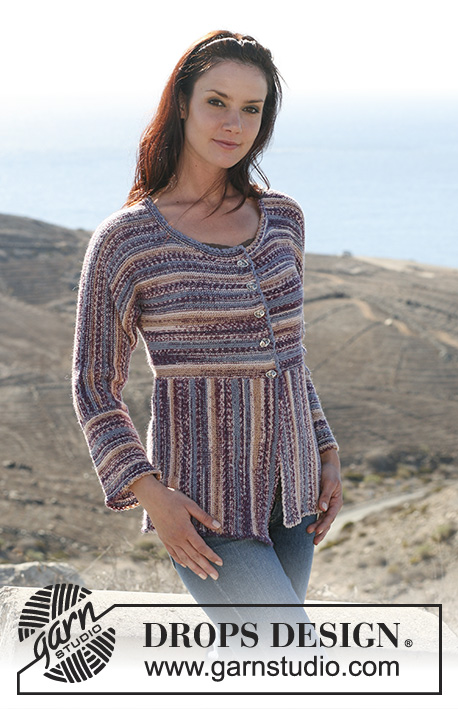
Bolero DROPS con sprone rotondo e maniche corte in “Fabel” e “Cotton Viscose”. Taglie: S – XXXL.
DROPS 107-19 |
|
|
MAGLIA LEGACCIO, avanti e indietro sui f: Lavorare tutti i f a dir. M LEGACCIO, in tondo: 1 giro dir, 1 giro rov. SUGGERIMENTO PER GLI AUMENTI: Aumentare all’interno delle 5 m del bordo davanti facendo 1 gettato. Lavorare il gettato a ritorno sul f di ritorno per evitare un buco. ASOLE: Fare 2 asole sul bordo davanti destro. 1 asola = lavorare insieme a dir la 2° e la 3° m dal centro davanti e fare un gettato. Fare le asole quando il lavoro misura 15-15-16-16-17-17 cm and 19-19-20-20-22-22 cm. Nota! La seconda asola viene fatta quando il bordo davanti è completamente separato. MOTIVO: Ferro 1: dir dal diritto del lavoro Ferro 2: rov dal rovescio del lavoro Ferro 3: dir dal diritto del lavoro Ferro 4: rov dal rovescio del lavoro Ferro 5: dir dal diritto del lavoro (diminuire su questo f) Ferro 6: dir dal rovescio del lavoro ---------------------------------------------------- BOLERO: Lavorare avanti e indietro con i f circolari dal centro davanti. Avviare 110-124-138-154-174-194 m (comprese 5 m per il bordo davanti a ogni lato) con i f circolari n° 5 mm con 1 capo di ogni qualità. Lavorare 4 f a m legaccio – leggere sopra. Inserire un segnapunti all’interno di 24-28-31-35-40-45 m da ogni lato (= 62-68-76-84-94-104 m sul dietro). LEGGERE TUTTA LA SEZIONE SEGUENTE PRIMA DI CONTINUARE! Continuare a m rasata con 5 m per il bordo davanti a ogni lato a m legaccio fino alla fine del lavoro. ALLO STESSO TEMPO aumentare a ogni lato verso il centro davanti – leggere il SUGGERIMENTO PER GLI AUMENTI: 1 m a f alterni 9 volte e poi 1 m ogni 4 f 3 volte. ALLO STESSO TEMPO quando il lavoro misura 6 cm per tutte le taglie aumentare 1 m a ogni lato di entrambi i segnapunti ai lati ogni 4-4-5-5-6-6 cm per un totale di 3 volte. FARE ATTENZIONE ALLA TENSIONE DEL LAVORO E RICORDARSI DELLE ASOLE – leggere sopra. Alla fine di tutti gli aumenti ci sono 146-160-174-190-210-230 m sul f. Continuare a m rasata con i bordi davanti a m legaccio fino a quando il lavoro misura 17-18-19-20-21-22 cm. Ora intrecciare 6 m a ogni lato (cioè 3 m a ogni lato di entrambi i segnapunti) = 134-148-162-178-198-218 m. Mettere il lavoro da parte e lavorare le maniche. MANICHE: Lavorate in tondo con i f a doppia punta. Avviare 48-50-52-54-56-58 m con i f n° 5 mm con 1 capo di ogni qualità. Lavorare 4 giri a m legaccio – leggere sopra – e continuare a m rasata. ALLO STESSO TEMPO quando il lavoro misura 2 cm aumentare 2 m al centro sotto il braccio ogni 6-4-3-3-3-2 giri per un totale di 3-4-5-5-6-7 volte = 54-58-62-64-68-72 m. Quando il lavoro misura 10 cm intrecciare 6 m al centro sotto la manica = 48-52-56-58-62-66 m. Mettere il lavoro da parte e lavorare l’altra manica. SPRONE: Trasferire le maniche sui f circolari dove sono state intrecciate le m per gli scalfi = 230-252-274-294-322-350 m. Trasferire le 5 m del bordo davanti a ogni lato su un fermamaglie = 220-242-264-284-312-340 m sul f. Lavorare 1 f rov dal rovescio del lavoro. Continuare con il motivo – leggere sopra, ALLO STESSO TEMPO diminuire ogni 6 f (= Ferro 5 del motivo) come segue: distribuire 21-23-25-25-28-28 diminuzioni in modo uniforme sul f per un totale di 7-7-7-8-8-8 volte. ALLO STESSO TEMPO quando il lavoro misura 21-21-22-22-23-23 cm diminuire per modellare la scollatura a ogni lato verso il centro davanti: 1 m a f alterni per un totale di 7 volte, poi 1 m ogni 4 f fino alla fine del lavoro. Continuare con il motivo fino a quando il lavoro misura 36-38-40-42-44-46 cm (dal f di avvio fino alla spalla). Intrecciare le m rimaste. CONFEZIONE: BORDO DAVANTI: Riportare le 5 m del bordo davanti di un lato sui f di lavoro e lavorare a m legaccio fino a quando il lavoro non combacia con la scollatura al centro dietro (il bordo davanti dev’essere tirato leggermente). Ora riportare le m sul fermamaglie. Lavorare l’altro bordo nello stesso modo e poi cucire i bordi al centro dietro (cucire insieme le m del fermamaglie e quelle sul f). Cucire le aperture sotto le braccia. Attaccare i bottoni. |
|
 |
|
Avete terminato questo modello?Allora taggate le vostre foto con #dropspattern o inviatele alla #dropsfan gallery. Avete bisogno di aiuto con questo modello?Troverete 19 video tutorial, una sezione per i commenti/domande e molto altro guardando il modello su www.garnstudio.com © 1982-2026 DROPS Design A/S. Ci riserviamo tutti i diritti. Questo documento, compreso tutte le sue sotto-sezioni, è protetto dalle leggi sul copyright. Potete leggere quello che potete fare con i nostri modelli alla fine di ogni modello sul nostro sito. |


Con oltre 40 anni di esperienza nel design di modelli di maglia e uncinetto, DROPS Design offre la più estesa collezione di modelli gratuiti su internet - tradotti in 17 lingue. Ad oggi vi possiamo fornire 324 cataloghi e 12290 modelli - 9561 dei quali sono tradotti in Italiano.
Ci stiamo impegnando molto per darvi il meglio che vi possiamo offrire in termini di maglia e uncinetto, ispirazioni e consigli così come filati di grande qualità ad un prezzo incredibile! Volete utilizzare i nostri modelli per qualcosa d'altro oltre al vostro uso personale? Potete leggere tutto ciò che è consentito nel testo sul Copyright in basso su tutte le pagine dei nostri modelli. Buon lavoro!
Lasciare un commento sul modello DROPS 107-19
Noi saremmo felici di ricevere i tuoi commenti e opinioni su questo modello!
Se vuoi fare una domanda, fai per favore attenzione a selezionare la categoria corretta nella casella qui sotto per velocizzare il processo di risposta. I campi richiesti sono indicati da *.