
Categorie popolari
State cercando un filato?


Commenti / Domande (100)
![]() Susan Brunner ha scritto:
Susan Brunner ha scritto:
In the pattern after the yo in chart M1, does that mean you just go to the next box with a symbol. I am new to charts. Thank you for your time
01.06.2019 - 02:39DROPS Design ha risposto:
Hello Susan. Yes, in chart M1, where there is the space after a yo, you go to the next box with a symbol. I.e. on first row, you work: k1, 1 yo, k2, p2 and so on. Happy knitting!
01.06.2019 - 06:46
![]() Susan ha scritto:
Susan ha scritto:
I am new to charts, in your chart M1, the space with absolutely nothing after the yo, does it mean you just go to the next st. I really like the look of the tank top and my daughter would like it, she lives in Las Vegas and this is a good one for her done in a cotton yarn. Thank you for your time.
01.06.2019 - 02:35DROPS Design ha risposto:
Hello Susan. Yes, in chart M1, where there is the space with absolutely nothing after a yo, you work the next st. I.e. on first row, you work: k1, 1 yo, k2, p2 and so on. Happy knitting!
01.06.2019 - 06:48
![]() Jenny Strick ha scritto:
Jenny Strick ha scritto:
In der Legende gibt es nur \ aber kein /. Im Muster gibt es nur / aber kein \.
04.05.2019 - 17:17DROPS Design ha risposto:
Liebe Frau Strick, ganz herzlichen Dank, den hatte ich verpasst! Unser Designteam wird das ändern. Viel Spaß beim stricken!
06.05.2019 - 15:40
![]() Jenny Strick ha scritto:
Jenny Strick ha scritto:
Ich hab einen Fehler im Muster entdeckt. Es wird in der Legende und im Muster / und \ vertauscht für zwei links zusammen stricken.
28.04.2019 - 10:59DROPS Design ha risposto:
Liebe Jenny Strick, Diagram M.1 ist korrekt, Sie werden die linken Maschen 2 li zusammen stricken und die rechten Maschen werden 2 re zusamment gestrickt. Viel Spaß beim stricken!
29.04.2019 - 11:30
![]() Thomas ha scritto:
Thomas ha scritto:
Det är tomma fält mellan diagram M1, vad betyder det?
01.04.2019 - 17:54DROPS Design ha risposto:
Hei Thomas. Det er bare lagt inn mellomrom for at alle økningne skal syntes i diagrammet (altså så du skal se hvordan det blir seende ut). Men du hopper bare over mellomrommet og strikker som om det ikke er der. God fornøyelse
02.04.2019 - 13:14
![]() Antoinetta ha scritto:
Antoinetta ha scritto:
M1 har tomma rutor hur gör jag där? Stickar XL.
31.03.2019 - 13:47DROPS Design ha risposto:
Hej Antoinetta. Se svar över. Mvh DROPS Design
05.04.2019 - 10:30
![]() Laurie ha scritto:
Laurie ha scritto:
It would be helpful if the pattern stated the intended amount of ease. The size to fit my bust is way too small for my hips by the measuring tape. Looks like I need to make the largest size for my hips and convert to the appropriate stitch count for XL at the waist.
25.09.2018 - 21:43DROPS Design ha risposto:
Dear Laurie, you will find all measurements for the finished garments in the chart at the bottom of the pattern. These measurements are taken flat - from side to side- in cm. compare these to a similar garment you have and like the shape to find out the matching size or adjust if required. Convert into inches and read more about sizing here. Happy knitting!
26.09.2018 - 08:26
![]() Donna Chustz ha scritto:
Donna Chustz ha scritto:
What do you mean by decreasing 1 st 5 times when shaping the armhole? Is this decreasing 5 stitches every knit row? If so how many decrease rows? Or is it decreasing 1 stitch for 5 times on the knit rows? And, where is the decrease put (1 decrease on each side of the 3 garter st? That would be 2 decreases per every knit row.
29.04.2018 - 05:09DROPS Design ha risposto:
Hi Donna, You work all decreases from the right side and you decrease one stitch every other row (in other words, every row from the right side) inside the 3 garter stitches on both sides of the back piece; so you are decreasing 2 stitches each time you decrease and you do this 5 times. Happy knitting!
30.04.2018 - 09:51
![]() Monica ha scritto:
Monica ha scritto:
Chiedo scusa, essendo abituata a lavorare con ferri non circolari avevo dimenticato che invece questo modello li prevede e quindi i diagrammi indicano i ferri visti sempre dal diritto!
16.04.2017 - 19:10
![]() Monica ha scritto:
Monica ha scritto:
Buongiorno, vorrei cominciare questo modello è mi è venuto un dubbio: i diagrammi mostrano i ferri diritto e rovescio o solo i ferri a diritto? Grazie per la vostra risposta.
16.04.2017 - 18:49DROPS Design ha risposto:
Buongiorno Monica. I diagrammi mostrano tutti i ferri del motivo visti sul diritto del lavoro. Si lavora in tondo e quindi lavora sempre sul diritto. Buon lavoro!
16.04.2017 - 19:42
|
|||||||||||||||||||||||||
DROPS 107-8 |
|||||||||||||||||||||||||
|
|
|||||||||||||||||||||||||
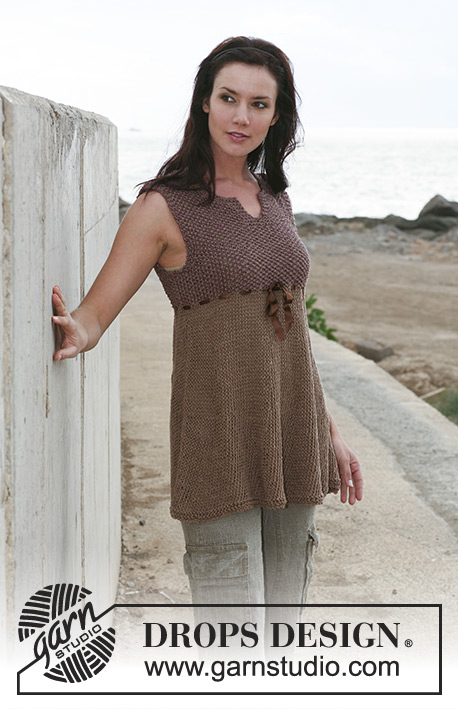
Top DROPS con motivo a pizzo in "Cotton Viscose". Taglie: dalla S alla XXXL
DROPS 107-8 |
|||||||||||||||||||||||||
|
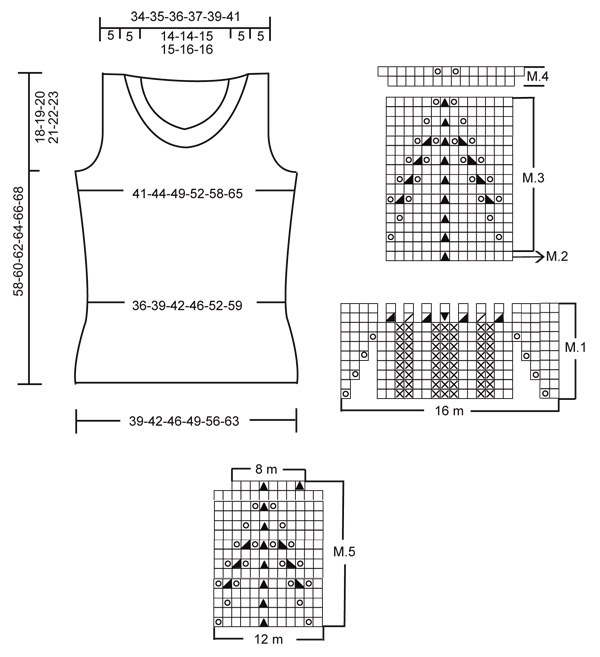
M. legaccio, avanti e indietro sui f.: lavorare tutti i f. a dir. M. legaccio, in tondo: 1 giro a dir., 1 giro a rov. Motivo: vedere i diagrammi M.1 - M.5. Nota! M.1 varierà da 16 a 23 m. Suggerimento per le diminuzioni (per lo scalfo): Diminuire all’interno delle 3 m. a m. legaccio. Fare tutte le diminuzioni dal diritto del lavoro! Diminuire come segue dopo le 3 m.: passare 1 m. a dir. senza lavorarla, 1 m. dir., accavallare la m. passata sopra quella appena lavorata. Diminuire come segue prima delle 3 m.: lavorare 2 m. insieme a dir. DAVANTI E DIETRO: lavorati in tondo con i ferri circolari. Avviare senza stringere 176-192-208-224-256-288 m. con i ferri circolari misura 3,5 mm. Lavorare 3 ripetizioni verticali di M.1 e poi 1 ripetizione verticale di M.2 (= 1 giro) = 154-168-182-196-224-252 m. Continuare con M.3 fino a quando il lavoro misura circa 30 cm – aggiustare a un’intera ripetizione, poi lavorare 1 ripetizione verticale di M.4 (= 2 giri) = 176-192-208-224-256-288 m. Inserire un segnapunti o un filo segnapunti a ogni lato (= 88-96-104-112-128-144 m. sul davanti e sul dietro). Continuare a m. rasata. Fare attenzione alla tensione del lavoro! Allo stesso tempo quando il lavoro misura 32-32-33-33-35-35 cm aumentare 1 m. da ogni lato di entrambi i segnapunti ogni 6 giri per un totale di 3-3-4-4-3-3 volte = 188-204-224-240-268-300 m. Quando il lavoro misura 39-40-41-42-43-44 cm lavorare 4 f. a m. legaccio su 12-14-16-18-20-22 m. da ogni lato (cioè 6-7-8-9-10-11 m. a entrambi i lati dei segnapunti), lavorare le m. rimaste a m. rasata come prima. Ora intrecciare 6-8-10-12-14-16 m. a ogni lato per lo scalfo e finire il davanti e il dietro in modo separato. DAVANTI: = 88-94-102-108-120-134 m. Continuare a m. rasata con 3 m. a m. legaccio da ogni lato. Allo stesso tempo diminuire per modellare lo scalfo da ogni lato ogni 2 ferri – leggere il suggerimento per le diminuzioni: 1 m. 5-7-10-11-15-20 volte. Continuare con 3 m. a m. legaccio da ogni lato verso lo scalfo. Allo stesso tempo quando il lavoro misura 41-42-43-44-45-46 cm trasferire le 20-20-22-22-24-24 m. centrali su un filo o un fermamaglie per il collo. Intrecciare per modellare la scollatura ogni 2 ferri: 3 m. 1 volta, 2 m. 4 volte e 1 m. 7 volte = 11-12-12-14-15-17 m. rimaste sulla spalla. Intrecciare quando il lavoro misura 58-60-62-64-66-68 cm. DIETRO: = 88-94-102-108-120-134 m. Diminuire per lo scalfo come descritto per il davanti = 78-80-82-86-90-94 m. Continuare con 3 m. a m. legaccio da ogni lato fino a quando il lavoro misura 53-55-57-59-61-63 cm. Ora intrecciare le 42-42-44-44-46-46 m. centrali per il collo e intrecciare per modellare la scollatura ogni 2 ferri: 2 m. 1 volta e 1 m. 5 volte = 11-12-12-14-15-17 m. rimaste sulla spalla. Intrecciare quando il lavoro misura 58-60-62-64-66-68 cm. CONFEZIONE: cucire i margini delle spalle. Scollatura: riprendere 168-168-168-180-180-180 m. attorno alla scollatura (comprese le m. sul fermamaglie sul davanti) con i ferri circolari misura 3,5 mm. Lavorare 1 giro a rov., poi lavorare M.5. Alla fine di M.5 ci sono 112-112-112-120-120-120 m. sul giro. Lavorare 1 giro a rov. e intrecciare. |
|||||||||||||||||||||||||
Spiegazioni del diagramma |
|||||||||||||||||||||||||
|
|||||||||||||||||||||||||
 |
|||||||||||||||||||||||||
Avete terminato questo modello?Allora taggate le vostre foto con #dropspattern o inviatele alla #dropsfan gallery. Avete bisogno di aiuto con questo modello?Troverete 22 video tutorial, una sezione per i commenti/domande e molto altro guardando il modello su www.garnstudio.com © 1982-2026 DROPS Design A/S. Ci riserviamo tutti i diritti. Questo documento, compreso tutte le sue sotto-sezioni, è protetto dalle leggi sul copyright. Potete leggere quello che potete fare con i nostri modelli alla fine di ogni modello sul nostro sito. |
|||||||||||||||||||||||||


Con oltre 40 anni di esperienza nel design di modelli di maglia e uncinetto, DROPS Design offre la più estesa collezione di modelli gratuiti su internet - tradotti in 17 lingue. Ad oggi vi possiamo fornire 324 cataloghi e 12290 modelli - 9561 dei quali sono tradotti in Italiano.
Ci stiamo impegnando molto per darvi il meglio che vi possiamo offrire in termini di maglia e uncinetto, ispirazioni e consigli così come filati di grande qualità ad un prezzo incredibile! Volete utilizzare i nostri modelli per qualcosa d'altro oltre al vostro uso personale? Potete leggere tutto ciò che è consentito nel testo sul Copyright in basso su tutte le pagine dei nostri modelli. Buon lavoro!
Lasciare un commento sul modello DROPS 107-8
Noi saremmo felici di ricevere i tuoi commenti e opinioni su questo modello!
Se vuoi fare una domanda, fai per favore attenzione a selezionare la categoria corretta nella casella qui sotto per velocizzare il processo di risposta. I campi richiesti sono indicati da *.