
Categorie popolari
State cercando un filato?


Commenti / Domande (42)
![]() Kelly Wright ha scritto:
Kelly Wright ha scritto:
This pattern calls for Drops Muskat Soft but it's discontinued. What yarn group was Drops Muskat Soft so I can choose an alternative. Thank you.
24.01.2025 - 14:51DROPS Design ha risposto:
Dear Kelly, DROPS Muskat Soft was a group B yarn; you can find more information about our discontinued yarns here, as well as some suggested substitutions: https://www.garnstudio.com/yarn-groups.php?d=1&cid=19. Happy knitting!
25.01.2025 - 19:27
![]() Heidrun Mühlberg-Krüger ha scritto:
Heidrun Mühlberg-Krüger ha scritto:
Ich möchte gern von Ihnen wissen ,wo ich die Drops Muskat soft Wolle multicolor kaufen kann. Da die Farbe Nr. 06 (blaulilamix) nicht mehr im Sortiment ist ,würde ich auch eine andere Farbe nehmen. Vielleicht können Sie mir weiter helfen. Danke und freundliche Grüße H. Mühlberg-Krüger
02.09.2020 - 17:03DROPS Design ha risposto:
Liebe Frau Mühlberg-Krüger, DROPS Muskat Soft is jetzt ausgelaufen, benutzen Sie unseren Garnumrechner um eine Alternative zu finden, gerne wird Ihnen auch Ihr DROPS Laden weiterhelfen, den richtigen Garn zu finden. Viel Spaß beim stricken!
03.09.2020 - 08:47
![]() Anne Berdal ha scritto:
Anne Berdal ha scritto:
Jag hittar inte garntypen. Bara Drops Muskat i en färg - inte som här i blålillamix.
24.02.2019 - 13:05DROPS Design ha risposto:
Hej Anne, Den färgen har tyvärr utgått, DROPS Muskat finns bara enfärgad. Lycka till :)
28.02.2019 - 14:04
![]() Monique ha scritto:
Monique ha scritto:
Geachte, er staat, neem voor de hals 52 steken op (kleinste maat) rondom de hals. Is dat ook langs de split of vanaf en tot en met de 5 op een draad gezette steken? Als dat met de split erbiij is heb ik veel meer dan 52 steken nodig. Met dank
17.03.2018 - 16:19DROPS Design ha risposto:
Hallo Monique, Deze 52 steken moet je inderdaad alleen opnemen langs de hals en over de bovenkant van de gehaakte steken van het split (dus niet langs de zijkanten van het split)
19.03.2018 - 07:52
![]() Monique ha scritto:
Monique ha scritto:
Beste, op een moment staat bij de mouw, kant daarna 2 steken af aan weerskanten tot een hoogte van 34 cm. Is dat elke naald of om de naald? Met dank.
12.03.2018 - 11:56DROPS Design ha risposto:
Hallo Monique, Dat is inderdaad op elke naald, steeds aan het begin van de naald 2 steken.
13.03.2018 - 16:21
![]() Diane Mueller ha scritto:
Diane Mueller ha scritto:
Thank you very much for the info and for answering so quickly! Am making this pullover for my 8 yr. old granddaughter who LOVES rainbow colors!
22.01.2016 - 18:13
![]() Diane Mueller ha scritto:
Diane Mueller ha scritto:
Love the pattern. My question has to do with the front neckline instructions: When the piece measures 15 3/4" put the 6 sts towards the mid front on a stitch holder. Then bind off 1 st for the neck on every row starting from neck a total of 2 times = 17 sts left for shoulder. Having trouble visualizing the stitch holder part. Shouldn't I just decrease 2 stitches at the neck edge and work till desired length and then bind off? Thank you
22.01.2016 - 17:27DROPS Design ha risposto:
Dear Mrs Mueller, work next row from neckline as follows: work the first 6 sts and slip them onto a st holder or a thread, work remaining sts on row, work return row. Dec 1 st at beg of next row from neckline and continue as stated. Afterwards you will slip sts from st holder /thread back onto needle and work the neckedge (see under assembly). Happy knitting!
22.01.2016 - 17:44
![]() Renate Hansen ha scritto:
Renate Hansen ha scritto:
Jeg ønsker en oppskrift på enkel glattstrikket genser med rageland og rund hals str 12 år jente. Jeg har forsøkt lenge å finne på nettsiden, men finner ikke :(( Mvh Renate
10.01.2016 - 20:41Kerry-Anne Tweddle ha scritto:
Good Day, I don't think you understood my previous question, what I was asking about the neck line has to do with the 4 rows of garter stitch that is mentioned after sewing the shoulders, I was asking if those garter rows must go all the way to the down the gap on the neckline or till the stitches that you have left on hooks, sorry I should have been more specific on the previous question.
08.07.2015 - 11:42DROPS Design ha risposto:
Dear Mrs Tweeddle, sorry for misunderstanding, the 4 rows in garter st are worked over the sts on the st holders each side on front pieces + along neckline on back piece, not along the vent mid front. You should hae approx. 52-70 sts including the sts from thread/st holder. Happy knitting!
08.07.2015 - 17:40Kerry-Anne Tweddle ha scritto:
Good Day, I am rather new to knitting and I just have a question about the neck line. It is the first time I am doing a neck line like this and I was wandering when you are assembling the jersey, do you only sew one side of the shoulders and then do the neck line or sew both shoulders. And you go all the way to the bottom of the opening or just until the stitches you have on the hooks?
07.07.2015 - 12:05DROPS Design ha risposto:
Dear Mrs Tweedle, in this pattern, you first sew both shoulders, then crochet the border beg at the bottom of vent on front piece then crochet up along the vent, then along neckline on back piece and down to the bottom of vent on the other side on front piece. Happy crocheting!
07.07.2015 - 16:38
|
|||||||||||||||||||
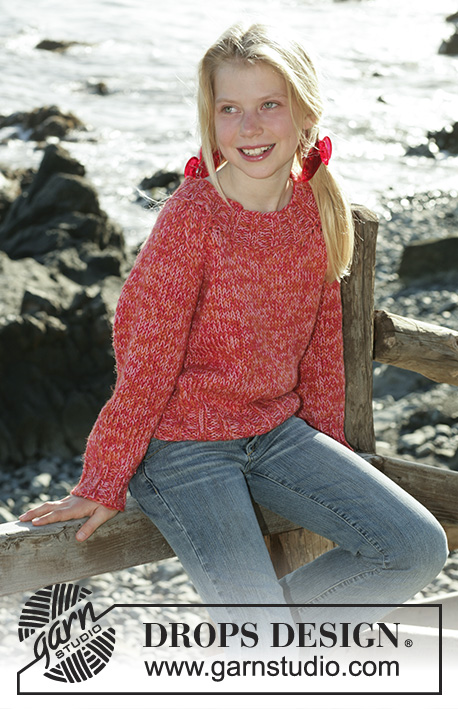
Addi's Sweater#addissweater |
|||||||||||||||||||
|
|
|||||||||||||||||||
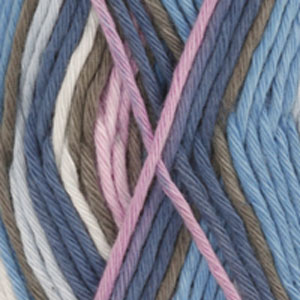
Maglione lavorato ai ferri in DROPS Muskat soft con un bordo all'uncinetto. Taglie: bambini da 5 a 14 anni.
DROPS Children 15-2 |
|||||||||||||||||||
|
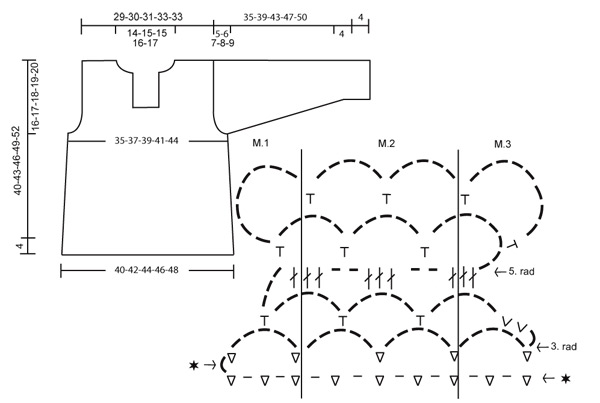
CAMPIONE: 21 m x 28 f con i f n° 4 mm a m rasata con Muskat soft = 10 x 10 cm. M LEGACCIO (avanti e indietro sui f): Lavorare tutti i f a dir. -------------------------------------------------------- DIETRO: Avviare 86-90-94-98-102 m (compresa 1 m di vivagno a ogni lato) con i f n° 4 mm con Muskat soft. Lavorare 2 f a m legaccio e continuare a m rasata. Quando il lavoro misura 4 cm intrecciare 1 m a ogni lato ogni 4-4,5-5-5,5-8 cm per un totale di 5-5-5-5-4 volte= 76-80-84-88-94 m. Quando il lavoro misura 24-26-28-30-32 cm intrecciare per gli scalfi a ogni lato a f alterni: 3 m 1 volta, 2 m 1-1-1-2-3 volte e 1 m 3-3-4-3-3 volte = 60-64-66-68-70 m. Quando il lavoro misura 38-41-44-47-50 cm intrecciare le 28-30-30-32-34 m centrali per il collo. Continuare a intrecciare 1 m verso il collo sul f successivo = 15-16-17-17-17 m rimaste per ogni spalla. Intrecciare quando il lavoro misura 40-43-46-49-52 cm. DAVANTI: Avviare e lavorare come per il dietro. Quando il lavoro misura 24-26-28-30-32 cm intrecciare per gli scalfi come fatto per il dietro e ALLO STESSO TEMPO quando il lavoro misura 27-29-31-33-35 cm intrecciare le 16-16-16-18-18 m centrali per lo spacco all'altezza del collo. Continuare a lavorare ogni lato in modo separato. Quando il lavoro misura 35-38-40-43-45 cm mettere le 5-6-6-6-7 m più esterne verso il centro davanti su un fermamaglie o filo di scarto. Intrecciare 1 m per il collo a f alterni 2 volte = 15-16-17-17-17 m rimaste per ogni spalla. Intrecciare quando il lavoro misura 40-43-46-49-52 cm. MANICA: Avviare 47-52-52-57-57 m (compresa 1 m di vivagno a ogni lato) con i f n° 4 mm con Muskat soft. Lavorare 2 f a m legaccio e continuare a m rasata, ALLO STESSO TEMPO quando il lavoro misura 4 cm aumentare 1 m a ogni lato ogni 3-3,5-3-4-3,5 cm per un totale di 9-8-10-9-10 volte = 65-68-72-75-77 m. Quando il lavoro misura 30-33-36-39-41 cm intrecciare per l'arrotondamento della manica a ogni lato a f alterni come segue: 3 m 1 volta, 2 m 3 volte, 1 m 0-1-2-3-5 volte. Poi intrecciare 2 m a ogni lato fino a quando il lavoro misura 34-38-42-46-49 cm e poi intrecciare 3 m 1 volta a ogni lato. Intrecciare le m rimaste quando il lavoro misura circa 35-39-43-47-50 cm. CONFEZIONE: Cucire i margini delle spalle. Riprendere circa 52-70 m (comprese le m sui fermamaglie) con i f n° 4 mm attorno al collo e lavorare 4 f a m legaccio. Intrecciare. Attaccare le maniche. Cucire le maniche e i margini dei lati all'interno della m di vivagno. BORDO ALL'UNCINETTO: Spacco del collo sul davanti: Iniziare in basso su un angolo dello spacco sul davanti usando l'uncinetto n° 3,5 mm. Lavorare *1 m.b, 1 cat* ripetere *-* in modo che ci sia un totale di 13-13-13-17-17 m.b (divisibile per 4 +1) su lungo un lato. Girare. Ora lavorare M.1 sulle prime 5 m e continuare a lavorare M.2 fino a quando rimangono 4 m.b e lavorare M.3 sulle ultime 4 m.b. Girare e continuare secondo il diagramma dalla 3° riga in poi. Misurare dopo la 6° riga = 4 cm. Ripetere dall'altro lato. Cucire il bordo ad uncinetto a piccoli punti al bordo inferiore dello spacco. BORDO ALL'UNCINETTO: Lavorare un bordo attorno alla parte inferiore della tunica e attorno al parte inferiore delle maniche come segue: 1° giro: 1 m.b nella 1° m *5 cat, saltare 3 m, 1 m.b nella m successiva*, ripetere *-* e finire con 1 m.bss nella 1° m.b sul giro. 2° giro: lavorare 3 m.bss in cima al 1° arco di cat dall'inizio del giro precedente, *5 cat, 1 m.b nell'arco di cat successivo dal giro precedente* ripetere *-* e finire con 1 m.bss in cima alla 1° cat dal giro precedente. 3° giro: 3 cat, *3 m.a nel 1° arco di cat dal giro precedente, 2 cat*, ripetere *-* e finire con 1 m.bss nella 3° cat dall'inizio del giro. 4° giro: *5 cat, 1 m.b nella 2° cat dal giro precedente*, ripetere *-* e finire con 1 m.bss nella 1° cat dall'inizio del giro. 5° giro: lavorare 3 m.bss in cima al 1° arco di cat del giro precedente, *5 cat, 1 m.b nel arco successivo dal giro precedente* ripetere *-* e finire con 1 m.bss in cima all'arco di cat dal giro precedente. Tagliare e affrancare il filo. Ora lavorare un bordo attorno ai bordi all'uncinetto sullo spacco e attorno al collo come segue: 1° giro: 1 m.b in cima all'angolo del bordo all'uncinetto al centro davanti *5 cat, saltare circa 1,5 cm, 1 m.b nella m successiva* ripetere *-* attorno al collo e sul bordo all'uncinetto dall'altro lato (assicurarsi di finire con 1 m.b nell'angolo più in alto). Girare. 2° giro: lavorare 3 m.bss in cima al 1° arco di cat all'inizio del giro precedente, *5 cat, 1 m.b nell'arco di cat successivo dal giro precedente* ripetere *-* e finire con 1 m.bss in cima al 1° arco dalla riga precedente. Tagliare e affrancare il filo. |
|||||||||||||||||||
Spiegazioni del diagramma |
|||||||||||||||||||
|
|||||||||||||||||||
 |
|||||||||||||||||||
Avete terminato questo modello?Allora taggate le vostre foto con #dropspattern #addissweater o inviatele alla #dropsfan gallery. Avete bisogno di aiuto con questo modello?Troverete 18 video tutorial, una sezione per i commenti/domande e molto altro guardando il modello su www.garnstudio.com © 1982-2026 DROPS Design A/S. Ci riserviamo tutti i diritti. Questo documento, compreso tutte le sue sotto-sezioni, è protetto dalle leggi sul copyright. Potete leggere quello che potete fare con i nostri modelli alla fine di ogni modello sul nostro sito. |
|||||||||||||||||||


Con oltre 40 anni di esperienza nel design di modelli di maglia e uncinetto, DROPS Design offre la più estesa collezione di modelli gratuiti su internet - tradotti in 17 lingue. Ad oggi vi possiamo fornire 324 cataloghi e 12290 modelli - 9561 dei quali sono tradotti in Italiano.
Ci stiamo impegnando molto per darvi il meglio che vi possiamo offrire in termini di maglia e uncinetto, ispirazioni e consigli così come filati di grande qualità ad un prezzo incredibile! Volete utilizzare i nostri modelli per qualcosa d'altro oltre al vostro uso personale? Potete leggere tutto ciò che è consentito nel testo sul Copyright in basso su tutte le pagine dei nostri modelli. Buon lavoro!
Lasciare un commento sul modello DROPS Children 15-2
Noi saremmo felici di ricevere i tuoi commenti e opinioni su questo modello!
Se vuoi fare una domanda, fai per favore attenzione a selezionare la categoria corretta nella casella qui sotto per velocizzare il processo di risposta. I campi richiesti sono indicati da *.