
Categorie popolari
State cercando un filato?


Commenti / Domande (486)
![]() Victoria Ashe ha scritto:
Victoria Ashe ha scritto:
Yes I understand the chain 4 is my first treble. So my last treble is supposed to be in the last St which is next to the first treble? That makes no sense
02.06.2020 - 19:29
![]() Victoria Ashe ha scritto:
Victoria Ashe ha scritto:
Ok so I'm working on my repeat rows (14-16) and it says 256 trs for round 14 (which I have) and for round 15 to *tr ch3 SK 2 * but that doesn't work out correctly. I've tried twice and end with 3 sts left instead of 2. I've even drawn up a diagram and I'm getting the same results. Im working on a sm
02.06.2020 - 16:56DROPS Design ha risposto:
Dear Mrs Ashe, you work 4 chains at the beg of the round to replace first treble, then repeat (3 ch, skip 2, 1 tr in next tr) x 85 = (you worked 3 sts x 85= 255 sts + the first st at the beg of round = 256 sts) and you get: 86 trebles. Happy crocheting!
02.06.2020 - 17:57
![]() Charlotte ha scritto:
Charlotte ha scritto:
Hvordan kan det lade sig gøre at i 8 omg at gå fra 144 dbl-st til 48? Jeg følger opskriften, men det giver mere end der står?
22.05.2020 - 10:44DROPS Design ha risposto:
Hej, da hopper du over 2 og hækler 3 lm imellem hver dbl-st. God fornøjelse!
27.05.2020 - 13:52
![]() Rebecca Beban ha scritto:
Rebecca Beban ha scritto:
Hi. Im up to 'Repeat rows 14, 15 and 16 with increase until circle measures 100cm'. Do I repeat the rows as written (do they include the increase) or if not how do I know where to increase and on which rows. Thanks
17.04.2020 - 10:53DROPS Design ha risposto:
Dear Mrs Beban, yes increases are included, when repeating these round as described, you will continue increasing the circle (just the number of stitches at the end of each row will be different every time you will work them just because you increased). Happy crocheting!
17.04.2020 - 11:27
![]() Claire Mckinnon ha scritto:
Claire Mckinnon ha scritto:
I am looking at the pictures posted with this pattern and the design is totally different to what the pattern is telling me to do..am I not actually making what I am seeing in your cover pic as this is what I wanted...the style...
11.04.2020 - 14:50DROPS Design ha risposto:
Dear Mrs McKinnon, can you please tell us where y ou are stuck? Also make sure you are reading correct pattern with the appropriate English terminology UK/US. Happy crocheting!
14.04.2020 - 14:36
![]() Claire Mckinnon ha scritto:
Claire Mckinnon ha scritto:
I am looking at the pictures posted with this pattern and the design is totally different to what the pattern is telling me to do..am I not actually making what I am seeing in your cover pic as this is what I wanted...the style...
11.04.2020 - 14:42
![]() Monika ha scritto:
Monika ha scritto:
Ich versteh das Abketten der Armlöcher nicht. Ich mach 3 Doppelstäbchen in eins. Dann mach ich 30 Luftmaschen. Wo mache ich dann das nächste Doppelstäbchen rein? Und s wiederhole ich 7 mal? Ich möchte doch nur ein Armloch..
08.04.2020 - 19:41DROPS Design ha risposto:
Liebe Monika, Sie überspringen jetzt (1 D-Stb, 3 Lm) 7 Mal für die Ärmel (diese Maschen werden durch die 30 Luftmaschen ersetzt), dann häkeln Sie 3 Stb in das nächste D-Stb vom 12. R, (2 Lm, 3 DStb in das nächste D-Stb) x 15 und jetzt das 2. Armloch häkeln: 30 Luftmaschen häkeln und (1 Dstb, 3 Lm) x 7 Mal überspringen, und Runde mit (2 Lm, 3 DStb in das nächste Stb) enden. Viel Spaß beim häkeln!
09.04.2020 - 17:24
![]() Cheryl Taylor ha scritto:
Cheryl Taylor ha scritto:
Rd 3, where does 1st stitch go? I ch 4 (= 1tr), ch 3, skip 1tr. Do I go into 3rd tr with a chain of 7? Rd 5, 6, 8, 9, 11, 12, 14, 15 , where do I place 1st stitch after ch 4 (tr)? Also, in bind off for XL, Do I ch 4 at the beginning of rd 15 and 16? Thank you.for all your help!
06.12.2019 - 01:20DROPS Design ha risposto:
Dear Mrs Taylor, not sure to really understand your meaning here sorry, start round 3 with 4 chains (= 1st tr), then crochet *3 chains (=1st ch-space) (= a total of 7 ch); then skip next tr, work 1 tr in next tr* and repeat from *-* (= you work in every other tr from round 2 = there are now 12 tr and 12 3-ch-spaces. See crochet info about beg/end of each round. On row 14 size XL, start with 4 chains, then crochet the 34 ch for 1st armhole. Happy crocheting!
06.12.2019 - 08:35
![]() Cheryl Taylor ha scritto:
Cheryl Taylor ha scritto:
I apologize for all the questions. Instructions say chain 4 to begin every rd (counts as tr). However, what do I do for Rd 3? It say 1tr, 3ch, skip 1 tr, etc. If I chain 4 for tr, I'll have 7 chains? What am I supposed to do for Rd 3? Thank you so much.
05.12.2019 - 01:00DROPS Design ha risposto:
Dear Mrs Taylor, on row 3, replace the first tr with 4 ch - as under crochet info and work: 4 chains (= 1st tr), and repeat now from *-* (so that you will have 7 chains, the first 4 are for the first tr and the next 3 are for the chain-space) and finish with 1 sl st in 4th chain from beg of the round. Happy crocheting!
05.12.2019 - 10:30
![]() Cheryl Taylor ha scritto:
Cheryl Taylor ha scritto:
On the rounds where it doesn't say to sl st, do I assume that I should sl st? I'm referring to rounds 5,8, 11, 12, 13, 14, 15 & 16. These instructions are very confusing.
02.12.2019 - 20:24DROPS Design ha risposto:
Dear Mrs Taylor, begin every round with 4 ch to replace first tr on the round and finish each round with a sl st in the 4th ch from beg of round - see Crochet Info at the beg of the pattern. Happy crocheting!
03.12.2019 - 10:25
|
|
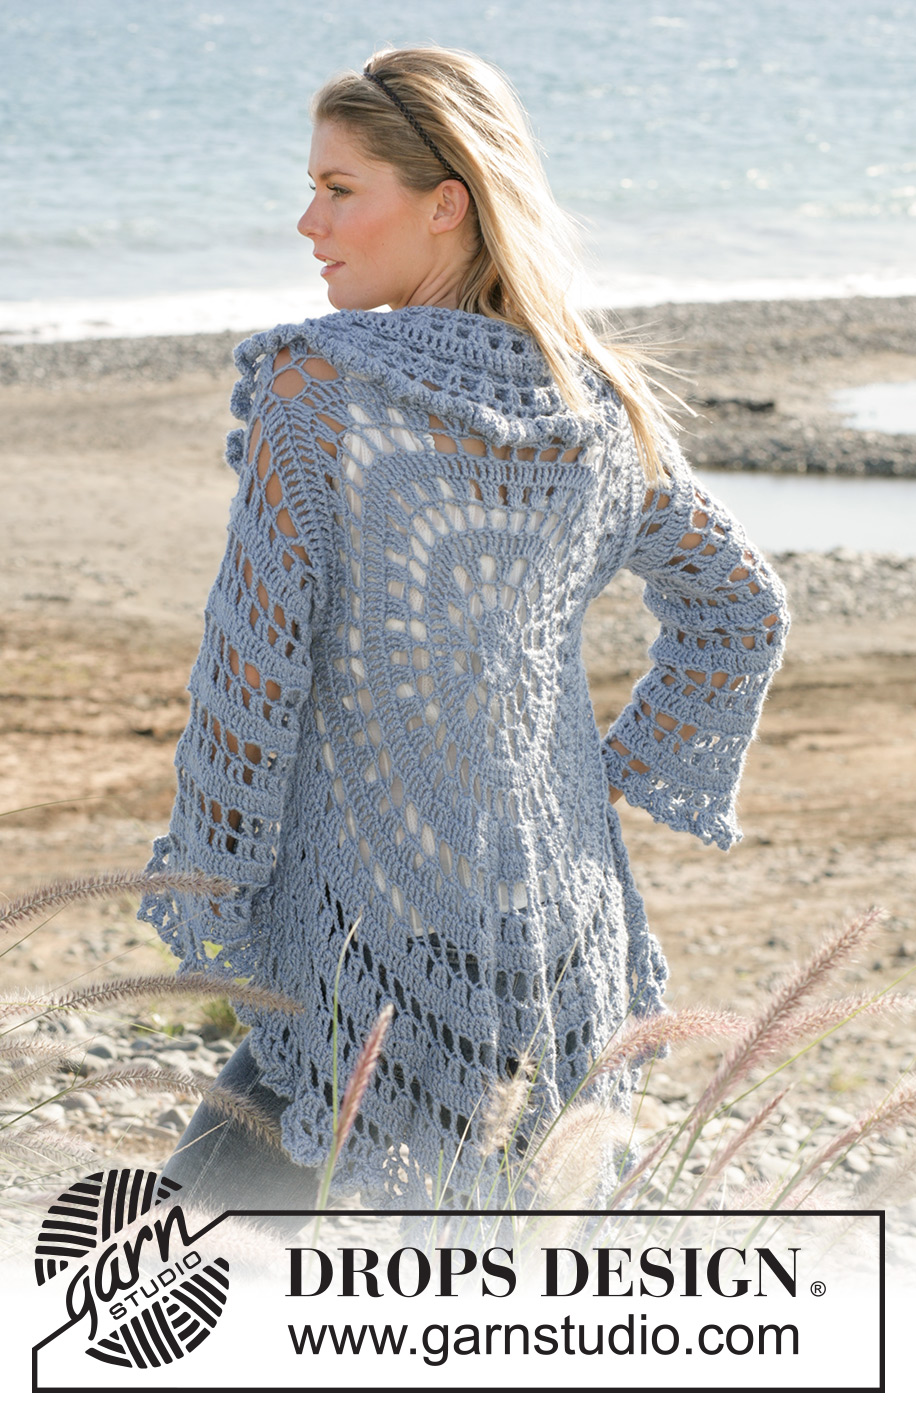
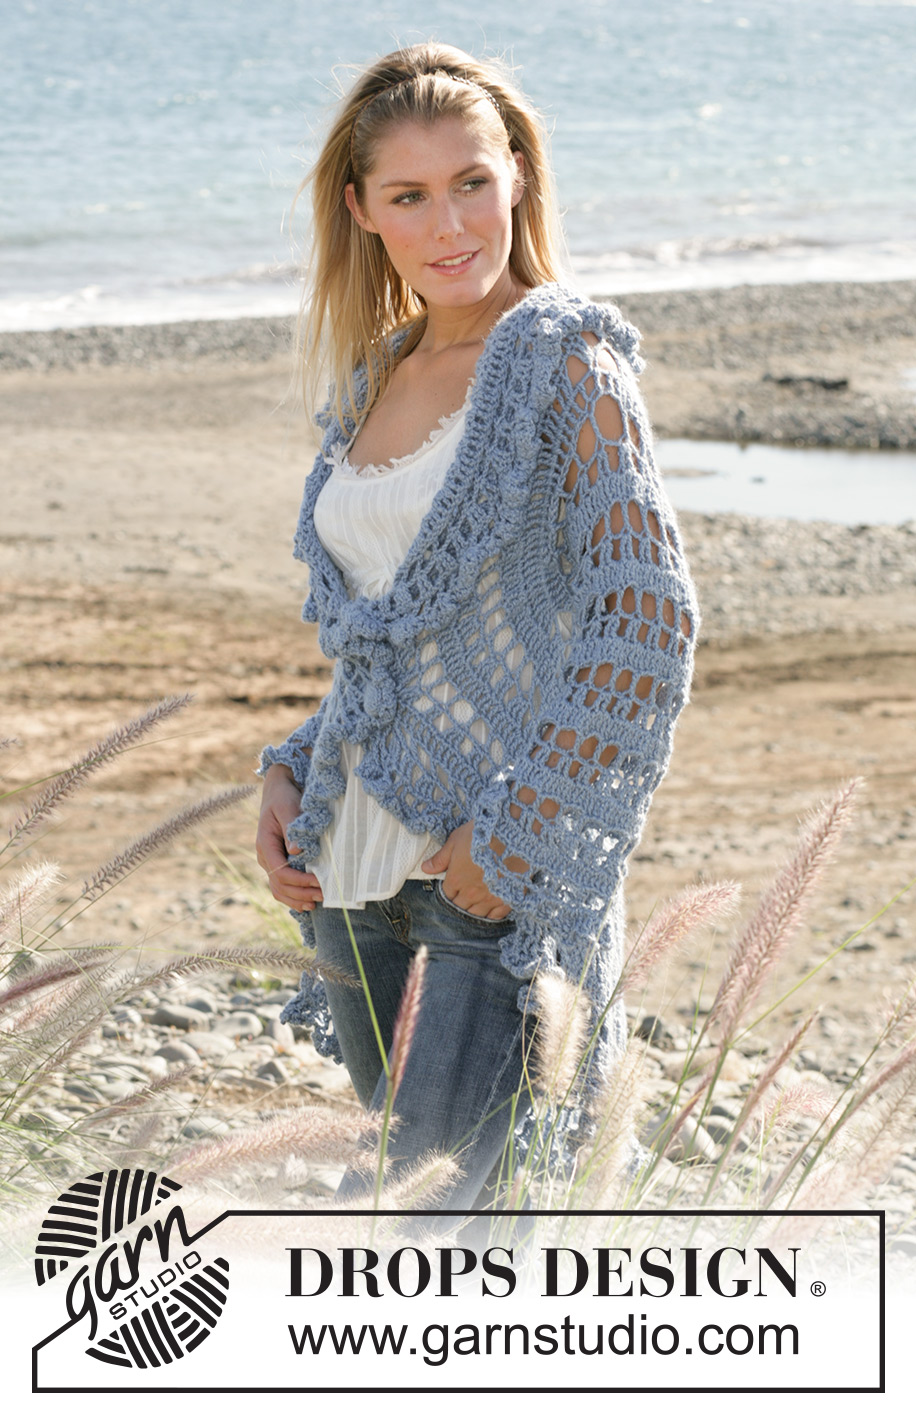
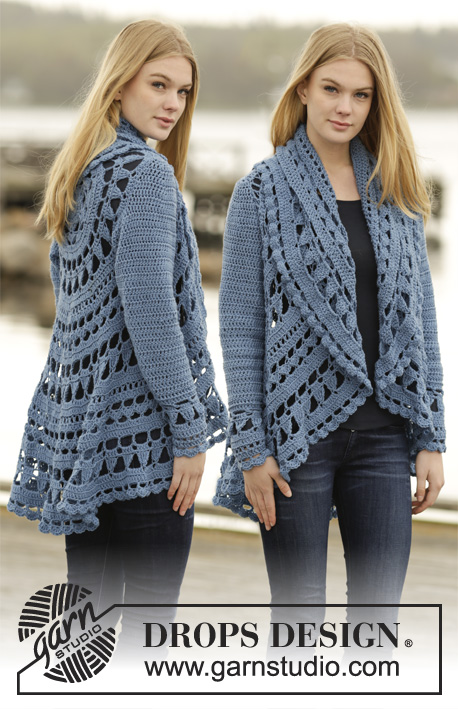
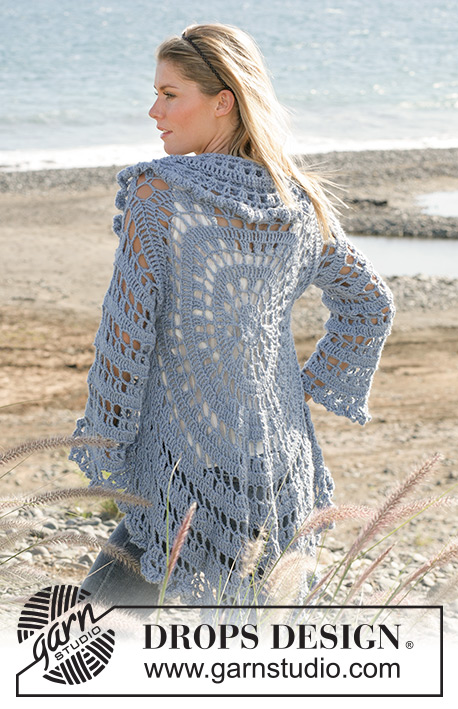
Moonlight Mist#moonlightmistjacket |
|
 |
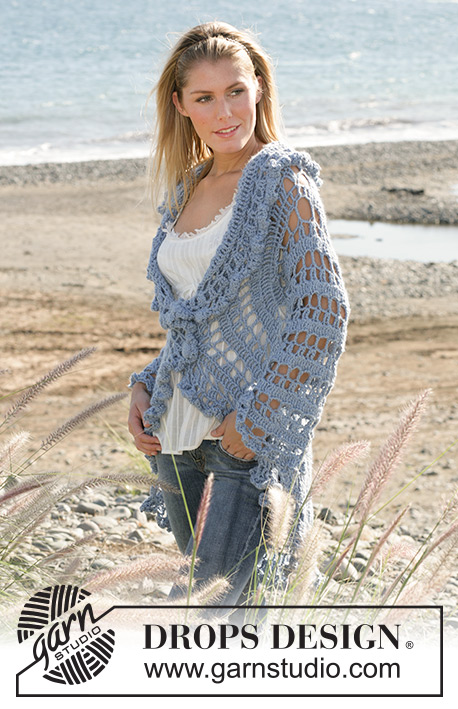 |
Giacca DROPS, lavorata in tondo, all’uncinetto, con 2 capi del filato "Alpaca". Taglie: Dalla S alla XL.
DROPS 99-3 |
|
|
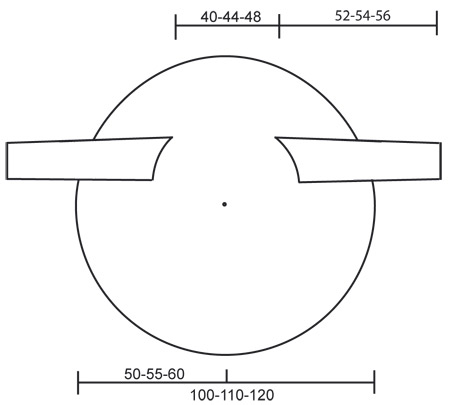
Lavorare la giacca in tondo, seguire le indicazioni per il cerchio. Iniziare gli scalfi in corrispondenza dei giri 12-13-14. Lavorare 2 giri seguendo le indicazioni per gli SCALFI, poi riprendere seguendo le indicazioni per il cerchio. CAMPIONE: 3 righe del cerchio con l’uncinetto n° 6 e 2 capi del filato Alpaca = 6,5 cm. Dopo il giro 5, il cerchio misura 20 cm di diametro. SUGGERIMENTO PER IL LAVORO: Sostituire la prima m.a.d di ogni giro con 4 cat. Finire ogni giro con 1 m.bss nella prima m del giro. SUGGERIMENTO PER PRENDERE LE MISURE: Per via del peso del filato, prendere tutte le misure con il capo appeso; in caso contrario le maniche saranno troppo lunghe quando si indosserà la giacca. ------------------------------------------------------- CERCHIO: Avviare 4 cat con 2 capi del filato Alpaca e formare un anello con 1 m.bss nella prima cat. Giro 1: Lavorare 8 m.b nell’anello. Giro 2: Vedere il SUGGERIMENTO PER IL LAVORO ! Lavorare 3 m.a.d in ogni m.b. Unire con 1 m.bss = 24 m.a.d. Giro 3: 1 m.a.d, *3 cat, saltare 1 m.a.d, 1 m.a.d nella m.a.d successiva*, ripetere da *-* su tutto il giro e finire con 3 cat e 1 m.bss nella prima m del giro = 12 m.a.d. Giro 4: 3 m.a.d nella prima m.a.d ,*3 cat, saltare 3 cat, 3 m.a.d nella m.a.d successiva *, ripetere da *-* e finire con 3 cat, saltare 1 m.a.d e 1 m.bss nella prima m del giro = 36 m.a.d. Giro 5: 1 m.a.d in ogni m.a.d e 3 m.a.d in ogni arco di cat = 72 m.a.d. Il cerchio misura ora ca.20 cm di diametro. Giro 6: 1 m.a.d nella prima m.a.d, *3 cat, saltare 1 m.a.d, 1 m.a.d nella m.a.d successiva *, ripetere da *-* e finire con 3 cat, saltare 1 m.a.d e finire con 1 m.bss nella prima m del giro = 36 m.a.d. Giro 7: 3 m.a.d nella prima m.a.d,* 2 cat, saltare 3 cat, 3 m.a.d nella m.a.d successiva *, ripetere da *-* e finire con 2 cat, saltare 3 cat e finire con 1 m.bss nella prima m del giro = 108 m.a.d. Giro 8: 1 m.a.d in ogni m.a.d e 1 m.a.d in ogni arco di cat = 144 m.a.d. Giro 9: 1 m.a.d nella prima m.a.d, *3 cat, saltare 2 m.a.d, 1 m.a.d nella m.a.d successiva *, ripetere da *-* e finire con 3 cat, saltare 2 m.a.d e 1 m.bss nella prima m del giro = 48 m.a.d Giro 10: 3 m.a.d nella prima m.a.d, *1 cat, 3 m.a.d nella m.a.d successiva *, ripetere da *-* e finire con 1 cat e 1 m.bss nella prima m del giro = 144 m.a.d. Giro 11: 1 m.a.d in ogni m.a.d e 1 m.a.d in ogni arco di cat = 192 m.a.d. Taglia S/M – per gli SCALFI, lavorare ora come indicato per i giri 12 e 13 nella sezione SCALFI riportata di seguito! Giro 12: *1 m.a.d, 3 cat, saltare 2 m.a.d *, ripetere da *-* fino alla fine del giro = 64 m.a.d. Taglia M/L – per gli SALFI, lavorare ora come indicato per i giri 13 e 14 nella sezione SCALFI riportata di seguito! Giro 13: 3 m.a.d nella prima m.a.d, *2 cat, 3 m.a.d nella m.a.d successiva *, ripetere da *-* su tutto il giro = 192 m.a.d. Taglia XL – per gli SCALFI lavorare ora come indicato per i giri 14 e 15 nella sezione SCALFI riportata di seguito! Giro 14: 1 m.a.d in ogni m.a.d, 1 m.a.d in ogni arco di cat = 256 m.a.d. Giro 15: 1 m.a.d nella prima m.a.d, *3 cat, saltare 2 m.a.d, 1 m.a.d nella m.a.d successiva *, ripetere da *-* fino alla fine del giro = 86 m.a.d. Giro 16: 3 m.a.d nella prima m.a.d, *2 cat, 2 m.a.d nella m.a.d successiva, 2 cat, 3 m.a.d nella m.a.d successiva *, ripetere da *-* su tutto il giro = 215 m.a.d. Ripetere i giri 14, 15 e 16 con gli aumenti, finché il cerchio non misura 100-110-120 cm di diametro. SCALFI: Taglia S/M: Lavorare per gli scalfi come indicato nel giro 12 qui di seguito: Giro 12: 1 m.a.d, 26 cat, saltare le 26 m.a.d successive, *1 m.a.d, 3 cat, saltare le 2 m.a.d successive *, ripetere da *-* per un totale di 14 volte, 1 m.a.d, 26 cat, saltare 26 m.a.d, *1 m.a.d, 3 cat, saltare 2 m.a.d *, ripetere da *-* fino alla fine del giro = 48 m.a.d. Giro 13: Lavorare come segue intorno alle 26 cat: * 3 m.a.d, 2 cat *, per un totale di 8 volte. Sulle m.a.d lavorare come segue: *3 m.a.d in ogni m.a.d, 2 cat *, ripetere da *-* = 192 m.a.d. Proseguire con il giro 14 come indicato sopra. Taglia M/L: Lavorare per gli scalfi come indicato nel giro 13 qui di seguito: Giro 13: 3 m.a.d nella prima m.a.d, 30 cat, saltare (1 m.a.d e 3 cat) per un totale di 7 volte, 3 m.a.d nella m.a.d successiva, *2 cat, 3 m.a.d nella m.a.d successiva *, ripetere da *-* per un totale di 15 volte, 30 cat, saltare (1 m.a.d e 3 cat) per un totale di 7 volte, *2 cat, 3 m.a.d nella m.a.d successiva *, ripetere da *-* fino alla fine del giro = 150 m.a.d. Giro 14: Lavorare 28 m.a.d sulle 30 cat; sulle m.a.d e nell’arco di cat lavorare come segue: 1 m.a.d in ogni m.a.d, 1 m.a.d in ogni arco di cat = 256 m.a.d. Proseguire con il giro 15 come indicato sopra. Taglia XL: Lavorare per gli scalfi come indicato nel giro 14 qui di seguito: Giro 14: 34 cat, saltare (3 m.a.d e 2 cat) per un totale di 8 volte, *1 m.a.d in ognuna delle 3 m.a.d successive, 1 m.a.d nell’ arco di cat successivo *, ripetere da *-* per un totale di 16 volte, 34 cat, saltare (3 m.a.d e 2 cat) per un totale di 8 volte *1 m.a.d in ognuna delle m.a.d successive, 1 m.a.d nell’ arco di cat successivo *, ripetere da *-* fino alla fine del giro = 192 m.a.d. Giro 15: Lavorare come segue intorno alle 34 cat: *1 m.a.d, 3 cat *, ripetere da *-* per un totale di 11 volte. Sulle m.a.d lavorare come segue: 1 m.a.d, *3 cat, saltare 2 m.a.d, 1 m.a.d nelle m.a.d successive *, ripetere da *-* e finire con 1 m.a.d nell’ ultima m.a.d = 86 m.a.d. Proseguire con il giro 16 come indicato sopra. MANICHE: Lavorare le maniche dagli scalfi verso i polsi, con 2 capi del filato Alpaca. Lavorare in tondo. Ricordarsi il SUGGERIMENTO PER IL LAVORO ! Giro 1: Lavorare 52-60-68 m.a.d intorno lo scalfo, e finire con 1 m.bss nella prima m.a.d dall’inizio del giro. Giro 2: 1 m.a.d nella prima m.a.d, *3 cat, saltare 3 m.a.d, 1 m.a.d nella m.a.d successiva *, ripetere da *-* e finire con 3 cat e 1 m.bss nella prima m.a.d = 13-15-17 m.a.d. Giro 3: 2 m.a.d nella prima m.a.d, *1 cat, saltare 3 cat, 2 m.a.d nella m.a.d successiva *, ripetere da *-* e finire con: 1 cat e 1 m.bss nella prima m del giro = 26-30-34 m.a.d. Giro 4: 1 m.a.d in ogni m.a.d e 2 m.a.d in ogni cat = 52-60-68 m.a.d. Ripetere i giri 2, 3 e 4 finché le maniche non misurano 52-54-56 cm dagli scalfi – vedere il suggerimento per prendere le misure. Tagliare e fermare i fili. BORDO: Lavorare un bordo tutto intorno al cerchio e nella parte inferiore delle maniche, con 2 capi del filato Alpaca, come segue: Giro 1: 1 m.a.d nella prima m.a.d, *2 cat, saltare 1,5 - 2 cm, 1 m.a.d nella m successiva *, ripetere da *-* e finire con 2 cat e 1 m.bss nella prima m.a.d. Giro 2: 2 m.a.d nella prima m.a.d, *4 cat, 2 m.a.d nella stessa m.a.d, 1 cat, 2 m.a.d nella m.a.d successiva *, finire con 4 cat, 2 m.a.d nella stessa m.a.d, 1 cat e 1 m.bss nella prima m.a.d. Tagliare e fermare il filo. RIVESTIMENTO PER I BOTTONI: Giro 1: Avviare 2 cat con 2 capi del filato Alpaca; lavorare 6 m.b nella prima delle 2 cat e unire con 1 m.bss nella prima m.b. Giro 2: 1 cat, 2 m.b in ogni m.b e finire con 1 m.bss all’inizio del giro (= 12 m.b) Giri 3 + 4: 1 cat, 1 m.b in ogni m.b e finire con 1 m.bss all’inizio del giro (= 12 m.b). Giro 5: 1 cat, * 1 m.b nella m successiva, saltare 1 m.b *, ripetere da *-* su tutto il giro e finire con 1 m.bss all’inizio del giro (= 6 m.b). Mettere il bottone all’interno del rivestimento, cucire intorno e stringere. Indossare la giacca e cucire i bottoni all’altezza della cintura, sul lato sinistro della giacca, sul penultimo giro del cerchio. Abbottonare attraverso gli archi sul davanti destro. |
|
 |
|
Avete terminato questo modello?Allora taggate le vostre foto con #dropspattern #moonlightmistjacket o inviatele alla #dropsfan gallery. Avete bisogno di aiuto con questo modello?Troverete 7 video tutorial, una sezione per i commenti/domande e molto altro guardando il modello su www.garnstudio.com © 1982-2026 DROPS Design A/S. Ci riserviamo tutti i diritti. Questo documento, compreso tutte le sue sotto-sezioni, è protetto dalle leggi sul copyright. Potete leggere quello che potete fare con i nostri modelli alla fine di ogni modello sul nostro sito. |
|


Con oltre 40 anni di esperienza nel design di modelli di maglia e uncinetto, DROPS Design offre la più estesa collezione di modelli gratuiti su internet - tradotti in 17 lingue. Ad oggi vi possiamo fornire 324 cataloghi e 12290 modelli - 9561 dei quali sono tradotti in Italiano.
Ci stiamo impegnando molto per darvi il meglio che vi possiamo offrire in termini di maglia e uncinetto, ispirazioni e consigli così come filati di grande qualità ad un prezzo incredibile! Volete utilizzare i nostri modelli per qualcosa d'altro oltre al vostro uso personale? Potete leggere tutto ciò che è consentito nel testo sul Copyright in basso su tutte le pagine dei nostri modelli. Buon lavoro!
Lasciare un commento sul modello DROPS 99-3
Noi saremmo felici di ricevere i tuoi commenti e opinioni su questo modello!
Se vuoi fare una domanda, fai per favore attenzione a selezionare la categoria corretta nella casella qui sotto per velocizzare il processo di risposta. I campi richiesti sono indicati da *.