
Categorie popolari
State cercando un filato?


Commenti / Domande (22)
![]() Isabel Robinson ha scritto:
Isabel Robinson ha scritto:
Hi I'm making a medium :)
28.11.2024 - 17:01DROPS Design ha risposto:
Hi Isabel, after increases you have 164 sts on needles (front 81 and back 82). Let’s take the front: 82-2 (1st decreases for neck)=80. Then decrease 1 st each side towards the neck on every other row 10 times and on every 4th row 6 times (10x2sts + 6x2sts =20+12=32). 80-32=48. 48-6 (3 sts both sides on the front)=42. And decreases for the armholes, both sides: 2x2 sts and 2x1 stitch = 8+4=12 (6 each side). 42-12=30. 30/2=15 sts for the shoulder. Happy knitting!
29.11.2024 - 09:29
![]() Isabel ha scritto:
Isabel ha scritto:
Hello, I am struggling with my decreasing and casting off for the neckline and underarm shaping, I have tried twice now and and not ending up with 15 stitches. I am decreasing once each side of the neck on every other row then decreasing 3 times each side on every 4th row is this correct? If not please let me know what is as I am very confused. Thank you.
27.11.2024 - 21:29DROPS Design ha risposto:
Hi Isabel, what size do you make?
28.11.2024 - 09:53
![]() Jane D Southard ha scritto:
Jane D Southard ha scritto:
Front Piece: Continue to dec. for neck shape At the same time continue to cast off for the armholes each side on every other row: 3 sts 0-0-0-1-1- times, 2 sts 1-2-3-3-5 times and 1 st 1-2-2-3-3 times... Question FOR THE SECOND SIZE do I skip the 3 stitches where it is marked 0? and go directly to the 2 stitches and then the 1 stitch decreases? OR do I DO the 3 stitches even though it reads 0 for my size? Thank you, Jane
17.07.2024 - 22:49DROPS Design ha risposto:
Hi June, exactly, for the second size you should skip the 3 stitches where it is marked 0 and go directly to the 2 stitches and then the 1 stitch decreases. Happy knitting!
18.07.2024 - 16:24
![]() Jane D Southard ha scritto:
Jane D Southard ha scritto:
So, the pattern should say, you will need to break the yarn and start your neck shaping in the middle of the front by casting off one stitch, then knit around to the other side, and case off one stitch on that side, and then, purl back and repeat. Is that correct?! Thank you, Jane
15.07.2024 - 20:50DROPS Design ha risposto:
Hi Jane, you are absolutely right :)
15.07.2024 - 21:01
![]() Jane D Southard ha scritto:
Jane D Southard ha scritto:
If I want a K2tog on the right hand side of the work, on the left front of the v neck, what stitch do I use on the right front of the work, when I get around to the other side, when I am still on the right hand side of the work... I will then purl back and repeat... is that correct? but I will always be off one row, because I make a u-turn at the neck... to start the bind shaping bind-offs... Oi!
15.07.2024 - 20:09DROPS Design ha risposto:
Dear Jane, you decrease 1 stitch on each side on the right side of the piece. You are working back and forth, so you decrease at the beginning (for the right side of the neck) and the end (for the left side of the neck). Then you purl back without decreases. Continue decreasing on every right side row as stated for your size and then decrease every 2nd right side row (so one right side row without decreases and one right side row with decreases). Happy knitting!
16.07.2024 - 20:20
![]() Jane D Southard ha scritto:
Jane D Southard ha scritto:
HOW do you work both sides of the neckline without CUTTING the yarn?
15.07.2024 - 20:06DROPS Design ha risposto:
Hi June, when 2 fronts are worked separately, you have to cut the yarn to finish second front part. Happy knitting!
15.07.2024 - 20:43
![]() Jane D Southard ha scritto:
Jane D Southard ha scritto:
How do you reduce every other row at the neckline, if you are knitting back and forth?! What reduction do you recommend? SSK on one side and K2tog on the other? All done on the RIGHT SIDE I guess??? Thank you,
15.07.2024 - 17:38DROPS Design ha risposto:
Hi Jane, we propose SSK on one side and K2tog on the other side. The decreases are worked on the right side inside your edge stitch. Happy knitting!
15.07.2024 - 17:48
![]() Jane D Southard ha scritto:
Jane D Southard ha scritto:
I am not understanding the directions "When the piece measures 28 cm cast off 1 st each side of the MT at the mid front = 162 Which stitches is this? On either side of the one on the marker?! Help. Thank you, Jane
12.07.2024 - 20:46DROPS Design ha risposto:
Dear Jane, when the piece measures 28 cm we need to start shaping the V-neck, so we have to cast off 1 st before a 1 st after the marker or MT which sits between sts at the mid front. Happy knitting!
13.07.2024 - 21:40
![]() Debra ha scritto:
Debra ha scritto:
Is the v-neck rib 15cm correct. It doesn’t look that wide to me.
27.05.2024 - 09:44DROPS Design ha risposto:
Dear Debra, the ribbing at the bottom is 15 cm, the ribbing at the neck is only 5 cm wide, see the sentence before the last one at the instructions. Happy Knitting!
27.05.2024 - 12:05
![]() Lena Grönvall ha scritto:
Lena Grönvall ha scritto:
Ska rundstickan vara 60 eller 80 cm lång?
23.03.2024 - 15:07DROPS Design ha risposto:
Hej Lena, det bestemmer du selv, du kan bruge både og :)
03.04.2024 - 14:38
|
|
Swansboro#swansborosweater |
|
|
|
|
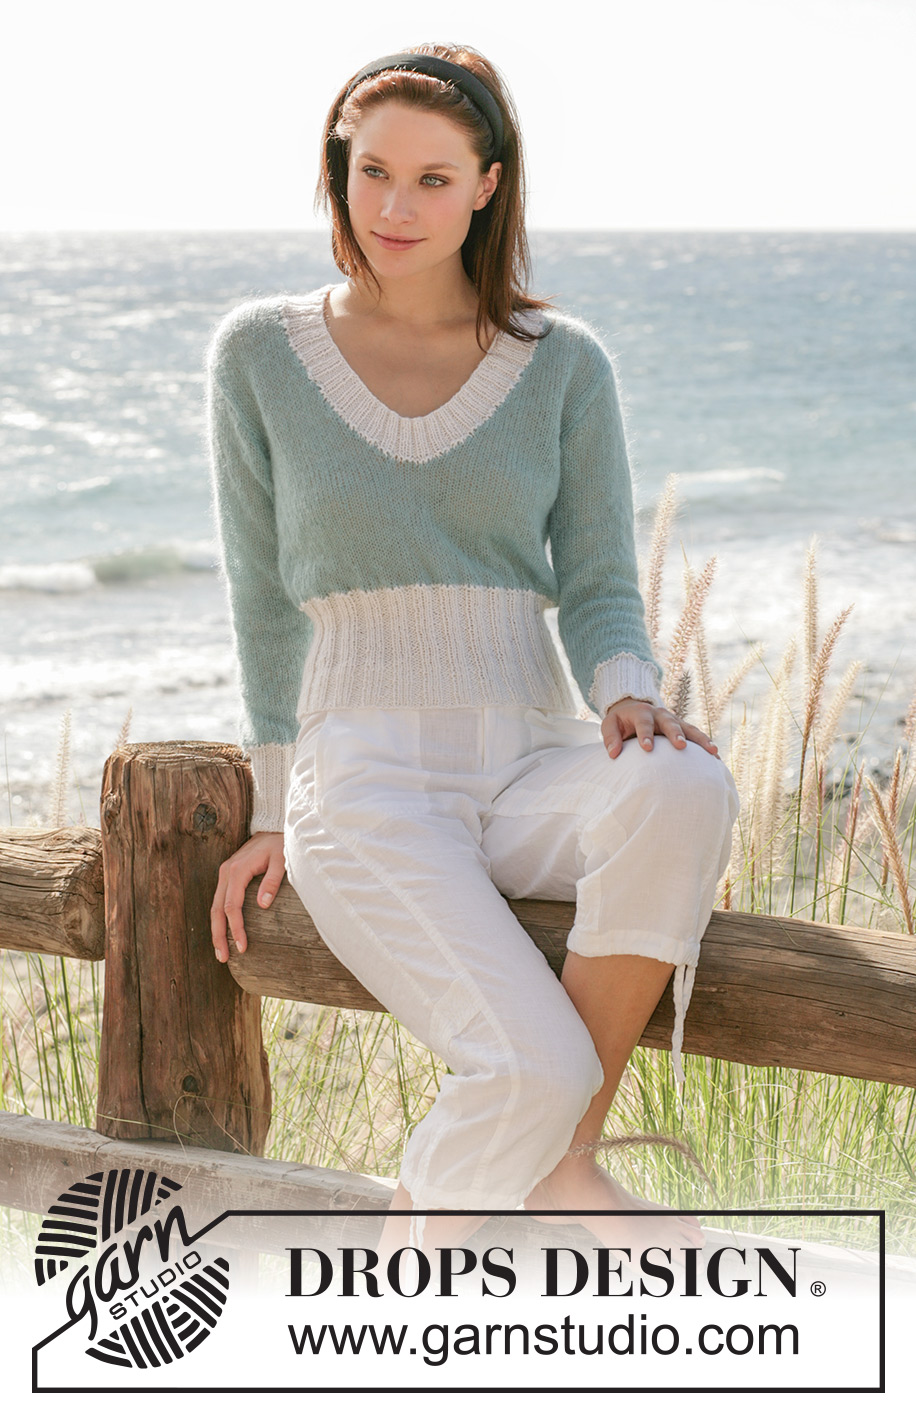
Maglione DROPS lavorato ai ferri a maglia rasata in “Vivaldi” e a coste con “Alpaca”.
DROPS 100-21 |
|
|
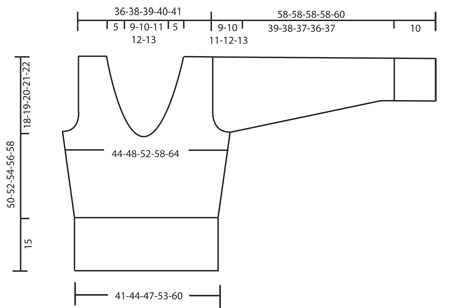
CAMPIONE: 17 maglie x 24 ferri con i ferri n° 5 mm a maglia rasata con 1 capo di Vivaldi = 10 x 10 cm. COSTE-1: * 3 maglie diritto, 3 maglie rovescio *, ripetere *-*. COSTE-2: * 2 maglie diritto, 2 maglie rovescio *, ripetere *-* CORPO: Lavorare in tondo con i ferri circolari. Avviare 156-168-180-204-228 maglie con i ferri circolari n° 4 mm con 2 capi di Alpaca. Lavorare a COSTE-1 – leggere la spiegazione sopra – fino a quando il lavoro misura 15 cm. Lavorare 1 giro a maglia rasata e allo stesso tempo diminuire 20-20-20-24-28 maglie in modo uniforme sul giro = 136-148-160-180-200 maglie. Inserire 3 segnapunti nel lavoro: 1 segnapunti all’inizio del giro (= centro del primo lato), 1 segnapunti dopo 34-37-40-45-50 maglie (= al centro davanti) e 1 segnapunti dopo 68-74-80-90-100 maglie (= il centro del 2° lato). Lavorare 1 giro rovescio. Passare a 1 capo di Vivaldi e lavorare 1 giro a maglia rasata. Passare ai ferri circolari n° 5 mm e continuare a maglia rasata. ALLO STESSO TEMPO quando il lavoro misura 18 cm aumentare 1 maglia a ogni lato del segnapunti ai lati ogni 4-3-3-3,5-3,5 cm per un totale di 3-4-4-4-4 volte = 148-164-176-196-216 maglie. Quando il lavoro misura 28-28-28-30-30 cm, intrecciare 1 maglia a ogni lato del segnapunti al centro davanti = 146-162-174-194-214 maglie. Continuare a lavorare in piano dal centro davanti. Diminuire 1 maglia a ogni lato verso il collo a ferri alterni 10-10-11-12-12 volte e ogni 4 ferri 5-6-6-6-6 volte. ALLO STESSO TEMPO quando il lavoro misura 32-33-34-35-36 cm intrecciare 3 maglie a ogni lato del segnapunti ai lati. Continuare a lavorare il davanti e il dietro in modo separato. DAVANTI: Continuare a diminuire per modellare il collo. ALLO STESSO TEMPO continuare ad intrecciare per gli scalfi a ogni lato a ferri alterni: 3 maglie 0-0-0-1-1 volte, 2 maglie 1-2-3-3-5 volte e 1 maglia 1-2-2-3-3 volte. Alla fine di tutte le chiusure per gli scalfi e le diminuzioni per il collo rimangono 15-15-15-15-16 maglie per ogni spalla. Lavorare fino a quando il lavoro misura 50-52-54-56-58 cm. Intrecciare senza stringere. DIETRO: Intrecciare per gli scalfi a ogni lato come fatto per il davanti = 62-64-66-68-70 maglie. Quando il lavoro misura 47-49-51-53-55 cm, intrecciare le 30-32-34-36-36 maglie centrali. Continuare ad intrecciare 1 maglia a ogni lato verso il collo =15-15-15-15-16 maglie rimaste per ogni spalla. Lavorare fino a quando il lavoro misura 50-52-54-56-58 cm. Intrecciare senza stringere. MANICA: Lavorare in tondo. Avviare 42-48-48-54-54 maglie con i ferri a doppia punta n° 4 mm con 2 capi di Alpaca. Lavorare a COSTE-1 – leggere la spiegazione sopra – fino a quando il lavoro misura 10 cm. Lavorare 1 giro a maglia rasata e ALLO STESSO TEMPO diminuire 4-8-8-10-10 maglie in modo uniforme = 38-40-40-44-44 maglie. Inserire un segnapunti all’inizio del giro = centro sotto la manica. Lavorare 1 giro rovescio. Passare a 1 capo di Vivaldi e lavorare 1 giro a maglia rasata. Passare ai ferri a doppia punta n° 5 mm e continuare a maglia rasata. ALLO STESSO TEMPO quando il lavoro misura 12 cm aumentare 1 maglia a ogni lato del segnapunti sotto la manica ogni 5-4-3-3-2,5 cm per un totale di 8-9-11-11-14 volte = 54-58-62-66-72 maglie. Quando il lavoro misura 49-48-47-46-47 cm intrecciare 3 maglie a ogni lato del segnapunti. Continuare a lavorare in piano. Poi intrecciare per l’arrotondamento della manica a ogni lato a ferri alterni 2 maglie 2-2-2-2-3 volte e 1 maglia 4-5-6-8-8 volte. Continuare a intrecciare 2 maglia a ogni lato fino a quando il lavoro misura 57-57-57-57-59 cm. Poi intrecciare 3 maglie a ogni lato. Intrecciare le maglie rimaste quando il lavoro misura circa 58-58-58-58-60 cm. CONFEZIONE: Cucire i margini delle spalle. Attaccare le maniche. COLLO: Riprendere 144 - 172 maglie attorno al collo con i ferri a doppia punta n° 4 mm con 1 capo di Vivaldi. Passare a 2 capi di Alpaca. Lavorare 1 giro a maglia rasata e allo stesso tempo aggiustare il numero di maglie a 124 – 152 maglie (divisibile per 4). Lavorare 1 giro rovescio. Continuare con le COSTE-2 – leggere la spiegazione sopra – fino a quando il bordo del collo misura circa 5 cm. Intrecciare senza stringere con diritto su diritto e rovescio su rovescio. |
|
 |
|
Avete terminato questo modello?Allora taggate le vostre foto con #dropspattern #swansborosweater o inviatele alla #dropsfan gallery. Avete bisogno di aiuto con questo modello?Troverete 20 video tutorial, una sezione per i commenti/domande e molto altro guardando il modello su www.garnstudio.com © 1982-2026 DROPS Design A/S. Ci riserviamo tutti i diritti. Questo documento, compreso tutte le sue sotto-sezioni, è protetto dalle leggi sul copyright. Potete leggere quello che potete fare con i nostri modelli alla fine di ogni modello sul nostro sito. |


Con oltre 40 anni di esperienza nel design di modelli di maglia e uncinetto, DROPS Design offre la più estesa collezione di modelli gratuiti su internet - tradotti in 17 lingue. Ad oggi vi possiamo fornire 324 cataloghi e 12290 modelli - 9561 dei quali sono tradotti in Italiano.
Ci stiamo impegnando molto per darvi il meglio che vi possiamo offrire in termini di maglia e uncinetto, ispirazioni e consigli così come filati di grande qualità ad un prezzo incredibile! Volete utilizzare i nostri modelli per qualcosa d'altro oltre al vostro uso personale? Potete leggere tutto ciò che è consentito nel testo sul Copyright in basso su tutte le pagine dei nostri modelli. Buon lavoro!
Lasciare un commento sul modello DROPS 100-21
Noi saremmo felici di ricevere i tuoi commenti e opinioni su questo modello!
Se vuoi fare una domanda, fai per favore attenzione a selezionare la categoria corretta nella casella qui sotto per velocizzare il processo di risposta. I campi richiesti sono indicati da *.