
Categorie popolari
State cercando un filato?


Commenti / Domande (139)
![]() Cinzia Pantaloni ha scritto:
Cinzia Pantaloni ha scritto:
Salve. Riprendendo 138 maglie per il collo non mi tornano i conti: come faccio ad avere 1 gettato e una m. passata a destra e sinistra delle cuciture)? Per ottenere questo dovrei trovarmi con due maglie a destra della cucitura dopo 2 rovesci e ripetere 1 gettato e 1 maglia passata a sinistra della stessa, ma questo non avviene. Come mai? grazie
07.10.2014 - 13:15DROPS Design ha risposto:
Buongiorno, abbiamo riguardato le spiegazioni e non era del tutto chiaro. Ora sono modificate. Bisogna trovarsi con 1 gettato + 1 m passata a dir senza lavorarla ad ogni lato vicino alla cucitura, NON ad ogni lato della cucitura.
17.10.2014 - 15:18Marlen Lopez ha scritto:
Hola no entiendo como se teje todo alrededor del bolero me podrian explicar paso a paso como tejerlo me encanta y quisiera hacerlo muchas gracias
22.07.2014 - 17:13DROPS Design ha risposto:
Hola Marlen. En primer lugar para tus siguientes preguntas marca , por favor , la casilla "question". La cenefa ancha del bolero se trabaja después de hacer la costura bajo la sisa. Se recogen los pts alrededor del borde y se trabaja en pt inglés, pero en la costura bajo la manga se trabaja una heb (lazada) + desl un pt al derecho a cada lado de la costura para que queda mas bonita.
27.07.2014 - 09:53
![]() Valeria Di Stasio ha scritto:
Valeria Di Stasio ha scritto:
Quando il lavoro misura 4, 8 e 12 cm, aumentare 1 m rov ad ogni lato i(???) 1 gettato e 1 m passata (non lavorata) ad... ogni lato
26.10.2013 - 21:57DROPS Design ha risposto:
Buongiorno Valeria, abbiamo corretto le spiegazioni: provi a vedere se ora è più chiaro. Ci riscriva se ha altri dubbi. Buon lavoro!
27.10.2013 - 16:06
![]() Christina ha scritto:
Christina ha scritto:
Wenn man die Maschen wieder neu anschlagen muss, wird 1 Seite komischerweise immer so das Sie nach dem abstricken über 2 Reihen glatt rechts erscheint. Die andere ist kraus rechts. Gibt es da einen Trick bzw. was mache ich falsch? Danke für die Hilfe.
18.10.2013 - 21:27DROPS Design ha risposto:
Liebe Christina, das kommt daher, dass einmal auf der Vorderseite und einmal auf der Rückseite die neuen Maschen angeschlagen werden. Die Reihen sind die Fortsetzung des normalen Krausrippenmusters, das fällt nachher nicht mehr auf.
21.10.2013 - 08:35
![]() Marina ha scritto:
Marina ha scritto:
Heel mooi vestje! Ook mooi met een rand van roze en aubergine (30 en 10).
20.05.2013 - 08:12
![]() Jasmin Landgraf ha scritto:
Jasmin Landgraf ha scritto:
Ich habe Probleme mit dem Muster am Kragen...wie kommt den in der ersten Reihe nach dem Aufnehmen der Umschlag zu stande? man hat ja nur die Maschen ohne Umschlag-also auch nichts zum zusammenstricken?!?
16.04.2013 - 21:15DROPS Design ha risposto:
Liebe Jasmin, schauen Sie die Legende zum Muster M1 an: in jeder ungeraden Rd werden Umschläge gemacht.
17.04.2013 - 07:59
![]() Mitra Marzi ha scritto:
Mitra Marzi ha scritto:
Hallo, langsam werdeh ich feruckt,was ich gestrickt habe siht nicht wie diagram aus wo ist halss von welche kante muß ich weiter stricken auf bild sieht anders aus
09.04.2013 - 21:35DROPS Design ha risposto:
Liebe Mitra, wenn Sie genau der Anleitung folgen erhalten Sie exakt die Form des Boleros. Wenn Sie mit der Umsetzung der Anleitung Probleme haben, wenden Sie sich bitte an den Laden oder Onlinehsop, in dem Sie unsere Wolle gekauft haben.
10.04.2013 - 08:36
![]() Mitra Marzi ha scritto:
Mitra Marzi ha scritto:
Hallo, ich komme nicht zu recht mit einleitung muß ich vor und rückenteil getrent stricken leider einleitung ist nicht deutlich,auf digram zeigt beide seite geleich aussiht aber einleitung ist anderes bitte erkleren sie deutlich danke
03.04.2013 - 14:03DROPS Design ha risposto:
Hallo Mitra, es wird nur 1 Teil gestrickt und Kante A gegen Kante B genäht (siehe Diagramm). Dann wird die Kante angestrickt.
06.04.2013 - 19:08
![]() Rochelle ha scritto:
Rochelle ha scritto:
I am having a problem with the diagram. After picking up stitches , the yo and knit stitch is not coming out correctly. Do you have a video for this?
10.03.2013 - 22:21DROPS Design ha risposto:
Dear Rochelle, you may adjust your sts so that the yo+K st comes out at the right place. Happy knitting!
13.03.2013 - 08:55Evi Chatzichronoglou ha scritto:
Hello! I want to ask you what do you mean when you say "inc 1 P stitch each side of "the yo + slip a st as if to knit" in each side ". What side do you mean? Where do I have to make the increases?
11.02.2013 - 22:15
|
||||||||||
DROPS 98-47 |
||||||||||
|
|
||||||||||
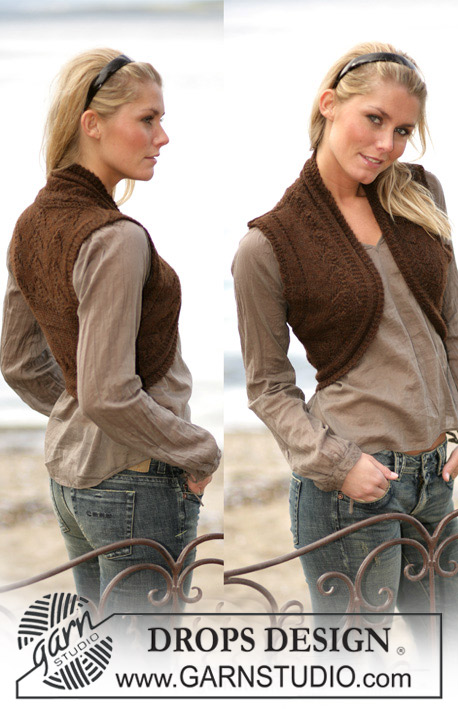
Coprispalle lavorato ai ferri con una variante delle false coste inglesi in DROPS Snow. Taglie: S-XXL
DROPS 98-47 |
||||||||||
|
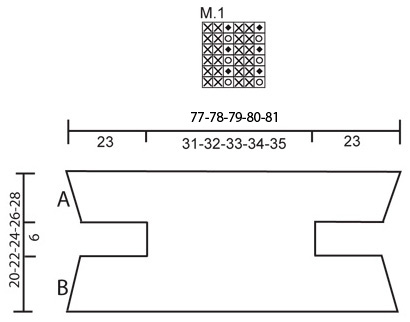
Punto legaccio (avanti e indietro sul f): Lavorare tutti i ferri a diritto. Motivo: Vedere il diag. M.1. DAVANTI&DIETRO: Avviare 70-71-72-73-74 m con il f 10 ed il filo Snow. Lavorare a punto legaccio, allo stesso tempo, ogni 2 ferri, diminuire 1 m ad ogni lato in totale 4 volte = 62-63-64-65-66 m. Quando il lavoro misura 7-8-9-10-11 cm, intrecciare 17 m senza stringere ad ogni lato = 28-29-30-31-32 m. Lavorare finché il lavoro non misuri 13-14-15-16-17 cm e avviare senza stringere 17 nuove m ad ogni lato. Lavorare a punto legaccio finché il lavoro non misuri 15-17-19-21-23 cm. Aumentare poi 1 m ad ogni lato ogni 2 ferri in totale 4 volte = 70-71-72-73-74 m. Intrecciare quando il lavoro misura 20-22-24-26-28 cm. CONFEZIONE: Cucire A insieme a B ad entrambi i lati con punti invisibili. Vedere il diagramma. BORDO: Si lavora in tondo. Riprendere 138-144-150-156-162 m intorno a tutto il bolero con il ferro circolare 10. Lavorare M.1. Assicurarsi di fare 1 gettato + 1 m passata a dir senza lavorarla ad ogni lato vicino alla cucitura. Quando il lavoro misura 4, 8 e 12 cm, aumentare 1 m rov ad ogni lato del "gettato + m passata (non lavorata) ad ogni lato" = 150-156-162-168-174 m. Intrecciare senza stringere quando il bordo misura 14 cm. |
||||||||||
Spiegazioni del diagramma |
||||||||||
|
||||||||||
 |
||||||||||
Avete terminato questo modello?Allora taggate le vostre foto con #dropspattern o inviatele alla #dropsfan gallery. Avete bisogno di aiuto con questo modello?Troverete 13 video tutorial, una sezione per i commenti/domande e molto altro guardando il modello su www.garnstudio.com © 1982-2026 DROPS Design A/S. Ci riserviamo tutti i diritti. Questo documento, compreso tutte le sue sotto-sezioni, è protetto dalle leggi sul copyright. Potete leggere quello che potete fare con i nostri modelli alla fine di ogni modello sul nostro sito. |
||||||||||


Con oltre 40 anni di esperienza nel design di modelli di maglia e uncinetto, DROPS Design offre la più estesa collezione di modelli gratuiti su internet - tradotti in 17 lingue. Ad oggi vi possiamo fornire 324 cataloghi e 12290 modelli - 9561 dei quali sono tradotti in Italiano.
Ci stiamo impegnando molto per darvi il meglio che vi possiamo offrire in termini di maglia e uncinetto, ispirazioni e consigli così come filati di grande qualità ad un prezzo incredibile! Volete utilizzare i nostri modelli per qualcosa d'altro oltre al vostro uso personale? Potete leggere tutto ciò che è consentito nel testo sul Copyright in basso su tutte le pagine dei nostri modelli. Buon lavoro!
Lasciare un commento sul modello DROPS 98-47
Noi saremmo felici di ricevere i tuoi commenti e opinioni su questo modello!
Se vuoi fare una domanda, fai per favore attenzione a selezionare la categoria corretta nella casella qui sotto per velocizzare il processo di risposta. I campi richiesti sono indicati da *.