
Categorie popolari
State cercando un filato?


Commenti / Domande (103)
![]() Claudine ha scritto:
Claudine ha scritto:
Bonjour Si J'ai bien compris les explications du col, 1, je relève des m sur l'encolure, je tricote 14 cm et je rabats 2, je relève à nouveau sur la même encolure des m que je tricote en jersey pendant 3cm, et je rabats Les 3 cms vont rouler sur eux mêmes alors ?
26.10.2018 - 16:57DROPS Design ha risposto:
Bonjour Claudine, c'est tout à fait ainsi que l'on tricote les 2 bordures d'encolure. Bon tricot!
29.10.2018 - 07:31
![]() Chantal B ha scritto:
Chantal B ha scritto:
Bonjour je suis à rabattre les mailles pour les emmanchures et je ne comprends pas. Rabattre trois maillesven même temps ? Merci de votre aide
17.10.2018 - 03:42DROPS Design ha risposto:
Bonjour Chantal, quand on doit rabattre 1 fois 3 m pour les emmanchures, on rabat les 3 premières mailles au début de chacun des 2 rangs suivants (= sur l'endroit et sur l'envers = 3 m rabattues de chaque côté) ainsi: tricotez les 2 premières m, passez la 1ère m par-dessus la 2ème (= il reste 1 m sur l'aig. droite), *tricotez la m suivante, passez la 1ère m par-dessus la dernière m*, répétez encore 1 fois de *-* = vous avez rabattu 3 m. Bon tricot!
17.10.2018 - 08:08
![]() Chantal B ha scritto:
Chantal B ha scritto:
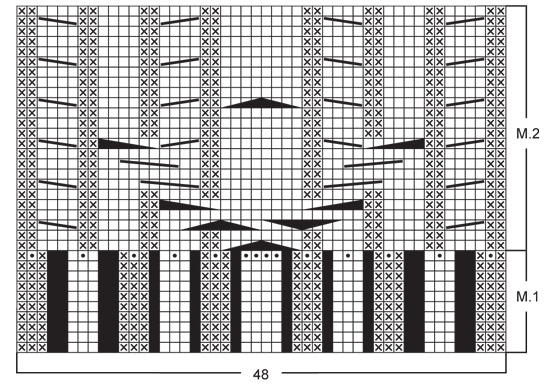
Bonjour, pouvez vous m'expliquer ce que veux dire la ligne sous le diagramme svp34 m blir......
02.10.2018 - 13:25DROPS Design ha risposto:
Bonjour Chantal B., bien volontiers: on a 34 m dans M.1 puis on va augmenter au dernier rang de M.1 et on aura ainsi 48 m dans M.1. Bon tricot!
02.10.2018 - 15:56
![]() Anne ha scritto:
Anne ha scritto:
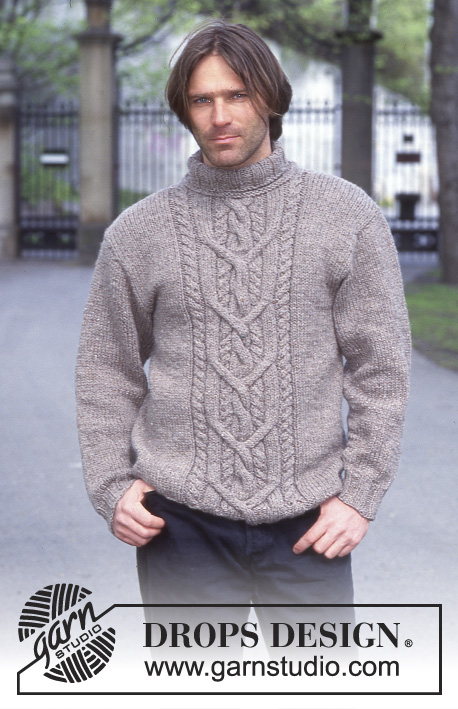
I love this pattern which I have almost finished but I\'m not sure how to stitch down the rolled edge on the neck. After zooming in on the photo it looks like the stocking stitch is turned inside out and then stitched down onto the main body of the jersey to cover the neck join. Is this correct? Thanks so much. Anne, New Zealand
28.08.2018 - 22:08DROPS Design ha risposto:
Dear Anne, the rolled edge is not sewn down, just felt to roll as the stockinett stitch would by itself. However, you can stitch it down with a few small stitches if you wish, but be careful, the stitching should not be too tight. Happy Knitting!
30.08.2018 - 19:22
![]() Anne ha scritto:
Anne ha scritto:
I love this pattern which I have almost finished but I\'m not sure how to stitch down the rolled edge on the neck. After zooming in on the photo it looks like the stocking stitch is turned inside out and then stitched down onto the main body of the jersey to cover the neck join. Is this correct? Thanks so much. Anne, New Zealand
28.08.2018 - 22:08DROPS Design ha risposto:
Dear Anne, you will first pick up sts around the neck and work rib for 12-14 cm (high collar). Then pick up once again stitches around neck (this time in the first row of rib in high collar) and work 3 rows stocking stitch then cast off (with yarn overs to make the bind off elastic enough and let it roll nicely). Happy knitting!
06.09.2018 - 10:01
![]() Annabella Pedemonte ha scritto:
Annabella Pedemonte ha scritto:
Tengo una duda: el diagrama de los cruces representa sólo las carreras del derecho? Estoy tejiendo las carreras del revés los puntos como se presentan pero no sé si es lo correcto. Muchas gracias desde ya.
19.07.2018 - 20:38DROPS Design ha risposto:
Hola Annabella. El diagrama muestra todas las filas del patrón vistas por el lado derecho, es decir, las filas de derecho se leen de derecho a izquierda y se trabajan los puntos como se presentan en el diagrama, las filas de revés se leen de izquierda a derecha y se trabajan los puntos al contrario que se presentan en el diagrama (presta atención a las explicaciones antes del diagrama).
21.07.2018 - 20:15Annette Stratford ha scritto:
The pattern for the King's Cable which I found on line is absolutely wrong. For an adult male, it says to cast on 65 stitches for the back and 32 for the sleeves. This is a child's size
12.08.2017 - 23:36
![]() 🇫🇷Rigault ha scritto:
🇫🇷Rigault ha scritto:
Bonjour, les 2 laines sont elles utilisées ensemble sur tout le pull? Les quantités étant différentes et le grammage des pilotes identique , j'ai un doute... Autre question, sur le descriptif des points utilisés, j'ai à l'écran des carrés vides les uns en dessous des autres avec des explications différentes. pouvez vous vérifier ou me transmettre par mail le document ? Merci d'avance, bien cordialement isabelle
31.03.2017 - 15:24DROPS Design ha risposto:
Bonjour Mme Rigault, ce pull se tricote avec 1 fil Alaska et 1 fil Alpaca tout du long, les quantités de chacune de ces qualités sont différentes car elles ont un métrage différent par pelote. Vous trouverez la légende des symboles du diagramme juste au-dessus dudit diagramme. Bon tricot!
31.03.2017 - 17:01
![]() Anni ha scritto:
Anni ha scritto:
Hei. Jeg har planer om å få strikket to gensere av denne modellen; King's Cable DROPS herregenser med fletter. Er det mulig å strikke denne modellen med enkelt garn, slik at den ikke blir så tykk/varm? Og i tilfelle hvordan tilpasser jeg da størrelse og oppskriften? ( opprinnelig str M og str L. Kan drops big merino brukes?Vennlig hilsen Anni
08.03.2017 - 20:05DROPS Design ha risposto:
Hej Anni. Vil du strikke den tyndere, saa aendres strikkefastheden. Det betyder at du skal beregne maskeantallet paany paa basis af den strikkepröve du har lavet med 1 traad. Men pröv i förste omgang at strikke med 1 traad - f.eks. Big Merino (fra gruppe C) og se om strikkefastheden i opskriften holder. Gör den det og er du tilfreds med resultatet, saa kan du strikke uden at aendre.
09.03.2017 - 13:59
![]() Franca ha scritto:
Franca ha scritto:
Also, after I BO the centre 16 sts, am I supposed to break the yarn and continue to work on each shoulder with separate balls of yarn? I don't know how else to continue as once I bind off for the neck, I can no longer work across both sides?
25.02.2017 - 15:02DROPS Design ha risposto:
Dear Franca, work 1 row while binding off the middle 16 sts, then work row to the end. Now continue each shoulder separately, work first the sts on needle to shoulder and finished measurement, then work the other shoulder joining yarn again. Happy knitting!
27.02.2017 - 09:44
|
|||||||||||||||||||||||||||||||||||||
King's Cable |
|||||||||||||||||||||||||||||||||||||
 |
 |
||||||||||||||||||||||||||||||||||||
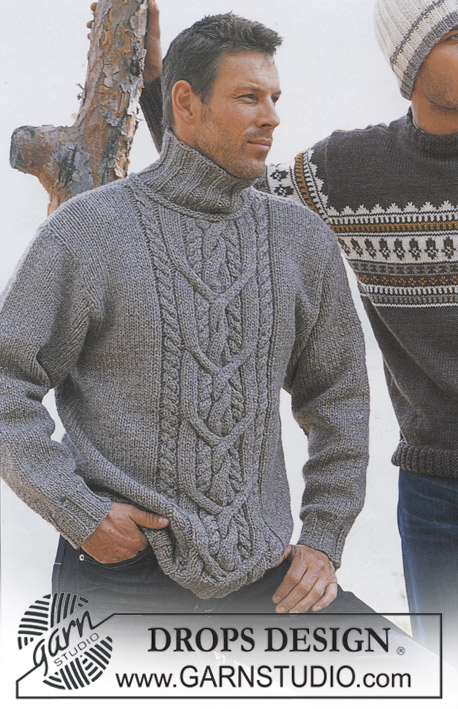
Maglione DROPS in "Alaska" e "Alpaca".
DROPS 85-6 |
|||||||||||||||||||||||||||||||||||||
|
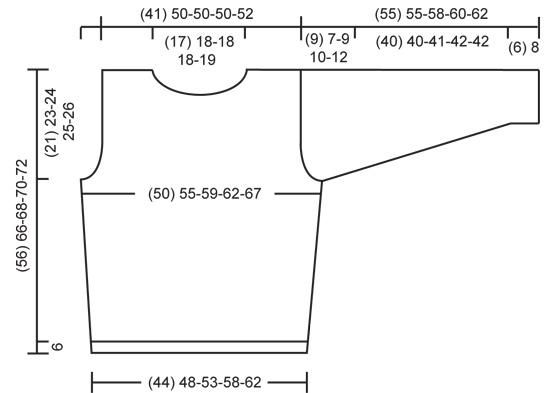
COSTE: *3 m dir, 3 m rov*, ripetere *-*. MOTIVO: Il motivo è visto dal diritto del lavoro. Il motivo 1 (M.1) sono i primi 10 f dello schema. I quadrati neri nel motivo 1 NON sono m – saltare questi quadrati. Il motivo 2 (M.2) sono i 24 f più in alto dello schema. DAVANTI: Avviare 60-66-72-78-84 m con i f più piccoli con 1 capo di Alaska + Alpaca e lavorare a coste come segue (1° f = diritto del lavoro): Taglia 12/14 anni: 1 m dir (m di vivagno lavorata a m legaccio), *3 m rov, 3 m dir*, ripetere *-* per un totale di 2 volte, motivo 1 (= 34 m), *3 m dir, 3 m rov*, ripetere *-* per un totale di 2 volte, finire con 1 m dir (m di vivagno lavorata a m legaccio). Taglia S/M: 1 m dir (m di vivagno lavorata a m legaccio), *3 m dir, 3 m rov*, ripetere *-* per un totale di 2 volte, 3 m dir, motivo 1 (= 34 m), *3 m dir, 3 m rov*, ripetere *-* per un totale di 2 volte, finire con 3 m dir e 1 m dir (m di vivagno lavorata a m legaccio). Taglia L: 1 m dir (m di vivagno lavorata a m legaccio), *3 m rov, 3 m dir*, ripetere *-* per un totale di 3 volte, motivo 1 (= 34 m), *3 m dir, 3 m rov*, ripetere *-* per un totale di 3 volte, finire con 1 m dir (m di vivagno lavorata a m legaccio). Taglia XL: 1 m dir (m di vivagno lavorata a m legaccio), *3 m dir, 3 m rov*, ripetere *-* per un totale di 3 volte, 3 m dir, motivo 1 (= 34 m), *3 m dir, 3 m rov*, ripetere *-* per un totale di 3 volte, finire con 3 m dir e 1 m dir (m di vivagno lavorata a m legaccio). Taglia XXL: 1 m dir (m di vivagno lavorata a m legaccio), *3 m rov, 3 m dir*, ripetere *-* per un totale di 4 volte, motivo 1 (= 34 m), *3 m dir, 3 m rov*, ripetere *-* per un totale di 4 volte, finire con 1 m dir (m di vivagno lavorata a m legaccio). Alla fine del motivo 1, (il lavoro misura circa 6 cm) passare ai f più grandi – ora ci sono 14 m incluse nel motivo = 74-80-86-92-98 m. Continuare come segue: 1 m dir (m di vivagno lavorata a m legaccio), 12-15-18-21-24 m a m rasata, motivo 2 (= 48 m) e 12-15-18-21-24 m a m rasata, 1 m dir (m di vivagno lavorata a m legaccio). Quando il lavoro misura 12 cm aumentare 1 m a ogni lato ogni 5-6-7-12-12 cm per un totale di 4-4-4-3-3 volte = 82-88-94-98-104 m. Quando il lavoro misura 35-43-44-45-46 cm intrecciare per lo scalfo a ogni lato a f alterni: 3 m 1 volta, 2 m 1-0-1-1-2 volte e 1 m 2-1-2-4-4 volte = (68) 80-80-80-82 m. Quando il lavoro misura 50-59-61-63-65 cm distribuire 14 diminuzioni in modo uniforme sulle 48 m centrali. Sul f successivo intrecciare le 14-16-16-16-18 m centrali per il collo. Poi intrecciare a ogni bordo del collo a f alterni: 2 m 1 volta e 1 m 2 volte = 16-21-21-21-21 m rimaste su ogni spalla. Intrecciare quando il lavoro misura 56-66-68-70-72 cm. DIETRO: Avviare 59-65-71-77-83 m con i f più piccoli con 1 capo di Alaska + Alpaca e lavorare a coste come segue: Taglie 12/14 anni + L + XXL: 1 m dir (m di vivagno lavorata a m legaccio), *3 m dir, 3 m rov*, ripetere *-*, finire con 3 m dir, 1 m dir (m di vivagno lavorata a m legaccio). Taglie S/M + XL: 1 m dir (m di vivagno lavorata a m legaccio), *3 m rov, 3 m dir*, ripetere *-*, finire con 3 m rov e 1 m dir (m di vivagno lavorata a m legaccio). Quando il lavoro misura 6 cm – la stessa lunghezza del davanti – passare ai f più grandi e a m rasata. Quando il lavoro misura 12 cm aumentare a ogni lato come sul davanti = 67-73-79-83-89 m. Intrecciare per lo scalfo come sul davanti = 53-65-65-65-67 m. Quando il lavoro misura 54-64-66-68-70 cm intrecciare le 19-21-21-21-23 m centrali per il collo. Sul f successivo diminuire 1 m a ogni bordo del collo = 16-21-21-21-21 m rimaste su ogni spalla. Intrecciare quando il lavoro misura 56-66-68-70-72 cm. MANICA: Avviare 32-32-38-38-38 m con i f più piccoli con 1 capo di Alaska + Alpaca e lavorare a coste, tenendo 1 m di vivagno a ogni lato a m legaccio. Quando il lavoro misura 6-8-8-8-8 cm passare ai f più grandi e a m rasata. Quando il lavoro misura 10-12-10-13-14 cm aumentare 1 m a ogni lato ogni 3,5-3-3,5-3-2,5 cm per un totale di 10-12-11-12-14 volte = 52-56-60-62-66 m. Quando la manica misura 46-48-49-50-50 cm intrecciare per l’arrotondamento della manica a ogni lato a f alterni: 4 m 1 volta, 3 m 1 volta, 2 m 1-1-2-2-2 volte e 1 m 3-1-1-2-2 volte, poi intrecciare 2 m a ogni lato fino a quando il lavoro misura 54-54-58-59-61 cm, poi intrecciare 3 m a ogni lato 1 volta. Intrecciare le m rimaste, il lavoro misura circa 55-55-58-60-62 cm. CONFEZIONE: Cucire i margini delle spalle. COLLO CON BORDO ARROTOLATO: Riprendere e lavorare circa 60-78 m (divisibile per 6) attorno al collo con i f a doppia punta più piccoli con 1 capo di Alaska + Alpaca; unire e mettere un segnapunti all’altezza del punto di unione. Lavorare a coste per 12-12-14-14-14 cm e poi intrecciare a coste. Riprendere e lavorare circa 56-72 nuove m sul 1° f a coste (all’altezza della scollatura) con i f a doppia punta più piccoli con 1 capo Alaska + Alpaca; unire e lavorare 3 f a m rasata (= bordo arrotolato). Intrecciare – per un risultato migliore, fare un gettato ogni 8 m durante gli intrecci. Attaccare le maniche. Cucire le maniche e i margini dei lati usando le m di vivagno come margine di cucitura. |
|||||||||||||||||||||||||||||||||||||
Spiegazioni del diagramma |
|||||||||||||||||||||||||||||||||||||
|
|||||||||||||||||||||||||||||||||||||
 |
|||||||||||||||||||||||||||||||||||||
 |
|||||||||||||||||||||||||||||||||||||
Avete terminato questo modello?Allora taggate le vostre foto con #dropspattern o inviatele alla #dropsfan gallery. Avete bisogno di aiuto con questo modello?Troverete 19 video tutorial, una sezione per i commenti/domande e molto altro guardando il modello su www.garnstudio.com © 1982-2026 DROPS Design A/S. Ci riserviamo tutti i diritti. Questo documento, compreso tutte le sue sotto-sezioni, è protetto dalle leggi sul copyright. Potete leggere quello che potete fare con i nostri modelli alla fine di ogni modello sul nostro sito. |
|||||||||||||||||||||||||||||||||||||


Con oltre 40 anni di esperienza nel design di modelli di maglia e uncinetto, DROPS Design offre la più estesa collezione di modelli gratuiti su internet - tradotti in 17 lingue. Ad oggi vi possiamo fornire 324 cataloghi e 12290 modelli - 9561 dei quali sono tradotti in Italiano.
Ci stiamo impegnando molto per darvi il meglio che vi possiamo offrire in termini di maglia e uncinetto, ispirazioni e consigli così come filati di grande qualità ad un prezzo incredibile! Volete utilizzare i nostri modelli per qualcosa d'altro oltre al vostro uso personale? Potete leggere tutto ciò che è consentito nel testo sul Copyright in basso su tutte le pagine dei nostri modelli. Buon lavoro!
Lasciare un commento sul modello DROPS 85-6
Noi saremmo felici di ricevere i tuoi commenti e opinioni su questo modello!
Se vuoi fare una domanda, fai per favore attenzione a selezionare la categoria corretta nella casella qui sotto per velocizzare il processo di risposta. I campi richiesti sono indicati da *.