Commenti / Domande (45)
Elfi ha scritto:
I followed the instructions exactly, but the bottom part of the hat looks different from the picture. In the picture it looks like it was also crotched with double strands and not hdc. Or am I missing something? Thanks in advance
07.02.2014 - 20:10DROPS Design ha risposto:
Dear Elfi, the whole hat is worked while crocheting only back loop on all rounds, until the end (the 3 sc rows included); Brim is then worked with double strands. Happy crocheting!
08.02.2014 - 10:01
![]() Marilynn Teague ha scritto:
Marilynn Teague ha scritto:
I need a list of crochet terms. I am not finding where to print them. Thank you, Marilynn
06.01.2014 - 02:34DROPS Design ha risposto:
Dear Mrs Teague, you will find here all used crocheted terms in UK-Englis and US-English as well as other languages if required. Happy crocheting!
06.01.2014 - 09:47
![]() Petra ha scritto:
Petra ha scritto:
Hoi ik snap niet hoe ik die streep er in krijg die rondje lukt wel maar die streep die er door loopt die niet hoe krijg ik dat er in groetjes petra
04.01.2014 - 15:40DROPS Design ha risposto:
Hoi Petra. De strepen haak je als de pet klaar is. Lees onder "strepen" aan het eind van het patroon.
06.01.2014 - 12:43
![]() Janet ha scritto:
Janet ha scritto:
I have made this hat exactly to the pattern with the correct yarn but it is tiny! What should I do?
04.10.2013 - 21:48DROPS Design ha risposto:
Dear Janet, did you get and keep all the way the tension of 8 htr = 10 cm ? The hat should measure approx. 50 cm around. Happy crocheting!
05.10.2013 - 09:26
![]() Markéta ha scritto:
Markéta ha scritto:
Dobrý den, baretek již mám uháčkovaný, ale nyní se snažím vytvořit proužky na vrchu...chápu kam a kolik proužků, ale nechápu jak mám přiháčkovat pevná oka a zároveň je udělat dlouhá 1-1 1/2 cm. Můžete
05.07.2013 - 23:05
![]() Katka ha scritto:
Katka ha scritto:
Zdravim, Tuto ciapku by som chcela uhackovat s priadze Bomull-Lin, kolko klbiek budem potrebovat?
05.02.2013 - 13:26DROPS Design ha risposto:
Milá Katko, příze Bomull-Lin by byla potřeba cca 4 klubka - musíte háčkovat dvojitou přízí. Nicméně ještě bych zvážila použití nějaké pružnější příze, např. Paris. Hodně zdaru!
25.05.2013 - 03:00Bergeron Francine ha scritto:
Bonjour,je suis tres visuel,et j aimerais savoir s il existe une vidéo qu il montre le montage de la casquette car j aimerai beaucoup la faire mais il faut que je vois la monter avant et ensuite je le fais en meme temps que la vidéo,car meme avec des bonnes explication je n y arrive pas ca me prend toujours une vidéo qui me montre au complet le début jusqu à la fin. merci de votre compréhensionet je trouve vos modèle super.merci encore.
26.01.2013 - 02:12
![]() Femmy ha scritto:
Femmy ha scritto:
Het is misschien een stomme vraag maar wat is hstk, is dit een afk. van half stokje? gr Femmy
13.01.2013 - 13:51José ha risposto:
Hallo Femmy, hstk = halfstokje. Boven het patroon is een woordenlijst en daarin vind je de gebruikte afkortingen. Succes
13.01.2013 - 14:27
![]() Kristi Chen ha scritto:
Kristi Chen ha scritto:
What does it mean in row 2 when the instructions say to only pull the hook through the back part of st?
08.11.2012 - 01:41DROPS Design ha risposto:
Dear Kristi, from row 2, you will insert crochet only in the back loop of st. I'll suggest you to watch this video called "Crochet both or single loops" you'll find in our video index. Happy crocheting !
13.11.2012 - 15:17
![]() Pilar Jimenez Jimenez ha scritto:
Pilar Jimenez Jimenez ha scritto:
Me encantaria tener este patron ?que debo de hacer para tenerlo¿ gracias
03.11.2012 - 05:12DROPS Design ha risposto:
Pilar, elige "español" en el menú desplegable debajo de la fotografía de la modelo.
04.11.2012 - 08:56
DROPS 93-22 |
|
|
|
|
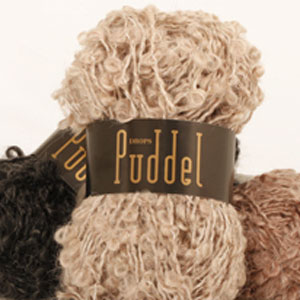
Berretto DROPS all’uncinetto in "Snow" e sciarpa in "Puddel".
DROPS 93-22 |
|
|
BERRETTO: Campione: 8 m.m.a lavorate con l’uncinetto n° 8 = 10 cm in larghezza. Attenzione: A seconda del proprio modo di lavorare, la tensione potrebbe essere diversa; potrebbe essere quindi necessario lavorare con un uncinetto di misura maggiore o minore in modo da ottenere il campione della misura corretta. INFORMAZIONI: Sostituire la 1° m.m.a di ogni giro con 2 cat. Finire ogni giro con 1 m.bss nella 2° cat dall’inizio del giro. DIMINUZIONI: Lavorare insieme 2 m.m.a. Lavorare 1 m.m.a, ma aspettare a intrecciare l’ultima gettata: lasciare quindi 3 m sull’uncinetto. Lavorare la 2° m.m.a, e all’ultima gettata, passare il filo attraverso tutte le m sull’uncinetto = è stata diminuita 1 m. BERRETTO: Con l’uncinetto n° 8, avviare 4 cat con il filato Snow e formare un anello con 1 m.bss. Giro 1: Lavorare 8 m.m.a nell’anello – vedere le INFORMAZIONI sopra. Giro 2: Lavorare 2 m.m.a in ogni m. Da adesso in avanti inserire sempre l’uncinetto nell’asola posteriore della m – si ottiene così l’effetto tessuto = 16 m.m.a Giro 3: * 1 m.m.a nella 1° m, 2 m.m.a nella m successiva * ripetere *-* = 24 m.m.a Giro 4: * 1 m.m.a nelle prime 2 m, 2 m.m.a nella m successiva * ripetere *-* = 32 m.m.a Giro 5: *1 m.m.a nelle prime 3 m, 2 m.m.a nella m successiva * ripetere *-* = 40 m.m.a Giro 6: *1 m.m.a nelle prime 4 m, 2 m.m.a nella m successiva * ripetere *-* = 48 m.m.a Giro 7: *1 m.m.a nelle prime 5 m, 2 m.m.a nella m successiva * ripetere *-* = 56 m.m.a Giro 8: *1 m.m.a nelle prime 6 m, 2 m.m.a nella m successiva * ripetere *-* = 64 m.m.a Giri 9 – 12: 1 m.m.a in ogni m = 64 m.m.a Giro 13; * Lavorare 6 m.m.a, lavorare insieme la 7° e l’8a° m.m.a (vedere DIMINUZIONI sopra) * ripetere da *-* = 56 m.m.a. Giro 14: * Lavorare 5 m.m.a, lavorare insieme la 6° e la 7° m.m.a * ripetere da *-* = 48 m.m.a. Giro 15: * Lavorare 4 m.m.a, lavorare insieme la 5° e la 6° m.m.a * ripetere da *-* = 40 m.m.a. Giri 16-18: 1 m.b in ogni m = 40 m.b. VISIERA: Proseguire lavorando la visiera con 2 capi del filato Snow sulle 18 m anteriori. Giro 1: Lavorare 1 m.m.a in ogni m = 18 m.m.a. Giri 2–4: Girare il lavoro, 2 cat, lavorare insieme le 2 m.m.a. successive (vedere DIMINUZIONI sopra), proseguire con m.m.a, ma lavorare le ultime 2 m.m.a insieme = 12 m.m.a Giro 5: Lavorare 1 giro di m.bss tutto attorno al berretto e alla visiera (1 m.bss in ogni m). RAGGI DECORATIVI: Inserire un segno su entrambi i lati del berretto in corrispondenza del giro 16. Lavorare 1 m.bss in una m vicino al segno, lavorare 1 m.bss lunga da 1 a 1,5 cm, lavorare un’altra m.bss nel giro 15, lavorare 1 m.bss lunga da 1 a 1,5 cm, lavorare una m.bss nel giro 14 e così via. Ripetere in corrispondenza del secondo segno. Lavorare altri 2 raggi. SCIARPA: Campione: 10 m x 14 ferri sui ferri n° 7 a maglia rasata = 10 x 10 cm. SCIARPA: Avviare 15 m su 2 ferri n° 7 con il filato Puddel (usare entrambi i ferri per essere sicuri di avere un bordo di avvio elastico). Sfilare uno dei ferri e lavorare 1 ferro sul rovescio del lavoro. Proseguire a maglia rasata finché la sciarpa non misura 79 cm. Lavorare 1 ferro sul rovescio del lavoro; intrecciare le m. |
|
Avete terminato questo modello?Allora taggate le vostre foto con #dropspattern o inviatele alla #dropsfan gallery. Avete bisogno di aiuto con questo modello?Troverete 18 video tutorial, una sezione per i commenti/domande e molto altro guardando il modello su www.garnstudio.com © 1982-2025 DROPS Design A/S. Ci riserviamo tutti i diritti. Questo documento, compreso tutte le sue sotto-sezioni, è protetto dalle leggi sul copyright. Potete leggere quello che potete fare con i nostri modelli alla fine di ogni modello sul nostro sito. |


Lasciare un commento sul modello DROPS 93-22
Noi saremmo felici di ricevere i tuoi commenti e opinioni su questo modello!
Se vuoi fare una domanda, fai per favore attenzione a selezionare la categoria corretta nella casella qui sotto per velocizzare il processo di risposta. I campi richiesti sono indicati da *.