
Categorie popolari
State cercando un filato?


Commenti / Domande (4)
![]() Hetty Stok ha scritto:
Hetty Stok ha scritto:
Thanks for the help. Now I have another question. Please explain the instruction for thumb, specifically “knit up stitches at the same time as you increase behind and on each side of the thumb where the 3 stitches were cast on.” It is confusing. “Knit up, make 1 yarn over…” ?? Where are these 3 stitches??
05.10.2024 - 09:17DROPS Design ha risposto:
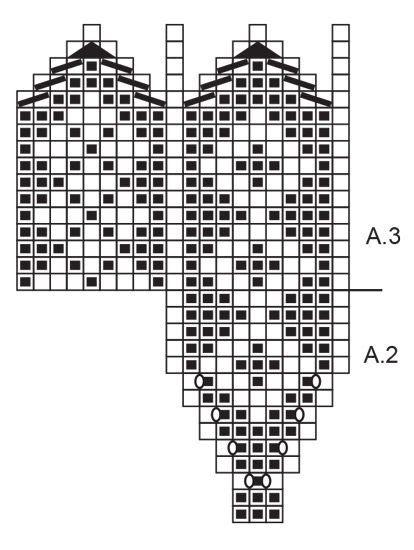
Dear Hetty, the 3 stitches that were cast on were used to continue working over the thumb and not interrupt pattern A.1. So you already worked over these 3 stitches. Now you have the stitches of A.2, that were on a thread, and you pick up the other end of these 3 stitches and pick up 1 stitch on each side of these 3 cast-on stitches, so that the thumb will be fully connected to the rest of the piece, and you will have no holes. So first work over the 11 stitches in the thread, with A.3 over A.2 as shown. Then, you knit up around the little hole for the thumb and work yarn overs in between the knitted up stitches, to get the correct number of stitches. Happy knitting!
06.10.2024 - 13:49
![]() Hetty Stok ha scritto:
Hetty Stok ha scritto:
Could you please clarify the instruction to increase at the base of the thumb? The colours do not remain as in the diagram. The instruction is to make a yarn over with the dark colour however the diagram indicates that the next stitch must be white. I’m aware that our English technique for “yarn over” is to bring the yarn to be knitted in the next stitch should be brought to the front (ie as for knitting a purl stitch) and that you may have a different technique. Please explain. Hetty
04.10.2024 - 14:30DROPS Design ha risposto:
Dear Mrs Stock, in this video we show how to increase for a thumb gusset (without pattern, but with the technique of the yarn overs); for these mittens we work the yarn over in the dark colour, but feel free to work it with the light colour if you rather like the result like this. Happy knitting!
04.10.2024 - 15:59
![]() Lorýa Björk Jónsson ha scritto:
Lorýa Björk Jónsson ha scritto:
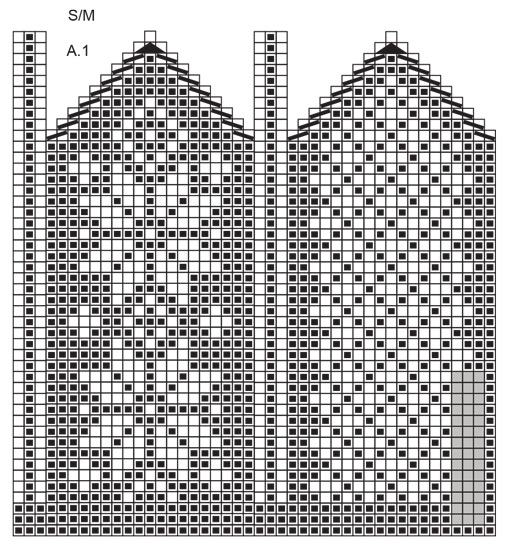
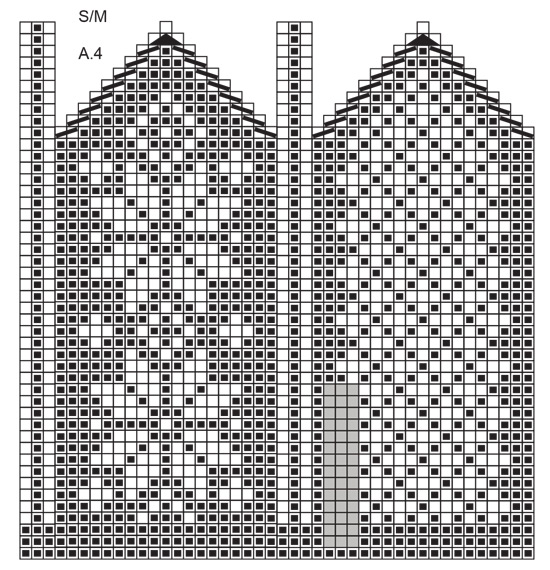
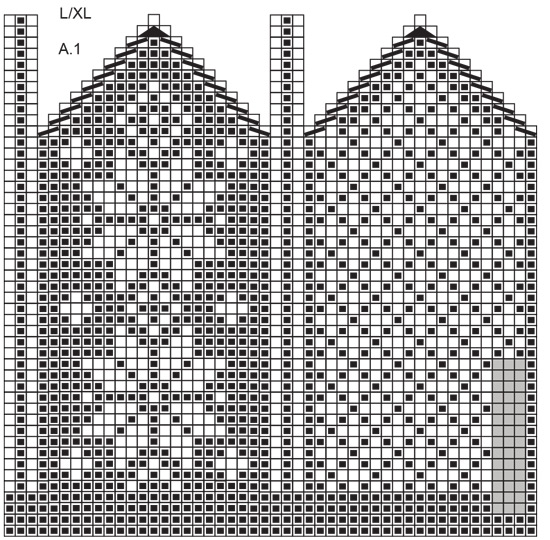
Fehler in muster a4 grösse s/m, linie 7 11 und 15 und fehler in muster a1 grösse l/xl, linie 16
04.12.2023 - 23:41
![]() Mette ha scritto:
Mette ha scritto:
Hej, Jag har lagt märke till att era vantar för herrar är väldigt små i storleken. Flera gånger har jag stickat olika modeller i största storlek och de är oftast passliga på en luten kvinnohand ändå. Här också är ju mönstret för storlek S/M lika långt som L/XL, vilket känns lite konstigt.
01.12.2023 - 11:44
|
||||||||||||||||||||||
Snow Flake Mittens#snowflakemittens |
||||||||||||||||||||||
 |
 |
|||||||||||||||||||||
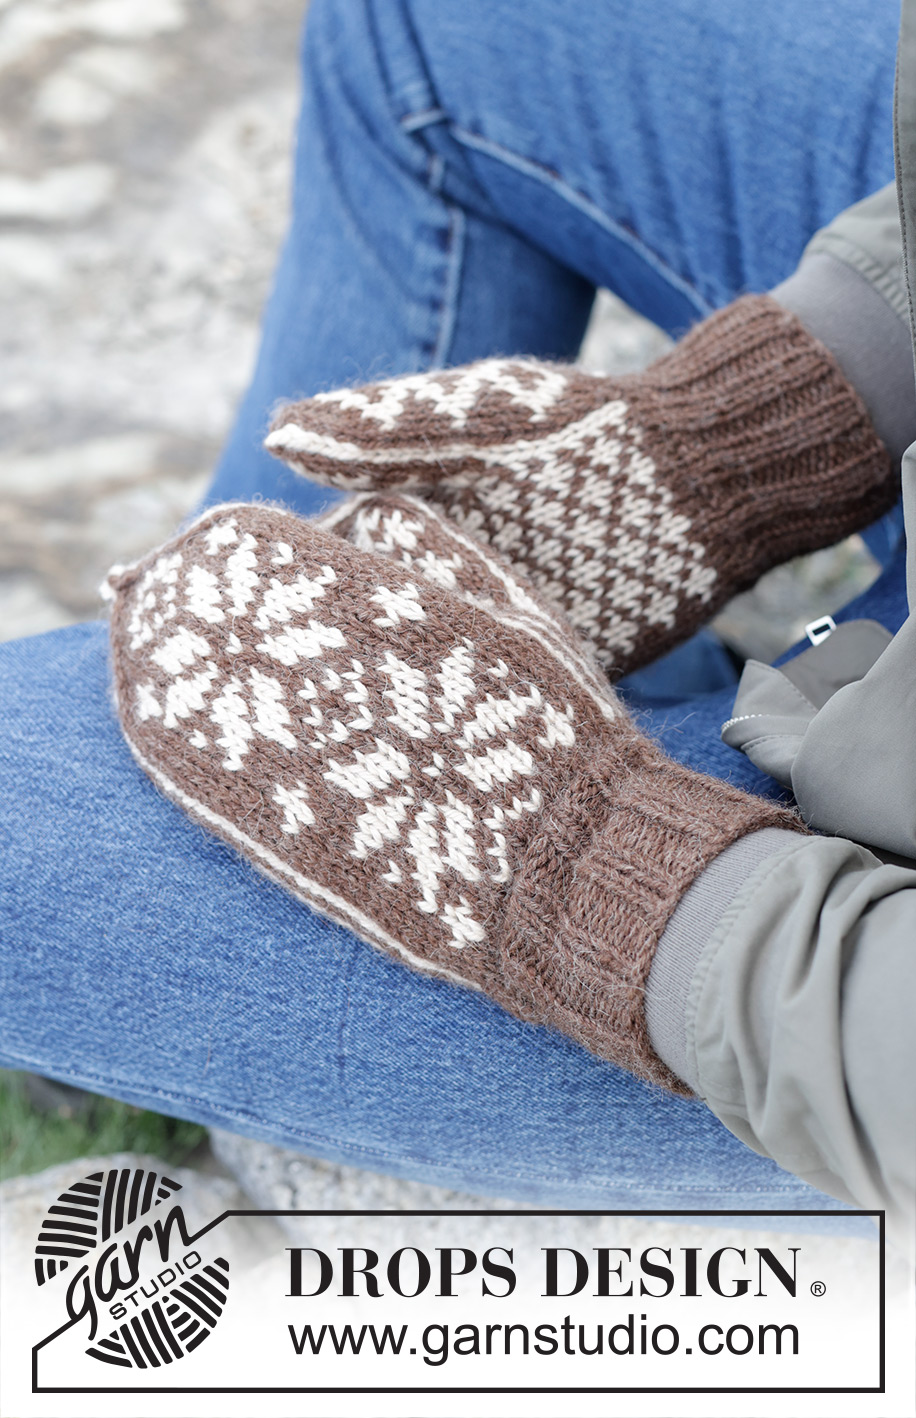
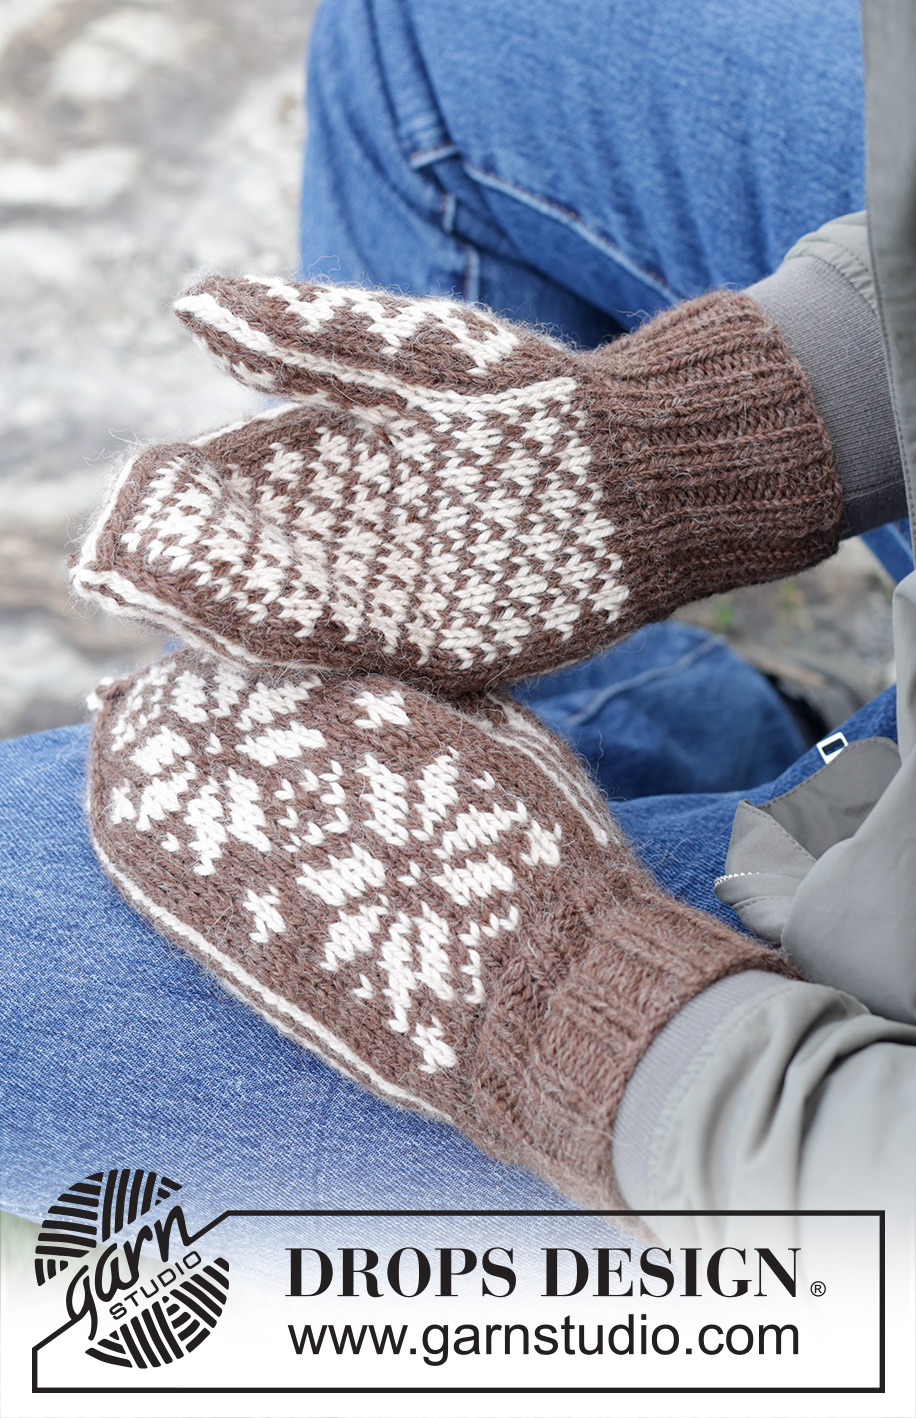
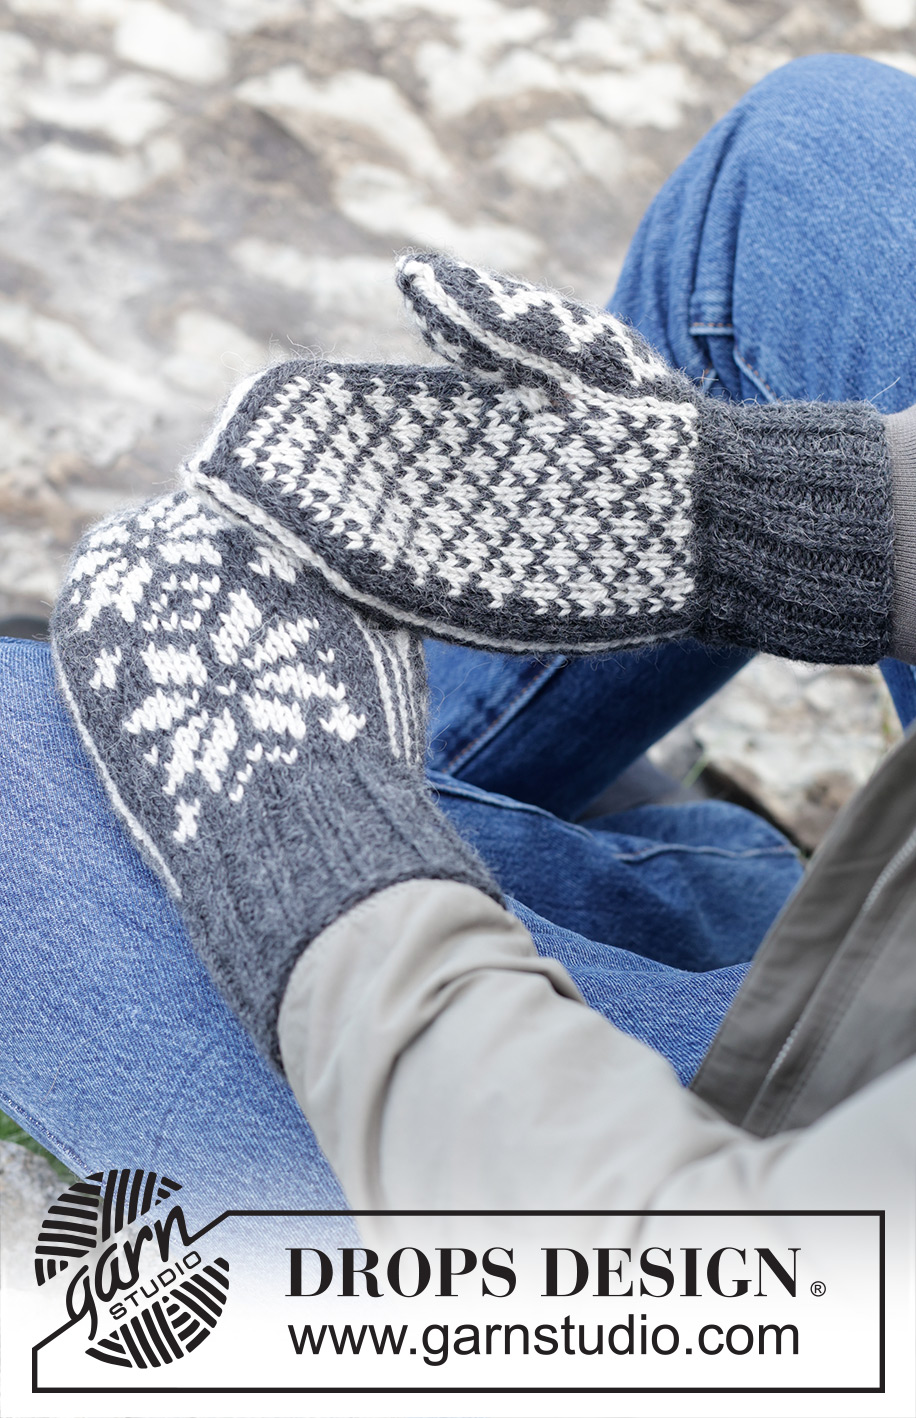
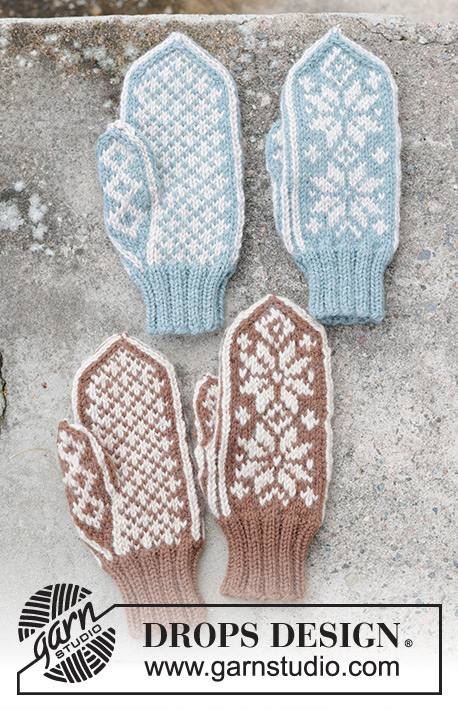
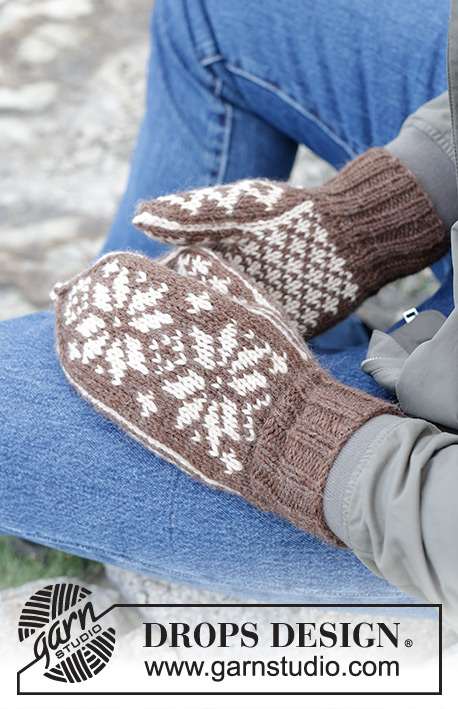
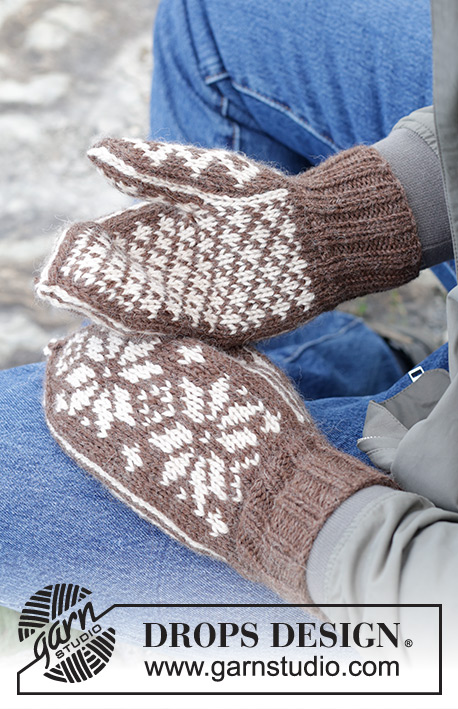
Muffole da uomo lavorate ai ferri in DROPS Nepal. Lavorate con motivo nordico.
DROPS 246-20 |
||||||||||||||||||||||
|
------------------------------------------------------- TECNICHE IMPIEGATE: ------------------------------------------------------- MOTIVO: Vedere i diagrammi A.1 - A.4. Scegliere i diagrammi per la vostra taglia. ------------------------------------------------------- INIZIO DEL LAVORO: ------------------------------------------------------- MUFFOLE – BREVE RIASSUNTO DEL LAVORO: Lavorato in tondo con i ferri a doppia punta. MUFFOLA DESTRA: Avviare 44-48 maglie con i ferri a doppia punta n° 3 mm e il colore grigio scuro/marrone medio in DROPS Nepal. Lavorare a coste in tondo (2 maglie diritto, 2 maglie rovescio) per 7-8 cm. Passare ai ferri a doppia punta n° 3,5 mm. Lavorare il resto della muffola a maglia rasata. Lavorare seguendo il diagramma A.1. Lavorare il diagramma A.2 sui quadrati in A.1 = pollice. FARE ATTENZIONE ALLA TENSIONE DEL LAVORO! Alla fine del diagramma A.2, sono state aumentate 8 maglie in A.2 (11 maglie in A.2). Sul giro successivo, mettere le maglie di A.2 in sospeso e avviare 3 maglie come mostrato sopra i quadrati grigi in A.1. Alla fine di A.1, tagliare i fili e farli passare attraverso le maglie rimaste, tirare e affrancare bene. POLLICE: Rimettere le 11 maglie in sospeso sui ferri a doppia punta n° 3,5 mm. Per avere una buona rifinitura, ora riprendere le maglie durante gli aumenti dietro e a ogni lato del pollice, dove sono state avviate 3 maglie come segue: Iniziare lavorando 3 maglie sulle maglie sul ferro, riprendere 1 maglia con il colore grigio scuro /marrone medio, 1 gettato con il colore grigio chiaro/beige chiaro, riprendere 1 maglia con il colore grigio chiaro/beige chiaro, 1 gettato con il colore grigio chiaro/beige chiaro, riprendere 1 maglia con il colore grigio scuro /marrone medio, 1 gettato con il colore grigio chiaro/beige chiaro, riprendere 1 maglia con il colore grigio chiaro/beige chiaro, 1 gettato con il colore grigio chiaro/beige chiaro, riprendere 1 maglia con il colore grigio scuro /marrone medio. Ora è stato lavorato/ripreso il 1° giro di A.3. Sul giro successivo, lavorare i gettati a diritto ritorto seguendo il giro 2 in A.3. Alla fine di A.3, tagliare i fili e farli passare attraverso le maglie rimaste, tirare e affrancare bene. MUFFOLA SINISTRA: Lavorare nello stesso modo di quella destra ma lavorare seguendo il diagramma A.4 invece di A.1. Lavorare A.2 sul lato opposto, dove ci sono i quadrati grigi in A.4. Alla fine di A.4, lavorare il pollice nello stesso modo della muffola destra. |
||||||||||||||||||||||
Spiegazioni del diagramma |
||||||||||||||||||||||
|
||||||||||||||||||||||
 |
||||||||||||||||||||||
 |
||||||||||||||||||||||
 |
||||||||||||||||||||||
 |
||||||||||||||||||||||
 |
||||||||||||||||||||||
Avete terminato questo modello?Allora taggate le vostre foto con #dropspattern #snowflakemittens o inviatele alla #dropsfan gallery. Avete bisogno di aiuto con questo modello?Troverete 20 video tutorial, una sezione per i commenti/domande e molto altro guardando il modello su www.garnstudio.com © 1982-2026 DROPS Design A/S. Ci riserviamo tutti i diritti. Questo documento, compreso tutte le sue sotto-sezioni, è protetto dalle leggi sul copyright. Potete leggere quello che potete fare con i nostri modelli alla fine di ogni modello sul nostro sito. |
||||||||||||||||||||||


Con oltre 40 anni di esperienza nel design di modelli di maglia e uncinetto, DROPS Design offre la più estesa collezione di modelli gratuiti su internet - tradotti in 17 lingue. Ad oggi vi possiamo fornire 324 cataloghi e 12290 modelli - 9561 dei quali sono tradotti in Italiano.
Ci stiamo impegnando molto per darvi il meglio che vi possiamo offrire in termini di maglia e uncinetto, ispirazioni e consigli così come filati di grande qualità ad un prezzo incredibile! Volete utilizzare i nostri modelli per qualcosa d'altro oltre al vostro uso personale? Potete leggere tutto ciò che è consentito nel testo sul Copyright in basso su tutte le pagine dei nostri modelli. Buon lavoro!
Lasciare un commento sul modello DROPS 246-20
Noi saremmo felici di ricevere i tuoi commenti e opinioni su questo modello!
Se vuoi fare una domanda, fai per favore attenzione a selezionare la categoria corretta nella casella qui sotto per velocizzare il processo di risposta. I campi richiesti sono indicati da *.