
Categorie popolari
State cercando un filato?


Commenti / Domande (48)
![]() Ria ha scritto:
Ria ha scritto:
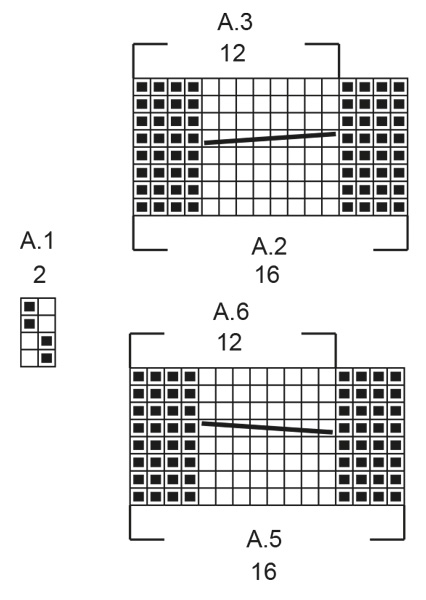
Ik ben er 'al' achter, het hoort bij teltekening A5,A6 Sorry Groetjes Ria
22.01.2026 - 22:47
![]() Ria ha scritto:
Ria ha scritto:
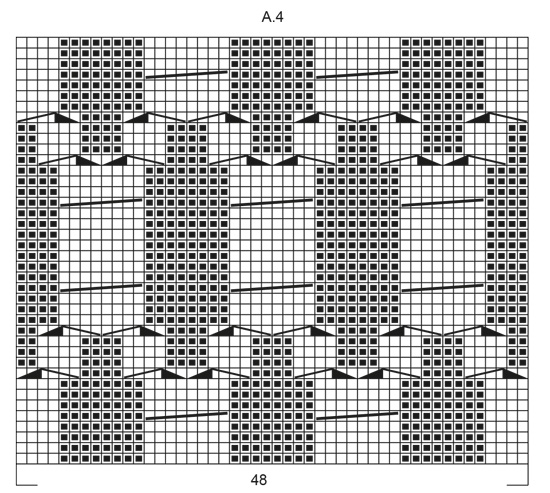
Goedenavond , In teltekening 4A staan in de tekens, een schuine streep naar rechts boven, kabelnld 4 st achter het werk enz. Er staat ook een schuine streep links naar boven, 4 st voor het werk enz. Die word niet in het patroon gebruikt, klopt dat? Zo ja, waarom staat de streep er? Het is nogal verwarrend. ik ben er erg benieuwd naar. Groetjes Ria
22.01.2026 - 22:44DROPS Design ha risposto:
Dag Ria,
De schuine streep die over acht steken van links boven naar rechts onder loopt wordt in telpatroon A.5 gebruikt.
25.01.2026 - 10:47
![]() Lucia ha scritto:
Lucia ha scritto:
Gosto Muito
10.01.2026 - 11:12DROPS Design ha risposto:
Obrigado em nome da equipa de design DROPS
12.01.2026 - 14:37
![]() Meg ha scritto:
Meg ha scritto:
Ciao! Chiedo scusa per la domanda forse banale: nella quantità di lana indicata è compresa quella necessaria per il doppio campione? Oppure va poi disfatto per recuperare il filato? Grazie!
23.12.2025 - 18:25DROPS Design ha risposto:
Buonasera Meg, la quantità di filato indicata è quella per il capo, non per i campioni. Buon lavoro!
27.12.2025 - 00:52
![]() Maria Tagliavia ha scritto:
Maria Tagliavia ha scritto:
C'è un tutorial per la cucitura delle spalle e il giro manica? Grazie
24.11.2025 - 08:57DROPS Design ha risposto:
Buongiorno Maria, può cucire il lavoro a punto maglia o punto materasso. Buon lavoro!
25.11.2025 - 08:58
![]() Fanjat ha scritto:
Fanjat ha scritto:
Ne pas tenir compte de ma question j ai vu la correction merci
09.11.2025 - 20:45
![]() Fanjat ha scritto:
Fanjat ha scritto:
Bonjour dans la taille S pour les emmanchures voys dites 0 tous les 2 rangs? Je ne comprends pas merci de m expliquer.
09.11.2025 - 20:43
![]() Marina ha scritto:
Marina ha scritto:
Oubliez ma question précédente je crois avoir compris Pour les rangs endroits on suit les diagrammes 1 2 3 4 5 6 1 Pour les rangs envers on tricote les mailles comme elles se présentent endroit sur endroit envers sur envers sauf bien sûr les 20 mailles du début et fin de rang qui se tricotent au point de blé C'est juste? Merci
16.09.2025 - 19:07DROPS Design ha risposto:
Bonjour Marina, c'est correct. Bon tricot!
17.09.2025 - 08:54
![]() Angela ha scritto:
Angela ha scritto:
Has knit now issue 181 made a mistake in this pattern Pattern C has no cable till row 9 and it looks wrong can you help me please
13.08.2025 - 19:06DROPS Design ha risposto:
Dear Angela, our diagrams are called A.1 to A.6, not sure which one you call "Pattern C", can you help here giving us the name of the diagram online concerned with your question? Thanks for your comprehension.
14.08.2025 - 08:49
![]() Angela ha scritto:
Angela ha scritto:
I think Knit now Issue 181 have made a mistake on part C as there is no cable till row 9 and it doesn’t look right, I looked at the picture and there is a cable before that,l have knitted it as instructed but would have been nice to see the proper pattern, please can you explain this to me thank you
13.08.2025 - 18:56
|
|||||||||||||||||||
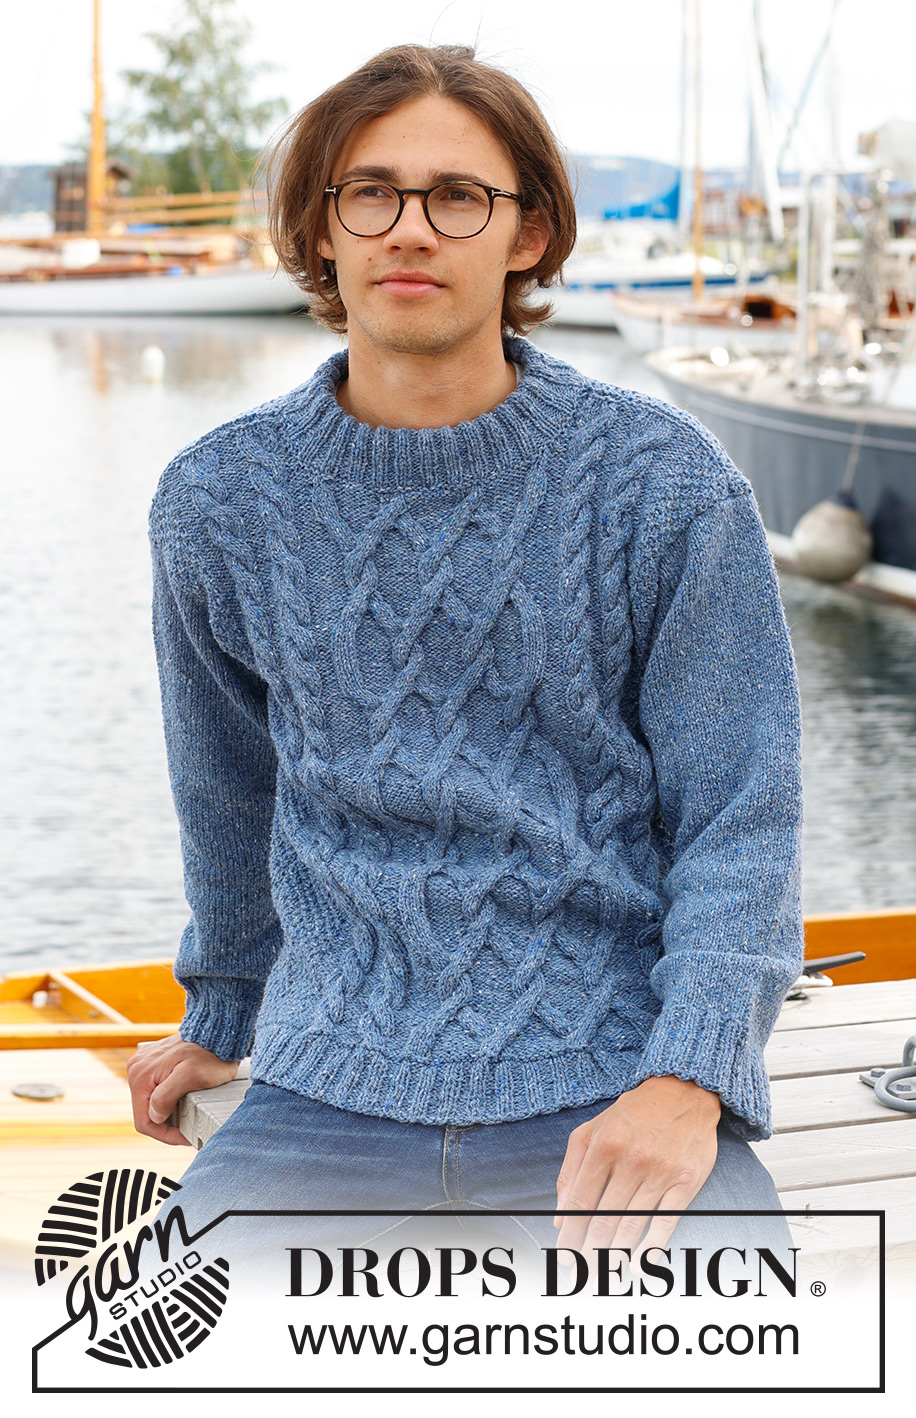
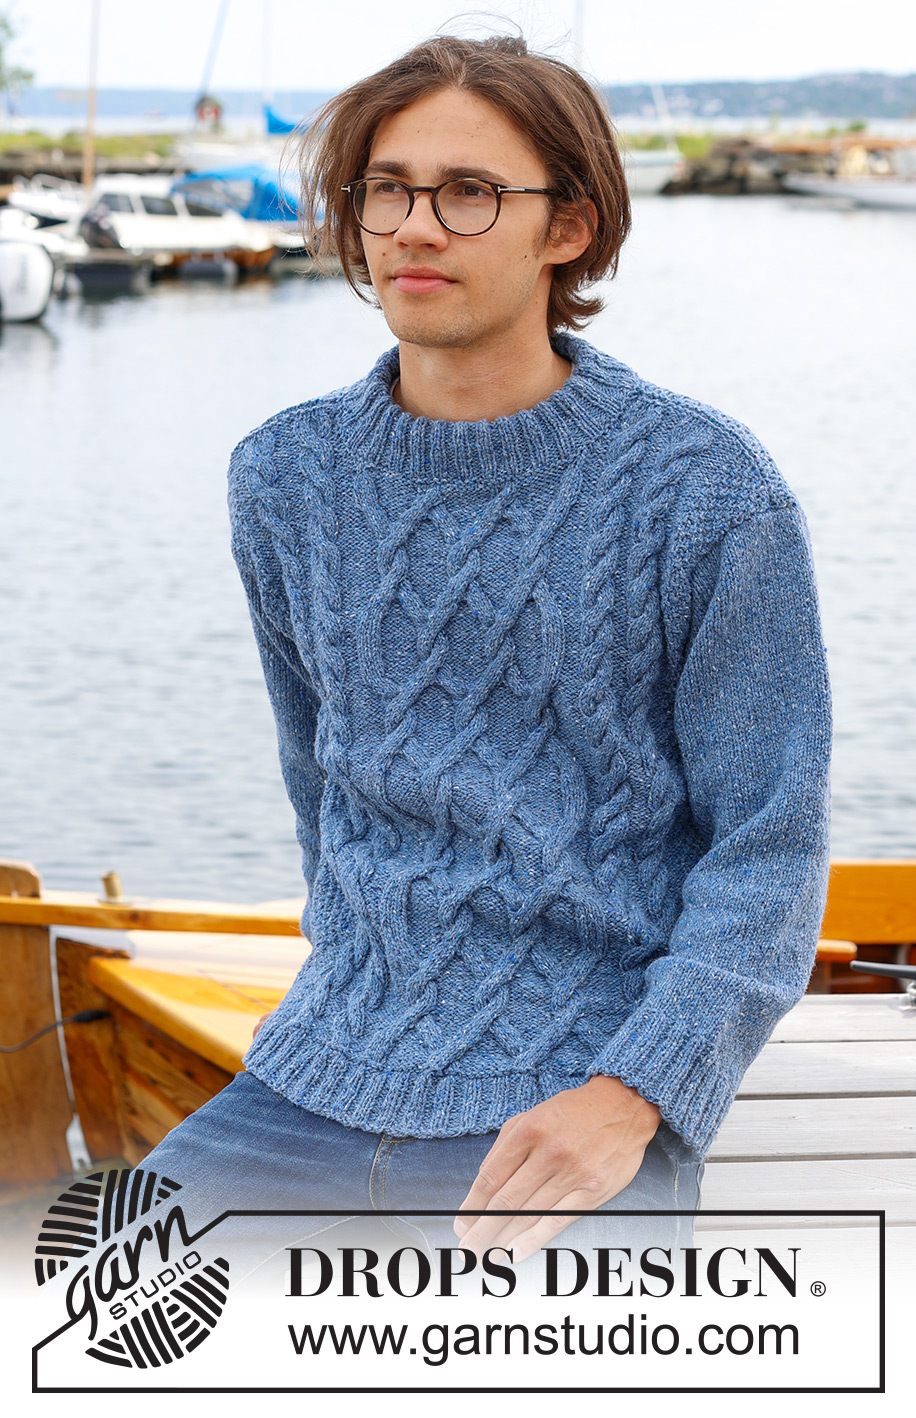
Sailor's Knots#sailorsknotssweater |
|||||||||||||||||||
 |
 |
||||||||||||||||||
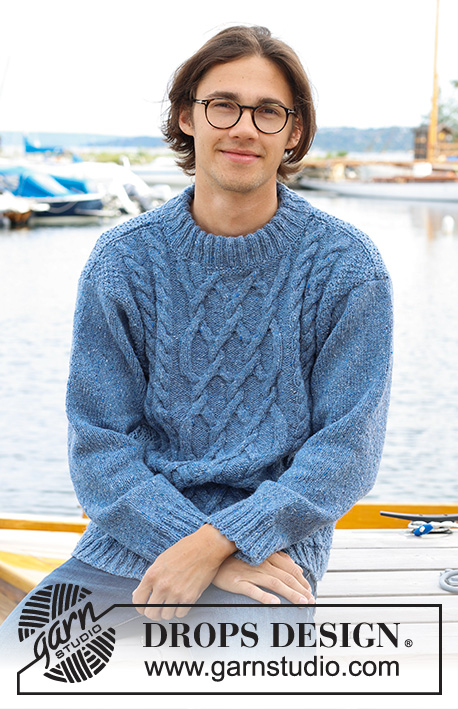
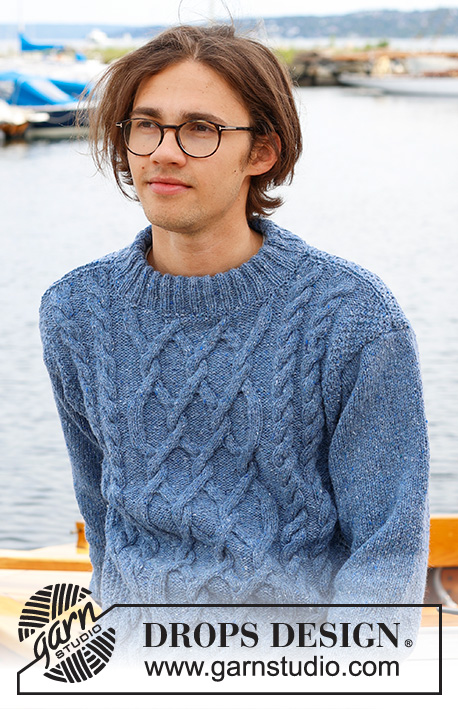
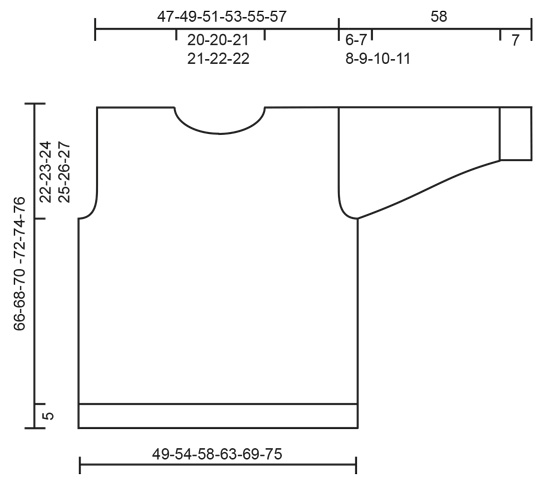
Maglione da uomo lavorato ai ferri in DROPS Soft Tweed. Lavorato dal basso verso l’alto, con trecce, collo doppio e maniche cucite. Taglie: S – XXXL.
DROPS 233-2 |
|||||||||||||||||||
|
------------------------------------------------------- TECNICHE IMPIEGATE: ------------------------------------------------------- COSTA/MAGLIA LEGACCIO (avanti e indietro): Lavorare tutti i ferri a diritto. 1 costa in altezza = 2 ferri diritto. MOTIVO: Vedere i diagrammi A.1 - A.6. I diagrammi mostrano tutti i ferri del motivo visti dal diritto del lavoro. SUGGERIMENTO PER GLI AUMENTI (maniche): Lavorare tutti gli aumenti dal diritto del lavoro! Fare 1 gettato all’interno di ogni maglia di vivagno a entrambi i lati. Sul ferro successivo lavorare i gettati a ritorto per evitare buchi. Poi lavorare le nuove maglie a maglia rasata. ----------------------------------------------------- INIZIO DEL LAVORO: ------------------------------------------------------- MAGLIONE – BREVE RIASSUNTO DEL LAVORO: Lavorato in parti separate, in piano e poi cucite. Lavorare il collo in tondo e piegarlo a metà. DIETRO: Avviare 116-124-136-148-160-172 maglie con i ferri circolari n° 3,5 mm e DROPS Soft Tweed. Lavorare a coste in piano come segue – 1° ferro dal diritto del lavoro: 1 maglia di vivagno a MAGLIA LEGACCIO – leggere la spiegazione sopra, * 2 maglie diritto, 2 maglie rovescio *, lavorare *-* fino a quando rimangono 3 maglie, 2 maglie diritto e 1 maglia di vivagno a maglia legaccio. Lavorare queste coste per 5 cm. Passare ai ferri circolari n° 4,5 mm. Lavorare 1 ferro diritto dal diritto del lavoro e diminuire 16-14-18-20-20-20 maglie in modo uniforme sul ferro = 100-110-118-128-140-152 maglie. Lavorare 1 ferro diritto dal rovescio del lavoro. Poi lavorare il motivo come segue dal diritto del lavoro: 1 maglia di vivagno a maglia legaccio, lavorare il motivo A.1 fino a quando rimane 1 maglia di vivagno a maglia legaccio. FARE ATTENZIONE ALLA TENSIONE DEL LAVORO! Continuare questo motivo. Quando il lavoro misura 44-45-46-47-48-49 cm, intrecciare all’inizio di ogni ferro per gli scalfi come segue: 3 maglie 1 volta, 2 maglie 0-1-2-2-3-4 volte, 1 maglia 0-1-1-4-6-8 volte a ogni lato = 94-98-102-106-110-114 maglie. Continuare questo motivo. Quando il lavoro misura 64-66-68-70-72-74 cm, intrecciare le 38-38-40-40-42-42 maglie centrali per il collo e finire ogni spalla in modo separato. Intrecciare 1 maglia sul ferro successivo dal collo = 27-29-30-32-33-36 maglie. Continuare il motivo A.1 fino a quando il lavoro misura 66-68-70-72-74-76 cm. Intrecciare. Lavorare l’altra spalla nello stesso modo. DAVANTI: Avviare 116-124-136-148-160-172 maglie con i ferri circolari n° 3,5 mm e DROPS Soft Tweed. Lavorare a coste in piano come segue – 1° ferro dal diritto del lavoro: 1 maglia di vivagno a maglia legaccio, * 2 maglie rovescio, 2 maglie diritto *, lavorare *-* fino a quando rimangono 3 maglie, 2 maglie rovescio e 1 maglia di vivagno a maglia legaccio. Lavorare queste coste per 5 cm. Passare ai ferri circolari n° 4,5 mm. Lavorare 1 ferro diritto dal diritto del lavoro e aumentare 12-14-10-8-8-8 maglie in modo uniforme sul ferro = 128-138-146-156-168-180 maglie. Lavorare 1 ferro diritto dal rovescio del lavoro. Poi lavorare il motivo come segue dal diritto del lavoro: 1 maglia di vivagno a maglia legaccio, lavorare il motivo A.1 su 11-16-20-25-31-37 maglie, A.2, A.3, A.4, A.5, A.6, lavorare 11-16-20-25-31-37 maglie in A.1, 1 maglia di vivagno a maglia legaccio. Continuare questo motivo. Quando il lavoro misura 44-45-46-47-48-49 cm, intrecciare all’inizio di ogni ferro per gli scalfi come segue: 3 maglie 1 volta, 2 maglie 0-1-2-2-3-4 volte, 1 maglia 0-1-3-4-6-8 volte a ogni lato = 122-126-130-134-138-142 maglie. Continuare questo motivo. Quando il lavoro misura 58-60-61-63-64-66 cm, diminuire 12 maglie in modo uniforme sulle maglie lavorate a diritto in A.4 = 110-114-118-122-126-130 maglie. Sul ferro successivo dal diritto del lavoro mettere in sospeso le 32 maglie centrali per il collo e finire ogni spalla in modo separato. Intrecciare su ogni ferro dal collo come segue: 2 maglie 1 volta e 1 maglia 2-2-3-3-3-4 volte = 35-37-38-40-41-43 maglie sulla spalla- Quando il lavoro misura 65-67-69-71-73-75 cm, diminuire 4 maglie nelle sezioni lavorate a diritto in A.2 e A.3 / A.5 e A.6 = 27-29-30-32-33-35 maglie. Continuare il motivo fino a quando il lavoro misura 66-68-70-72-74-76 cm. Intrecciare. Lavorare l’altra spalla nello stesso modo. MANICHE: Avviare 62-62-66-66-70-70 maglie con i ferri circolari n° 3,5 mm e DROPS Soft Tweed. Lavorare a coste in piano come segue – 1° ferro dal diritto del lavoro: 1 maglie di vivagno a maglia legaccio, * 2 maglie diritto, 2 maglie rovescio *, lavorare *-* fino a quando rimane 1 maglia, 1 maglia di vivagno a maglia legaccio. Lavorare queste coste in piano per 7 cm. Passare ai ferri circolari n° 4,5 mm. Lavorare 1 ferro diritto dal diritto del lavoro e diminuire 8-6-8-8-10-8 maglie in modo uniforme = 54-56-58-58-60-62 maglie. Continuare a maglia rasata e 1 maglia di vivagno a maglia legaccio a ogni lato fino a quando la manica misura 10 cm. Aumentare 1 maglia all’interno di entrambe le maglie di vivagno – leggere il SUGGERIMENTO PER GLI AUMENTI. Aumentare in questo modo ogni 2½-2½-2-1½-1½-1½ cm per un totale di 15-15-16-19-19-21 volte = 84-86-90-96-98-104 maglie. Quando la manica misura 52-51-50-49-48-47 cm, intrecciare 3 maglie a ogni lato. Intrecciare per l’arrotondamento della manica all’inizio di ogni ferro: 2 maglie 2-2-3-3-4-4 volte, 1 maglia 0-1-0-1-0-1 volte a ogni lato. Poi intrecciare 2 maglie a ogni lato fino a quando la manica misura 57 cm per tutte le taglie, intrecciare 3 maglie a ogni lato, poi intrecciare le maglie rimaste. La manica misura 58 cm per tutte le taglie. Lavorare l’altra manica nello stesso modo. CONFEZIONE: Cucire i margini delle spalle all’interno dei bordi di chiusura. Attaccare le maniche. Cucire le maniche e i lati all’interno della maglia di vivagno. COLLO: Lavorare il collo in tondo, iniziando dal diritto del lavoro vicino a una cucitura della spalla. Usando i ferri circolari corti n° 3,5 mm e DROPS Soft Tweed. Riprendere 96 - 108 maglie (comprese le maglie in sospeso sul davanti) – il n° delle maglie dev’essere divisibile per 4. Lavorare 1 giro rovescio e 1 giro diritto. Lavorare a coste (2 maglie diritto, 2 maglie rovescio) per 11 cm. Intrecciare con diritto su diritto e rovescio su rovescio. Piegare il collo a metà verso l’interno e cucire. Per evitare che il collo risulti tirato e si arrotoli verso l’esterno, è importante che la cucitura sia elastica. |
|||||||||||||||||||
Spiegazioni del diagramma |
|||||||||||||||||||
|
|||||||||||||||||||
 |
|||||||||||||||||||
 |
|||||||||||||||||||
 |
|||||||||||||||||||
Avete terminato questo modello?Allora taggate le vostre foto con #dropspattern #sailorsknotssweater o inviatele alla #dropsfan gallery. Avete bisogno di aiuto con questo modello?Troverete 27 video tutorial, una sezione per i commenti/domande e molto altro guardando il modello su www.garnstudio.com © 1982-2026 DROPS Design A/S. Ci riserviamo tutti i diritti. Questo documento, compreso tutte le sue sotto-sezioni, è protetto dalle leggi sul copyright. Potete leggere quello che potete fare con i nostri modelli alla fine di ogni modello sul nostro sito. |
|||||||||||||||||||


Con oltre 40 anni di esperienza nel design di modelli di maglia e uncinetto, DROPS Design offre la più estesa collezione di modelli gratuiti su internet - tradotti in 17 lingue. Ad oggi vi possiamo fornire 324 cataloghi e 12290 modelli - 9561 dei quali sono tradotti in Italiano.
Ci stiamo impegnando molto per darvi il meglio che vi possiamo offrire in termini di maglia e uncinetto, ispirazioni e consigli così come filati di grande qualità ad un prezzo incredibile! Volete utilizzare i nostri modelli per qualcosa d'altro oltre al vostro uso personale? Potete leggere tutto ciò che è consentito nel testo sul Copyright in basso su tutte le pagine dei nostri modelli. Buon lavoro!
Lasciare un commento sul modello DROPS 233-2
Noi saremmo felici di ricevere i tuoi commenti e opinioni su questo modello!
Se vuoi fare una domanda, fai per favore attenzione a selezionare la categoria corretta nella casella qui sotto per velocizzare il processo di risposta. I campi richiesti sono indicati da *.