
Categorie popolari
State cercando un filato?


Commenti / Domande (77)
![]() Ghezal Soumaya ha scritto:
Ghezal Soumaya ha scritto:
Bonsoir, très joli modèle, très agréable à tricoter, merci beaucoup pour les explications qui sont très claires. Bonne continuation
07.02.2026 - 18:37
![]() Mia ha scritto:
Mia ha scritto:
Ik zou graag de trui Scent of Sage (Drops 226-62, patroon nr wi-38) breien. Aangezien Drops Wish niet meer te verkrijgen is, zou ik hem willen breien met Drops Air. Begrijp ik het goed dat ik de trui dan brei met dubbele draad ? En zo ja, klopt het dat ik toch maar even zoveel bollen nodig heb ? Als ik toch een dubbele hoeveelheid garen nodig heb, dan wordt dit wel een dure trui. Bestaat er een ander, gelijkaardig garen uit garengroep C (enkele draad) ? Alvast bedankt voor uw antwoord !
03.02.2026 - 15:08DROPS Design ha risposto:
Dag Mia,
Ja, dat klopt, je breit dan met dubbele draad. De totale hoeveelheid wol staat al aangegeven, dus je hebt 550-600-650-700-750-800 gram DROPS Air nodig en niet het dubbele daarvan.
03.02.2026 - 21:33
![]() Courtney ha scritto:
Courtney ha scritto:
Hello. What size is the sweater in the pattern sample (pictured above)?
20.01.2026 - 08:14
![]() Geneviève ha scritto:
Geneviève ha scritto:
Je vous remercie pour votre réponse rapide. Je comprends par rapport aux torsades, mais 14 mailles de différence pour les côtes??? Cordiales salutations
26.11.2025 - 20:07DROPS Design ha risposto:
Bonjour Geneviève, de la même façon, les côtes sont tricotées différemment sur le devant et le dos, le besoin des mailles sera donc automatiquement aussi différent. Bon tricot!
27.11.2025 - 09:29
![]() Geneviève ha scritto:
Geneviève ha scritto:
Bpnjour, je trouve très étonnant la différence de mailles à monter entre le devant et le dos? Pouvez-vous m'éclaircir svpl.?
26.11.2025 - 10:22DROPS Design ha risposto:
Bonjour Geneviève, volontiers, en voici la raison: il faut, pour la même largeur, plus de mailles pour les torsades que pour le jersey, et comme il n'y a pas de torsades dans le dos, on va avoir besoin de moins de mailles. Bon tricot!
26.11.2025 - 16:19
![]() Michele ha scritto:
Michele ha scritto:
Par quoi remplacer la laine drops wish qui est épuisée?Merci
19.11.2025 - 13:59DROPS Design ha risposto:
Bonjour MIchele, utilisez le convertisseur pour voir les alternatives possibles et les quantités correspondantes. Bon tricot!
19.11.2025 - 16:31
![]() Ajay ha scritto:
Ajay ha scritto:
Sorry forgot to also ask - why is circular needle stated for a back and forth pattern. I' m worried im missing something if I use SPNs. Thank you!
16.03.2025 - 12:00DROPS Design ha risposto:
Dear Ajay, in these cases, if we use circular needles when working back and forth is because the number of stitches is quite big, so it's more confortable to place the stitches in the cable, instead of trying to fit them all in the straight needles. But you can work perfectly fine with the straight needles. Happy knitting!
16.03.2025 - 20:49
![]() Ajay ha scritto:
Ajay ha scritto:
Hello - could you tell me what type of Cast on is used in this pattern please? Or what type of cast on is recommended for this sweater? Thank you!
16.03.2025 - 11:58DROPS Design ha risposto:
Dear Ajay, we recommend using the Continental Method but you can use whichever one that you prefer. Happy knitting!
16.03.2025 - 22:45
![]() Ana ha scritto:
Ana ha scritto:
Hi, Silly question time but I am confused with the quantity of yarn required - Drops Air states 650g the same as Drops Wish but two different yarn groups. Do I need to double up to 1300 of Air as the pattern requires two strands knitted together. Thanks
14.02.2025 - 16:27DROPS Design ha risposto:
Dear Ana, you need the same amount of yarn in gr, but you need to take into account that each yarn has a different meterage. DROPS Wish is 50gr = 70m; DROPS Air: 50g = 150m. So you have double the meterage in a ball of Air than a ball of Wish. For the indicated size you need 910m (650/50gr per ball = 13 balls x 70m each ball = 910) of DROPS Wish and you would need 910+910 of DROPS Air. Which, according to the gauge, should be: 1820m total/150m per ball = approx. 13 balls of DROPS Air total. Happy knitting!
16.02.2025 - 23:00
![]() Eleanor ha scritto:
Eleanor ha scritto:
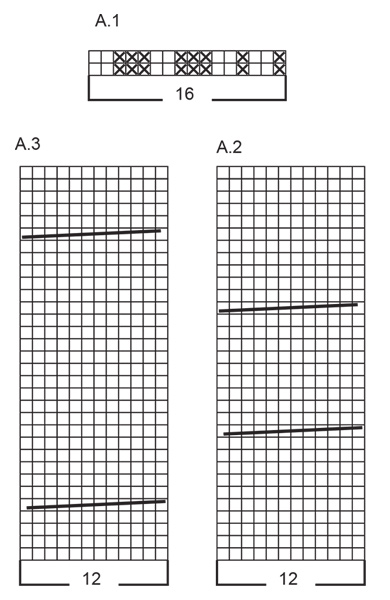
Hello! Silly question: When working on the front piece and beginning the post-ribbing section on the right side, I see that A2 and A3 have their cabling on the wrong side. I've made this before and don't remember being confused then, but I'm a little confused doing these cables on the wrong side. Should I pull 6 stitches to the side, purl them, and then purl the 6 stitches pulled? Thanks!
18.01.2025 - 00:10DROPS Design ha risposto:
Dear Elenor, the diagrams ALWAYS show the pattern as you would see it from the right side. So, if ypu have to "place 6 stitches on cable needle behind the piece, knit 6, knit 6 from cable needle" from the right side, then from the wrong side you will have to : place 6 stitches on cable needle at the front the piece, purl 6, purl 6 from cable needle. Happy Knitting!
18.01.2025 - 01:49
|
||||||||||
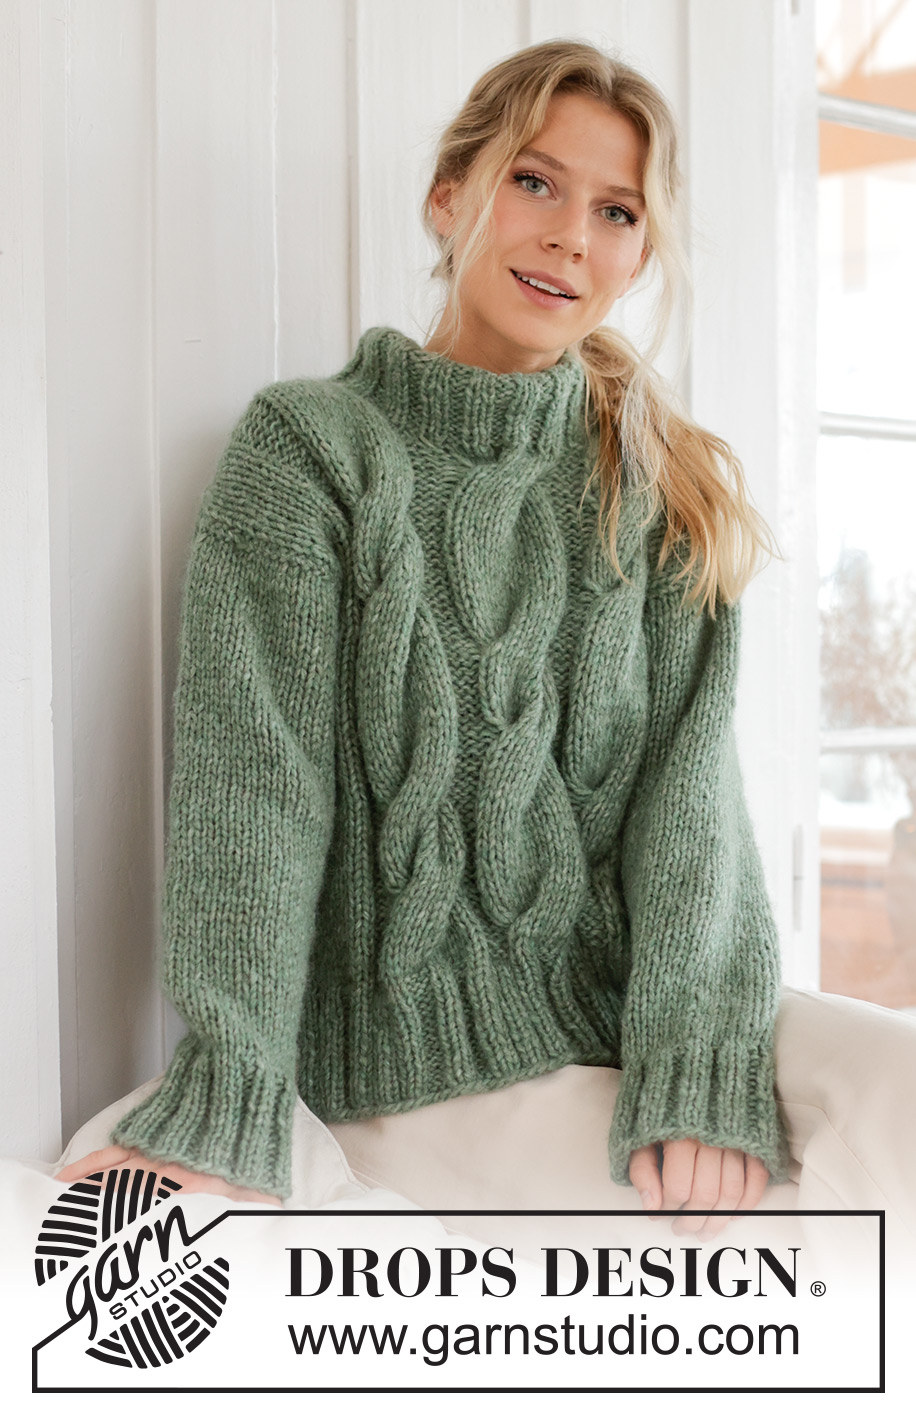
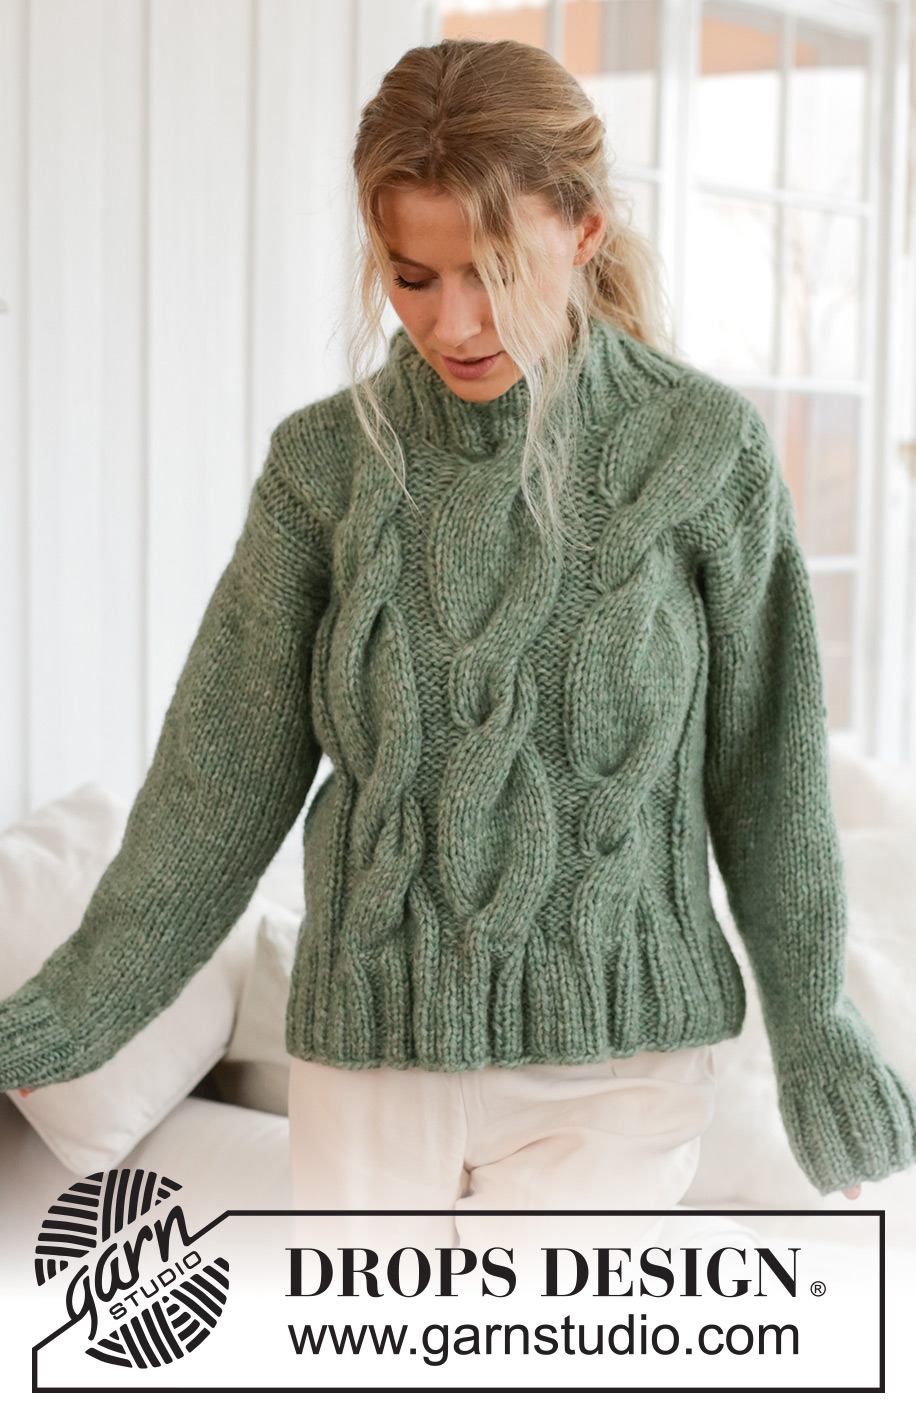
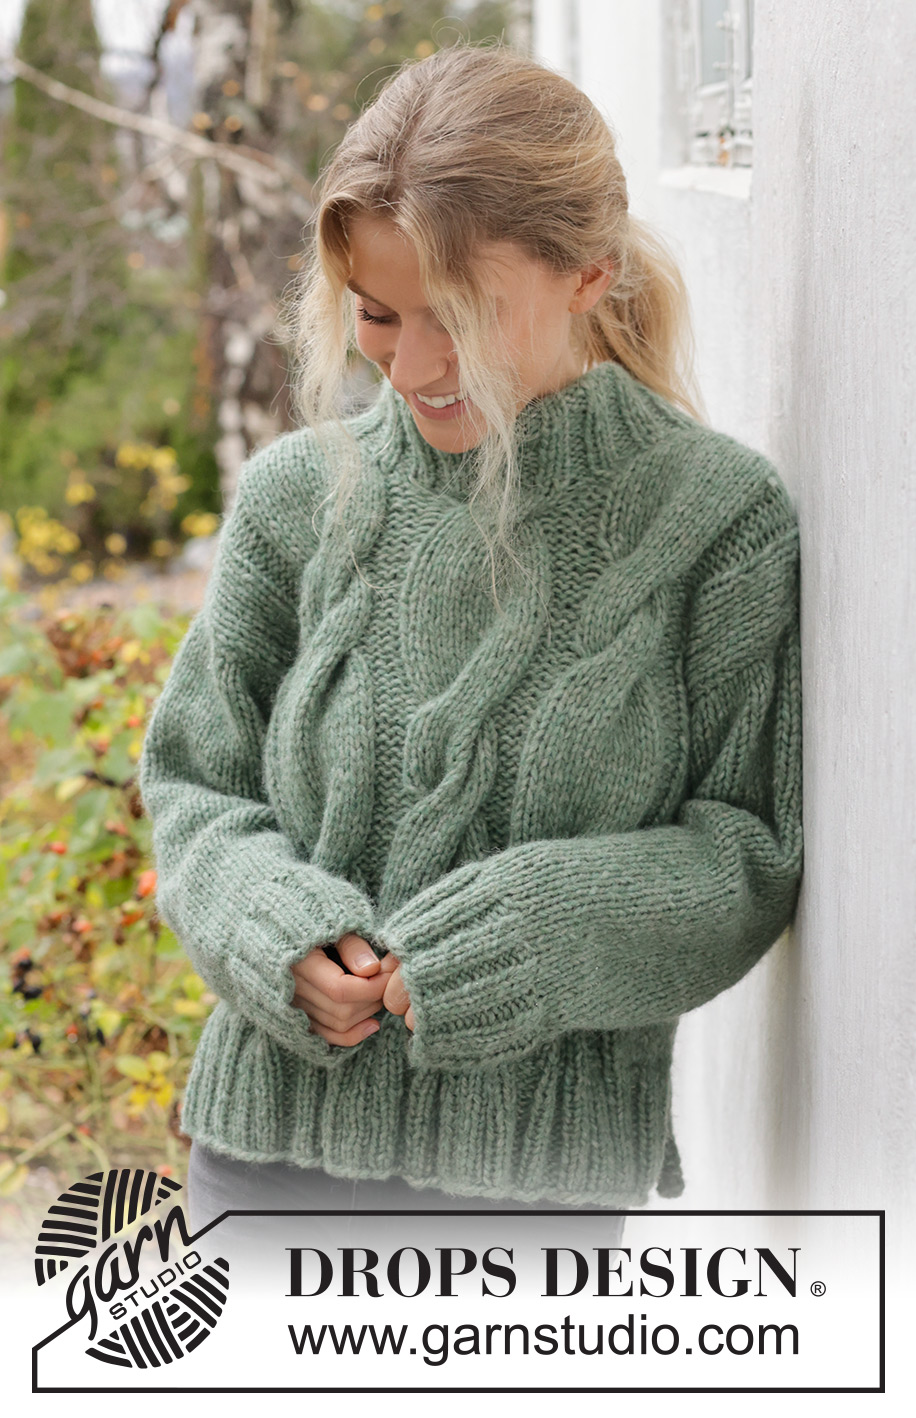
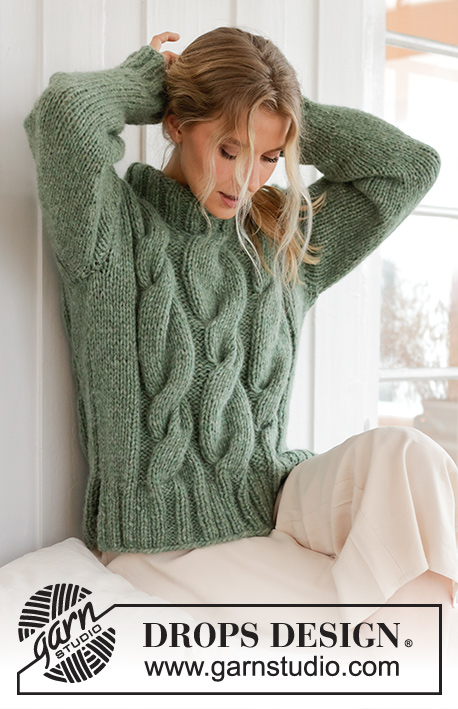
Scent of Sage#scentofsagesweater |
||||||||||
 |
 |
|||||||||
Maglione lavorato ai ferri con 1 capo di DROPS Wish o 2 capi di DROPS Air. Lavorato con trecce e collo doppio. Taglie: S - XXXL.
DROPS 226-62 |
||||||||||
|
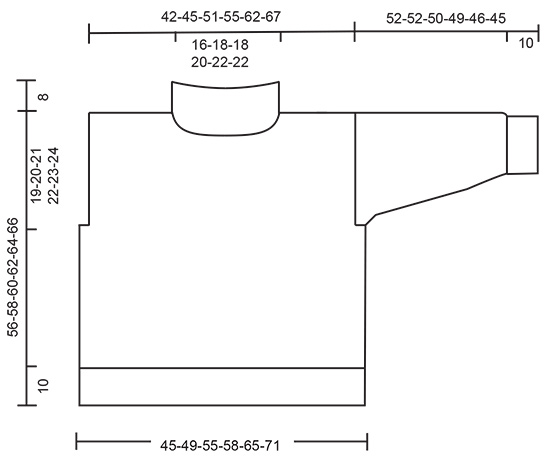
------------------------------------------------------- TECNICHE IMPIEGATE: ------------------------------------------------------- COSTA/MAGLIA LEGACCIO (avanti e indietro): Lavorare tutti i ferri a diritto. 1 costa in altezza = 2 ferri diritto. MOTIVO: Vedere i diagrammi A.1 - A.3. I diagrammi mostrano tutti i ferri del motivo visti dal diritto del lavoro. SUGGERIMENTO PER LE DIMINUZIONI (collo): Diminuire all’inizio del ferro (spalla destra): 1 maglia diritto, passare 1 maglia a diritto senza lavorarla, 2 maglie insieme a diritto, accavallare la maglia passata sopra quelle appena lavorate insieme. Diminuire alla fine del ferro (spalla sinistra): Lavorare fino a quando rimangono 4 maglie, 3 maglie insieme a diritto, 1 maglia diritto. SUGGERIMENTO PER GLI AUMENTI (applicato alle maniche): Lavorare fino a quando rimane 1 maglia prima del segnapunti, 1 gettato, 2 maglie diritto (il segnapunti è al centro di queste 2 maglie), 1 gettato. Sul giro successivo lavorare i gettati a diritto ritorto per evitare buchi. Poi lavorare le nuove maglie a maglia rasata. ------------------------------------------------------- INIZIO DEL LAVORO: ------------------------------------------------------- MAGLIONE – BREVE RIASSUNTO DEL LAVORO: Lavorare il davanti e il dietro in modo separato in piano e dal basso verso l’alto con i ferri circolari. Lavorare le maniche in tondo con i ferri a doppia punta/ferri circolari corti. Unire le sezioni e lavorare il collo alla fine. DAVANTI: Avviare 74-74-82-90-98-98 maglie con i ferri circolari n° 7 mm con 1 capo di DROPS Wish o 2 capi di DROPS Air. Lavorare 1 ferro rovescio dal rovescio del lavoro. Poi lavorare come segue dal diritto del lavoro: 1 maglia di vivagno a MAGLIA LEGACCIO – leggere la descrizione sopra, 2 maglie diritto, * 2 maglie rovescio, 2 maglie diritto *, lavorare *-* 2-2-3-4-5-5 volte, lavorare A.1 3 volte, poi le prime 4 maglie di A.1, 2 maglie diritto, * 2 maglie rovescio, 2 maglie diritto *, lavorare *-* 2-2-3-4-5-5 volte, 1 maglia di vivagno a maglia legaccio. Continuare queste coste per 10 cm. Passare ai ferri circolari n° 8 mm e lavorare come segue dal diritto del lavoro: lavorare a maglia rasata sulle prime 11-11-15-19-23-23 maglie, ALLO STESSO TEMPO diminuire 3-1-2-4-4-1 maglie in modo uniforme, 4 maglie rovescio, A.2, 4 maglie rovescio, A.3, 4 maglie rovescio, A.2, 4 maglie rovescio, maglia rasata sulle ultime 11-11-15-19-23-23 maglie, ALLO STESSO TEMPO diminuire 3-1-2-4-4-1 maglie in modo uniforme = 68-72-78-82-90-96 maglie. Continuare questo motivo. FARE ATTENZIONE ALLA TENSIONE DEL LAVORO! Quando il lavoro misura 37-38-39-40-41-42 cm, intrecciare 2 maglie all’inizio dei 2 ferri successivi per gli scalfi = 64-68-74-78-86-92 maglie. Continuare il motivo fino a quando il lavoro misura 50-52-53-55-56-58 cm. Sul ferro successivo mettere in sospeso le 20-22-22-24-26-26 maglie centrali per il collo e finire ogni spalla in modo separato. Diminuire come segue su ogni ferro dal diritto del lavoro all’altezza del collo: 2 maglie 4 volte – leggere il SUGGERIMENTO PER LE DIMINUZIONI = 14-15-18-19-22-25 maglie sulla spalla. Lavorare a maglia rasata sulle trecce quando non c’è più spazio per le trecce. Lavorare fino a quando il lavoro misura 56-58-60-62-64-66 cm, intrecciare. Lavorare l’altra spalla nello stesso modo. DIETRO: Avviare 56-60-68-72-80-88 maglie con i ferri circolari n° 7 mm con 1 capo di DROPS Wish o 2 capi di DROPS Air. Lavorare 1 ferro rovescio dal rovescio del lavoro. Poi lavorare come segue dal diritto del lavoro: 1 maglia di vivagno a maglia legaccio, 2 maglie diritto, * 2 maglie rovescio, 2 maglie diritto *, lavorare *-* fino a quando rimane 1 maglia, 1 maglia di vivagno a maglia legaccio. Continuare queste coste per 10 cm. Passare ai ferri circolari n° 8 mm. Lavorare 1 ferro in cui diminuire 6-6-8-8-8-10 maglie in modo uniforme = 50-54-60-64-72-78 maglie. Lavorare a maglia rasata su tutte le maglie. Quando il lavoro misura 37-38-39-40-41-42 cm, intrecciare 2 maglie all’inizio dei 2 ferri successivi per gli scalfi = 46-50-56-60-68-74 maglie. Continuare a maglia rasata fino a quando il lavoro misura 54-56-58-60-62-64 cm. Sul ferro successivo intrecciare le 16-18-18-20-22-22 maglie centrali per il collo e finire ogni spalla in modo separato. Poi intrecciare 1 maglia sul ferro successivo dal collo = 14-15-18-19-22-25 maglie per la spalla. Lavorare fino a quando il lavoro misura 56-58-60-62-64-66 cm, intrecciare. Lavorare l’altra spalla nello stesso modo. MANICHE: Avviare 36-40-40-44-44-48 maglie con i ferri a doppia punta/ferri circolari corti n° 7 mm con 1 capo di DROPS Wish o 2 capi di DROPS Air. Lavorare 1 giro diritto, poi lavorare a coste (2 maglie diritto, 2 maglie rovescio) in tondo per 10 cm. Passare ai ferri a doppia punta n° 8 mm. Lavorare 1 giro diritto in cui diminuire 4-6-4-6-4-6 maglie in modo uniforme = 32-34-36-38-40-42 maglie. Inserire un segnapunti all’inizio del giro = centro sotto la manica. Lavorare a maglia rasata fino a quando il lavoro misura 11 cm. Ora aumentare 1 maglia a entrambi i lati del segnapunti – leggere il SUGGERIMENTO PER GLI AUMENTI. Aumentare in questo modo ogni 9½-9½-9-9-8½-8 cm per un totale di 5 volte = 42-44-46-48-50-52 maglie. Intrecciare quando la manica misura 52-52-50-49-46-45 cm. Lavorare l’altra manica nello stesso modo. CONFEZIONE: Cucire i margini delle spalle. Cucire i margini laterali nel filo più esterno della maglia più esterna, fino alle coste (10 cm di spacco in basso). Attaccare le maniche. COLLO DOPPIO: Iniziare dal diritto del lavoro all’altezza di una spalla e riprendere 60 - 76 maglie attorno al collo (comprese le maglie in sospeso), con i ferri circolari corti n° 7 mm e 1 capo di DROPS Wish o 2 capi di DROPS Air. Il n° di maglie dev’essere divisibile per 4. Lavorare a coste (2 maglie diritto, 2 maglie rovescio) in tondo per 16 cm. Intrecciare. Piegare il collo a metà verso l’interno e cucire. Per evitare che il collo risulti tirato e si arrotoli all’esterno, è importante che la cucitura sia elastica. |
||||||||||
Spiegazioni del diagramma |
||||||||||
|
||||||||||
 |
||||||||||
 |
||||||||||
Avete terminato questo modello?Allora taggate le vostre foto con #dropspattern #scentofsagesweater o inviatele alla #dropsfan gallery. Avete bisogno di aiuto con questo modello?Troverete 34 video tutorial, una sezione per i commenti/domande e molto altro guardando il modello su www.garnstudio.com © 1982-2026 DROPS Design A/S. Ci riserviamo tutti i diritti. Questo documento, compreso tutte le sue sotto-sezioni, è protetto dalle leggi sul copyright. Potete leggere quello che potete fare con i nostri modelli alla fine di ogni modello sul nostro sito. |
||||||||||


Con oltre 40 anni di esperienza nel design di modelli di maglia e uncinetto, DROPS Design offre la più estesa collezione di modelli gratuiti su internet - tradotti in 17 lingue. Ad oggi vi possiamo fornire 324 cataloghi e 12290 modelli - 9561 dei quali sono tradotti in Italiano.
Ci stiamo impegnando molto per darvi il meglio che vi possiamo offrire in termini di maglia e uncinetto, ispirazioni e consigli così come filati di grande qualità ad un prezzo incredibile! Volete utilizzare i nostri modelli per qualcosa d'altro oltre al vostro uso personale? Potete leggere tutto ciò che è consentito nel testo sul Copyright in basso su tutte le pagine dei nostri modelli. Buon lavoro!
Lasciare un commento sul modello DROPS 226-62
Noi saremmo felici di ricevere i tuoi commenti e opinioni su questo modello!
Se vuoi fare una domanda, fai per favore attenzione a selezionare la categoria corretta nella casella qui sotto per velocizzare il processo di risposta. I campi richiesti sono indicati da *.