
Categorie popolari
State cercando un filato?


Commenti / Domande (53)
![]() Michaela ha scritto:
Michaela ha scritto:
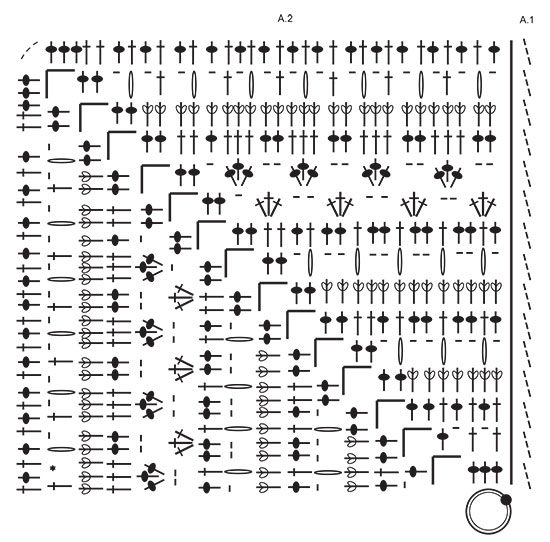
Tut mir leid, vielleicht war die Frage vorher unklar. Wenn man im Diagramm A2 z.B. die 4. und 5. Reihe von unten ansieht, dann sind in der 4. Reihe 9 Stäbchen dargestellt. In der 5. Reihe sollen dann jeweils 4 Stäbchen zusammengehäkelt werden, und dass insgesamt dreimal. Das geht sich aber nicht aus - dazu bräuchte ich in der 4. Reihe 12 Stäbchen und nicht 9. Daher meine Frage, ob man hier nicht immer 3 Stäbchen zusammenhäkelt anstatt 4? Vielen Dank!
27.05.2024 - 10:18DROPS Design ha risposto:
Liebe Michaela, die 4 Stäbchen zusammen sind als nur 1 Stäbchen gezählt und werden so gehäket (Anfang der 5. Reihe: 1 Lm, 1 M überpsringen, 4 Stb zs in das nächste Stb, 2 Lm, 2 M überspringen, 4 Stb zs in das nächste Stb, 2 Lm, 2 M überspringen, 4 Stb zs in das nächste Stb, 1 Lm, 1 Stäbchen überspringen (= 1+1+2+1+2+1+1= 9 Maschen), dann 2 Stäbchen in nächsten Luftmaschenbogen, usw... Viel Spaß beim Häkeln!
27.05.2024 - 12:59
![]() Michaela ha scritto:
Michaela ha scritto:
In der Anleitung steht bei einem Symbol: "4 STÄBCHEN ZU 1 STÄBCHEN ZUSAMMENHÄKELN." Wenn man aber das Diagramm A2 ansieht und dort die Maschen zählt, sieht es eher so aus, als würden nur 3 Stäbchen zusammengehäkelt? Habe ich etwas übersehen? Vielen Dank!
26.05.2024 - 13:37DROPS Design ha risposto:
Liebe Michaela, hier wird man 4 Stäbchen zusammen häkeln, so zählt jedes als 1 Stäbchen (wie für 1 Noppe z.B.). Viel Spaß beim Häkeln!
27.05.2024 - 08:46
![]() Gunvor ha scritto:
Gunvor ha scritto:
Jag blir galen på varv 4! Hur jag än gör får jag 2 stolpar över vid hörnet. Om jag tolkat diagramet rätt, är det sammanlagt 11 relief stolpar i varvet innan. Hoppar över 2m, en stolpgrupp i nästa, hoppas över 2m, en stolpgrupp i nästa. Hoppas över 2m 1 stolpgrupp i nästa, hoppa över 1m. Då är jag framme vid hörnet och har 2 st kvar. Det funkar ju inte? Tänker jag fel? Mönstret är jättevackert, men diagrammet är svårt att följa. Hade föredragit en beskrivning i text.
24.05.2024 - 08:56DROPS Design ha risposto:
Hej Gunvor, du starter med at hoppe over 1m, 1 stolpgrupp i nästa, hoppa över 2, 1 stolpgrupp i nästa, hoppa över 2, 1 stolpgrupp i nästa, hoppa över 1, 2 stolpar i lm-bågen, 5lm, 2 stolpar i samma lm-båge, hoppa över 1 osv :)
24.05.2024 - 10:25
![]() Hennie Verhees ha scritto:
Hennie Verhees ha scritto:
Bij dit patroon voel ik mij misleid, jullie geven 1200 gram aan en ik heb nld 4 gebruikt de afmeting is hetzelfde ,maar ik houd ruim 4 bollen garen over. Hoe kan dit? 1 bol dat snap ik , maar niet 4 volle bollen . ook lijkt dit patroon op een luchtige omslagdoek , terwijl het een best zware deken is. Graag hier uw antwoord op . Met vriendelijke groet , Hennie Verhees
02.04.2024 - 11:06
![]() Kathleen A Dougherty ha scritto:
Kathleen A Dougherty ha scritto:
This is a beautiful blanket. I am going to start it. Thank You for the pattern.
05.02.2024 - 21:23
![]() Mattea ha scritto:
Mattea ha scritto:
Buongiorno, volevo una precisazione. Nella riga 6 devo lavorare una maglia alta sul gruppo di 4 maglie sottostante ma non so dove devo inserire l'uncinetto. C'è per caso un video esplicativo? grazie
23.12.2023 - 10:17DROPS Design ha risposto:
Buongiorno Mattea, deve lavorare la maglia alta attorno al gruppo di maglie sotto. Provi a vedere se questo video può esserle di aiuto. Buon lavoro!
30.12.2023 - 10:51
![]() Agnieszka ha scritto:
Agnieszka ha scritto:
Not clear for me second row. I start wt chain 3, wich counts as first DC. Then directly I make second DC. Shouldn't I start with chain 4, which counts as first DC plus chain 1 space? Otherwise I have two DCs, without chain space in the begining of the row.
23.11.2023 - 10:25DROPS Design ha risposto:
Dear Agnieszka, in this pattern, the 3 chains to start rounds are not replacing the first dc, this means A.1 is worked extra: you first work A.1 then repeat A.2 a total of 4 times in the round. Happy crocheting!
23.11.2023 - 15:36
![]() Connie Sahagun ha scritto:
Connie Sahagun ha scritto:
I already did all the squares but I started too crochet the sides together with the single stich but what I I don’t understand what to do in the corners.
27.07.2023 - 21:11DROPS Design ha risposto:
Dear Mrs Sahagun, for the edge you will crochet 3 double crochets (US-crochet terminology) in each corner (and. 1 double crochet in each stitch along the sides of each square + 1 double crochet in the transition between 2 squares). Happy crocheting!
28.07.2023 - 07:39
![]() Gabi ha scritto:
Gabi ha scritto:
Guten Tag Werden nur vordere Reliefstäbchen gehäkelt oder abwechselnd vordere und hintere ? Herzlichen Dank
10.07.2023 - 06:43DROPS Design ha risposto:
Liebe Gabi, Diagram wird in Runde gehäkelt, so die Reliefstäbchen werden immer so gehäkelt. Viel Spaß beim häkeln!
28.07.2023 - 09:08
![]() Linda Mcsweeney ha scritto:
Linda Mcsweeney ha scritto:
The graph is confusing for the last round. How many stitches should you have on one side? The graph does not line up with the stiches below on the left side. Thanks.
12.06.2023 - 19:57DROPS Design ha risposto:
Dear Mrs Mcsweeney, on the last round you will have 32 dc (US-English) on the last half side on the square (A.2) and 3 chains in the corner, then 29 dc on the first half part on next side, this means you should have 32+29= 61 dc along each side of the square. Happy crocheting!
13.06.2023 - 08:14
|
||||||||||||||||||||||||||||
Day By The Sea#daybytheseablanket |
||||||||||||||||||||||||||||
 |
 |
|||||||||||||||||||||||||||
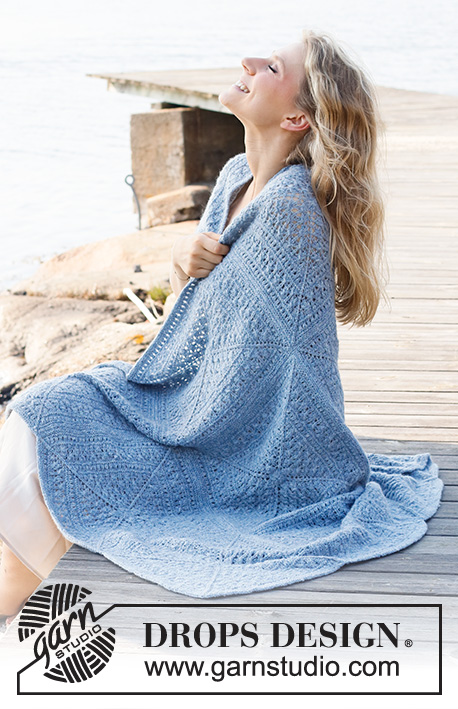
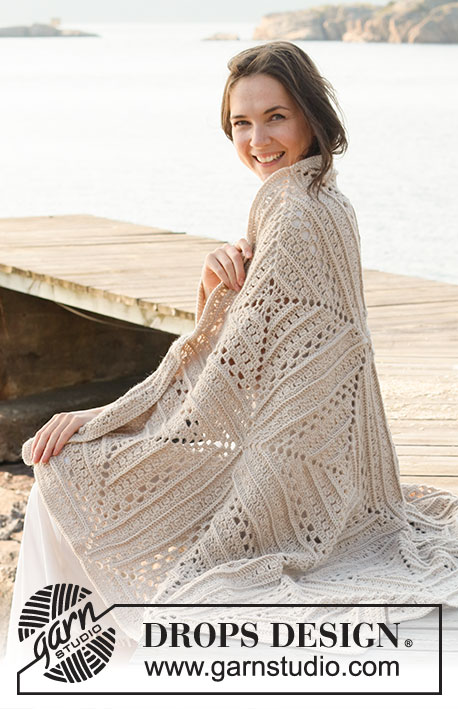
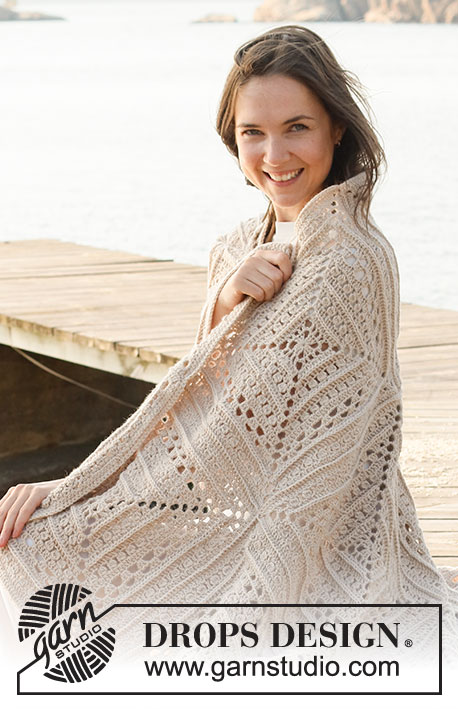
Coperta lavorata all’uncinetto in DROPS Lima.
DROPS 221-2 |
||||||||||||||||||||||||||||
|
------------------------------------------------------- TECNICHE IMPIEGATE: ------------------------------------------------------- MOTIVO: Vedere i diagrammi A.1 e A.2. Il diagramma A.1 mostra come iniziano e finiscono i giri. CATENELLE: Se lavorate prevalentemente sulla punta dell’uncinetto la catenella risulterà spesso troppo tirata; 1 catenella dev’essere lunga come la larghezza di 1 maglia alta. ------------------------------------------------------- INIZIO DEL LAVORO: ------------------------------------------------------- COPERTA – BREVE RIASSUNTO DEL LAVORO: La coperta è formata da 12 quadrati lavorati seguendo i diagrammi. I quadrati vengono poi uniti e si lavora un bordo all’uncinetto attorno alla coperta per rifinirla. QUADRATO: Usando l’uncinetto n° 4 mm e Lima. Leggere CATENELLE nella spiegazione sopra. Lavorare il diagramma A.2 per un totale di 4 volte attorno all’anello di catenelle - A.1 mostra come inizia e finisce il giro. FARE ATTENZIONE ALLA TENSIONE DEL LAVORO! Lavorare 12 quadrati in totale. CONFEZIONE: Disporre i quadrati con 3 quadrati in larghezza e 4 in altezza. Fare in modo che tutti i quadrati abbiano il diritto del lavoro in su. Usare il Lima e unire i quadrati, prima in larghezza e poi in lunghezza. Posizionare 2 quadrati insieme, rovescio contro rovescio, e lavorare attraverso entrambi gli strati dal diritto del lavoro come segue: Affrancare il filo con 1 maglia bassa attorno all’angolo di catenelle nell’angolo, * lavorare 1 maglia bassa in ogni maglia fino all’angolo successivo (= 3 catenelle), lavorare 1 maglia bassa attorno all’angolo, 2 catenelle e 1 maglia bassa attorno all’angolo successivo (= 3 catenelle). Lavorare *-* fino a quando sono stati uniti tutti i quadrati, ma sull’ultimo quadrato finire con 1 maglia bassa nell’ultimo angolo (= 3 catenelle). Ripetere lungo l’altra striscia in larghezza. Unire le strisce in lunghezza nello stesso modo. BORDO: Usare l’uncinetto n° 4 mm e Lima. Iniziare affrancando il filo con 1 maglia bassissima nel 1° angolo, poi lavorare come segue: lavorare 3 catenelle e 2 maglie alte attorno al 1° angolo. * Lavorare 1 maglia alta in ogni maglia fino agli angoli tra i quadrati, lavorare 1 maglia alta attorno a ogni angolo *, lavorare *-* fino all’ultimo angolo su questo lato della coperta. Attorno all’angolo 2 lavorare 3 maglie alte, lavorare *-* fino all’ultimo angolo su questo lato della coperta. Attorno all’angolo 3 lavorare 3 maglie alte, lavorare *-* fino all’ultimo angolo su questo lato della coperta. Attorno all’angolo 4 lavorare 3 maglie alte, lavorare *-* fino al 1° angolo e finire con 1 maglia bassissima nella 3° catenella all’inizi del giro. Tagliare e affrancare il filo. |
||||||||||||||||||||||||||||
Spiegazioni del diagramma |
||||||||||||||||||||||||||||
|
||||||||||||||||||||||||||||
 |
||||||||||||||||||||||||||||
Avete terminato questo modello?Allora taggate le vostre foto con #dropspattern #daybytheseablanket o inviatele alla #dropsfan gallery. Avete bisogno di aiuto con questo modello?Troverete 9 video tutorial, una sezione per i commenti/domande e molto altro guardando il modello su www.garnstudio.com © 1982-2026 DROPS Design A/S. Ci riserviamo tutti i diritti. Questo documento, compreso tutte le sue sotto-sezioni, è protetto dalle leggi sul copyright. Potete leggere quello che potete fare con i nostri modelli alla fine di ogni modello sul nostro sito. |
||||||||||||||||||||||||||||


Con oltre 40 anni di esperienza nel design di modelli di maglia e uncinetto, DROPS Design offre la più estesa collezione di modelli gratuiti su internet - tradotti in 17 lingue. Ad oggi vi possiamo fornire 324 cataloghi e 12290 modelli - 9561 dei quali sono tradotti in Italiano.
Ci stiamo impegnando molto per darvi il meglio che vi possiamo offrire in termini di maglia e uncinetto, ispirazioni e consigli così come filati di grande qualità ad un prezzo incredibile! Volete utilizzare i nostri modelli per qualcosa d'altro oltre al vostro uso personale? Potete leggere tutto ciò che è consentito nel testo sul Copyright in basso su tutte le pagine dei nostri modelli. Buon lavoro!
Lasciare un commento sul modello DROPS 221-2
Noi saremmo felici di ricevere i tuoi commenti e opinioni su questo modello!
Se vuoi fare una domanda, fai per favore attenzione a selezionare la categoria corretta nella casella qui sotto per velocizzare il processo di risposta. I campi richiesti sono indicati da *.