
Popular categories
Looking for a yarn?


Comments / Questions (44)
![]() Michela wrote:
Michela wrote:
Buona domenica scusate se disturbo ancora,ma non ho capito bene lo sprone,le diminuzioni e come proseguire.credo di aver capito a coste normali.se mi spiegate in parole povere non sono giovanissima.grazie in anticipo per la vostra disponibilità e celerità.buona serata 😊
02.04.2017 - 15:50DROPS Design answered:
Buongiorno Michela. Per lo sprone mette tutte le maglie sullo stesso ferro, le maniche vanno inserite dove ci sono gli scalfi. Lavora poi in tondo e per le coste inglesi lavora come indicato nel paragrafo:DIETRO & DAVANTI IN COSTE INGLESI (in tondo sul ferro circolare), ripetendo i giri 2 e 3. Poi quando lo sprone misura 18-19-20-21-22-23 cm a seconda della taglia, cambia ferri, lavora 1 giro a coste normali, e al giro successivo, lavora 2 m insieme a dir ritorto e 2 m insieme a rov su tutto il giro. Prosegue a coste normali fino alla misura necessaria. Buon lavoro!
02.04.2017 - 16:08
![]() Michela wrote:
Michela wrote:
Nu Buongiorno,scusate ma non riesco a lavorare con i ferri circolari,in 7ore di lavoro ho fatto 3 giri e pure il disfatto più volte.posso realizzarlo con ferri diritti,magari fare lo sprone circolare?gia le coste inglesi sono complicatejn,piu la prima volta con i circolari r' un caos
16.03.2017 - 01:44DROPS Design answered:
Buongiorno Michela. Può lavorare con i ferri dritti avviando metà delle maglie (le m devono essere dispari) +1 maglia vivagno da ciascun lato. Sul davanti /dietro lavorati avanti e indietro, dovrà lavorare le coste come indicato per le maniche. Se lavora lo sprone in tondo seguirà le indicazioni per le coste inglesi lavorate in tondo. Quando unisce le maniche per lo sprone, verifichi che le coste inglesi proseguano correttamente. Buon lavoro!
16.03.2017 - 07:13
![]() Silje wrote:
Silje wrote:
Hei! Har dere en video som viser det felletipset som vises i akkurat denne oppskriften? På forhånd takk!
22.10.2016 - 16:34DROPS Design answered:
Hej Silje. Desvaerre har vi ikke lige nu en video paa dette. Men jeg har sat det paa önskelisten :)
24.10.2016 - 10:47
![]() Helmi Wittmer wrote:
Helmi Wittmer wrote:
Das Patentmuster kann auch einfacher gemacht werden: 1.R: 1 Rdm, 1M rechts, *1 tiefer gestochene M rechts, 1 M rechts, * fortlaufend wiederholen, mit 1 Rdm enden. 2R: 1Rdm, 1 tiefer gestochene M rechts, 1M rechts , ab * fortlaufend wiederholen, mit 1 tiefer gestochenen M rechts, 1Rdm enden tIefer gestochen: 1R tiefer in die M der Vor- R einstechen. Die obere M löst sich dabei auf.
04.03.2016 - 07:47
![]() Giorgia Margutta wrote:
Giorgia Margutta wrote:
Salve,ho una domanda circa la diminuzione nelle coste inglesi con ferro circolare.Nel modello "mocaccino",dice che,prima di ogni segno,c'è una maglia.Ma nel video di spiegazione accostato al modello,essenzialmente vengono coinvolte 3 maglie(due insieme e la prima passata,si accavalla sulle due insieme.)A questo punto non devo lavorare fino a quando non ho 3 maglie prima del segno?Ovviamente senza contare i gettati come maglie...forse non ho capito io,potreste spiegarmelo in altre parole?
11.12.2014 - 19:17DROPS Design answered:
Buongiorno Giorgia. Le diminuzioni si eseguono come indicato nel modello: passa la m prima del segno senza lavorarla, lavora le 2 m dopo il segno insieme a dir, accavalla la m passata (quella prima del segno) sulle 2 m lavorate insieme. In questo modo diminuisce 1 m prima del segno e 1 m dopo il segno. Se facesse queste stesse diminuzioni 3 m prime del segno, le diminuzioni non sarebbero simmetriche in quanto diminuirebbe 2 m prima del segno e nessuna dopo il segno. Buon lavoro!
12.12.2014 - 09:56
![]() Desiree wrote:
Desiree wrote:
Een mooie warme, wat zware trui. De patentsteek is een addertje - moeilijk achteraf te herstellen bij een fout. De verspringing bij de mindering heeft mij ook hoofdbrekens bezorgd. Het afkanten van de hals vooral heel elastisch doen.
04.10.2013 - 18:04
![]() Danai wrote:
Danai wrote:
Schön und kuschelig. Allerdings habe ich 150g weniger benutzt als was in der Anleitung stand (für Größe S).
04.02.2012 - 14:45
![]() DROPS Design NL wrote:
DROPS Design NL wrote:
Hoi. De beschrijving voor de patentsteek in de rondte klopt. Let op dat patentsteek in de rondte anders wordt gebreid dan heen en weer. Bekijk eventueel de video onderaan dit patroon over patentsteek in de rondte. Succes.
03.01.2012 - 12:04
![]() Lanji wrote:
Lanji wrote:
Juist wat hieronder van uitleg staat . als ik het brei op die manier gewoon doorbreien dat er niet twee dezelfde achter elkaar komen dan kom ik juist niet mooi uit.
31.12.2011 - 01:39
![]() Lanji wrote:
Lanji wrote:
Datgene wat er niet mooi uit ziet is de verspringing of wisseling. het begin van de naald waar je dan door blijft breien. je ziet niet die 'rijtjes' van de paternsteek maar een grote warboel hoe komt dit?
31.12.2011 - 01:33
|
|
Mocaccino#mocaccinosweater |
|
|
|
|
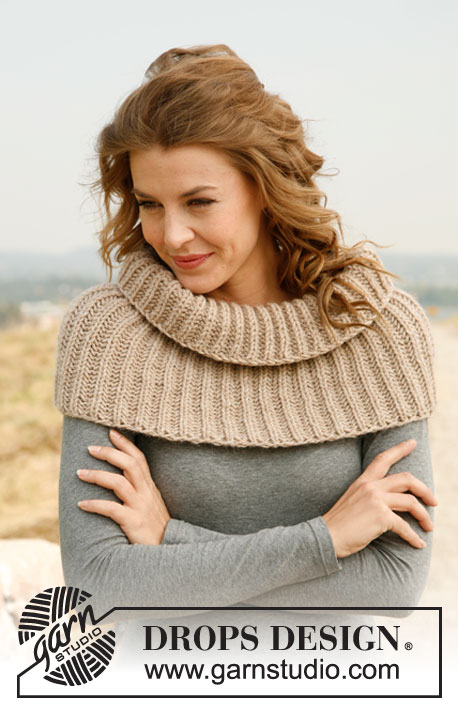
Knitted DROPS jumper in English rib with round yoke in “Nepal”. Size: S - XXXL.
DROPS 133-11 |
|
|
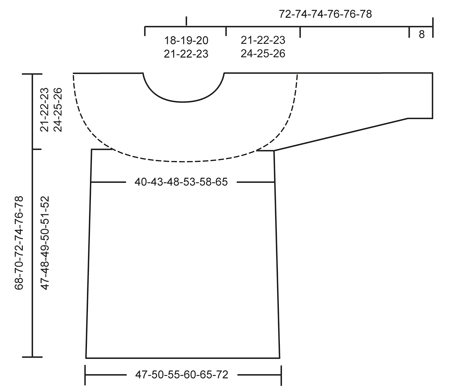
BODY IN ENGLISH RIB (in the round on circular needle): ROUND 1: * 1 YO, slip 1 st as if to P, K 1 *, repeat from *-*. ROUND 2: * P tog YO and slipped st, 1 YO, slip 1 st as if to P *, repeat from *-*. ROUND 3: * 1 YO, slip 1 st as if to P, K tog YO and slipped st *, repeat from *-*. Repeat 2nd and 3rd round upwards. SLEEVE IN ENGLISH RIB (back and forth on needle): 1st row (= RS): 1 edge st, * K 1, 1 YO, slip 1 st as if to P *, repeat from *-* until 1 st remains, finish with 1 edge st. 2nd row: 1 edge st, * K tog YO and slipped st, 1 YO, slip 1 st as if to P *, repeat from *-* until 1 st remains, finish with 1 edge st. Repeat 2nd row upwards. ENGLISH RIB ST: When counting the sts, the YOs are not counted as sts. DECREASE TIP IN ENGLISH RIB (applies to sides of body): Dec 2 sts on 2nd round in English rib at each marker in each side as follows: Work in English rib until 1 st remains before marker (YOs are not counted as sts), slip this st as if to K, marker, K the next 2 sts tog and psso = 2 dec sts, (and the marker is placed before the K 2 tog st). Continue in English rib as before. INCREASE TIP (applies to sleeve): Inc 1 st inside 1 edge st in each side of piece. Inc 1 st by making 1 YO, on next row work YO twisted (i.e. work in back loop of st instead front to avoid holes). NOTE: Work the inc sts in English rib. GARTER ST (back and forth on needle): K all rows. -------------------------------------------------------- BODY: Worked in the round on circular needle size 6 mm with Nepal. Cast on 168-180-198-216-234-258 sts. Work first round as follows: * P 2 tog, K 1 *, repeat from *-* the entire round = 112-120-132-144-156-172 sts. Insert 2 markers in each side of piece as follows: Insert 1 marker at beg of round and 1 marker after 56-60-66-72-78-86 sts (round beg in the side). Move the markers upwards when working. Then work BODY IN ENGLISH RIB - see explanation above. REMEMBER THE KNITTING TENSION! When piece measures 10-11-12-13-14-15 cm, dec 2 sts on 2nd round of English rib at each marker in each side of piece - Read DECREASE TIP above (= 4 dec sts on the round). Repeat dec every 9-9-9-10-10-10 cm a total of 4 times = 96-104-116-128-140-156 sts. Continue until piece measures approx. 47-48-49-50-51-52 cm, adjust to finish after 3rd round in English rib. On next round (= 2nd round), cast off 3-3-3-4-4-4 sts on each side of each marker for armholes (YOs are not counted as sts - Read ENGLISH RIB ST above) = 42-46-52-56-62-70 sts on front/back piece. Cut the thread, put piece aside and knit the sleeves. SLEEVE: Worked back and forth on circular needle size 6 mm. Cast on 41-44-44-47-47-50 sts (incl 1 edge st in each side). Work first row (= WS) as follows: 1 edge st in garter st, * K 1, P 2 tog *, repeat from *-* until 1 st remains, finish with 1 edge st in garter st = 28-30-30-32-32-34 sts. Then work in English rib with 1 edge st in garter st in each side - Read SLEEVE IN ENGLISH RIB above. When piece measures 12-12-11-11-8-8 cm, inc 1 st in each side - read INCREASE TIP above. Repeat inc every 15-15-11-11-8-8 cm a total of 2-2-3-3-4-4 times = 32-34-36-38-40-42 sts. When piece measures 42-42-41-41-40-40 cm, cast off for sleeve cap starting from RS as follows: Cast off 3-3-2-3-4-4 sts at beg of the next 2 rows = 26-28-32-32-32-34 sts, cut the thread. Work another sleeve the same way. YOKE: Worked in the round on circular needle size 6 mm. Slip sleeves on to same circular needle as body where armholes were cast off - NOTE: Make sure the pattern will continue to fit in every transition between body and sleeves = 136-148-168-176-188-208 sts. Then work English rib in the round. When yoke measures 18-19-20-21-22-23 cm from where body and sleeves were placed tog, switch to circular needle size 5 mm and work 1 round in rib (= K 1/P 1, work YOs tog with sts) over all sts. On next round, dec as follows: * K 2 twisted tog (in back loop of st), P 2 tog *, repeat from *-* the entire round = 68-74-84-88-94-104 sts. Continue with rib until yoke measures 21-22-23-24-25-26 cm, then cast off all sts with K over K and P over P. ASSEMBLY: Sew the sleeve seams inside 1 edge st. Sew the opening under the sleeves. |
|
 |
|
Have you finished this pattern?Tag your pictures with #dropspattern #mocaccinosweater or submit them to the #dropsfan gallery. Do you need help with this pattern?You'll find 7 tutorial videos, a Comments/Questions area and more by visiting the pattern on garnstudio.com. © 1982-2026 DROPS Design A/S. We reserve all rights. This document, including all its sub-sections, has copyrights. Read more about what you can do with our patterns at the bottom of each pattern on our site. |


With over 40 years in knitting and crochet design, DROPS Design offers one of the most extensive collections of free patterns on the internet - translated to 17 languages. As of today we count 324 catalogues and 12290 patterns translated into English (UK/cm). 12290
We work hard to bring you the best knitting and crochet have to offer, inspiration and advice as well as great quality yarns at incredible prices! Would you like to use our patterns for other than personal use? You can read what you are allowed to do in the Copyright text at the bottom of all our patterns. Happy crafting!
Post a comment to pattern DROPS 133-11
We would love to hear what you have to say about this pattern!
If you want to leave a question, please make sure you select the correct category in the form below, to speed up the answering process. Required fields are marked *.