
Popular categories
Looking for a yarn?


Comments / Questions (44)
![]() Mieke Baras wrote:
Mieke Baras wrote:
Om de pas te breien met de steken van het lijf samen met de mouwen,hoe kan ik raglan minderingen breien? Hier worden die niet gedaan en dus vrees ik dat de pas te ruim/breed zal worden
19.09.2025 - 13:44DROPS Design answered:
Dag Mieke,
Op de pas zelf worden geen raglanminderingen meer gebreid. Pas op het eind, vlak voor de boordsteek worden de steken 2 aan 2 samen gebreid. Hierdoor zal de pas niet te ruim worden.
21.09.2025 - 19:48
![]() Gill wrote:
Gill wrote:
I have now tried 3 times but still cannot get the sleeve stitches to equal 36 when the length Is complete . Size L is cast on 44 then next row reduces the stitches to 30 stitches. The first row of the English rib for sleeves brings the 30 stitches back up to 44 stitches and these are the stitches you continue to work the English rib on. You then increase 1 stitch either end 3 times which gives 50 sets not 36 stitches as stated in the pattern where have I gone wrong.
22.10.2023 - 17:41DROPS Design answered:
Dear Gill, in English rib, the yarn overs are not counted as stitches, since they will later on be worked together with their respective stitches. So you will still have 30 stitches. Later on, you will increase 1 stitch on each side 3 times. Since you are increasing on each side, you increase 2 stitches on each round or 6 stitches in total = 36 stitches. Happy knitting!
23.10.2023 - 00:28
![]() Ramona Håkonsen wrote:
Ramona Håkonsen wrote:
Dette var utrolig forvirrende da d er så mange ulike forklaringer på hvordan mønstret skal strikkes.. vil så gjerne forstå og sku hatt video som viste hvordan begynne, helt fra starten på mønstret DROPS 133-11 og litt utover noen rader.. d hadde vært flott å få svar fort som mulig..
17.09.2023 - 06:22DROPS Design answered:
Hei Ramona. Har dessverre ingen video til akkurat denne modellen, men anbefaler deg å lese forklaringene og så se på de generelle videoene som er lagt til denne modellen. Lykke til. mvh DROPS Design
18.09.2023 - 14:27
![]() Carmen-Gabriela wrote:
Carmen-Gabriela wrote:
Hallo:) Kann es sein, dass die 2. Seitenabn. 3M li (überzoogen) zus ist? (s. Foto), evtl. auch die 4. Abn. Nur die 1. + 3. Abn. wäre 3M re überzogen zus. lt. Anleitung + Video. Würde ich alle 4 Abn re zus stricken hätte ich ein anderes Maschenbild u. würden sich die Rippen dann nicht um mich herumdrehen? Ich werde die 2. Abn li in einer 3.MuRunde machen, 3. Abn re wieder in einer 2. MuRd - so müsste es lt. Foto gut aussehen.
17.09.2022 - 17:57DROPS Design answered:
Liebe Carmen-Gabriela, der Markierung sollen Sie wie im Video nach der Abnahmen stellen (= nach der 1. Abnahmen) so kann die nächste Abnahme genauso gestrickt werden. In jeden Falls beachten Sie nur, daß es die selbe Maschenanzahl für Vorder- und Rückenteil gibt. Viel Spaß beim stricken!
19.09.2022 - 09:46
![]() Maria Rodrigues wrote:
Maria Rodrigues wrote:
Boa noite, muito obrigada pela vossa ajuda e paciência. Apercebi-me do meu erro, que os remates estão indicados pelos tamanhos e não pela quantidade dos pontos rematados.
03.03.2022 - 22:27
![]() Maria Rodrigues wrote:
Maria Rodrigues wrote:
Boa noite, mais uma vez venho junto de vocês pedir mais um esclarecimento sobre as mangas deste modelo: 1º-começo com 50 pts, diminuiu para 34 pts; 2º -aumento no meu caso 4 pts, fico com 42 pts; 3º- rematar arrematar 3-3-2-3-4-4 pts (em principio serão por vezes, senão seriam no total 19 pts);4º- 42 pts menos os remates 19 pts = 23 pts e não os 34 pts . mesmo assim, para mim e outras são muito poucos pts para o tamanho maior do modelo. Grata pela atenção dispensada.
01.03.2022 - 21:54DROPS Design answered:
Bom dia, O remate é feito apenas uma vez para todos os tamanhos. 42 pontos - 8 pontos (4 pontos de cada lado da manga para o tamanho maior) = 34 pontos. O ponto brioche é um ponto que tem muita elasticidade e alarga bastante pelo que pode parecer estreito nas agulhas mas vai alargar se usar o fio indicado no modelo. Bons tricôs!
02.03.2022 - 09:46
![]() Maria Rodrigues wrote:
Maria Rodrigues wrote:
Não entendo como fazer as mangas: 1º diz montar 50 pts, depois fazer os aumentos, no meu caso 4 vezes. Então como é possível ficarem 42 pts, se os aumentos no total dá 54 pts no mínimo. Poder-me-ia ajudar em como fazer as mangas com outra explicação mais clara, do que as instruções do modelo descreve. Um grande obrigada. Poder-me-ia dar
22.02.2022 - 20:14DROPS Design answered:
Bom dia, Depois de montar 50 pontos, na 1.ª volta, vai fazer diminuições. A bula diz: "Tricotar a 1.ª carreira (= pelo avesso) da seguinte maneira : 1 m/p ourela em ponto jarreteira, *1 m/p meia, 2 ms/pts tricotadas juntamente em liga/tricô (ao tricotar estas 2 malhas juntas está fazendo 1 diminuição) *, repetir de * a * até restar 1 m/p, terminar com 1 m/p ourela em ponto jarreteira = 28-30-30-32-32-34 ms/pts. Só depois se fazem aumentos. Bons tricôs.
23.02.2022 - 08:36
![]() Roberta wrote:
Roberta wrote:
Buona sera, vorreri fare questo modello da regalare a mia nipote per Natale. Mi piacerebbe però farlo con il motivo raglan. La taglia sarà una L. Se fosse possibile avere un suggerimeno ve ne sarei grata. Buona serata. Roberta
18.09.2019 - 23:37DROPS Design answered:
Buongiorno Roberta, in questa sede non possiamo darle un aiuto così personalizzato, le consigliamo però di rivolgersi al suo rivenditore DROPS di fiducia. Buon lavoro!
19.09.2019 - 06:58
![]() Michelle wrote:
Michelle wrote:
Hi, just wondering, I have tried to do this pattern 3 times now, the first row states to p2tog, k1 till end, then to yo, sl 1, k1. But I have ended up with a stitch short each time. If I join in the round like video tutorial provided for fisherman’s rib, I’m not doing the first row as stated, I’m confused! Lol, please help! Do I pin in the round whilst doing the p2tog, or do I yo then p2tog or do I just do like the video? Thanks in advance!
05.12.2017 - 10:23DROPS Design answered:
Dear Michelle, on the first round on body, repeat *P2 tog, K1* all the round = 112-120-132-144-156-172 sts remain. Then work round 1 BODY IN ENGLISH RIB round 1 (over 2 sts: *YO, slip 1 as if to K, K1* repeat from *-* around) and now repeat round 2 and 3. Number of sts should match in all size. Happy knitting!
05.12.2017 - 11:20
![]() ROBIN GUERRIERO wrote:
ROBIN GUERRIERO wrote:
Can this be made with straight needles? And if there are any crocheting parts, is there another option I can use besides crocheting!
01.05.2017 - 18:18DROPS Design answered:
Dear Mrs Guerriero, you will find here some informations about adapting a pattern with straight needles. This jumper is only knitted. Happy crocheting!
02.05.2017 - 11:58
|
|
Mocaccino#mocaccinosweater |
|
|
|
|
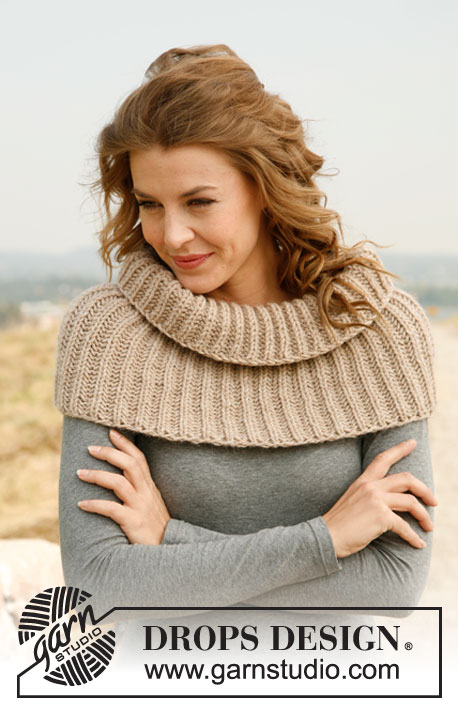
Knitted DROPS jumper in English rib with round yoke in “Nepal”. Size: S - XXXL.
DROPS 133-11 |
|
|
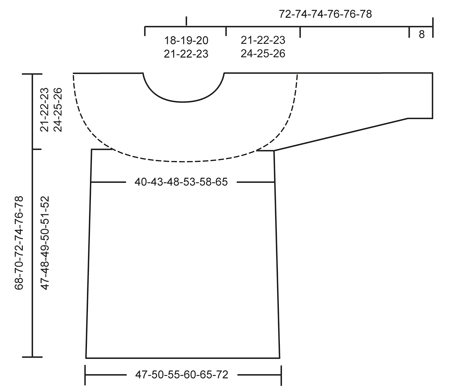
BODY IN ENGLISH RIB (in the round on circular needle): ROUND 1: * 1 YO, slip 1 st as if to P, K 1 *, repeat from *-*. ROUND 2: * P tog YO and slipped st, 1 YO, slip 1 st as if to P *, repeat from *-*. ROUND 3: * 1 YO, slip 1 st as if to P, K tog YO and slipped st *, repeat from *-*. Repeat 2nd and 3rd round upwards. SLEEVE IN ENGLISH RIB (back and forth on needle): 1st row (= RS): 1 edge st, * K 1, 1 YO, slip 1 st as if to P *, repeat from *-* until 1 st remains, finish with 1 edge st. 2nd row: 1 edge st, * K tog YO and slipped st, 1 YO, slip 1 st as if to P *, repeat from *-* until 1 st remains, finish with 1 edge st. Repeat 2nd row upwards. ENGLISH RIB ST: When counting the sts, the YOs are not counted as sts. DECREASE TIP IN ENGLISH RIB (applies to sides of body): Dec 2 sts on 2nd round in English rib at each marker in each side as follows: Work in English rib until 1 st remains before marker (YOs are not counted as sts), slip this st as if to K, marker, K the next 2 sts tog and psso = 2 dec sts, (and the marker is placed before the K 2 tog st). Continue in English rib as before. INCREASE TIP (applies to sleeve): Inc 1 st inside 1 edge st in each side of piece. Inc 1 st by making 1 YO, on next row work YO twisted (i.e. work in back loop of st instead front to avoid holes). NOTE: Work the inc sts in English rib. GARTER ST (back and forth on needle): K all rows. -------------------------------------------------------- BODY: Worked in the round on circular needle size 6 mm with Nepal. Cast on 168-180-198-216-234-258 sts. Work first round as follows: * P 2 tog, K 1 *, repeat from *-* the entire round = 112-120-132-144-156-172 sts. Insert 2 markers in each side of piece as follows: Insert 1 marker at beg of round and 1 marker after 56-60-66-72-78-86 sts (round beg in the side). Move the markers upwards when working. Then work BODY IN ENGLISH RIB - see explanation above. REMEMBER THE KNITTING TENSION! When piece measures 10-11-12-13-14-15 cm, dec 2 sts on 2nd round of English rib at each marker in each side of piece - Read DECREASE TIP above (= 4 dec sts on the round). Repeat dec every 9-9-9-10-10-10 cm a total of 4 times = 96-104-116-128-140-156 sts. Continue until piece measures approx. 47-48-49-50-51-52 cm, adjust to finish after 3rd round in English rib. On next round (= 2nd round), cast off 3-3-3-4-4-4 sts on each side of each marker for armholes (YOs are not counted as sts - Read ENGLISH RIB ST above) = 42-46-52-56-62-70 sts on front/back piece. Cut the thread, put piece aside and knit the sleeves. SLEEVE: Worked back and forth on circular needle size 6 mm. Cast on 41-44-44-47-47-50 sts (incl 1 edge st in each side). Work first row (= WS) as follows: 1 edge st in garter st, * K 1, P 2 tog *, repeat from *-* until 1 st remains, finish with 1 edge st in garter st = 28-30-30-32-32-34 sts. Then work in English rib with 1 edge st in garter st in each side - Read SLEEVE IN ENGLISH RIB above. When piece measures 12-12-11-11-8-8 cm, inc 1 st in each side - read INCREASE TIP above. Repeat inc every 15-15-11-11-8-8 cm a total of 2-2-3-3-4-4 times = 32-34-36-38-40-42 sts. When piece measures 42-42-41-41-40-40 cm, cast off for sleeve cap starting from RS as follows: Cast off 3-3-2-3-4-4 sts at beg of the next 2 rows = 26-28-32-32-32-34 sts, cut the thread. Work another sleeve the same way. YOKE: Worked in the round on circular needle size 6 mm. Slip sleeves on to same circular needle as body where armholes were cast off - NOTE: Make sure the pattern will continue to fit in every transition between body and sleeves = 136-148-168-176-188-208 sts. Then work English rib in the round. When yoke measures 18-19-20-21-22-23 cm from where body and sleeves were placed tog, switch to circular needle size 5 mm and work 1 round in rib (= K 1/P 1, work YOs tog with sts) over all sts. On next round, dec as follows: * K 2 twisted tog (in back loop of st), P 2 tog *, repeat from *-* the entire round = 68-74-84-88-94-104 sts. Continue with rib until yoke measures 21-22-23-24-25-26 cm, then cast off all sts with K over K and P over P. ASSEMBLY: Sew the sleeve seams inside 1 edge st. Sew the opening under the sleeves. |
|
 |
|
Have you finished this pattern?Tag your pictures with #dropspattern #mocaccinosweater or submit them to the #dropsfan gallery. Do you need help with this pattern?You'll find 7 tutorial videos, a Comments/Questions area and more by visiting the pattern on garnstudio.com. © 1982-2026 DROPS Design A/S. We reserve all rights. This document, including all its sub-sections, has copyrights. Read more about what you can do with our patterns at the bottom of each pattern on our site. |


With over 40 years in knitting and crochet design, DROPS Design offers one of the most extensive collections of free patterns on the internet - translated to 17 languages. As of today we count 324 catalogues and 12290 patterns translated into English (UK/cm). 12290
We work hard to bring you the best knitting and crochet have to offer, inspiration and advice as well as great quality yarns at incredible prices! Would you like to use our patterns for other than personal use? You can read what you are allowed to do in the Copyright text at the bottom of all our patterns. Happy crafting!
Post a comment to pattern DROPS 133-11
We would love to hear what you have to say about this pattern!
If you want to leave a question, please make sure you select the correct category in the form below, to speed up the answering process. Required fields are marked *.