
Popular categories
Looking for a yarn?


Comments / Questions (31)
![]() Agnes wrote:
Agnes wrote:
Bonsoir, J'ai terminé les augmentations pour les manches. Pour être sûre (car j'ai recommencé plusieurs fois l'ouvrage après des erreurs sur les augmentations...les augmentations à venir pour l'empiècement se font avec un jeté ? tricoté torse au tour suivant? Je vous remercie.
05.03.2026 - 18:17DROPS Design answered:
Bonjour Agnès, on utilise ici la technique des AUGMENTATIONS-2, autrement dit, on relève le fil entre 2 mailles du rang précédent comme pour les augmentations précédentes. Bon tricot!
06.03.2026 - 07:15
![]() Agnes wrote:
Agnes wrote:
Bonjour, Pour ce modèle pour les augmentations pour les manches, après celles pour les épaules/manches marteau, il est écrit : On va maintenant augmenter seulement pour les manches et le nombre de mailles du devant et du dos reste le même. Tricoter les augmentations en jersey. Faut-il faire 1 jeté, tricoté torse rang suivant ? et si oui où doit-on faire cette augmentation? Merci pour votre réponse. C'est toujours un plaisir d'utiliser votre site!
18.02.2026 - 13:00DROPS Design answered:
Bonjour Agnès, pour augmenter pour les manches, augmentez comme indiqué sous AUGMENTATIONS-2 (= sur l'endroit en relevant le fil entre 2 mailles) mais après les fils marqueurs -1 et -3 et avant les fils marqueurs -2 et -4. Retrouvez ici, en vidéo comment procéder. Bon tricot!
19.02.2026 - 08:27
![]() Ida wrote:
Ida wrote:
Hej! Jag har stickat fyra varv med sadelaxökning och ska starta med mönstret , men får inte till det. Hur räknar jag ut mönstrets start? Hur räknar jag mot den andra markeringen ? Börjar mönstret om vid fram och bakstycke eller hur tänker jag där? Och hur räknar jag på varje fram och bakstycke om mönstret endast visar 10m. Eftersom det ökas maskor varje varv, på vilket sätt påverkar det mönstret, vad ska jag tänka på för att mönstret ska bli rätt?
18.01.2026 - 10:23DROPS Design answered:
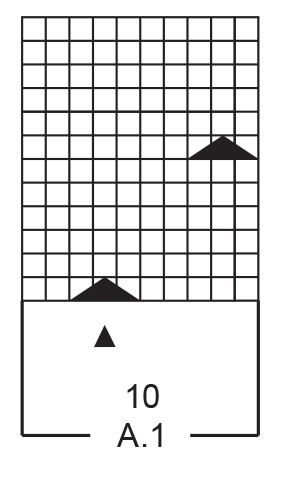
Hei Ida. Finn midtmasken i din str. og tell mønsterets start ut fra merket midt foran – se symbol i A.1 (og les diagramteksten til symbolet). Husk å les godt etter OBS: under MÖNSTER. mvh DROPS Design
29.01.2026 - 13:06
![]() Torunn wrote:
Torunn wrote:
Hei! Skal ermene ha mønster?
12.01.2026 - 19:59DROPS Design answered:
Hei Torunn, Ermene er strikket i glattstrikk. Hilsen Drops Team
13.01.2026 - 07:15
![]() Ingeborg wrote:
Ingeborg wrote:
Angående ok ökningen: hur många varv totalt ska stickas i de storlekar där det ska ökas 8 maskor 0 gånger vartannat varv och 1 maska varje varv, lika många varv som i de övriga storlekarna?
02.01.2026 - 22:32DROPS Design answered:
Det stickas färre varv i de storlekar där det ökas färre maskor. I storlek S stickas det alltså endast 1 varv. Ifall arbetet blir för kort kan du sticka några extra varv utan ökningar.
05.01.2026 - 16:51
![]() Anja wrote:
Anja wrote:
Hallo! Ich bin dabei den Pullover zu stricken. Die Anleitung und die Wolle gefallen mir sehr gut. Aber: 20cm von der Achsel bis zum unteren Bündchen?! Dem soll das denn passen? Ich habe jetzt 30 cm gestrickt und mir ist der Pulli immer noch zu kurz. Ich hoffe, dass er nach dem Waschen/Blocken dann passt. Sonst ist die Anleitung gut erklärt.
10.09.2025 - 21:45DROPS Design answered:
Liebe Anja, danke für Ihre Rückmeldung! Der Pullover ist als kurzes Modell designed und dies ist ja aus der Maßskizze auch über die Gesamtlänge erkennbar. Am besten lässt sich die gewünschte Länge vorher an einem gut passenden Pullover ermitteln. Dieses Modell kann, wie Sie es ja auch gemacht haben, in der Länge verändert werden, da der Schnitt gerade ist. Viel Spaß beim Tragen, hoffentlich entspricht er nach dem Spannen Ihren Vorstellungen!
11.09.2025 - 08:31
![]() Connie wrote:
Connie wrote:
Hallo zusammen! Ich habe eine Frage zur Anleitung: Bei den Zunahmen aus dem Querfaden soll man Maschen in die hinteren Maschenglieder stricken. Funktioniert das wie verschränkte Maschen oder gibt es in der Technik einen Unterschied? Ich bin noch am Anfang meiner Strick-Karriere und sehr dankbar für eure detaillierten Anleitungen und die vielen Technik-Videos. Liebe Grüße
13.12.2024 - 16:41DROPS Design answered:
Liebe Connie, in diesem Video zeigen wir, wie man vor und nach einer Markierung zunimmt. Viel Spaß beim Stricken!
16.12.2024 - 09:35
![]() Megan wrote:
Megan wrote:
The elevation looks like the heel of a sock. I wonder if it is because the saddle shoulder constrains it from stretching, thus it is not flat on the back.
18.11.2024 - 11:12DROPS Design answered:
Dear Megan, as you are working short rows the back piece will be higher than front piece but this part should be flat, make sure you kept correct tension. Try to shown on this piece to your store (even sending them a picture per mail if needed), it will be easier for them to see and check your piece. Happy knitting!
19.11.2024 - 07:30
![]() Anjow wrote:
Anjow wrote:
I am knitting size M and the finished sleeve length is 15 inches (38 cm). This seems quite short for a full length sleeve. Are the sleeves meant to be only bracelet length? I'm knitting this with drops alpaca and drops brushed alpaca held together.
06.10.2024 - 14:54DROPS Design answered:
Dear Anjow, you can see the final measurements in the measurements schematic. Including the shoulder/sleeve cap, the sleeve should be 52cm. Due to the saddle shoulders, the start of the sleeve is lower than it should be, so with 38 cm you should have enough. The upper part of the sleeves is worked in the saddle shoulders (the 14cm indicated at the top of the sleeve). If the whole sleeve, including the saddle shoulder, still seems too short to you, you can make some adjustments to lengthen the sleeve. Happy knitting!
06.10.2024 - 23:00
![]() Kath Lenglet wrote:
Kath Lenglet wrote:
Bonjour, Je poursuis mon tricot, tout va bien, encore une précision : les nœuds se font toutes les 5 mailles ? Merci
03.10.2024 - 09:44DROPS Design answered:
Bonjour Mme Lenglet, non pas exactement, comme vous répétez le diagramme A.1 en largeur, vous devez avoir (2 m après le 1er noeud) + (5 m avant le 2ème noeud) soit 7 mailles entre chaque noeud (pour un motif à tricoter sur 10 mailles). Bon tricot!
03.10.2024 - 16:04
|
||||||||||||||||||||||
Oatfield#oatfieldsweater |
||||||||||||||||||||||
 |
 |
|||||||||||||||||||||
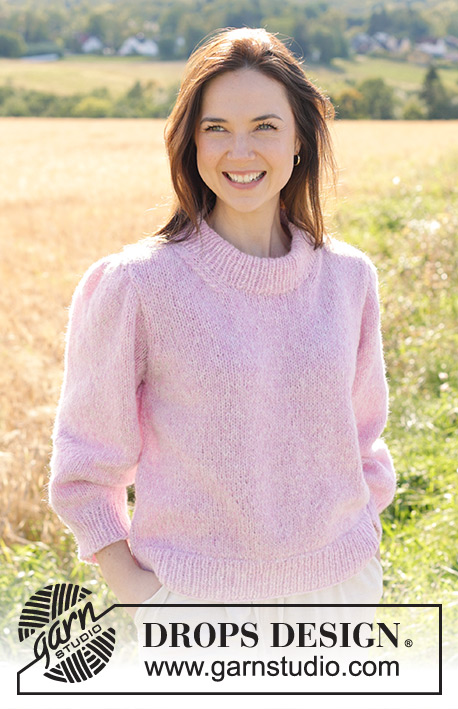
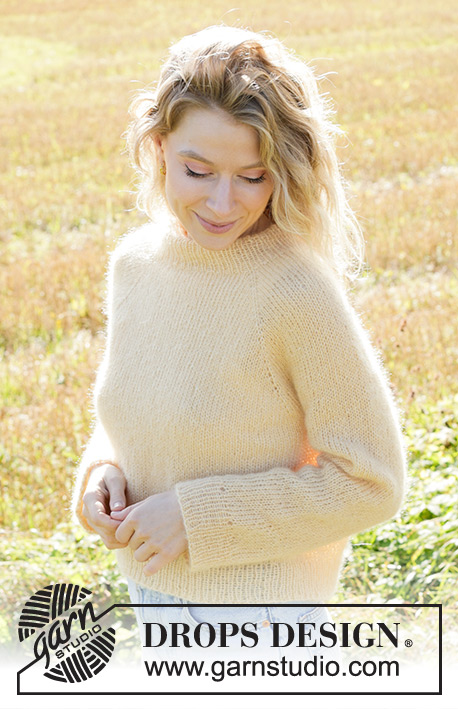
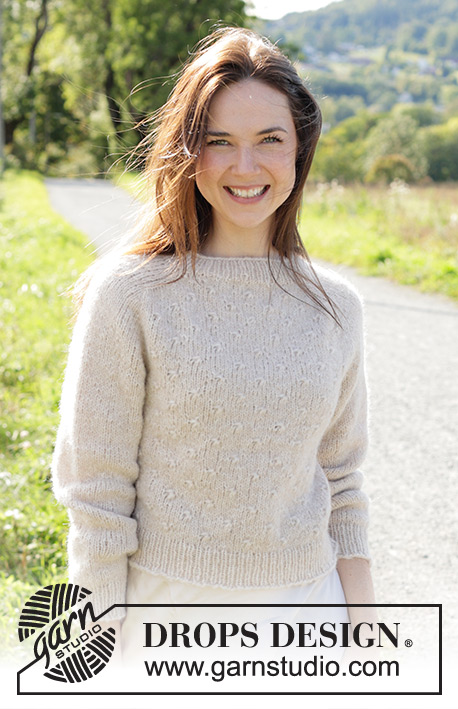
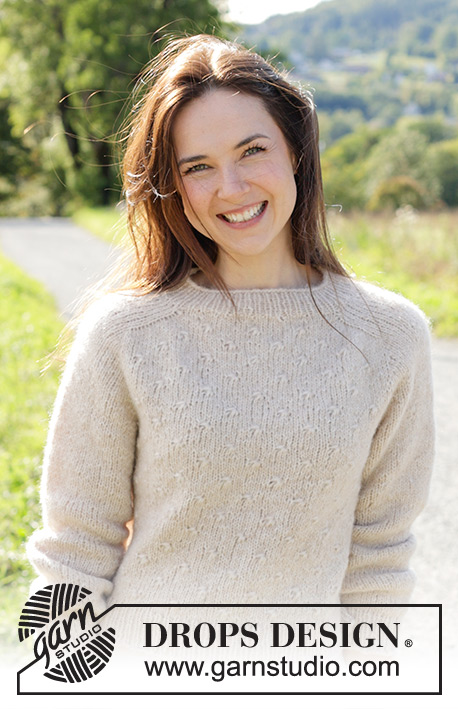
Knitted jumper in DROPS Air or DROPS Big Merino. The piece is worked top down with saddle shoulders and relief-pattern. Sizes S - XXXL.
DROPS 248-7 |
||||||||||||||||||||||
|
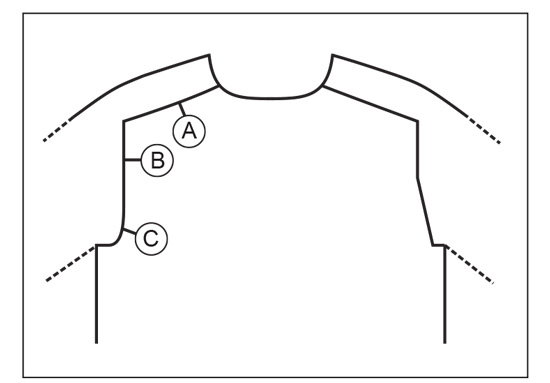
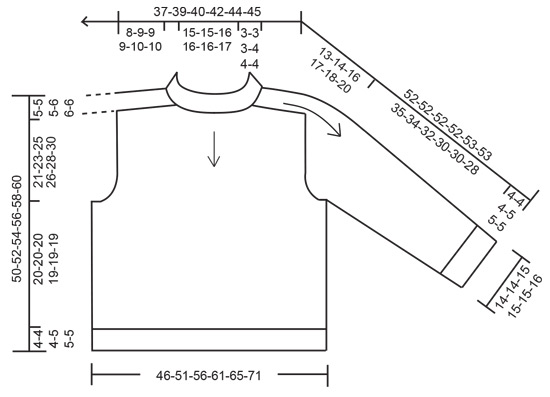
------------------------------------------------------- EXPLANATIONS FOR THE PATTERN: ------------------------------------------------------- PATTERN: See diagram A.1. INCREASE TIP-1 (evenly spaced): Increase 1 stitch by making 1 yarn over, which is knitted twisted on the next round to avoid a hole. INCREASE TIP-2 (from right side): Increase 1 towards the left after marker-thread: Use the left needle to pick up the strand between 2 stitches from the previous row/round, pick up strand from the front and knit the back loop. Increase 1 towards the right before marker-thread: Use the left needle to pick up the strand between 2 stitches from the previous row/round, pick up strand from behind and knit the front loop. INCREASE TIP-3 (from wrong side): Increase 1 towards the left after marker-thread: Use the left needle to pick up the strand between 2 stitches from the previous row/round, pick up strand from behind and purl the front loop. Increase 1 towards the right before marker-thread: Use the left needle to pick up the strand between 2 stitches from the previous row/round, pick up strand from the front and purl the back loop. DECREASE TIP (mid-under sleeves): Decrease 2 stitches on the round by decreasing 1 stitch on each side of the marker-thread as follows: Work until there are 3 stitches left before the marker-thread, knit 2 together, knit 2 (marker-thread sits between these 2 stitches), slip 1 stitch knit-wise, knit 1 and pass the slipped stitch over the knitted stitch. ------------------------------------------------------- START THE PIECE HERE: ------------------------------------------------------- JUMPER – SHORT OVERVIEW OF THE PIECE: The pattern uses both long and short needles; start with the length which fits the number of stitches and change when necessary. The piece is worked top down and in the round (apart from the elevation) with circular needle. When the neck and yoke are finished, the piece is divided for body and sleeves and the body is continued in the round, while the sleeves wait. The sleeves are worked in the round, top down. NECK: Cast on 84-86-90-94-96-100 stitches with circular needle size 4 mm and DROPS Air or DROPS Big Merino. Work rib in the round (knit 1, purl 1) for 3-3-3-4-4-4 cm. YOKE: Change to circular needle size 5 mm. Knit 1 round and increase 18-16-16-20-22-18 stitches evenly spaced – read INCREASE TIP-1 = 102-102-106-114-118-118 stitches. Insert 1 marker in the first stitch on the round (= mid-back) and 1 marker in the 52nd-52nd-54th-58th-60th-60th stitch on the round (= mid-front). The yoke is measured from the marker mid-front. The markers are also used when determining where to start the pattern. In addition, insert 4 marker-threads (used when working the saddle shoulders) without working the stitches and each thread is inserted between 2 stitches as follows: MARKER-THREAD 1: Start mid-back, count 18-18-19-19-20-20 stitches including the marker-stitch (= ½ back piece), insert marker-thread before the next stitch. MARKER-THREAD 2: Count 16-16-16-20-20-20 stitches after marker-thread 1 (= shoulder-stitches), insert marker-thread before the next stitch. MARKER-THREAD 3: Count 35-35-37-37-39-39 stitches after marker-thread 2 (= front piece), insert marker-thread before the next stitch. MARKER-THREAD 4: Count 16-16-16-20-20-20 stitches after marker-thread 3 (= shoulder-stitches), insert marker-thread before the next stitch. There are 17-17-18-18-19-19 stitches left after marker-thread 4 (= ½ back piece). Allow the threads to follow your work onwards, you will increase by each one. Now work an elevation as described below. ELEVATION: The elevation is worked back and forth in stocking stitch. REMEMBER THE KNITTING TENSION! Start mid-back, knit 8-8-9-9-10-10, turn, tighten the strand and purl 15-15-17-17-19-19 – when turning there will be a small hole – this can be closed by tightening the strand or working the technique GERMAN SHORT ROWS (search our videos). Turn, tighten the strand and knit 23-23-26-26-29-29, turn, tighten the strand and purl 31-31-35-35-39-39. Turn, tighten the strand and knit 39-39-44-44-49-49 – in addition, increase 1 stitch BEFORE marker-thread 1 – read INCREASE TIP-2 (the increased stitch is in addition to the stitch count in the elevation), turn, tighten the strand and purl 47-47-53-53-59-59 – in addition, increase 1 stitch AFTER marker-thread 1 and BEFORE marker-thread 4 – read INCREASE TIP-3 (remember the increased stitches are in addition to the stitch count), turn, tighten the strand and knit to mid-back – in addition, increase 1 stitch AFTER marker-thread 4, cut the strand. You have increase 2 stitches before marker-thread 1 and 2 stitches after marker-thread 4 (seen from the right side). There are 4 more stitches on the back piece than on the front piece = 106-106-110-118-122-122 stitches. OVERVIEW OF NEXT SECTION: The round now starts just after marker-thread 1 (stitches between mid-back and marker-thread 1 are moved onto the right needle). Work in the round and start to increase for the saddle shoulders and work pattern on the front and back pieces. Read SADDLE SHOULDER INCREASES and PATTERN before continuing! SADDLE SHOULDER INCREASES: Work stocking stitch and increase 4 stitches for the saddle shoulders on the first round as follows: Increase 1 stitch AFTER marker-threads 2 and 4 and BEFORE marker-threads 1 and 3 – remember INCREASE TIP-2. You only increase on the front and back pieces and the number of shoulder stitches remains the same. Increase like this each round a total of 16-18-18-18-20-20 times. Then work 2 rounds where you only increase on each side of the front piece, (so the stitch count is the same on the front and back pieces), i.e., increase AFTER marker-thread 2 and BEFORE marker-thread 3 on both rounds = 174-182-186-194-206-206 stitches (= 16-16-16-20-20-20 stitches on each shoulder and 71-75-77-77-83-83 stitches on the front and back pieces). After the last increase, the piece measures approx. 8-9-9-9-10-10 cm from the marker-stitch mid-front. You now increase for the sleeves as described further down. PATTERN: At the same time, after 4 rounds of stocking stitch from the elevation, begin working pattern. A.1 is only worked on the front and back pieces, the shoulders are worked in stocking stitch. On the front piece, count out from the marker-stitch mid-front – see symbols in A.1 marking mid-front/back, towards the side (towards marker-thread 2) and as far as possible to the saddle shoulder increases. NOTE: It is neatest to avoid a «knot» close to the saddle shoulder increases, here you can work stocking stitch. Work A.1 as far as the saddle shoulder increases on the other side (towards marker-thread 3), then work the remaining stitches in stocking stitch (the pattern is symmetrical on both sides). Work stocking stitch over the shoulder and pattern on the back piece in the same way as on the front piece. Continue in the round. The stitches from the saddle shoulder increases, and later from the yoke increases, are worked into the pattern but try to avoid a «knot» close to the increases. SLEEVE INCREASES: When the saddle shoulders increases are finished, increase 4 stitches for the sleeves on the next round as follows: Increase 1 stitch AFTER marker-threads 1 and 3, and BEFORE marker-threads 2 and 4 – remember INCREASE TIP-2! You now only increase on the sleeves and the number of stitches on the front and back pieces remains the same. The increased stitches are worked in stocking stitch. Increase like this every 2nd round a total of 12-13-15-13-13-10 times, then every round 3-2-0-0-0-0 times = 234-242-246-246-258-246 stitches. The piece measures approx. 20-22-23-21-22-19 cm from the marker-stitch mid-front. Now increase for the yoke. YOKE INCREASES: Remove the 4 marker-threads from the previous increases and insert 1 marker in the outermost stitch on each side of the front and back pieces (4 new markers), with 71-75-77-77-83-83 stitches on the front and on the back (including the marker-stitches) and 46-46-46-46-46-40 stitches on each sleeve. On the next round increase 1 stitch before and after all 4 marker-stitches (8 increased stitches). You now increase on both the front/back pieces and on the sleeves – the increased stitches are worked into pattern A.1 on the front/back pieces and in stocking stitch on the sleeves. Increase like this every 2nd round a total of 0-0-1-3-5-12 times, then every round 1-2-3-5-3-0 times. After the last increase there are 242-258-278-310-322-342 stitches and the piece measures approx. 21-23-25-26-28-30 cm from the marker-stitch mid-front (approx. 26-28-30-32-34-36 cm from the shoulder). DIVIDE FOR BODY AND SLEEVES: Place the first 48-50-54-62-62-64 stitches on 1 thread for the sleeve (= all stitches between marker-threads 1 and 2), cast on 6-8-10-10-12-14 stitches (= in side under sleeve), continue the pattern over the next 73-79-85-93-99-107 stitches (= front piece), place the next 48-50-54-62-62-64 stitches on 1 thread for the sleeve (= all stitches between marker-threads 3 and 4), cast on 6-8-10-10-12-14 stitches (= in side under sleeve), continue the pattern over the last 73-79-85-93-99-107 stitches (= back piece). Remove all markers and marker-threads. The body and sleeves are finished separately. The piece is now measured from here! BODY: = 158-174-190-206-222-242 stitches. Insert 1 marker in the middle of the 6-8-10-10-12-14 cast on stitches under one sleeve). Knit to the marker – the round now starts here. Continue pattern in the round. NOTE: The stitches which do not fit into the pattern under the sleeves are worked in stocking stitch. Work until the body measures 20-20-20-19-19-19 cm from the division – adjusting so there are several rounds of stocking stitch after the last round of «knots». Change to circular needle size 4 mm and work rib (knit 1, purl 1), AT THE SAME TIME increase 16-20-22-24-24-28 stitches evenly on round 1 = 174-194-212-230-246-270 stitches. When the rib measures 4-4-4-5-5-5 cm, cast off a little loosely. The jumper measures approx. 50-52-54-56-58-60 cm from the shoulder. SLEEVES: Place the 48-50-54-62-62-64 stitches from the thread on the one side of the piece on short circular needle/double pointed needles size 5 mm and knit up 1 stitch in each of the 6-8-10-10-12-14 stitches cast on under the sleeve = 54-58-64-72-74-78 stitches. Insert a marker-thread in the middle of the 6-8-10-10-12-14 stitches under the sleeve. Start at the marker-thread and work stocking stitch in the round. When the sleeve measures 4-4-4-3-3-3 cm from the division, decrease 2 stitches under the sleeve – read DECREASE TIP. Decrease like this every 8-6-4-2½-2½-2 cm a total of 4-5-7-10-11-12 times = 46-48-50-52-52-54 stitches. Continue working until the sleeve measures 35-34-32-30-30-28 cm from the division (There is 4-4-4-5-5-5 cm left; try the jumper on and work to desired length before the rib). Change to double pointed needles size 4 mm. Work rib (knit 1, purl 1) AT THE SAME TIME as you increase 6 stitches evenly on round 1 = 52-54-56-58-58-60 stitches. When the rib measures 4-4-4-5-5-5 cm, cast off a little loosely The sleeve measures approx. 39-38-36-35-35-33 cm from the division. |
||||||||||||||||||||||
Diagram explanations |
||||||||||||||||||||||
|
||||||||||||||||||||||
 |
||||||||||||||||||||||
 |
||||||||||||||||||||||
 |
||||||||||||||||||||||
Have you finished this pattern?Tag your pictures with #dropspattern #oatfieldsweater or submit them to the #dropsfan gallery. Do you need help with this pattern?You'll find 35 tutorial videos, a Comments/Questions area and more by visiting the pattern on garnstudio.com. © 1982-2026 DROPS Design A/S. We reserve all rights. This document, including all its sub-sections, has copyrights. Read more about what you can do with our patterns at the bottom of each pattern on our site. |
||||||||||||||||||||||


With over 40 years in knitting and crochet design, DROPS Design offers one of the most extensive collections of free patterns on the internet - translated to 17 languages. As of today we count 324 catalogues and 12290 patterns translated into English (UK/cm). 12290
We work hard to bring you the best knitting and crochet have to offer, inspiration and advice as well as great quality yarns at incredible prices! Would you like to use our patterns for other than personal use? You can read what you are allowed to do in the Copyright text at the bottom of all our patterns. Happy crafting!
Post a comment to pattern DROPS 248-7
We would love to hear what you have to say about this pattern!
If you want to leave a question, please make sure you select the correct category in the form below, to speed up the answering process. Required fields are marked *.