
Popular categories
Looking for a yarn?


Comments / Questions (30)
![]() Ghada Gamil wrote:
Ghada Gamil wrote:
The first marker will be always after 12 sts and the second 12 apart or it will increase after increasing sts
05.12.2020 - 13:44DROPS Design answered:
Dear Mrs Gamil, seen from RS you will have: 12 sts, marker, 12 sts, marker, 18 sts when all increases have been worked = 36 sts. Happy knitting!
07.12.2020 - 07:37
![]() Mary L Custard wrote:
Mary L Custard wrote:
Can this be made in crochet? It seems simple enuf, since there are short rows in crochet too.? Thank you very much for a reply..
14.08.2020 - 10:08DROPS Design answered:
Dear Mrs Custard, this might be worked in crochet but we are unfortunately not able to adjust every pattern to every single request - please contact your DROPS store (even per mail or telephone) or any crochet forum for any individual assistance. Thanks for you comprehension, happy crocheting!
14.08.2020 - 11:10
![]() Gosia wrote:
Gosia wrote:
Wzór z 2011? Naprawdę?
27.02.2020 - 22:24
![]() Iris wrote:
Iris wrote:
Hallo, ich verstehe bei der Anleitung zu den verkürzten Reihen zwei Dinge nicht: 1) Bedeutet "2 Reihen stricken" nun konkret 1,5 R. oder 2,5 R. stricken, denn die verkürzte Reihe beginnt ja gewissermaßen in der Mitte. Dasselbe gilt natürlich auch für Teil zwei der Anleitung zum Rapport der verkürzten Reihen. 2) Innen stricke ich doch wegen der Verkürzung mehr Reihen als außen. Deswegen komme ich mit der Zählweise für den Rapport nicht klar. Müsste es nicht andersherum sein?
28.12.2015 - 08:56DROPS Design answered:
Wenn Sie 2 R stricken sollen, stricken Sie diese über ALLE M, d.h. die ganze Reihe. Die Seite, an der Sie mehr Krausrippen stricken, liegt außen. Sie stricken ja beide Teile gleich und eins wird dann einfach vor dem Zusammennähen gewendet.
25.01.2016 - 11:15
![]() AndrosGirl wrote:
AndrosGirl wrote:
I need clarification for DROPS design: Pattern no FA-159. Please tell me between which stitches do the 2 markers go. I know they are 16 sts apart, but do they come at the beginning, middle or end of the row? Thank you. Then insert 2 markers in the piece 12-14-16 sts apart.
15.12.2015 - 20:03DROPS Design answered:
Dear Mrs AnrosGirl, insert the markers beg from right side, from RS of work the first marker after the first 16 sts (in larger size) and the second marker after 16 more sts, 16 sts remain after 2nd marker. Happy knitting!
16.12.2015 - 09:05Tlc wrote:
Like the first one and made a second one as a gift. Did not make the bobbles and using one thread & 4mm needles...going one size up. On completion of knitting, join the centre back seam. Next kitchener stitch one shoulder together, cast off the neck stitches and kitchener the other shoulder - all in one row. Despite garter stitches all over, it was not boring because of the wrap/turn but comfortable to watch telly while knitting.
08.05.2013 - 02:40
![]() Jill Krahling wrote:
Jill Krahling wrote:
I like this
28.04.2013 - 02:19
![]() Lisa Lebrija wrote:
Lisa Lebrija wrote:
Hej Drops! Er ved at strikke den model, men synes jeg strikker "i blinde". Den må da skulle syes sammen end andet end på ryggen? Når jeg ser på tegningen, er der bobler nederst og igen øverst. Jeg kan slet ikke se modellen for mig med nakkestykket. Hvor sidder begyndelsen af arbejdet? Under armen? Håber I kan hjælpe mig. Det er jo ikke sådan lige at pille det strikkede op.
07.05.2012 - 21:44DROPS Design answered:
Du syr sammen hver cirkel mitt oppå hver skulder, deretter sys de 2 delerna sammen mitt bak. Diagrammet viser plagget sett bakifra. Det er inge bobbler mitt bak, men de er lengs hver forkant.
07.05.2012 - 22:28
![]() Drops Design wrote:
Drops Design wrote:
Det skal stemme med 34 p retstrik i højden. Der går flere pinde i højden når du strikker i retstrik end hvis du strikker din strikkeprøve i glatstrik.
19.10.2011 - 13:40
![]() Karin Quist wrote:
Karin Quist wrote:
Kære Drops! Tak for rigtig gode opskrifter. Jeg har strikket en enkelt af dem, har gang i en anden og planer om en tredie. Her kommer min forundring. Jeg kan ikke få strikke prøven til at passe til model FA 159. Der står 17 m x 34 pinde på pinde 5? Det bliver alt for langt og det er ikke nok at skrifte til pinde 4.Er der mon en fejl? Tak for god inspiration og lækkert garn! Mange hilsner fra Karin
19.10.2011 - 02:39
|
||||
Butterfly#butterflybolero |
||||
|
|
||||
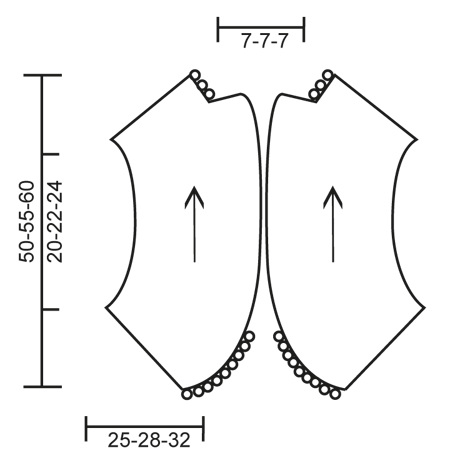
DROPS vest knitted in 2 circles in garter st with short rows and bobbles in ”Fabel” and ”Kid-Silk”. Size: S to XXXL
DROPS 132-28 |
||||
|
GARTER ST (back and forth on needle): K all rows. SHORT ROWS: To make the circles wider at the outer edge, work more rows over the outermost sts than the innermost sts. This is done as follows (1st row = RS): * Work 2 rows over all sts, work until 2nd marker, turn, tighten thread and work back, work until 1st marker, turn, tighten thread and work back, work 2 rows over all sts, work until 2nd marker, turn, tighten thread and work back *, repeat from *-*, i.e. 1 repetition = 4 rows on inside and 10 rows at the outer edge. INCREASE TIP: Inc by making 1 YO inside outermost st, on next row K YO twisted (i.e. work in back loop of st instead of front) to avoid holes. BOBBLE: Work 1 bobble from WS at the end of every 4th row (i.e. along outer edge of circle), this is done as follows: Cast on 5 new sts at the end of row, work 4 rows back and forth over these sts, turn, K 6 sts (i.e. the 5 new sts + 1 st on piece), then slip 2nd st on right needle over first st, then 3rd st over first st, 4th st over first st, 5th st over first st and finally 6th st over first st. Now all the 5 bobble sts have been cast off. MEASURING TIP: Measure when piece is flat, it is important not to stretch the piece when measuring. -------------------------------------------------------- -------------------------------------------------------- VEST: Work 2 circles which then are sewn tog in the back. Each circle is worked back and forth on needle in garter st with short rows and bobbles along the edge. Beg at the shoulder and work down along front piece, then up along back piece and to the shoulder again. LEFT CIRCLE: Cast on 36-42-48 sts on needle size 5 mm with 1 thread Fabel and 1 thread Kid-Silk. K 2 rows - 1st row = RS. Then insert 2 markers in the piece 12-14-16 sts apart. Continue in GARTER ST with SHORT ROWS and BOBBLES – see explanation above. When 20 rows in garter st (= 10 ridges) have been worked on outer edge, inc 1 st at the edge on next row from WS – SEE INCREASE TIP! Repeat inc every 3 cm a total of 6 times = 42-48-54 sts. Continue as before but now 18-20-22 sts remain at the edge after 2nd marker. When piece measures approx. 76-82-88 cm in outer edge - SEE MEASURING TIP, do NOT work bobbles any more along the edge - last part is sewn tog with other circle mid back. Continue in garter st and with short rows until piece without bobbles measures 24-28-32 cm in outer edge, loosely cast off. Sew cast off edge against cast on edge – beg at the inside with the shortest side and sew outwards – cast off edge is 6 sts wider than cast on edge, these 6 sts should stand out (= dec for neck). RIGHT CIRCLE: Work as left circle but before assembly turn piece inside out so that it is opposite from first circle. ASSEMBLY: Sew the 2 circles tog mid back – i.e. sew edge to edge on part without bobbles. Chart is shown from behind. |
||||
Diagram explanations |
||||
|
||||
 |
||||
Have you finished this pattern?Tag your pictures with #dropspattern #butterflybolero or submit them to the #dropsfan gallery. Do you need help with this pattern?You'll find 5 tutorial videos, a Comments/Questions area and more by visiting the pattern on garnstudio.com. © 1982-2026 DROPS Design A/S. We reserve all rights. This document, including all its sub-sections, has copyrights. Read more about what you can do with our patterns at the bottom of each pattern on our site. |
||||


With over 40 years in knitting and crochet design, DROPS Design offers one of the most extensive collections of free patterns on the internet - translated to 17 languages. As of today we count 324 catalogues and 12290 patterns translated into English (UK/cm). 12290
We work hard to bring you the best knitting and crochet have to offer, inspiration and advice as well as great quality yarns at incredible prices! Would you like to use our patterns for other than personal use? You can read what you are allowed to do in the Copyright text at the bottom of all our patterns. Happy crafting!
Post a comment to pattern DROPS 132-28
We would love to hear what you have to say about this pattern!
If you want to leave a question, please make sure you select the correct category in the form below, to speed up the answering process. Required fields are marked *.